Thingiverse
Micromake C1-M (Modified C1) by Gipsz
by Thingiverse
Last crawled date: 3 years ago
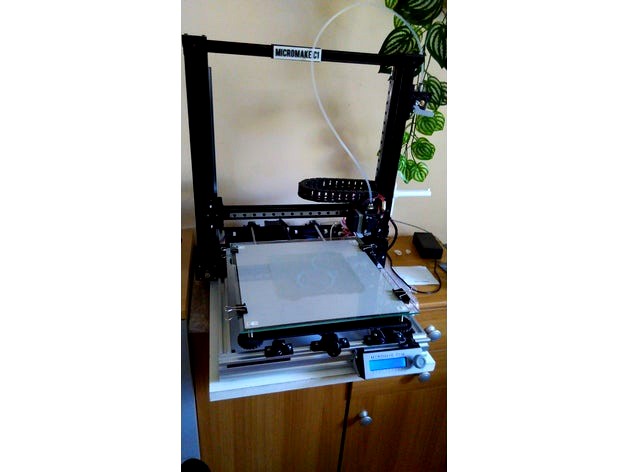
Improve quality of prints, Micromake C1
Dramatically improve X and Y and Z precision. After the modification, the Micromake C1 better printing than most 1000 dollar printer.
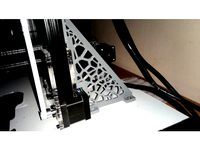
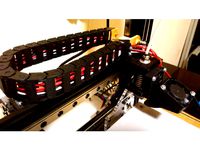
The Core XZ modification eliminate the X axis wobbling (it will be a perfect circle)
Bed linear four point underneath eliminate bed vibration and bending
The previous two result in very uniform Z layers at one time (and easy bed leveling)
Due to the double fixation, the twisting between the Y and Z frames the movement almost disappears. (reducing the amount of ghosting effect)
Due to the transformations, maximum print volumes increased:
Original
X = 245
Y = 245
Z = 260
New
X = 280 (Compact Z carrier)
Y = 280 (longer Y axis)
Z = 270 (lower bed)
I use 300x300 glass on bed.
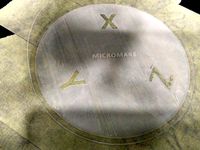
(these new dimensions must be overwritten in the firmware, see the picture above)
I set all printable parts to the correct print position
Part needed:
frame:
2x460mm 2040 alu profile https://www.aliexpress.com/item/HOT-Sale-CNC-3D-Printer-Parts-European-Standard-Anodized-V-Slot-Linear-Rail-Aluminum-Profile-Extrusion/32813630598.html?spm=a2g0s.9042311.0.0.781iM0
1x360mm 2040 alu profile + (use the remain Y axis 2040 profile, cut 360mm)https://www.aliexpress.com/item/HOT-Sale-CNC-3D-Printer-Parts-European-Standard-Anodized-V-Slot-Linear-Rail-Aluminum-Profile-Extrusion/32813630598.html?spm=a2g0s.9042311.0.0.781iM0
Y axis:
2x 500mm 8mm dia steel rod https://www.aliexpress.com/item/2pcs-NEW-8-500mm-Long-steel-shaft-metal-rods-diameter-8mm-DIY-axle-for-building-model/32727032946.html?spm=a2g0s.9042311.0.0.Nxyy1b
4x LMUU8 equivalent bearing (igus drylin 8mm nylon bearing) https://www.aliexpress.com/item/2pcs-lot-3D-Printer-Solid-Polymer-LM8UU-Bearing-8mm-shaft-Same-As-RJMP-01-08-R/32828635521.html?spm=a2g0s.9042311.0.0.Nxyy1b
Linear rails:
Z axis: 2x350mm MGN9C https://www.aliexpress.com/item/Free-shipping-Linear-Guide-9mm-MGN9-L-350mm-linear-rail-way-MGN9C-or-MGN9H-Long-linear/32795227249.html?spm=a2g0s.9042311.0.0.rt7tpR
X axis: 1x300mm MGN9C
2xGT2 16 Teeth (or without teeth) Pulley Wheel https://www.aliexpress.com/item/Micromake-3D-Printer-Parts-3pcs-lot-GT2-16-Teethless-Pulley-Wheel-Perlin-Passive-Idler-Bore-3mm/32795049665.html?spm=a2g0s.9042311.0.0.100yBS
2m GT2 6mm belt https://www.aliexpress.com/item/2m-5m-GT2-Timing-Belt-6mm-Width-Fiber-Reinforced-Rubber-Timing-Belt-For-CNC-3D-Printer/32842140058.html?spm=a2g0s.9042311.0.0.Nxyy1b
The 3mm hole i use Plastic Injection Moulding Brass Insert Round Knurled Thumb Nuthttps://www.aliexpress.com/item/100pcs-M3-M3-4-3-ID-OD-L-Copper-Injection-Moulding-Brass-Insert-Round-Knurled-Thumb/32705709306.html?spm=a2g0s.9042311.0.0.L5psiW
The original bed should be drilled and cut out as shown in the picture above!
Important! : before the use printer after core XZ modification, in the firmware change XY stepper motor rotate direction! See the picture.
Update 2018. 04. 13.
Added some picture and Z carriage set (L and R) this part needed support (a little)!
Update 2018. 04. 17.
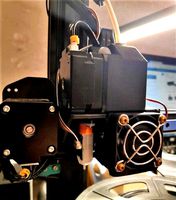
Remove old upper idler and added myown design better upper idler. two version, two design.
Common features
Anti twist design (it does not loosen, himself)
Swing horizontally to stretch and loosen the belt if necessary
Built in spacer (Only one washer needed, between the gears)
Open design (visible the gears)
Update 2018. 05. 16.
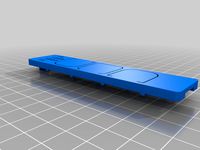
Added New LCD Frame, holders, and Motherboard holders
(Removing the outer box, the control card is placed inside the frame and the LCD is on the front of the frame.)
LCD frame front with percent scale signs.
Experimental suggestion: 100% infill recommended for exposed to load element !
Update 2018. 09 15.
Added my own design Igus RJMP-01-08 equivalent printable bearing. (This bearing 100% fit my own design holder.)
Dramatically improve X and Y and Z precision. After the modification, the Micromake C1 better printing than most 1000 dollar printer.
The Core XZ modification eliminate the X axis wobbling (it will be a perfect circle)
Bed linear four point underneath eliminate bed vibration and bending
The previous two result in very uniform Z layers at one time (and easy bed leveling)
Due to the double fixation, the twisting between the Y and Z frames the movement almost disappears. (reducing the amount of ghosting effect)
Due to the transformations, maximum print volumes increased:
Original
X = 245
Y = 245
Z = 260
New
X = 280 (Compact Z carrier)
Y = 280 (longer Y axis)
Z = 270 (lower bed)
I use 300x300 glass on bed.
(these new dimensions must be overwritten in the firmware, see the picture above)
I set all printable parts to the correct print position
Part needed:
frame:
2x460mm 2040 alu profile https://www.aliexpress.com/item/HOT-Sale-CNC-3D-Printer-Parts-European-Standard-Anodized-V-Slot-Linear-Rail-Aluminum-Profile-Extrusion/32813630598.html?spm=a2g0s.9042311.0.0.781iM0
1x360mm 2040 alu profile + (use the remain Y axis 2040 profile, cut 360mm)https://www.aliexpress.com/item/HOT-Sale-CNC-3D-Printer-Parts-European-Standard-Anodized-V-Slot-Linear-Rail-Aluminum-Profile-Extrusion/32813630598.html?spm=a2g0s.9042311.0.0.781iM0
Y axis:
2x 500mm 8mm dia steel rod https://www.aliexpress.com/item/2pcs-NEW-8-500mm-Long-steel-shaft-metal-rods-diameter-8mm-DIY-axle-for-building-model/32727032946.html?spm=a2g0s.9042311.0.0.Nxyy1b
4x LMUU8 equivalent bearing (igus drylin 8mm nylon bearing) https://www.aliexpress.com/item/2pcs-lot-3D-Printer-Solid-Polymer-LM8UU-Bearing-8mm-shaft-Same-As-RJMP-01-08-R/32828635521.html?spm=a2g0s.9042311.0.0.Nxyy1b
Linear rails:
Z axis: 2x350mm MGN9C https://www.aliexpress.com/item/Free-shipping-Linear-Guide-9mm-MGN9-L-350mm-linear-rail-way-MGN9C-or-MGN9H-Long-linear/32795227249.html?spm=a2g0s.9042311.0.0.rt7tpR
X axis: 1x300mm MGN9C
2xGT2 16 Teeth (or without teeth) Pulley Wheel https://www.aliexpress.com/item/Micromake-3D-Printer-Parts-3pcs-lot-GT2-16-Teethless-Pulley-Wheel-Perlin-Passive-Idler-Bore-3mm/32795049665.html?spm=a2g0s.9042311.0.0.100yBS
2m GT2 6mm belt https://www.aliexpress.com/item/2m-5m-GT2-Timing-Belt-6mm-Width-Fiber-Reinforced-Rubber-Timing-Belt-For-CNC-3D-Printer/32842140058.html?spm=a2g0s.9042311.0.0.Nxyy1b
The 3mm hole i use Plastic Injection Moulding Brass Insert Round Knurled Thumb Nuthttps://www.aliexpress.com/item/100pcs-M3-M3-4-3-ID-OD-L-Copper-Injection-Moulding-Brass-Insert-Round-Knurled-Thumb/32705709306.html?spm=a2g0s.9042311.0.0.L5psiW
The original bed should be drilled and cut out as shown in the picture above!
Important! : before the use printer after core XZ modification, in the firmware change XY stepper motor rotate direction! See the picture.
Update 2018. 04. 13.
Added some picture and Z carriage set (L and R) this part needed support (a little)!
Update 2018. 04. 17.
Remove old upper idler and added myown design better upper idler. two version, two design.
Common features
Anti twist design (it does not loosen, himself)
Swing horizontally to stretch and loosen the belt if necessary
Built in spacer (Only one washer needed, between the gears)
Open design (visible the gears)
Update 2018. 05. 16.
Added New LCD Frame, holders, and Motherboard holders
(Removing the outer box, the control card is placed inside the frame and the LCD is on the front of the frame.)
LCD frame front with percent scale signs.
Experimental suggestion: 100% infill recommended for exposed to load element !
Update 2018. 09 15.
Added my own design Igus RJMP-01-08 equivalent printable bearing. (This bearing 100% fit my own design holder.)
Similar models
thingiverse
free

Paste extruder Flyingbear tornado by nico754
...t it.
this calculation is in calculation file included. please confirm my calculation.
i will put more details on summary soon...
thingiverse
free

Dual Y rod holder for linear bearings by 3RC4N
.../item/optical-axis-300-320-330-350-390-400-500-mm-smooth-rods-8mm-linear-shaft-rail/32816641684.html?spm=a2g0s.9042311.0.0.9gisw2
grabcad
free

FPV google LIPO Holder
...gle lipo holder
grabcad
thanks for likes
https://www.aliexpress.com/item/4001152338150.html?spm=a2g0s.9042311.0.0.dbb54c4dozpr7s
thingiverse
free
Curtain Control System
...2311.0.0.3bb14c4djb8a7m
dc-dc (12v to 5v) : https://www.aliexpress.com/item/32742116421.html?spm=a2g0s.9042311.0.0.27424c4doqjuwk
thingiverse
free

Hictop 3DP17 Axe Z extension at 300mm by Diauguerry93
...624zz-4-13-5mm/32436342099.html?spm=a2g0s.9042311.0.0.my9vpy
and next you need to change the maximun hight in the firmware marlin
thingiverse
free

X Tensioner and Pully for 2GT toothed idler pulley, 6mm belt, 4mm bore by jnsanders1983
...ion. so i redrew the brace and puller in inventor. i lengthen the brace and redimensioned the puller to fit the new idler pulley.
thingiverse
free
KP3S BMG E3DV6 extruder mod by ehitaja_fpv
...af19b7xaof8q
nema17 17hs4023 extruder motor https://www.aliexpress.com/item/32998564515.html?spm=a2g0s.9042311.0.0.27424c4da1ai8m
thingiverse
free

power supply box by Ozkancinar
...-2-103l-3590s-10k-ohm-precision-multiturn-potentiometer-10-ring-adjustable-resistor/32674459761.html?spm=a2g0s.9042311.0.0.wss6kj
thingiverse
free

CR-10 S4 Frame Braces by perolalars
...oxi resin.
support was only used for the link arm.
hope that it will attract someone and please show if you also used this setup!
thingiverse
free

Tevo Tarantula Single Motor Dual Z Axis by olala2
...ng 8mm - not sure about translation to english and haven´t got link because i am using my 2nd 20teeth gt2 timing pulley bore 8mm)
Gipsz
thingiverse
free

Essential oil bottle cap by Gipsz
...ap by gipsz
thingiverse
essential oil bottle caps tend to ripple, break. i designed a replacement cap for replacing broken ones.
thingiverse
free

Gree climate wallmount remote holder (replace the original) by Gipsz
...thingiverse
gree climate wallmount remote holder (replace the original)
i got a loan from an original piece and bought the sizes
thingiverse
free

Handle for 3D printer for 20x20 aluprofil by Gipsz
...iy ozone generator. i built it into the house of a bad pc power supply. i made this handle for this.
https://youtu.be/feu0cgbwk-g
thingiverse
free
Micromake C1 frame support by Gipsz
... accessibility during assembly.
update 2017.11.14.
-change right model, printable position
-add print both in one session modell.
thingiverse
free

Micromake C1 Z plate with 3 wheel by Gipsz
...educe the twist of the x axis.
update 2018.07.04.:
on request i made a flat version without spacers (you can use factory spacers)
thingiverse
free

Tupperware cheese slicer rotary drum by Gipsz
...eak, so i designed it thicker than the original. i've been printing, my mother-in-law has been using it with satisfaction :-)
thingiverse
free

Micromake C1 Zaxis Linear guide Hblock plate by Gipsz
...together)
print friendly, minimal support needed,
this is newest (core xz mod) version: https://www.thingiverse.com/thing:2858549
thingiverse
free

Cup Raiser for PHILIPS HD3000 -3100 series Coffee Maker by Gipsz
... a hoist with 2 or 1 cups.
the dripping coffee has openings, so it continues to get into the droplet collection without hindrance
thingiverse
free

Micromake C1 Flat Fan Duct V5 by Gipsz
...643121
update 2019.01.27
i redesign the air outlet for stronger air flow. this is v5.
https://www.youtube.com/watch?v=wlhl4rhat44
thingiverse
free
Micromake C1 Effector plate for Linear guide 9C block by Gipsz
...ut for easier screwing
update: 2017. 11. 26. added hollow model for filament fan duct :https://www.thingiverse.com/thing:2670107
Micromake
thingiverse
free

Top and Bottom Vertex for Micromake D1 by MicroMake
...make d1 by micromake
thingiverse
welcome to us.
aliexpress store :http://www.aliexpress.com/store/2128317http://www.micromake.cn
thingiverse
free

filment holder micromake by Alex897
...filment holder micromake by alex897
thingiverse
this is the original filament holder of the micromake delta printer
thingiverse
free

Micromake Glass Holder by wiwatar
...micromake glass holder by wiwatar
thingiverse
leveling the build plate for micromake delta will be easier with these parts.
thingiverse
free

Micromake D1 labels by hata_ph
...micromake label and some xyz label that can fix a 20x20mm aluminum extrution frame for micromake d1 mini.
created using openscad.
thingiverse
free

MICROMAKE 3D Printer Delta mini kossel Power back by MicroMake
...er supply
aliexpress store :http://www.aliexpress.com/store/2128317
[our website]http://umake.taobao.comhttp://www.micromake.cn
thingiverse
free

Micromake Glass Plate Clip by igormedeiros
...micromake glass plate clip by igormedeiros
thingiverse
clip for micromake 3d printer
thingiverse
free

C_TYPE_BUCKLE for micromake d1 by hugheschung
...d1 by hugheschung
thingiverse
this is refitting for micromake d1,you can reduce the rods to shake.
you need printing 12 pieces.
thingiverse
free

toolbox for Micromake D1 by hirtak
...e
this is the tool box for micormake d1. it has some holders for the wrenches and driver which are a part of a micromake d1 kit.
thingiverse
free

Racks for Micromake D1 by born_to_kill
...s for micromake d1
available for different versions of the printer in height
it is recommended to make of steel thickness of 2 mm
thingiverse
free
Micromake Leveling test by MicroMake
...com/drive/folders/0b1dqurzkdp-tndu0nxhvcghlc0k
获得。
如果您对我们的3d打印机感兴趣,可以访问
aliexpress store :http://www.aliexpress.com/store/2128317
C1
3ddd
free

C1 Credenza
...c1 credenza
3ddd
тумба
c1 credenza
3d_export
free

Citroen C1
...citroen c1
3dexport
2011 citroen c1
design_connected
$29

Gentry C1
...gentry c1
designconnected
moroso gentry c1 computer generated 3d model. designed by urquiola, patricia.
3d_export
free

Chevrolet Corvette C1
...chevrolet corvette c1
3dexport
1960 chevrolet corvette c1
turbosquid
$12

chair c1
...urbosquid
royalty free 3d model chair c1 for download as max on turbosquid: 3d models for games, architecture, videos. (1283254)
turbosquid
$2

C1 CHAIR
... available on turbo squid, the world's leading provider of digital 3d models for visualization, films, television, and games.
3ddd
$1

Vitra C1 Chair
...c1 chair
by verner panton, 1959
в архиве форматы max2012, fbx, obj
660x580x735 ммhttp://www.vitra.com/en-pl/product/c1
3d_export
free
Bathyscaphe C1
...bathyscaphe c1
3dexport
subscribe to my youtube channel:
turbosquid
free
Oscilloscope C1-91
...bosquid
free 3d model oscilloscope c1-91 for download as max on turbosquid: 3d models for games, architecture, videos. (1180837)
turbosquid
$7

C1 Ariete tank
...uid
royalty free 3d model c1 ariete tank for download as stl on turbosquid: 3d models for games, architecture, videos. (1365969)
Modified
turbosquid
$5

modify car
...bosquid
royalty free 3d model modify car for download as max on turbosquid: 3d models for games, architecture, videos. (1390511)
turbosquid
$35

Soleste modified
...e 3d model soleste modified for download as 3dm, stl, and jpg on turbosquid: 3d models for games, architecture, videos. (1646606)
turbosquid
$35

Screwdriver-Modified
... available on turbo squid, the world's leading provider of digital 3d models for visualization, films, television, and games.
turbosquid
$20

APS modified
... available on turbo squid, the world's leading provider of digital 3d models for visualization, films, television, and games.
turbosquid
$5

Modified skull
... available on turbo squid, the world's leading provider of digital 3d models for visualization, films, television, and games.
3d_export
$8

Maruti 800 Modified
...obile engineers. this concept will also helpful to modified car enthusiast. this is made in solidworks & rendered in keyshot.
3d_ocean
$5
Spacecraft with Subdivision Modifier
...raft with subdivision modifier
3docean
fantasy spacecraft vehicle
the model was created in blender using the subdivision modifier
turbosquid
$10

Modified 9mm pistol
...royalty free 3d model modified 9mm pistol for download as fbx on turbosquid: 3d models for games, architecture, videos. (1560956)
3d_export
$10
ak-47 modified
...ak-47 modified
3dexport
turbosquid
$10

modified evo x
...ree 3d model modified evo x for download as obj, fbx, and stl on turbosquid: 3d models for games, architecture, videos. (1461606)
M
turbosquid
$20
Stage M&M
... available on turbo squid, the world's leading provider of digital 3d models for visualization, films, television, and games.
3ddd
$1

bag m&m's
...bag m&m's
3ddd
bag m&m's
bag m&m;'s
3d_export
$35
iskander m
...iskander m
3dexport
iskander m 3d model
design_connected
$7
barstool m
...barstool m
designconnected
barstool m computer generated 3d model.
3ddd
free
CACTUS M
...cactus m
3ddd
cactus , lzf
настольный светильник cactus m
производитель lzf
design_connected
$13

Anfora M
...anfora m
designconnected
lzf anfora m computer generated 3d model. designed by herranz, miguel.
3ddd
$1
зеркало M Gastone
...зеркало m gastone
3ddd
зеркало m gastone
зеркало m gastone
design_connected
$16

Dogon M
...dogon m
designconnected
emmemobili dogon m chairs computer generated 3d model. designed by ferruccio laviani.
design_connected
$9
Sunlight M
...sunlight m
designconnected
bonacina pierantonio sunlight m computer generated 3d model. designed by bizzozzero, franco.
3ddd
$1
Karman / Norma-M
...arman , norma-m
http://www.karmanitalia.it/en/prodotto/norma-m/norma-m-ap640n/