Thingiverse

Micro LED Lamp by geit_de
by Thingiverse
Last crawled date: 3 years ago
Hi there,
This is a little project to up-cycle some old batteries and learn more
on how to use FreeCAD.
Today we create a small micro LED lamp with parts I found when cleaning
up. :D
Requirements:
3 Batteries LR41. (other possible, see notes below)
1 LED
1 Improvised switch by using a metal part, a wire or folded aluminium
foil.
Tools:
3D Printer
Pliers (optional but recommended)
Requirement Notes:
I used metal from an old file for documents. It fit perfectly after
cutting to length.
When using a wire make sure the ends have proper contact. A
single core wire may work best due the fact it gives some spring
effect to the switch.
Using folded aluminium foil may not give the best results.
Adding some paper to fold around may add some more spring effect.
This is totally untested, but works for sure.
You may need to decrease the "roof" of the battery compartment to
gain enough space for the switch design of your choice. However
you can rasp it down to your needs without printing easily.
Printing:
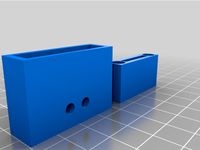
This thing is tiny and the supports may cause trouble. The small
gaps between the battery compartment are required. The one in
the back is to get the metal part through. The first one to be
able to pop out the batteries and fit the LED.
I printed it upside down, but you may want it in any other
direction. The nice part of this project is that it does not
require a lot of plastic, so you learn about the capabilities
of your printer, too. Because of the fragile components it may
also be wise to print at high quality. Again, the part barley
needs any plastic.
Make sure your printer is calibrated or you may get a to small or
to big part.
Assembly:
Assembly is actually the hard part. Since there is no battery
cover, I designed the lamp to be a tight fit. Prepare the LED
first. Easiest way is to place the LED onto the ledge of the
printed part where it will be mounted. Cut the wire without
the goblet (cathode) so it hits the case. Now bend the one
with the goblet (anode) 90 degree inwards and cut it like
shown in the pictures.
Insert the bended LED wire using the gab under the "roof" of
the battery compartment. If done right the LED holds itself
and the small ledge of the printed part will fit perfect
between the LEDs wires. Now insert the batteries with the plus
side facing the LED. Make sure the first battery hits the LED
wire with the front side. Along with the last battery put the
metal part or wire into place and bend the other side, to just
not connect to the other LED wire.
You may need pliers to push the batteries in place. Trust me
they will jump around a few times until everything is in place,
but once you are finished everything is rock solid.
If done correct you just need to push the metal, wire, aluminium
and the LED lights up. If the spring effect is big enough the
"switch" should open the circuit once you stop pushing it.
Notes:
Even though this is just for LR41, you may change the sketch of
the LED lamp to fit any other battery at your disposal.
Since I am still a beginner with FreeCAD the included file may
have some issues, so please don´t blame me. This project only
exists to learn how to design parts and instead of creating
useless cubes or other stuff, I want to create actual
functional parts as kind of reward for myself.
Happy Printing
This is a little project to up-cycle some old batteries and learn more
on how to use FreeCAD.
Today we create a small micro LED lamp with parts I found when cleaning
up. :D
Requirements:
3 Batteries LR41. (other possible, see notes below)
1 LED
1 Improvised switch by using a metal part, a wire or folded aluminium
foil.
Tools:
3D Printer
Pliers (optional but recommended)
Requirement Notes:
I used metal from an old file for documents. It fit perfectly after
cutting to length.
When using a wire make sure the ends have proper contact. A
single core wire may work best due the fact it gives some spring
effect to the switch.
Using folded aluminium foil may not give the best results.
Adding some paper to fold around may add some more spring effect.
This is totally untested, but works for sure.
You may need to decrease the "roof" of the battery compartment to
gain enough space for the switch design of your choice. However
you can rasp it down to your needs without printing easily.
Printing:
This thing is tiny and the supports may cause trouble. The small
gaps between the battery compartment are required. The one in
the back is to get the metal part through. The first one to be
able to pop out the batteries and fit the LED.
I printed it upside down, but you may want it in any other
direction. The nice part of this project is that it does not
require a lot of plastic, so you learn about the capabilities
of your printer, too. Because of the fragile components it may
also be wise to print at high quality. Again, the part barley
needs any plastic.
Make sure your printer is calibrated or you may get a to small or
to big part.
Assembly:
Assembly is actually the hard part. Since there is no battery
cover, I designed the lamp to be a tight fit. Prepare the LED
first. Easiest way is to place the LED onto the ledge of the
printed part where it will be mounted. Cut the wire without
the goblet (cathode) so it hits the case. Now bend the one
with the goblet (anode) 90 degree inwards and cut it like
shown in the pictures.
Insert the bended LED wire using the gab under the "roof" of
the battery compartment. If done right the LED holds itself
and the small ledge of the printed part will fit perfect
between the LEDs wires. Now insert the batteries with the plus
side facing the LED. Make sure the first battery hits the LED
wire with the front side. Along with the last battery put the
metal part or wire into place and bend the other side, to just
not connect to the other LED wire.
You may need pliers to push the batteries in place. Trust me
they will jump around a few times until everything is in place,
but once you are finished everything is rock solid.
If done correct you just need to push the metal, wire, aluminium
and the LED lights up. If the spring effect is big enough the
"switch" should open the circuit once you stop pushing it.
Notes:
Even though this is just for LR41, you may change the sketch of
the LED lamp to fit any other battery at your disposal.
Since I am still a beginner with FreeCAD the included file may
have some issues, so please don´t blame me. This project only
exists to learn how to design parts and instead of creating
useless cubes or other stuff, I want to create actual
functional parts as kind of reward for myself.
Happy Printing
Similar models
thingiverse
free

Mini LED Desk Lamp by djminnesota
...or is up to you
a foot or two of insulated wire
one rocker switch. the one i used was 1x1.5x1 inches
two 9v battery holders
thingiverse
free
Iron Man Arc Reactor for Osram Dot-it LED by ScotchBunny
... ring for putting it on a hook. i hotglued some magnet to the battery cover and stuck them to the metal piece through my t-shirt.
thingiverse
free

Amoeba LED Lamp-V1 by ChrisTheViolaNerd
...ints, and negative battery terminal will be wired to the (com) switch point. no wires will be connected to the (nc) switch point.
thingiverse
free
CR2032 Switch by PanzerMajier
...2x 6mm x 18mm springs some blu tack or similar to hold battery in 1 cr2032 battery some small...
thingiverse
free
LR66 to LR41 (AG4 to AG3) micro battery adapter by jukkas95
... some lr66 batteries i recovered (from my used freestyle libre glucose sensor) to fit in a thermometer which needs lr41 batteries
thingiverse
free
Berkas Battery-driven LED-Lamp by el_berko
...20 bolts with nuts, 45cm led-stripe, electric wires and a small switch.
and if you want a taller arm, just print more arm-pieces.
cults
free
Amoeba LED Lamp-V1
...nts, and negative battery terminal will be wired to the (com) switch point. no wires will be connected to the (nc) switch point.
thingiverse
free
Desk Lamp by Salalammas
...led
on-off switch
i glued the switch to the bottom plate
cause the battery is 9volts and the led is 3.5volts i needed a resistor.
thingiverse
free

Bulbasaur lamp
...ont legs
place a battery with a switch inside the stand
et voila!
don't print with 100% fill if you wish to use it as a light
thingiverse
free

LR41 button cell stack by chudley78
...ts. part is 1mm shorter than a normal stack to accommodate for you tabs on ends and groove through middle will fit 30 gauge wire.
Geit
thingiverse
free

GeitPrinter by geit_de
...(magnetic parking)
2x m3 15mm counter sunk enclosure screws (e3dv6 fan)
8x 4mm cubic neodymium magnets (magnetic parking)
3dwarehouse
free

model houdertje voor in geit
...model houdertje voor in geit
3dwarehouse
model houdertje voor in geit
3dwarehouse
free

Playground skip goat _Wip geit toestel
...playground skip goat _wip geit toestel
3dwarehouse
3dwarehouse
free

Geit Kip en Konijnenhok voor open verblijf
...geit kip en konijnenhok voor open verblijf
3dwarehouse
hok geschikt voor 2-3 dwergeitjes tot 50-60 cm 3-4 konijnen 3-5 kippen
3dwarehouse
free
Goat
...goat 3dwarehouse goat geit 3d geit 3d goat...
3dwarehouse
free
estonian 'my home'
...'my home' 3dwarehouse its my home in estonia autor geit griin #estonia #gonsiori...
3dwarehouse
free

Stal / Barn
...invented it myself. #barn #boerderij #cow #cows #farm #geit #geitn #hok #koe #koeien #schaap #schapen #sheep...
3dwarehouse
free
Ibex (adult male)
...steep regions to avoid predators. #animal #beast #beest #dier #geit #goat #ibex #mammal #mountain...
3dwarehouse
free

schaap
...leveren. het is een herkauwer, nauw verwant met de geit de soort behoort tot het geslacht ovis, waar ook...
Micro
3ddd
$1
Micro
...micro
3ddd
автобус
turbosquid
$80

MICRO
...ty free 3d model micro for download as max, c4d, obj, and fbx on turbosquid: 3d models for games, architecture, videos. (1700743)
3ddd
$1

JBL Micro Wireless
... micro , колонка , плеер
jbl micro wireless
turbosquid
$10
Suppressor Micro
...quid
royalty free 3d model suppressor micro for download as on turbosquid: 3d models for games, architecture, videos. (1380433)
turbosquid
$20
Micro Meter
...osquid
royalty free 3d model micro meter for download as fbx on turbosquid: 3d models for games, architecture, videos. (1350448)
turbosquid
$7
NIghtstand Micro
...d
royalty free 3d model nightstand micro for download as max on turbosquid: 3d models for games, architecture, videos. (1248117)
3ddd
$1
Micro wind turbine
...micro wind turbine
3ddd
турбина
micro wind turbine for your green building projects
turbosquid
$29
Micro Speakers
... available on turbo squid, the world's leading provider of digital 3d models for visualization, films, television, and games.
turbosquid
$29
Micro Servo.max
... available on turbo squid, the world's leading provider of digital 3d models for visualization, films, television, and games.
turbosquid
$20

Micro cells
... available on turbo squid, the world's leading provider of digital 3d models for visualization, films, television, and games.
Led
3d_export
$5

led
...led
3dexport
the led is cut with all the parts.
3ddd
$1

Monacor / PARL56DMX / LED-320RGBW / LED-345RGBW / LED-300RGB
... прожектор
http://www.monacor.dk/
parl56dmx
led-320rgbw
led-345rgbw
led-300rgb
turbosquid
$10

LED
...led
turbosquid
free 3d model led for download as blend on turbosquid: 3d models for games, architecture, videos. (1691856)
3d_export
$5

led lamp
...led lamp
3dexport
led lamp, brightness animation
3ddd
free

leds-c4
...leds-c4
3ddd
leds-c4
современный торшер
3ddd
free

leds-c4
...leds-c4
3ddd
leds-c4
настольный лампа
turbosquid
$19

LED
... available on turbo squid, the world's leading provider of digital 3d models for visualization, films, television, and games.
turbosquid
$12

Led
... available on turbo squid, the world's leading provider of digital 3d models for visualization, films, television, and games.
turbosquid
free

LED
... available on turbo squid, the world's leading provider of digital 3d models for visualization, films, television, and games.
turbosquid
free

LED
... available on turbo squid, the world's leading provider of digital 3d models for visualization, films, television, and games.
Lamp
archibase_planet
free
Lamp
...lamp
archibase planet
lamp reading lamp table lamp
lamp - 3d model (*.gsm+*.3ds) for interior 3d visualization.
archibase_planet
free
Lamp
...lamp
archibase planet
lamp reading lamp table lamp
lamp - 3d model (*.gsm+*.3ds) for interior 3d visualization.
archibase_planet
free

Lamp
...lamp
archibase planet
lamp table lamp reading lamp
lamp - 3d model (*.gsm+*.3ds) for interior 3d visualization.
archibase_planet
free

Lamp
...lamp
archibase planet
lamp table lamp reading lamp
lamp - 3d model (*.gsm+*.3ds) for interior 3d visualization.
archibase_planet
free

Lamp
...lamp
archibase planet
lamp reading lamp table lamp
lamp - 3d model (*.gsm+*.3ds) for interior 3d visualization.
archibase_planet
free
Lamp
...lamp
archibase planet
lamp reading lamp table lamp
lamp - 3d model (*.gsm+*.3ds) for interior 3d visualization.
archibase_planet
free
Lamp
...lamp
archibase planet
lamp table lamp reading lamp
lamp - 3d model (*.gsm+*.3ds) for interior 3d visualization.
archibase_planet
free

Lamp
...lamp
archibase planet
lamp table lamp reading lamp
lamp - 3d model (*.gsm+*.3ds) for interior 3d visualization.
archibase_planet
free
Lamp
...lamp
archibase planet
lamp reading lamp table lamp lantern
lamp - 3d model (*.3ds) for interior 3d visualization.
3d_ocean
$6
Lamp
...lamp
3docean
lamp
a high quality lamp.