Thingiverse
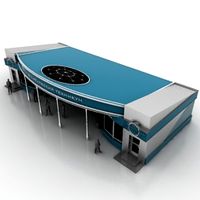
MeteoStation printable weather station by Magnus_e
by Thingiverse
Last crawled date: 3 years ago
// UPDATE 4
Removed obsolete files. Updated parts with large flat surfaces to print cleaner. Made compartement for Arduino slightly larger, and easier to remove suport (by tapering walls).
Only print MeteoStation-rainguard.stl if updating a older weatherstation.
// UPDATE 3
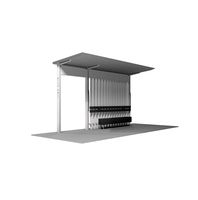
Now for better rain proofing and better fastening there is the new files MeteoStation-bottom_v2 and MeteoStation-bottom_v2_ZipTieVersion. These files has a grid of holes to let air troug, but prevent water. If you have allready printed this project, then you can print 4x of the MeteoStation-rainguard(s). Note that the holes are tilted upwards to stop rain poring in. Mount them with the high side inwards.
// UPDATE 2
The firmware code and web config for this project have now been updated. There is also a full Tutorial on configuring, building and using this weatherstation on indilib.orghttp://indilib.org/develop/tutorials/177-howto-configure-compile-wire-print-and-assemble-the-induino-meteostation.html
And a dev / debug forum threadhttp://indilib.org/forum/general/2265-building-the-induino-meteostation-with-3d-printed-housing.html?limitstart=0
// UPDATE 1
Update to v2.
Plastic glass window is now made smaller to allow for IR sensor to be mounted with a clear view of the sky.
The compartement for the arduino is also made larger for easier install.
// ORIGINAL TEXT
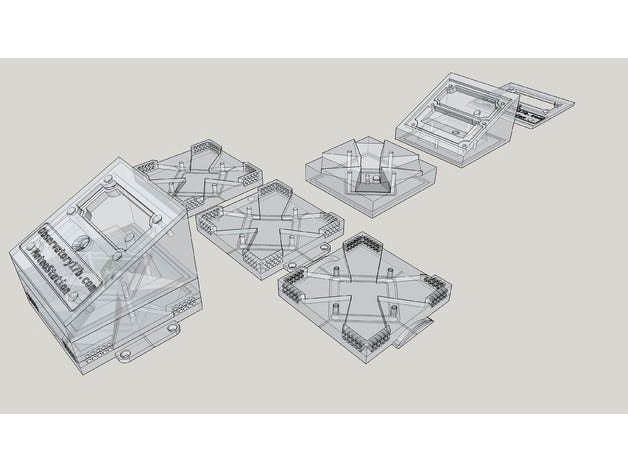
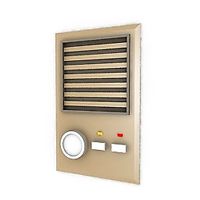
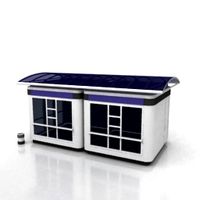
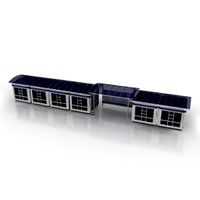
This is the Induino MeteoStation 3d printable weather station.
Arduino project on https://indiduino.wordpress.com/2013/02/02/meteostation/ with component list and more. (I am not the developer of the MeteoStation code, only the printable case). This project is a INDILib weather driver, and can be used standalone (With Linux webserver and indiserver for a web based interface). http://indilib.org/develop/arduino/meteostation.html
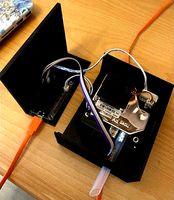
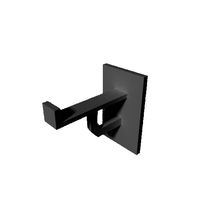
Use pictures as assembly guide. Sensors for temperature and humidity goes in the 'wind tunnel' betwean the bottom and middle part. Light sensitive sensors mounts under the acryllic glass.
Use 2mm thick 9x9 cm acryllic 'plexi' glass, that can be worked on with wood tools.
Screws used are all countersunk. 4x 4x50mm, 4x (6x for v2) 4x15mm
Finished product is close to 10 cm^3
Removed obsolete files. Updated parts with large flat surfaces to print cleaner. Made compartement for Arduino slightly larger, and easier to remove suport (by tapering walls).
Only print MeteoStation-rainguard.stl if updating a older weatherstation.
// UPDATE 3
Now for better rain proofing and better fastening there is the new files MeteoStation-bottom_v2 and MeteoStation-bottom_v2_ZipTieVersion. These files has a grid of holes to let air troug, but prevent water. If you have allready printed this project, then you can print 4x of the MeteoStation-rainguard(s). Note that the holes are tilted upwards to stop rain poring in. Mount them with the high side inwards.
// UPDATE 2
The firmware code and web config for this project have now been updated. There is also a full Tutorial on configuring, building and using this weatherstation on indilib.orghttp://indilib.org/develop/tutorials/177-howto-configure-compile-wire-print-and-assemble-the-induino-meteostation.html
And a dev / debug forum threadhttp://indilib.org/forum/general/2265-building-the-induino-meteostation-with-3d-printed-housing.html?limitstart=0
// UPDATE 1
Update to v2.
Plastic glass window is now made smaller to allow for IR sensor to be mounted with a clear view of the sky.
The compartement for the arduino is also made larger for easier install.
// ORIGINAL TEXT
This is the Induino MeteoStation 3d printable weather station.
Arduino project on https://indiduino.wordpress.com/2013/02/02/meteostation/ with component list and more. (I am not the developer of the MeteoStation code, only the printable case). This project is a INDILib weather driver, and can be used standalone (With Linux webserver and indiserver for a web based interface). http://indilib.org/develop/arduino/meteostation.html
Use pictures as assembly guide. Sensors for temperature and humidity goes in the 'wind tunnel' betwean the bottom and middle part. Light sensitive sensors mounts under the acryllic glass.
Use 2mm thick 9x9 cm acryllic 'plexi' glass, that can be worked on with wood tools.
Screws used are all countersunk. 4x 4x50mm, 4x (6x for v2) 4x15mm
Finished product is close to 10 cm^3
Similar models
grabcad
free

Acrylic case
...acrylic case
grabcad
i developed the acrylic case for protecting arduino and sensors on my irrigation project.
thingiverse
free

weatherstation sensor cover
...d easy outdoor weather station sensor cover, keeps direct rain and snow fall off of the sensor while allowing plenty of air flow.
grabcad
free

Starship Arduino Compartment
...for arduino, bluetooth sensor, and battery pack for mounting on a starship robot. aided in our physics 4al final project at ucla.
grabcad
free

Igernet Weatherstation
... the gopro-cam different external sensors can be added.
further information of the project will be available soon on https://...
thingiverse
free

Ultrasonic Sensor Arduino Microservo mount V2 compact by Seth2Christ
...rduino microservo mount v2 compact by seth2christ
thingiverse
ultrasonic sensor arduino microservo mount v2 compact
1x 2mm screw
thingiverse
free

Weather Stack Mount for Sparkfun Redboard by amcbride
...t leaves room for the connections to the sparkfun weather meters (rain, wind). it uses some #6 screws. i printed with supports.
thingiverse
free

Weather Station by Dtanguy
...diy weather station using raspberry pi.
code and more informations on my git hub repo : https://github.com/dtanguy/weatherstation
thingiverse
free

Weather Prognosticator (RGB LED cover) by FlyByPC
...9;ll also need an arduino uno, an arduino ethernet card, and a radio shack rgb led strip. code is available at the website above.
thingiverse
free

Weatherstation by boanjo
...youtu.be/e27cfrdzh9k
for more build instructions and firmware see:https://github.com/boanjo/myhome/tree/master/weather_station_dc
grabcad
free

Human Following Robot
...o-motor
ultrasonic sensor
infrared sensor (2x)
18650 li-on battery (2x)
male and female jumper wire
acrylic sheet
dc power switch
Meteostation
thingiverse
free

AlexGyver Meteostation body by trytodo
...alexgyver meteostation body by trytodo
thingiverse
just my design for meteostation
thingiverse
free
Box for Meteostation (SDS011, BME280) by 2lvr2
...ware
here is the link to upload firmware for this station https://github.com/opendata-stuttgart/airrohr-firmware-flasher/releases
grabcad
free

Outer sensor
...outer sensor grabcad for the meteostation ...
grabcad
free

Autonomic weather station
...autonomic weather station grabcad model of a portable meteostation here is the device...
Magnus
turbosquid
$14

Magnus Bronze Desk Lamp
...lty free 3d model magnus bronze desk lamp for download as max on turbosquid: 3d models for games, architecture, videos. (1561483)
turbosquid
$40

Ultra Magnus Rig G1
... available on turbo squid, the world's leading provider of digital 3d models for visualization, films, television, and games.
turbosquid
$29

i-SIT armchair by Magnus Olesen
...l i-sit armchair by magnus olesen for download as max and obj on turbosquid: 3d models for games, architecture, videos. (1414618)
3d_export
$70

zhuchengtyrannus magnus- descendant of trex sculpt
... format= 45.923 mil 4 pieces -. check out my new a zhuchengtyrannus magnus- descendant of trex<br>thanks for your purchase!
3ddd
$1

Tint Lamp / Magnus Pettersen
...tersen
3ddd
лофт
лампа в трёх вариациях, с разными лампочками. цвет стекла может быть абсолютно любым-).
в архиве есть файл 2011.
3d_ocean
$9

Bar Stool - Contra
...bar chair bar stool chair furnishing furniture home interrior magnus metal pettersen seating stool studio whiskey wood contra bar...
design_connected
$11
Partout
...partout designconnected magnus olesen partout bar stools computer generated 3d model. designed...
3d_ocean
$6

Leimu Lamp (2013)
...3d model c4d concrete design glass iittala lamp leimu magnus pettersen vray leimu lamp (iittala, 2013) leimu lamp item...
archive3d
free
Lamp 3D Model
...model archive3d lamp table lamp reading lamp lamp by magnus pettersen n241213 - 3d model (*.gsm+*.3ds) for interior 3d...
3d_export
$150
20th Anniversary Optimus Prime 3D Model
...convoy takara hasbro 20th anniversay masterpiece transformers transformer ultra magnus megatron starscream hybrid truck vehicle robot 20th anniversary optimus...
Weather
turbosquid
$10

weather radar
...yalty free 3d model weather radar for download as c4d and fbx on turbosquid: 3d models for games, architecture, videos. (1664322)
turbosquid
$2

Weather radar
...lty free 3d model weather radar for download as obj and blend on turbosquid: 3d models for games, architecture, videos. (1281545)
turbosquid
$49

weather satellite
... 3d model weather satellite for download as max, obj, and fbx on turbosquid: 3d models for games, architecture, videos. (1691555)
turbosquid
$2

Saucepan Weathered
... model saucepan weathered for download as blend, fbx, and obj on turbosquid: 3d models for games, architecture, videos. (1678359)
turbosquid
$39
Weathered Wheelbarrow
... available on turbo squid, the world's leading provider of digital 3d models for visualization, films, television, and games.
turbosquid
$29

weather shelter
... available on turbo squid, the world's leading provider of digital 3d models for visualization, films, television, and games.
turbosquid
$25

Weather Vane
... available on turbo squid, the world's leading provider of digital 3d models for visualization, films, television, and games.
turbosquid
$10

Boxer Weather
... available on turbo squid, the world's leading provider of digital 3d models for visualization, films, television, and games.
turbosquid
$3

weather vane
... available on turbo squid, the world's leading provider of digital 3d models for visualization, films, television, and games.
turbosquid
$2

Weathered Pillar
... available on turbo squid, the world's leading provider of digital 3d models for visualization, films, television, and games.
Station
3d_export
$5
station
...station
3dexport
station
archibase_planet
free
Station
...station
archibase planet
railroad station railway station bay
railway station n160707 - 3d model for interior 3d visualization.
archibase_planet
free
Station
...station
archibase planet
intercom station equipment
intercom station - 3d model for interior 3d visualization.
archibase_planet
free
Station
...station
archibase planet
station
station n260108 - 3d model (*.gsm+*.3ds) for interior 3d visualization.
3d_export
$5
Station
...station
3dexport
low poly bus station
archibase_planet
free
Station
...station
archibase planet
building station construction
station n170708 - 3d model(*.gsm+*.3ds) for interior 3d visualization.
archibase_planet
free

Station
...station
archibase planet
bus station bus stop
station 1 - 3d model (*.gsm+*.3ds) for interior 3d visualization.
archibase_planet
free
Station
...station
archibase planet
bus station bus stop
station 2 - 3d model (*.gsm+*.3ds) for interior 3d visualization.
archibase_planet
free

Station
...station
archibase planet
bus station bus stop
station 3 - 3d model (*.gsm+*.3ds) for interior 3d visualization.
3d_ocean
$19

Space station
...space station
3docean
space station
space station
Printable
turbosquid
$5
printable giraffe
...uid
royalty free 3d model printable giraffe for download as on turbosquid: 3d models for games, architecture, videos. (1504825)
turbosquid
$49

Longhorn Printable
...
royalty free 3d model longhorn printable for download as stl on turbosquid: 3d models for games, architecture, videos. (1712930)
3d_export
$2
printable audi car
...printable audi car
3dexport
printable audi car
turbosquid
$40
Fox printable
...lty free 3d model fox printable for download as blend and stl on turbosquid: 3d models for games, architecture, videos. (1507558)
turbosquid
$23

Printable Statue
...ty free 3d model printable statue for download as obj and stl on turbosquid: 3d models for games, architecture, videos. (1415137)
turbosquid
$3

Ear Printable
...yalty free 3d model ear printable for download as obj and stl on turbosquid: 3d models for games, architecture, videos. (1671689)
turbosquid
$1

heart printable
...y free 3d model heart printable for download as stl and sldpr on turbosquid: 3d models for games, architecture, videos. (1209566)
turbosquid
$1
Printable Hook
...
royalty free 3d model 3d printable hook for download as stl on turbosquid: 3d models for games, architecture, videos. (1413683)
turbosquid
$30
Printable support
... model 3d printable support for download as max, 3ds, and stl on turbosquid: 3d models for games, architecture, videos. (1689342)
turbosquid
$24

Printable Dolphin
...el printable dolphin for download as , dae, fbx, obj, and stl on turbosquid: 3d models for games, architecture, videos. (1602353)
E
3ddd
$1
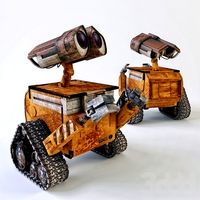
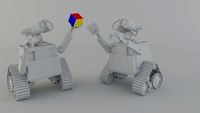
WALL-E
...wall-e
3ddd
wall-e , робот
wall-e
3d_export
$100

e-rickshaw
...e-rickshaw
3dexport
e-rickshaw- it have 3d model of passenger e-rickshaw
3d_ocean
$12
Wall E
...wall e
3docean
character robot wall e
its a 3d model of wall e….
turbosquid
$68
Model-E Droids 2-E Q-E Star Wars
... available on turbo squid, the world's leading provider of digital 3d models for visualization, films, television, and games.
cg_studio
$45

Model-E Droids 2-E Q-E Star Wars3d model
....3ds .c4d .obj .vue - model-e droids 2-e q-e star wars 3d model, royalty free license available, instant download after purchase.
3d_export
$100
e-rickshaw
...e-rickshaw
3dexport
e-rickshaw design for passenger it have all mechanical component
design_connected
$7

Cone E
...cone e
designconnected
bonaldo cone e computer generated 3d model. designed by pasini, ennio.
3ddd
$1

Wall-E NEW
...wall-e new
3ddd
wall-e , робот
wall-e
design_connected
$29

Extrasoft E
...extrasoft e
designconnected
living divani extrasoft e computer generated 3d model. designed by lissoni, piero.
3ddd
$1

E-Turn
... скамейка
современная скамейка фирмы kundalini.
модель e-turn.
дизайнер brodie neil.
размеры: h 42 cm l 185 cm w 54 cm