Thingiverse
McKENZIELackEnclosure by TheZeroBeast
by Thingiverse
Last crawled date: 3 years, 1 month ago
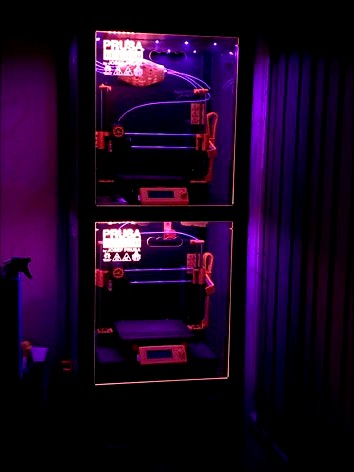
This is my personal take on the Lack 3D Printer Enclosure, it is constantly evolving but at present is a MK3 MMUv2 enclosure on top and MK2.5 on the bottom.
From an initial idea of the cabinet I have faced some hurdles that I have solutions for bellow.
What parts to get and print. Assemble with preferred fasteners, I used ZINC plated countersunk and button heads where needed.
3 x Lack 550mm x 550mm coffee tables
1 x 1200mm x 550mm 6mm plywood for back of cabinet
1 x 550mm x 550mm 19mm plywood for base to attach casters to
4 x 75mm caster of chocie
6 x 6mm x 447mm x 525mm Acrylic with .DXF cutting with CNC/Laser
Each of the 6 panels have M3x5mm ZINC button head bolts tapped into the top corners 1" down.
6mmD x 10mmL Neodymium magnet cylinders get installed in corresponding top of Lack legs so they align when panels are mounted.
2 of which you then could have laser etched with design attached for front panels
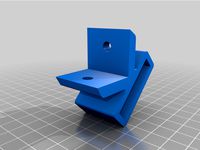
8 x 3D Printed Leg Extensions attached with your your choice of faster to table and leg
2 x Door Hooks to store doors when either printing PLA or doing maintenance
1 x AC Shielding parts set if you have any exposed AC on rear (ie. SSRs, RCBO 5v PSU)
List of accessories/upgrades
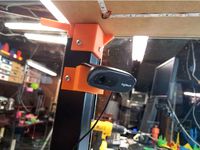
Cam Mount with Cable Snakehttps://www.thingiverse.com/thing:3129741
RasPi Frame Mounts MK2.5/MK3https://www.thingiverse.com/thing:2943918 MK2/MK2.5https://www.thingiverse.com/thing:2941913 MK3
MMUv2 Backfeed Containmenthttps://www.thingiverse.com/thing:3128344
Lighting with Cabinet RasPi controller
(STILL WRITING ARTICLE)
Solid State Relay control of printers on Cabinet RasPi controller
(STILL WRITING ARTICLE)
From an initial idea of the cabinet I have faced some hurdles that I have solutions for bellow.
What parts to get and print. Assemble with preferred fasteners, I used ZINC plated countersunk and button heads where needed.
3 x Lack 550mm x 550mm coffee tables
1 x 1200mm x 550mm 6mm plywood for back of cabinet
1 x 550mm x 550mm 19mm plywood for base to attach casters to
4 x 75mm caster of chocie
6 x 6mm x 447mm x 525mm Acrylic with .DXF cutting with CNC/Laser
Each of the 6 panels have M3x5mm ZINC button head bolts tapped into the top corners 1" down.
6mmD x 10mmL Neodymium magnet cylinders get installed in corresponding top of Lack legs so they align when panels are mounted.
2 of which you then could have laser etched with design attached for front panels
8 x 3D Printed Leg Extensions attached with your your choice of faster to table and leg
2 x Door Hooks to store doors when either printing PLA or doing maintenance
1 x AC Shielding parts set if you have any exposed AC on rear (ie. SSRs, RCBO 5v PSU)
List of accessories/upgrades
Cam Mount with Cable Snakehttps://www.thingiverse.com/thing:3129741
RasPi Frame Mounts MK2.5/MK3https://www.thingiverse.com/thing:2943918 MK2/MK2.5https://www.thingiverse.com/thing:2941913 MK3
MMUv2 Backfeed Containmenthttps://www.thingiverse.com/thing:3128344
Lighting with Cabinet RasPi controller
(STILL WRITING ARTICLE)
Solid State Relay control of printers on Cabinet RasPi controller
(STILL WRITING ARTICLE)
Similar models
thingiverse
free

Prusa Control Panel Mount V2
... front of the lack table enclosure. it uses the same screws from the original installation and they are slotted in to the mount.
thingiverse
free

McKENZIELackEnclosure RasPiCamMount (Cable Snake) by TheZeroBeast
... raspi mount above einsy board.https://www.thingiverse.com/thing:2941913 mk3https://www.thingiverse.com/thing:2943918 mk2/mk2.5
thingiverse
free

Original Prusa i3 MK3/MK2.5 MMUv2 SSS Backfeed Containment by TheZeroBeast
...red my five which is sufficient.
once assembled there should be almost no friction on rotating parts, clean as needed if not.
rob
thingiverse
free

Lack Remix by Herr_Morris
...pot will be cut to size for front and sides, respectively
i'll update this as the build progresses. i do have a day job. ;)
thingiverse
free

Prusa MK2/MK2s/MK2.5/MK3 Removable LCD Controller (update: 08/19/2018) by elmarciano
...multiple sizes) -- v2 (updated 2018/07/28))
https://www.thingiverse.com/thing:3024792 (led clip v1 (for modular mounting system))
thingiverse
free
Logitech C270 Lack Enclosure Cam Mount by brotherchris
...
this is a quick mount i made for a c270 cam that can screw on to one of the legs of my ikea lack enclosure. screw holes are 6mm
thingiverse
free
Logitech C270 Lack Enclosure Cam Mount by DaWheelz
...because i have my plexiglass inside the legs. the pieces that go on the legs of the enclosure are 25mm. and the screw hole is 6mm
cg_trader
$10

Prusa Enclosure MK3S Print Controller Mount Control Bracket | 3D
...closure so i can meddle with the live z settings during my prints without opening and closing the enclosure doors while doing it.
thingiverse
free

Ikea Lack switch panel
...1x vent
switches: marquardt wippschalter 1830.3112 250 v/ac 6 a 1 x aus/ein
any switch with mounting opening 30mm x 11mm will fit
thingiverse
free

MK3 Tool Holder - Lack Table Top by modonaut
...rinter itself. mounting holes designed to fit #10x1" screws.
original by acorderob:https://www.thingiverse.com/thing:3062320
Thezerobeast
thingiverse
free

Utensils Container Vase by TheZeroBeast
...utensils container vase by thezerobeast
thingiverse
container for kitchen utensils
thingiverse
free

Knives Container Vase by TheZeroBeast
...knives container vase by thezerobeast
thingiverse
vase container for knives in the kitchen.
thingiverse
free

SPANNERHANDS Spool System - PRUSA Filament 1kg Core 48.5mm by TheZeroBeast
...spannerhands spool system - prusa filament 1kg core 48.5mm by thezerobeast
thingiverse
designed for prusa research 1kg spools
thingiverse
free

SPANNERHANDS Spool System Pinboard Bench Mount/Clip by TheZeroBeast
...t/clip by thezerobeast
thingiverse
mesh modified to clip over the top of a bench pinboard and hold the spannerhand spool system.
thingiverse
free
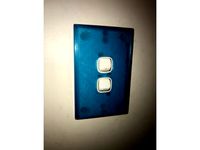
AU Clipsal Dual Gang Face Plate by TheZeroBeast
...ralian clipsal dual gang switch face plate. designed to print in glo-in-the-dark filament for locating switch easier in the dark.
thingiverse
free

PS4 Controller Stand - 38mm Cube Organiser Edge by TheZeroBeast
...robeast
thingiverse
this attaches to the edge of a 38mm cube organiser with a pea sized piece of blutak to hold ps4 controllers.
thingiverse
free
AU Clipsal Single Gang Face Plate by TheZeroBeast
...late. designed to print in glo-in-the-dark filament for locating switch easier in the dark. also is great for customising a room.
thingiverse
free

Tripod Phone Mount - 1/4" & Manfrotto QR-RC2 by TheZeroBeast
...thingiverse
modified design to incorporate the manfrotto qr-rc2 quick release and a 1/4" thread for universal phone mount.
thingiverse
free

xBox One S Controller Stand - 38mm Cube Organiser Edge by TheZeroBeast
...
thingiverse
this attaches to the edge of a 38mm cube organiser with a pea sized piece of blutak to hold xbox one s controllers.
thingiverse
free

KINGKONG/LDARC TINY6 65mm 5-Way Charging Board Support/Guide by TheZeroBeast
...by thezerobeast
thingiverse
designed for the tiny6 5-way battery charger as the connections flex if moving board while charging.