Thingiverse
Master-pi v3.0 by donaldsimonet
by Thingiverse
Last crawled date: 4 years ago
MasterPi
ver. 3.0
Carefully read the description before printing this.
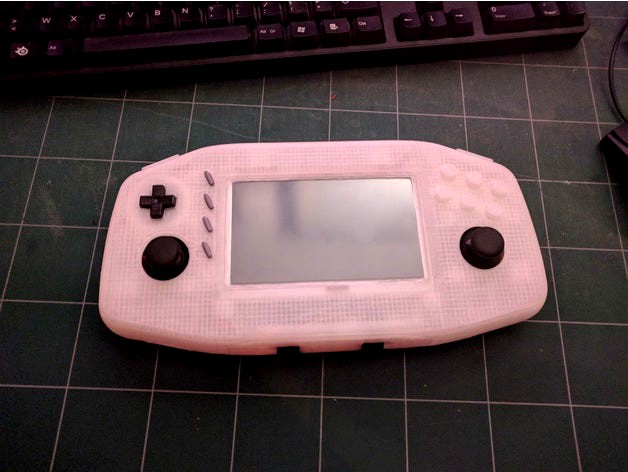
This is my first working prototype of MasterPi Game Pad. I put it here to share with the community and for to archive it. It suffers of multiples small issues, if you still want to print it, this game pad will need a co-architect and a lot of patience to make it work. But, as i said, it is my first working prototype.
As I said, it is my first working prototype, so I used commercial stuffs and things I already have to do it. So the bill of material is a bit messy. Even if it's home made portable game console it will need special tools and equipments to build all parts.
If you have any question, remark or idea for improvement, feel free to contact me. Function of feedback i may update this version.
This version was not designed to be easy to produce. It was just a test (proof of concept). Future versions will be designed to be easy to produce (Only one PCB card instead the actual mess). No soldering required. So, big improvement. But i'm still working on it ! Even this page is still work in progress.
This improved version will can both be printed with a regular 3D printer and injected with industrial thermal forming machine. See my twitter (https://twitter.com/donaldsimonet) to get news about it.
Thanks.
Tools needed :
3D printer (Printable size bed 30x30)
PCB making equipment.
Solder iron
Bill of materials :
(More information on each section bellow)
WaveShare 5inch display
1 arduino 32U4 (pro micro)
1 battery bank (with 26650 li-ion)
Flex HDMI ribbon cable
3 GameBoy silicon switch rubber kit
2 analog joystick (watch size)
FR4 or FR2 PCB with 1 layer
Screw (different size)
Cable, Switch, jack, stuff... :trollface:
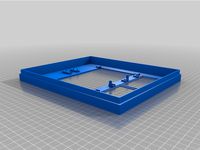
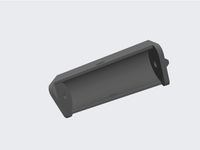
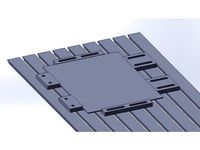
Enclosure
I added additional version for the bottom side fot the enclosure. A flat version to avoid people to print it with support. No one like to print with support
Best print parameter is for a 0.4 mm printer head 0.15mm layer size. Cause any new layer will melt with previous. I tried to print it at 0.3, or 0.4mm and this result in very bad resistance.
I suggest you to use 100% infill or minimal 50%
Display :
This display is a bit expensive and viewing angle are very bad. But for my first test it was ok.
5inch is a good size for the need. Not too big (big screen means big enclosure and it is already too much bigger).
It is important to use a display with HDMI port. If you use composite video, quality will be very low.
You can chose a display without touch screen BUT touch screen are often much resistant than regular display. So even if you don't use the touch screen, I think it is a good idea to have one.
HID Arduino 32U4 :
It was very important to me to NOT use any pin of the GPIO port. Cause I would like to let people use it for any other purpose. So to do this, I find a micro controller who emulates USB and have analog and digital IO (input/output). First I found Teensy. But I thought that using the Arduino platform could be easy for future development. I finally found Arduino pro micro with Atmega 32U4. This MCU has usb built-in and with the HID master library I can easily emulate game pad. It's easy to configure on any retro-gaming distribution cause it no need special driver.
But the best advantage of the pro-micro arduino is the re-programmable game pad. You can change analog ramp (from linear to logarithmic for example) or remap button during the game (using one button to switch between configuration) or using a joystick as a mouse under desktop.
See here the 32U4 library : https://github.com/NicoHood/HID
I don't use any pullup or pulldown resistor. Cause I use pullup built-in the ATmega 32U4. This means every boolean value of each button is inverted.
Atmega Have no enough input pin for all buttons. So i'm using a multiplexing matrix grid to retrieve information from all buttons.
Here is the grid connexion :
Theory of operation : We are activating one column and testing all buttons (row). Passing to the next column and testing again all button. Because all input (row) is pulled up by the MCU (no pulldown built in) All value are inverted. If my input is low, then my button is pressed, if it's high my button is released.
More, to avoid any bad behavior when pressing two or more buttons at the same time (ex. move right and jump) you cannot leave a column high output when you are testing another column (remember high is the unswitched value of input row). Because it will drain current and you will have bad behaviors. So after testing column, we change them to input (high z impedance)
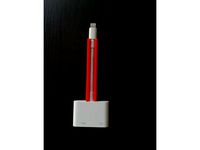
Ribbon HDMI cable
Not hard to find, but a bit long to come. You can NOT use standard HDMI cable inside, cause you don't have enough space. So you have to use this ribbon cable.
HDMI signal (not for this resolution) are high frequency so you can not just buy hdmi plug and solder them with regular cable.
You will need 3 elements. One right angle HDMI to 20 pin FFC cable. 1 straight connector. And one 20cm 20pin ribbon cable (FPC 0.5mm pitch).
Take care of the orientation of the plug and the FPC connector.
See picture :
Battery Bank
I found this battery bank useful. Cause it had inside Li-ion 26650 cell. This cell could be easily inserted inside the enclosure. For my further version of my game pad I'm using this kind of cell (26650) cause it could be easily removed and changed during the day.
With a regular battery bank you have all you need to charge (current regulator and battery protection) and discharge the battery (with boost voltage from 3v to 5V).
https://www.amazon.fr/gp/product/B00N5LP35I/ref=oh_aui_detailpage_o06_s00?ie=UTF8&psc=1
GameBoy silicon
You can find them here. Good seller on ebay. And fast delivery.
You need 3 kit. I used Dpad for Dpad (obvious) but used for Left and Right shoulder trigger.
In the next version of this game pad I will will not use GameBoy Classic Rubber kit but Game Boy pocket instead.
https://www.ebay.co.uk/itm/ZedLabz-conductive-silicone-rubber-pad-button-kit-Game-Boy-original-DMG-01-/371591385727?hash=item568492927f
Analog joystick
Tricky part. I found them in a Logitech gamepad. Carefully watch and match the size of the footprint before buy or tear-down from any device.
How to build it
I'm writing it right now.
Last and futur version
This is evolutions of Master-Pi. You can see first version on top and the one i'm actually working on at the bottom.
ver. 3.0
Carefully read the description before printing this.
This is my first working prototype of MasterPi Game Pad. I put it here to share with the community and for to archive it. It suffers of multiples small issues, if you still want to print it, this game pad will need a co-architect and a lot of patience to make it work. But, as i said, it is my first working prototype.
As I said, it is my first working prototype, so I used commercial stuffs and things I already have to do it. So the bill of material is a bit messy. Even if it's home made portable game console it will need special tools and equipments to build all parts.
If you have any question, remark or idea for improvement, feel free to contact me. Function of feedback i may update this version.
This version was not designed to be easy to produce. It was just a test (proof of concept). Future versions will be designed to be easy to produce (Only one PCB card instead the actual mess). No soldering required. So, big improvement. But i'm still working on it ! Even this page is still work in progress.
This improved version will can both be printed with a regular 3D printer and injected with industrial thermal forming machine. See my twitter (https://twitter.com/donaldsimonet) to get news about it.
Thanks.
Tools needed :
3D printer (Printable size bed 30x30)
PCB making equipment.
Solder iron
Bill of materials :
(More information on each section bellow)
WaveShare 5inch display
1 arduino 32U4 (pro micro)
1 battery bank (with 26650 li-ion)
Flex HDMI ribbon cable
3 GameBoy silicon switch rubber kit
2 analog joystick (watch size)
FR4 or FR2 PCB with 1 layer
Screw (different size)
Cable, Switch, jack, stuff... :trollface:
Enclosure
I added additional version for the bottom side fot the enclosure. A flat version to avoid people to print it with support. No one like to print with support
Best print parameter is for a 0.4 mm printer head 0.15mm layer size. Cause any new layer will melt with previous. I tried to print it at 0.3, or 0.4mm and this result in very bad resistance.
I suggest you to use 100% infill or minimal 50%
Display :
This display is a bit expensive and viewing angle are very bad. But for my first test it was ok.
5inch is a good size for the need. Not too big (big screen means big enclosure and it is already too much bigger).
It is important to use a display with HDMI port. If you use composite video, quality will be very low.
You can chose a display without touch screen BUT touch screen are often much resistant than regular display. So even if you don't use the touch screen, I think it is a good idea to have one.
HID Arduino 32U4 :
It was very important to me to NOT use any pin of the GPIO port. Cause I would like to let people use it for any other purpose. So to do this, I find a micro controller who emulates USB and have analog and digital IO (input/output). First I found Teensy. But I thought that using the Arduino platform could be easy for future development. I finally found Arduino pro micro with Atmega 32U4. This MCU has usb built-in and with the HID master library I can easily emulate game pad. It's easy to configure on any retro-gaming distribution cause it no need special driver.
But the best advantage of the pro-micro arduino is the re-programmable game pad. You can change analog ramp (from linear to logarithmic for example) or remap button during the game (using one button to switch between configuration) or using a joystick as a mouse under desktop.
See here the 32U4 library : https://github.com/NicoHood/HID
I don't use any pullup or pulldown resistor. Cause I use pullup built-in the ATmega 32U4. This means every boolean value of each button is inverted.
Atmega Have no enough input pin for all buttons. So i'm using a multiplexing matrix grid to retrieve information from all buttons.
Here is the grid connexion :
Theory of operation : We are activating one column and testing all buttons (row). Passing to the next column and testing again all button. Because all input (row) is pulled up by the MCU (no pulldown built in) All value are inverted. If my input is low, then my button is pressed, if it's high my button is released.
More, to avoid any bad behavior when pressing two or more buttons at the same time (ex. move right and jump) you cannot leave a column high output when you are testing another column (remember high is the unswitched value of input row). Because it will drain current and you will have bad behaviors. So after testing column, we change them to input (high z impedance)
Ribbon HDMI cable
Not hard to find, but a bit long to come. You can NOT use standard HDMI cable inside, cause you don't have enough space. So you have to use this ribbon cable.
HDMI signal (not for this resolution) are high frequency so you can not just buy hdmi plug and solder them with regular cable.
You will need 3 elements. One right angle HDMI to 20 pin FFC cable. 1 straight connector. And one 20cm 20pin ribbon cable (FPC 0.5mm pitch).
Take care of the orientation of the plug and the FPC connector.
See picture :
Battery Bank
I found this battery bank useful. Cause it had inside Li-ion 26650 cell. This cell could be easily inserted inside the enclosure. For my further version of my game pad I'm using this kind of cell (26650) cause it could be easily removed and changed during the day.
With a regular battery bank you have all you need to charge (current regulator and battery protection) and discharge the battery (with boost voltage from 3v to 5V).
https://www.amazon.fr/gp/product/B00N5LP35I/ref=oh_aui_detailpage_o06_s00?ie=UTF8&psc=1
GameBoy silicon
You can find them here. Good seller on ebay. And fast delivery.
You need 3 kit. I used Dpad for Dpad (obvious) but used for Left and Right shoulder trigger.
In the next version of this game pad I will will not use GameBoy Classic Rubber kit but Game Boy pocket instead.
https://www.ebay.co.uk/itm/ZedLabz-conductive-silicone-rubber-pad-button-kit-Game-Boy-original-DMG-01-/371591385727?hash=item568492927f
Analog joystick
Tricky part. I found them in a Logitech gamepad. Carefully watch and match the size of the footprint before buy or tear-down from any device.
How to build it
I'm writing it right now.
Last and futur version
This is evolutions of Master-Pi. You can see first version on top and the one i'm actually working on at the bottom.
Similar models
thingiverse
free
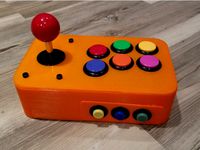
MAME remote control by aalbinger
... charging and the ability to run off of a small lipo battery.
software i'm using: https://github.com/albinger/mamekeyboard
thingiverse
free
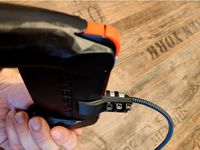
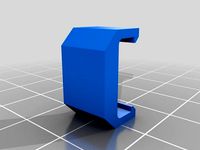
RG350 Gamepad HDMI strain relief by LupusWoraxCustom
... mounts "hook lip" aligns plain onto the top edge!
++++++++++++++++++++++++++++++++++++++++++++++++++++++++++++++++++++
3dwarehouse
free
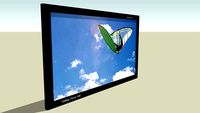
My own LCD television
...39;s a 70 inch screen, you can measure it. lol #1080p #70_inch #black #cable #comonent #composite #hdmi #hdtv #home #lcd #perfect
thingiverse
free
Smart Fridge Touchscreen with Solar panels by Ghost384904
... case you could use regular hdmi cables. dfrobots solar power manager 5v v1.1 was used and mount installed on front case design.
thingiverse
free
HDMI iPad Adapter
...had any problem.
design
i have uploaded the freecad design that i made, so you can remix it and mod it.
i hope it works for you!
thingiverse
free

BatteryTester for 18650 and 26650 Batterys by bagwan
...26650 ecigarette mods. to check batttery level i created this batterychecker. the display is a little lipochecker for a few euros
thingiverse
free
Creality Ender-3 Display Ribbon Cable Clip by gn-jr
...rse
clip to tide up ribbon cable from controller to display ender-3 printer, print it sideway so you don't need any support.
thingiverse
free

RetroTV for Adafruit HDMI 5" Backpack by kazy
...rt micro-usb cables to power the display and speaker, a short 3.5mm patch cable to connect the panel 3.5mm jack with the speaker.
thingiverse
free
18650 battery to 26650 adapter
...tery but i only do have 18650 batteries.
so it was easy job to print a rough adapter to get 18650 cell centered inside the light.
thingiverse
free
26650 battery holder by danielv0419
...te any size you want . the stand offs are a tight fit but i still glued mine in place to make sure the battery dose not come lose
Donaldsimonet
thingiverse
free
PCB fixation for CNC by donaldsimonet
...pcb fixation for cnc by donaldsimonet
thingiverse
not tested yet.
15/20% infill mini
thingiverse
free
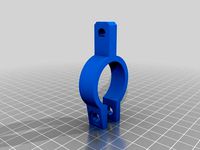
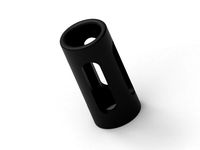
Reflow Holder by donaldsimonet
...//www.bumpdesign.fr/3d-print-stuffs/#reflow_holder
fix for hot air flow reflow resolder. diameter of the gun env. 30mm
use m6 nut
thingiverse
free

Display port place holder by donaldsimonet
...3d-print-stuffs/#display_port
0.2 layer size.
for blocking display port of my laptop and preventing wrong hole with usb connector
thingiverse
free
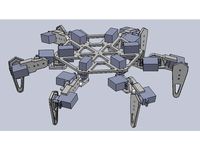
Bleuet Hexapod by donaldsimonet
...helicopter-airplane-control-car-boat/263597825771
you can follow my software development here :https://github.com/dsimonet/bleuet
thingiverse
free

jewel tree by donaldsimonet
... made it for my girlfriend. to help her to forget that i bought a cnc machine. now it's my wife, so it did work pretty well !
V3
3ddd
$1

Curtain v3
...curtain v3
3ddd
полупрозрачная штора v3
3d_export
$5

potato v3
...potato v3
3dexport
3ddd
$1

Curtain v3
...curtain v3
3ddd
штора: полупрозрачная
материал: vray
3ddd
free

фонтан V3
...фонтан v3
3ddd
фонтан
фонтан,fantan, fontan
3ddd
$1
tree-snow v3 / дерево в снегу v3
..., снег , дерево
snowflowpro конвертирован в меш
3d_export
$30
Motorola v3 3D Model
...motorola v3 3d model
3dexport
motorola pebl v3 colored mobile phone
motorola v3 3d model chinaviper 1105 3dexport
3d_export
$12

gothic arch v3
...gothic arch v3
3dexport
3d_export
$5

Robot V3 3D Model
...robot v3 3d model
3dexport
robot gan weapons
robot v3 3d model alexde 75374 3dexport
cg_studio
$45
As-350 V3 Helicopter3d model
...d model
cgstudio
.3ds .lwo .mb - as-350 v3 helicopter 3d model, royalty free license available, instant download after purchase.
cg_studio
$45
Agusta V3 Helicopter3d model
...d model
cgstudio
.3ds .lwo .mb - agusta v3 helicopter 3d model, royalty free license available, instant download after purchase.
Master
3ddd
$1
Master
...master
3ddd
besana , master
фабрика: besana
master
размер: 80х60х80
design_connected
$20

Masters
...photo-realistic 3d models of the kartell masters chair by philippe starck for 3d architectural and interior design presentations.
3ddd
$1
Masters
...ка на производительяhttp://www.designboom.com/design/philippe-starck-masters-chair-for-kartell-at-milan-design-week-09/
3d_export
$5

master roshi
...master roshi
3dexport
master roshi 3d model good quality for animation
design_connected
$18
Masters Stool
...masters stool
designconnected
kartell masters stool computer generated 3d model. designed by starck, philippe.
3ddd
free
Key Master
...key master
3ddd
игровой автомат , key master
д 950 / ш 950 / в 1850
3ddd
$1
Стул: Masters Chair
... kartell
стул: masters chair
коллекция: masters
бренд: kartell
страна: италия
размеры, см: 83x54x54; высота сиденья – 47.
3ddd
$1
kartel masters
...el masters
3ddd
kartel , masters
в архиве присутствует fbx и модель в 2011 версии макса.
3ddd
$1
master Salon
...master salon
3ddd
кресло
:-) :-)
3ddd
free
Master
...uot;
стол для руководителя классический. фабрика arca - модель master.
от себя: лепил по одной картинке - так что не обессудьте.
Pi
design_connected
$11

Pi
...pi
designconnected
ligne roset pi chairs computer generated 3d model. designed by thibault desombre.
3ddd
$1

Emme pi light
...emme pi light
3ddd
emme pi light
люста emme pi light
3ddd
$1

Emme pi light
...emme pi light
3ddd
emme pi light
бра классическое emme pi light
3ddd
$1

Emme Pi Light
...emme pi light
3ddd
emme pi light
3ddd
$1

Emme Pi Light
...emme pi light
3ddd
emme pi light
design_connected
$16

Pi-Air
...pi-air
designconnected
living divani pi-air lounge chairs computer generated 3d model. designed by harry & camila.
3ddd
$1

Emme pi light
...emme pi light
3ddd
emme pi light
люстра классическая фирма: emme pi light
артикул: 3595/5/cot/12/wh
3d_ocean
$15

Manneken Pis
...picting a naked little boy urinating into a fountain’s basin. (wikipedia) the model was sculpted in blender 2.70a rendered wit...
3ddd
$1
Emme Pi Light
...emme pi light
3ddd
emme pi light
classical ceiling lusters.
3ddd
$1
Pi Light 8010 8
...pi light 8010 8
3ddd
emme pi light
люстра pi light 8010 8
0
3d_export
$18

wood-guardrail-fence 0
...wood-guardrail-fence 0
3dexport
wood-guardrail-fence 0<br>3ds max 2015
3d_ocean
$5

0 zero balloon
...aped balloon. this balloon was modelled and prepared for photo-realistic renderings, close-ups, cg visualization. the 0 number...
3ddd
free

ITRE / 0-SOUND 3 SOSPENSIONE
...itre / 0-sound 3 sospensione
3ddd
itre
0-sound 3 sospensione,
производитель itre, италия
артикул 0303306373532
3ddd
$1

Whirpool FRUU2VAF20-0
... холодильник
моделька выполнена по размерам и со средней детализацией. текстура и .obj в комплекте
3d_export
$7

Lion pand 0 3D Model
... model
3dexport
lion pand
lion pand 0 3d model download .c4d .max .obj .fbx .ma .lwo .3ds .3dm .stl gorgsalvatore 113339 3dexport
3ddd
free
Стеллаж для книг 0+1
... стеллаж
стеллаж для книг 0+1
фабрика: bernini (италия)
размеры: 99см x 33см x высота 207см
материал: дерево (светлый ясень)
cg_studio
$79

Handley Page 0/4003d model
....c4d .fbx .lwo .ma .max .obj .xsi - handley page 0/400 3d model, royalty free license available, instant download after purchase.
3ddd
free

Kohler 11000-VT-0 керамический кран
... смеситель
модель керамического крана kohler 11000-vt-0
все текстуры присутствуют, материалы настроены
3ddd
$1

Зеркало №5-0
...d
dana
цвет корпуса: орех-пекан
цвет фасадов : раис-корень ореха
стр. на оф. сайте:http://www.dana.ru/catalog/409/2916/
3ddd
$1
Transitional Table Lamps Collection 18009-0 by Ambience Lighting
...n 18009-0 by ambience lightinghttp://www.farreys.com/lighting/ambience/collection_transitional_table_lamps_18009-0.html