Thingiverse

Makergear M2 Larger Electronics Box with 2 LM2596 Holders by dellrio
by Thingiverse
Last crawled date: 3 years ago
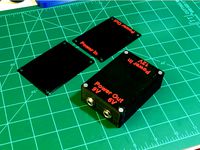
I have converted all the fans on my printer to 12v noctua fans for lower noise levels. Since the Printer pushes 24volts I needed 2 LM2596 Buck converters to convert the output to 12v. I also added active cooling fans to the X, Y, and Extruder motors and have added LED lights as well. I built a distribution block with 2 sides, one for the Fan0 Output and one for the Fan1 output filtered through the Buck Converters to convert to 12V. This larger electronics case accommodates the 2 LM2596 converters and a Radio Shack 276-150 Circuit Board which I built the distribution block on.
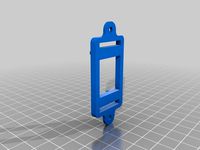
The top panel is divided into an upper and lower lid, the lower lid slides into a mount on the left side and lowers down with the right wall under the upper lid to keep it in place. The upper lid slides into a mount on the right side then has holes that line up with the case which can be attached with 2 M4(I think - extra screws from the M2 Kit) screws. The holes are tight enough you can screw directly into the plastic and it did hold for me, but there is also a slot to insert 2 M4 Lock nuts (also M2 extras). I used the lock nuts to ensure a hold even if the plastic strips over time. I have included 2 Lower lid files, one has a cutout to view the voltage on the 2 Buck Converters, the other one is solid and does not contain the cutouts in case you want to use the case without those converters. The pegs that they mount to can be broken off with pliers if you choose not to use them.
I have been using this case with no issues for a couple weeks. In regards to the amperage draw from the Fan1 and Fan0 - I have been using these accessories on the printer for about 5 months (printing almost daily) with no negative side effects. Below is a list of the accessories that I have attached to the printer
Fan1
Extruder Fan - Noctua 40mm
Case Fan - Noctua 40mm
Lighting - Peel and stick Roll of 12v white LEDs cut in 3 sections, 2 sections with 12 LEDs each mounted under the X axis frame, and one section with 3 LEDs mounted under the extruder Fan in a custom Fan Grill with LED holder.
Fan0
Bed Fan - 60mm Noctua in custom mount (see other designs)
3 Scythe Super Kaze 40mm fans for cooling the stepper motors (X, Y, and Extruder)
The distribution block has 1 open port still on the Fan0 Side, and I have tested it with an additional fan in the event I choose to upgrade to dual extruder. My Z motor never even gets warm.
Similar models
thingiverse
free

LM2596 Buck Converter Case by Sethman511
...ef=mp_s_a_1_17?dchild=1&keywords=drok+buck+converter&qid=1584648971&sr=8-17&swrs=a05ce4ded55b156ec4b54c4e546e0b8e
thingiverse
free

M2 dual 40mm ducted fan mount by willnewton
...
if you have a newer model m2 make sure to use a 24v to 12v converter to power the fan. i used a small r/c model buck converter.
thingiverse
free

Case for LM2596 (Buck Converter) by Cyklopet
...re to use support from buildplate when printing the case with mounting because of the overhang that comes the arrow-shaped mount.
thingiverse
free
Buck Converter Double Box by steve220
...may differ, so i uploaded a blank lid and a generic input/output lid.
thanks to animusoft for his original buck converter holder!
grabcad
free

Buck Converter Housing
...ck converter to 40mm t-slot aluminum extrusion for stepping down printer voltage, as needed, to power fans and other accessories.
thingiverse
free

Sidewinder X1 E3D V6 40mm Fan Duct by HenryCharlie
... or anti vibration mounts. the stock and 3rd party 30mm fans are too loud.
bkvines created a simple snap-on mount for the noctua.
thingiverse
free

LM2596 DC Buck Converter case by sammy2142
...2.5 / 3mm wide cable/zip ties to use as strain relieve.
the lid is push fit.
step file is included if you wish to customise this.
thingiverse
free

Buck Converter 24v to 12v DROK LM2596 Case by MAD_ALIEN
... once its put on. it does provide a view port into the screen.
i think there are better ones out there but this is my take on it.
thingiverse
free

LM2596 Buck Converter case
...k converter for a match to yours.
if the lid wont snap and hold in place, use a little hot glue on the post and place the cover.
thingiverse
free

Yet Another Ender 3 Station (Raspberry Pi 3A+)
...hole for a toggle switch (i use it for leds)
40mm fan
cable output + fixation for a camera
printed in two parts to limit supports
Dellrio
thingiverse
free

Jig for Cabinet Door by dellrio
...of wood clamped to my drill press to align cabinet doors for drilling hidden hinge holes. could maybe be used for other purposes.
thingiverse
free

Star Trek Ascendancy Box Insert V2 by dellrio
...insert v2 by dellrio
thingiverse
my sister asked me to modify talker13's design for this box to add an additional partition.
thingiverse
free

Ascendancy Game Tokens by dellrio
...file size without impacting the design. that one does not show up in the viewer because of the size but is available to download.
thingiverse
free

LM2596 Buck Conveter Stand by dellrio
... location. not sure if its useful to anyone, i used it to test the spacing of my pegs prior to merging that with a bigger model.
thingiverse
free

Washer for Kitchen Cabinet Handles by dellrio
...anymore, then i designed and printed this washer that works perfectly. was quicker to design and print than to run to the store.
thingiverse
free

Nut for Furniture Screw Sleeve by dellrio
...lse can make use of this part. if you overtighten your screw, you will need to reprint - print took me like 10 minutes... twice
thingiverse
free

Golf Ball Display - 13 Golf balls by dellrio
...n vacation. this was what i designed for him, the balls do touch a little but it still works. he was very excited to have it.
thingiverse
free

Stand for Radio Shack 276-150 Circut Board by dellrio
...oard, i used this to hold the board in place while i soldered, also used the pegs in a larger model that i merged this file into.
thingiverse
free

Small cabinet hook by dellrio
...this version is slightly longer and has a greater angle at the end of the hook. this solved my problem of the falling dish brush.
thingiverse
free

PC Board Test Bed - Individual File by dellrio
... smaller project and only needed 4. here is the file split into 1, i added 4 to my try in my slicer (s3d). they worked great.
Lm2596
thingiverse
free

lm2596s
...lm2596s
thingiverse
enjoy 3d priter~^^
thingiverse
free

LM2596S Case
...lm2596s case
thingiverse
lm2596s case with optional hold for ender 3 pro
thingiverse
free

LM2596 Aliexpress
...lm2596 aliexpress
thingiverse
lm2596 from aliexpress, a little bit different in size.
thingiverse
free

LM2596S Gehäuse by windischb
...lm2596s gehäuse by windischb
thingiverse
lm2596s gehäuse
thingiverse
free

LM2596 case by RCChris
...lm2596 case by rcchris
thingiverse
lm2596 raspberry pi
thingiverse
free
LM2596 case by Yeti1994
...lm2596 case by yeti1994
thingiverse
lm2596 case for elettronic applications
thingiverse
free

LM2596 holder by jscottb
...lm2596 holder by jscottb
thingiverse
lm2596 power supply breakout board mount.
thingiverse
free

LM2596 Case by oksaeger
...lm2596 case by oksaeger
thingiverse
case for lm2596 dc-dc buck converter.
thingiverse
free

LM2596 Mount
...ount.
uses two m2.5 x 4mm (or 3mm) screws to mount the module to the mount and two m4 x whatever length you need to hold it down.
thingiverse
free

LM2596 BOX by LordCarvalho
...lm2596 box by lordcarvalho
thingiverse
this is a remix from https://www.thingiverse.com/thing:2629075
fits lm2596 60*40
enjoy
Makergear
thingiverse
free

MakerGear M2 faceplate by TimEdwards
...frame and holds itself in place.
the makergear logo is presumed to be a trademark of makergear, inc., http://www.makergear.com.
thingiverse
free

spacer for Makergear X-Carriage by mic
...spacer for makergear x-carriage by mic
thingiverse
spacer for makergear x-carriage
thingiverse
free

bioprinter for makergear M2 by goldengrape
...for makergear m2 by goldengrape
thingiverse
remix fromhttps://3dprint.nih.gov/discover/3dpx-008366
try to modify my makergear m2
thingiverse
free

Modified Y-stage by MakerGear
...ified y-stage used for the makergear heated build platform. these files may be helpful for botters using or waiting on their hbp.
thingiverse
free

Makergear M2 Fan Bracket by Werner
...makergear m2 fan bracket by werner
thingiverse
makergear m2 fan bracket for use with fan shroud thing:69327
thingiverse
free

MakerGear HotEnd by RaD
...makergear hotend by rad
thingiverse
it helps you to build new mendel90 model.
thingiverse
free
Makergear Z Axis Knob by Aydelott
...makergear z axis knob by aydelott
thingiverse
makergear z axis knob press in steel when the abs is still a little warm
thingiverse
free

Makergear M2 Filament guide by Werner
...ent guide by werner
thingiverse
slightly optimised 3mm filament guide for makergear m2
with provision for 2. mount for small fan
thingiverse
free

Fan Shroud (MakerGear M2) by JohnShawDesign
...by johnshawdesign
thingiverse
tested fan shroud for makergear m2. centers air flow for better overhangs and more direct cooling.
thingiverse
free

MakerGear M2 Tool Holder by wschleter
...thingiverse
a compact toolholder for a makergear m2. mounts to the frame using two existing holes. freecad source file included.
M2
turbosquid
$50

M2
... available on turbo squid, the world's leading provider of digital 3d models for visualization, films, television, and games.
design_connected
free
M2 Sofa
...m2 sofa
designconnected
free 3d model of m2 sofa by ka design designed by kleine allekotte, joachim.
turbosquid
$10

M2 Browning_LP
...uid
royalty free 3d model m2 browning_lp for download as lwo on turbosquid: 3d models for games, architecture, videos. (1279588)
turbosquid
$120

Browning M2
...y free 3d model browning m2 for download as 3ds, max, and obj on turbosquid: 3d models for games, architecture, videos. (1298501)
turbosquid
$70

m2 collection
... available on turbo squid, the world's leading provider of digital 3d models for visualization, films, television, and games.
turbosquid
$19

Browning M2
... available on turbo squid, the world's leading provider of digital 3d models for visualization, films, television, and games.
turbosquid
$19

Turntable M2
... available on turbo squid, the world's leading provider of digital 3d models for visualization, films, television, and games.
turbosquid
free

M2 Carbine
... available on turbo squid, the world's leading provider of digital 3d models for visualization, films, television, and games.
turbosquid
free

M2 Grand
... available on turbo squid, the world's leading provider of digital 3d models for visualization, films, television, and games.
turbosquid
free

Lego M2
... available on turbo squid, the world's leading provider of digital 3d models for visualization, films, television, and games.
Larger
turbosquid
$59

Spiral Table set (larger)
... available on turbo squid, the world's leading provider of digital 3d models for visualization, films, television, and games.
3d_export
$10

sexy secretary
...are additional textures in excellent quality (2000x2000 pic/ and larger. ...
3d_export
$60

lockheed martin f-35 c lightning ii
...aircraft carriers. compared to the f-35a, the f-35c features larger wings with foldable wingtip sections, larger control surfaces for...
3d_export
$5

guitar
...can scale the object to make it smaller or larger then after printing stick the two parts to the...
3d_ocean
$8

Drawer Unit
...a small drawer unit. can be fit to any larger office decoration scene. all objects are grouped and arranged....
3d_export
$15

ring pandora
...in millimeters) stones 1.5 mm the weight of the larger ring in gold 4 gram smaller ring weight 3,61...
3ddd
free

Vaughan Figeac Chandelier CL0166.IV (old ID CLA66/L )
...figeac chandelier cl0166.iv (old id cla66/l ) 3ddd vaughan larger gilded and ivory painted wood and metal, 12 lights...
3ddd
$1

Lampe indus Michigan
.... it is articulated and adjustable . for a larger model , see this lamp...
3d_export
$6

Camille Zen Room Divider
...room divider 3dexport the camille zen room divider with larger panes. the piece for extra stability and protection from...
3d_export
$8

chameleon model 3d
...(2000 x 2000 up to 2048 x 2048)<br>with a largerthan-life personality from both these cute character.<br>formats:...
Electronics
turbosquid
$1

electron
...urbosquid
royalty free 3d model electron for download as max on turbosquid: 3d models for games, architecture, videos. (1157488)
turbosquid
$50

electronic
...
royalty free 3d model electronic for download as max and obj on turbosquid: 3d models for games, architecture, videos. (1289427)
turbosquid
$40

Electron
... available on turbo squid, the world's leading provider of digital 3d models for visualization, films, television, and games.
3d_ocean
$8
Electronic game
...electronic game
3docean
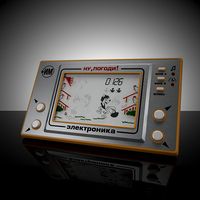
electronic games nu pogody wait a minute well
electronic game “well, wait a minute”, “nu pogody”
3ddd
$1
Brilux Electronic
...brilux electronic
3ddd
подвес. brilux electronic. польша. материалы настроены.
3d_export
free

electronic shop
...lectronic shop with high quality interior and exterior. it has tvs smartphone play station printer and many more electronic item.
3ddd
$1

Термостаты OJ Electronics
...ермостаты oj electronics
3ddd
oj electronics , термостат
термостаты фирмы oj electronics
3d_export
$8

electron 714
...electron 714
3dexport
game ready model for export to unreal engine soviet tv electron 714 pbr 4k
3ddd
$1

Термостат OJ Electronics
... oj electronics
3ddd
oj electronics , термостат
термостат occ2-1991 фирмы oj electronics
turbosquid
$60

Electronics Stuff
...
royalty free 3d model electronics stuff for download as max on turbosquid: 3d models for games, architecture, videos. (1624680)
Holders
archibase_planet
free

Holder
...holder
archibase planet
holder toilet paper holder
holder paper n070712 - 3d model (*.gsm+*.3ds) for interior 3d visualization.
archibase_planet
free

Holder
...e planet
holder rack toilet paper holder
holder toilet roll n240715 - 3d model (*.gsm+*.3ds+*.max) for interior 3d visualization.
archibase_planet
free

Holder
...holder
archibase planet
pen holder support prop
pen holder - 3d model for interior 3d visualization.
archibase_planet
free

Holder
...holder
archibase planet
pole post holder
сhurch cross pole holder - 3d model for interior 3d visualization.
archibase_planet
free

Holder
...holder
archibase planet
holder bathroom ware
shower holder - 3d model (*.gsm+*.3ds) for interior 3d visualization.
archibase_planet
free

Holder
...oilet paper holder
holder paper devon&devon; time black n241113 - 3d model (*.gsm+*.3ds+*.max) for interior 3d visualization.
archibase_planet
free

Holder
...holder
archibase planet
holder hanger hanger for towel
holder 7 - 3d model (*.gsm+*.3ds) for interior 3d visualization.
archibase_planet
free

Holder
...holder
archibase planet
holder hanger hanger for towel
holder 3 - 3d model (*.gsm+*.3ds) for interior 3d visualization.
archibase_planet
free

Holder
...holder
archibase planet
holder towel rack towel-horse
holder - 3d model (*.gsm+*.3ds) for interior 3d visualization.
archibase_planet
free

Holder
...lder
archibase planet
holder hanger hanger for towel
holder towel n250912 - 3d model (*.gsm+*.3ds) for interior 3d visualization.
Box
archibase_planet
free

Box
...box
archibase planet
box carton cardboard box
box 2 - 3d model (*.3ds) for interior 3d visualization.
archibase_planet
free

Box
...box
archibase planet
carton cardboard box box
box 1 - 3d model (*.3ds) for interior 3d visualization.
3d_export
$6

box
...box
3dexport
box
3d_export
$5

Box
...box
3dexport
box
3d_export
$5

box
...box
3dexport
box
3d_export
$5

box
...box
3dexport
box
archibase_planet
free

Box
...box
archibase planet
box box for paper notebook pencil
box - 3d model (*.gsm+*.3ds) for interior 3d visualization.
archibase_planet
free

Box
...box
archibase planet
box carton cardboard box
box n170111 - 3d model (*.gsm+*.3ds) for interior 3d visualization.
archibase_planet
free

Box
...box
archibase planet
box carton cardboard box
box n050411 - 3d model (*.gsm+*.3ds) for interior 3d visualization.
archibase_planet
free

Boxes
...boxes
archibase planet
boxes box case bin
boxes n281213 - 3d model (*.gsm+*.3ds+*.max) for interior 3d visualization.
2
design_connected
$11

No 2
...no 2
designconnected
sibast no 2 computer generated 3d model. designed by sibast, helge.
turbosquid
$6

Cliff Rock 2-2
...uid
royalty free 3d model cliff rock 2-2 for download as obj on turbosquid: 3d models for games, architecture, videos. (1619161)
turbosquid
$29

Book variation 2 2
...3d model book variation 2 2 for download as max, obj, and fbx on turbosquid: 3d models for games, architecture, videos. (1366868)
turbosquid
$22

Classic baluster (2) (2)
...assic baluster (2) (2) for download as max, obj, fbx, and stl on turbosquid: 3d models for games, architecture, videos. (1483789)
turbosquid
$99

Smilodon 2 Pose 2
... available on turbo squid, the world's leading provider of digital 3d models for visualization, films, television, and games.
turbosquid
$20

Barrel Barricade 2-2
... available on turbo squid, the world's leading provider of digital 3d models for visualization, films, television, and games.
turbosquid
$6

Wall Trophy (2) (2)
... available on turbo squid, the world's leading provider of digital 3d models for visualization, films, television, and games.
turbosquid
free

Tire label 2 of 2
... available on turbo squid, the world's leading provider of digital 3d models for visualization, films, television, and games.
3ddd
$1

Кровать, 2 тумбочки, 2 светильника
...кровать, 2 тумбочки, 2 светильника
3ddd
кровать, 2 тумбочки, 2 светильника
нормальное качество
формат 3ds max
без текстур
3ddd
free

Кровать, 2 тумбочки, 2 светильника
...кровать, 2 тумбочки, 2 светильника
3ddd
кровать, 2 тумбочки, 2 светильника
нормальное качество
формат 3ds max
без текстур