Thingiverse
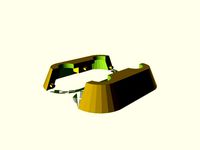
Makerbot 5th Gen Heated Print Bed (HPB) by lanyx
by Thingiverse
Last crawled date: 3 years, 1 month ago
Ever wanted to print something other than PLA on your MB 5thGen? Having issues with warped edges? Time to put a heated print bed (HPB) on it. MB does not have any options for an HPB so I had to make my own design. I am now able to print perfectly flat using ABS, PET+, and PLA. I am sure it will do others but have not experimented yet. The HPB will easily heat to 110° C. It will use your existing glass plate. Keep in mind that this will NOT be integrated with the MB software. You will have to manually turn off/on the HPB before/after you print. The temperature controller will maintain whatever temperature you set and I also enabled a safety feature so that if the thermocouple fails or a relay fails closed, it will automatically turn off the power supply to prevent a fire. Materials needed:
350w 12-24v DC power supply http://www.amazon.com/gp/product/B00KXV4WH8?psc=1&redirect=true&ref_=oh_aui_detailpage_o03_s02
PCB heatbed hot plate (i got the one with the LEDs already soldered) http://www.amazon.com/gp/product/B015369VT6?psc=1&redirect=true&ref_=oh_aui_detailpage_o03_s03
12v relay 30/40amp with wiring harness (you only need 1, i bought a 5 pack) http://www.amazon.com/gp/product/B005HFYE1O?psc=1&redirect=true&ref_=oh_aui_detailpage_o03_s02
Temperature controller able to go above 100°C http://www.amazon.com/gp/product/B00OLOGO9M?psc=1&redirect=true&ref_=oh_aui_detailpage_o03_s01
Some 14ga wire
5 amp 120v fuse and holder
Heat shrink tubing
120v plug
Masking tape
Painters tape
2 paint sticks or yard sticks that are 5mm thick (Update: changing to Aluminum strips. May have to adjust clips as they are only 3.5mm thick.)
120v LED Panel mount (to let you know if the power supply is running, not required)
SPST panel mount switch (to turn off power to HPB but still leave the control unit on)
110v Power switch ( to turn the HPB and Temp Controller on/off)
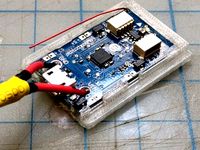
Plastic or metal enclosure 4x5x6” to hold all components (recommend plastic if you don't have a nibbler to cut metal squares/holes
Banana female connectors for the ability to unplug Thermocouple
High amperage 12v connector like an XT60 or Dean's for the ability to unplug the HPB.
Both of the above connectors are recommended to be able to remove HPB and remove/replace the blue tape.
Some soldering skills
Some electrical skills
Work very slowly and make sure all your connections are 100% correct prior to energizing. This is a lot of power and easy to make mistakes
Steps:
Build temperature controller
Get plastic enclosure box and cut out square opening for Temperature Controller
Drill holes for the banana plugs, switches, power cables and anything you need in/out of the box
Refer to the wiring diagram on how everything ties together
Use 14ga wire for anything that will have high current
Refer to Inkbird on how the temperature controller operates for the ITC-100RH
Be sure to ground your power supply and case if using a metal box
Remember you are dealing with 120v in the case. Be careful if operating with case open and any shorts or incorrect wiring
Build Heated Print Bed
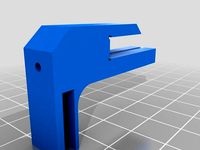
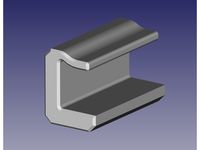
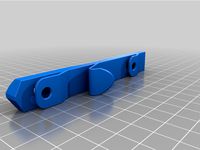
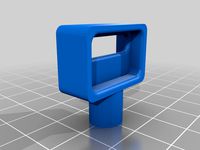
Print 4 clips prior to dismanteling your print bed
o 100% infil, Standard resolution (200mm)
o Order of preferance on filament (PET+, ABS,PLA)
Remove print bed tray and remove glass
Clean glass of all material and finish with an alcohol wipe
Store print bed plastic tray. Will no longer need
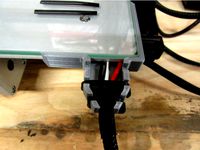
On PCB heater, solder power connections to bottom of PCB (side with the LED connector)
o Make sure the top is flat even at the solder pads
o Make sure there is solder going all the way through the PCB to ensure heating elements on top are getting power
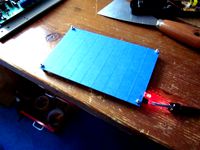
Cut paint sticks/yard sticks 1x235mm, 2x108mm
o Maker sure the paint sticks are 5mm thick (homedepot/lowes)
Center PCB heating element side (noticable by all the rows of traces on the board) on the glass
Tape (masking tape) PCB to glass. Do not wrap tape around edges of glass
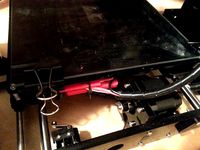
Bend thermocouple tip 90° and place in center hold of PCB (update: use some hose bib rubber washers taped around the tip to keep in place over time.)
Using masking tape, put ~3 layers of tape on thermocouple to hold in center of PCB and provide some insulation
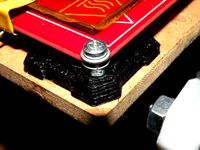
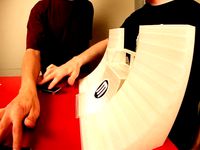
Tape (masking tape) wood pieces to PCB as shown in pictures
o Two shorter pieces are for placing on the front side with space for the thermocouple wiring
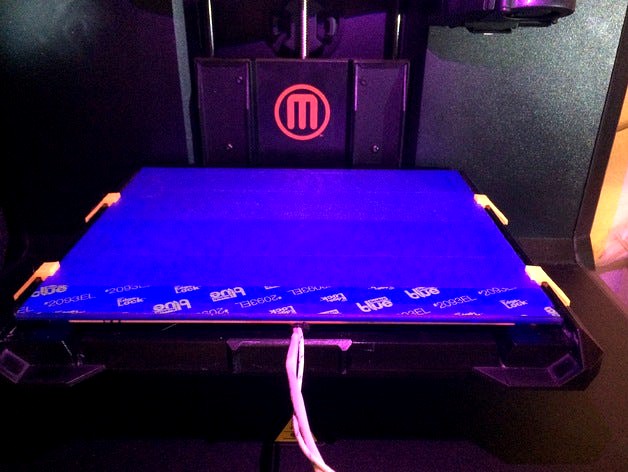
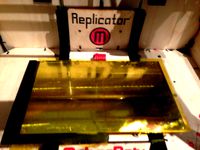
Cover top of glass with Blue Painters tape. Wipe with an alcohol wipe. This creates a fantastic surface for all filaments. Wipe gets rid of any residue or grease on the surface.
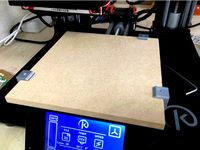
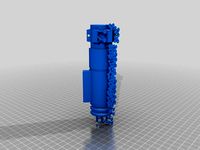
Install new heater print bed on bed platform
Install clips starting top first and snap at the bottom of the platform edge
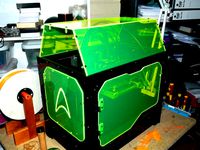
Admire your creation
Perform level process based on your printer. On the MB 5th gen, I first start with an auto level then finish with a manual level.
o Turn off printer
o Manually turn bed Z rod to move the print bed to within a couple mm of the print head
Use a paper towel or something as this has grease on it
You will want to recoat the rod after you are done with grease as this should be done periodically anyways
o Manually move the print head to the center of the print bed
o Use a business card and bring print bed up to the thickness of the business card. You should be able to move the business in an out with minimal friction
o Move the print head to the front center
o Measure with business card again. Adjust front/back knob to same friction as center
o Move print head to rear center, measure and adjust. Do this several times to get front and back as close as possible
o Move print head to right center, then left center and adjust the left/right knob until the exact same
o Do this process several times to get the entire surface of the print bed the same height.
o Keep in mind that the glass may not be 100% flat and that the print head rods may also not be 100% flat. I ALWAYS print with a raft on the MB to eliminate as much unlevel as possible
Once you have everything setup and operational, the below settings should get you started. Adjust for your brand of filament. This entire setup also helps in eliminating any variances you may be seeing by your room temperature. Before I had to put the printer in a closet with a space heater as my house was too cold causing a lot of warping. Now with the HPB I don't have to use a space heater, my prints are near 100% flat and I am able to do stronger filaments.
Filament starting temperature (all numbers in C)
o ABS HPB 110° Extruder 235° Speed 90% (Infill,inset, raft)
o PET+ HPB 70° Extruder 245° Speed 50%
o PLA HPB 50° Extruder 215° Speed 100%
350w 12-24v DC power supply http://www.amazon.com/gp/product/B00KXV4WH8?psc=1&redirect=true&ref_=oh_aui_detailpage_o03_s02
PCB heatbed hot plate (i got the one with the LEDs already soldered) http://www.amazon.com/gp/product/B015369VT6?psc=1&redirect=true&ref_=oh_aui_detailpage_o03_s03
12v relay 30/40amp with wiring harness (you only need 1, i bought a 5 pack) http://www.amazon.com/gp/product/B005HFYE1O?psc=1&redirect=true&ref_=oh_aui_detailpage_o03_s02
Temperature controller able to go above 100°C http://www.amazon.com/gp/product/B00OLOGO9M?psc=1&redirect=true&ref_=oh_aui_detailpage_o03_s01
Some 14ga wire
5 amp 120v fuse and holder
Heat shrink tubing
120v plug
Masking tape
Painters tape
2 paint sticks or yard sticks that are 5mm thick (Update: changing to Aluminum strips. May have to adjust clips as they are only 3.5mm thick.)
120v LED Panel mount (to let you know if the power supply is running, not required)
SPST panel mount switch (to turn off power to HPB but still leave the control unit on)
110v Power switch ( to turn the HPB and Temp Controller on/off)
Plastic or metal enclosure 4x5x6” to hold all components (recommend plastic if you don't have a nibbler to cut metal squares/holes
Banana female connectors for the ability to unplug Thermocouple
High amperage 12v connector like an XT60 or Dean's for the ability to unplug the HPB.
Both of the above connectors are recommended to be able to remove HPB and remove/replace the blue tape.
Some soldering skills
Some electrical skills
Work very slowly and make sure all your connections are 100% correct prior to energizing. This is a lot of power and easy to make mistakes
Steps:
Build temperature controller
Get plastic enclosure box and cut out square opening for Temperature Controller
Drill holes for the banana plugs, switches, power cables and anything you need in/out of the box
Refer to the wiring diagram on how everything ties together
Use 14ga wire for anything that will have high current
Refer to Inkbird on how the temperature controller operates for the ITC-100RH
Be sure to ground your power supply and case if using a metal box
Remember you are dealing with 120v in the case. Be careful if operating with case open and any shorts or incorrect wiring
Build Heated Print Bed
Print 4 clips prior to dismanteling your print bed
o 100% infil, Standard resolution (200mm)
o Order of preferance on filament (PET+, ABS,PLA)
Remove print bed tray and remove glass
Clean glass of all material and finish with an alcohol wipe
Store print bed plastic tray. Will no longer need
On PCB heater, solder power connections to bottom of PCB (side with the LED connector)
o Make sure the top is flat even at the solder pads
o Make sure there is solder going all the way through the PCB to ensure heating elements on top are getting power
Cut paint sticks/yard sticks 1x235mm, 2x108mm
o Maker sure the paint sticks are 5mm thick (homedepot/lowes)
Center PCB heating element side (noticable by all the rows of traces on the board) on the glass
Tape (masking tape) PCB to glass. Do not wrap tape around edges of glass
Bend thermocouple tip 90° and place in center hold of PCB (update: use some hose bib rubber washers taped around the tip to keep in place over time.)
Using masking tape, put ~3 layers of tape on thermocouple to hold in center of PCB and provide some insulation
Tape (masking tape) wood pieces to PCB as shown in pictures
o Two shorter pieces are for placing on the front side with space for the thermocouple wiring
Cover top of glass with Blue Painters tape. Wipe with an alcohol wipe. This creates a fantastic surface for all filaments. Wipe gets rid of any residue or grease on the surface.
Install new heater print bed on bed platform
Install clips starting top first and snap at the bottom of the platform edge
Admire your creation
Perform level process based on your printer. On the MB 5th gen, I first start with an auto level then finish with a manual level.
o Turn off printer
o Manually turn bed Z rod to move the print bed to within a couple mm of the print head
Use a paper towel or something as this has grease on it
You will want to recoat the rod after you are done with grease as this should be done periodically anyways
o Manually move the print head to the center of the print bed
o Use a business card and bring print bed up to the thickness of the business card. You should be able to move the business in an out with minimal friction
o Move the print head to the front center
o Measure with business card again. Adjust front/back knob to same friction as center
o Move print head to rear center, measure and adjust. Do this several times to get front and back as close as possible
o Move print head to right center, then left center and adjust the left/right knob until the exact same
o Do this process several times to get the entire surface of the print bed the same height.
o Keep in mind that the glass may not be 100% flat and that the print head rods may also not be 100% flat. I ALWAYS print with a raft on the MB to eliminate as much unlevel as possible
Once you have everything setup and operational, the below settings should get you started. Adjust for your brand of filament. This entire setup also helps in eliminating any variances you may be seeing by your room temperature. Before I had to put the printer in a closet with a space heater as my house was too cold causing a lot of warping. Now with the HPB I don't have to use a space heater, my prints are near 100% flat and I am able to do stronger filaments.
Filament starting temperature (all numbers in C)
o ABS HPB 110° Extruder 235° Speed 90% (Infill,inset, raft)
o PET+ HPB 70° Extruder 245° Speed 50%
o PLA HPB 50° Extruder 215° Speed 100%
Similar models
thingiverse
free

Adjustable Power Source - Hot Wheels by NHSE
...o-universal-switching-replacement-connectors/dp/b013p01udc?ie=utf8&psc=1&redirect=true&ref_=oh_aui_detailpage_o01_s00
thingiverse
free
100x160mm PCB standard sized heated bed by jjshortcut
...urning the potentiometer.
more info about it at http://jjshortcut.wordpress.com/2011/11/21/555-timer-controlled-heated-print-bed/
thingiverse
free
Creality CR-10 Wire management, Strain relief and Glass holder by Evanrude
...r glass is to small then you can just put a piece of zip tie in there to hold it which allows you more front and back print area.
thingiverse
free
A8 Heat bed Solder Support by Radem
...or and supports the connection. i attached it to the the acrylic frame with 2 sided tape, then attached the wires with a zip tie.
thingiverse
free
3/16" Clip for Glass Heated Bed for M3D Printer by bkibalo
... 3/16" glass heated bed into the micro m3d printer. this clip has a hole to hold a thermocouple for temperature montioring.
thingiverse
free

Heated Bed Wire/Solder Support Clip by Walk3rt
...ace. i did create this model in sketchup, so if you would like to download the file to edit to your needs, just let me know. :)
thingiverse
free
Heat-Bed Clamp 6mm by Sisul
...few hours at 50-60°c, and only noticed a slight stress fatigue. the clamp is still holding the glass bed well on the heating bed.
thingiverse
free
Turntable by jwilcott
...
and this motor controller: http://www.amazon.com/gp/product/b00dvggwc0?psc=1&redirect=true&ref_=oh_aui_search_detailpage
thingiverse
free

C-bot Monster V1 533mm x 711mm x 711mm by konkop
...ugh and on wheel to slide under my workbench.
more to come. if you have questions let me know i will try to answer them as i can.
thingiverse
free

CobbleBot XL Bed Strain Relief by ThorMJ
...s don't move.
remember to print this in a high-temperature plastic (i used abs) because this is right next to the heated bed.
Lanyx
thingiverse
free
Case for Parrot Drone by lanyx
... to allow you to customize to your liking.
update 3/2/2016: modified case to handle turnigy 750mah batteries and to fix hinges.
thingiverse
free
SciSky FC (Quanum PICO) in Parrot Frame by lanyx
...ngr923 http://www.thingiverse.com/thing:1302382.
updated 2016-03-02: updated fc cover to hold better. be sure to use supports.
thingiverse
free
Quanum FPV Goggles v1 & v2 Extension Tube for 4.3" & 5" Monitor by lanyx
...mechanical (excellent 3d software for free), i've included the native files for you to play with and customize as you desire.
thingiverse
free
Mini Camera Holder for Parrot Rolling Spider Frame by yoannwyffels
...spider frame by yoannwyffels thingiverse camera holder redesigned from lanyx original design for the mini 600tvl camera: http://www.banggood.com/600tvl-8_0mp-14-2_8mm-cmos-fpv-170-degree-wide-anlge-lens-camera-palntsc-p-984345.html or...
Hpb
thingiverse
free
LM8UU Y Axis for HPB Deluxe Kit by Kempy
...hpb deluxe kit has 25mm or 23~mm pitch on screws, all others apear to be wider @ 30mm pitch. hence my requirement to adjust this.
thingiverse
free
MPCNC Primo 25mm nut trap by hpb
... falling out if you change the tool mount.
no idea why i can't mark this as a remix
https://www.thingiverse.com/thing:4550789
thingiverse
free
Trinus 3D Laser Wasteboard clips by 3dnoobie
...as a wasteboard for the laser. protect your expensive hpb with some cheap material before you risk damaging it....
thingiverse
free
Front Panel powered Printer by cr3a7ure
...12v without hpb, and plus 11a @ 12v with hpb be sure your psu has enough wattage to power...
thingiverse
free
Lazy Man's Kapton Jig (Replicator) by CrazyJaw
...up both sides of kapton tape for the replicator hpb doing it by hand always takes me a dozen...
thingiverse
free
Replicator 1 Cover - "The Carbonator" by solertron
...the supplied dxf files. you will note that the hpb arms are from "bottleworks" - i highly recommend these....
thingiverse
free
foldable and adjustable Tablet PC Stand by Ijon
...that thing again, as soon as we have a hpb in...
thingiverse
free
Prusa V2 Y-Axis Corner Nut Traps by Justblair
...possibility of backlash originating from the mounting of the hpb i have included the stl file that should produce...
thingiverse
free

Ergo iPhone 6 Plus Case - For Limited Hand Mobility by daveyclk
...temp - layer 1 - 220c all others 200c hpb - 52c speed 70mm/s infil - 100% notes: this...
5Th
thingiverse
free

Spark 5th grade cookie by yaneirag17
...spark 5th grade cookie by yaneirag17
thingiverse
spark 5th grade cookie
thingiverse
free

iPod 5th/Classic stand by kodera2t
...ipod 5th/classic stand by kodera2t
thingiverse
ipod 5th/classic stand
thingiverse
free

Canoloth DND 5th by Pirracas15
...canoloth dnd 5th by pirracas15
thingiverse
28mm canoloth miniature from dnd 5th edition, made with blender sculpting tool.
thingiverse
free

5th position by WillandMrData2
...ballet.
suggest lay print flat on build plate, the back has been made flat for easy printing.
bye for now and be well :) :]
thingiverse
free

5th gen Holder by DawgDodger
...5th gen holder by dawgdodger
thingiverse
haaaaaaaaa
thingiverse
free

makerbot 5th generation print base by rkormos
...makerbot 5th generation print base by rkormos
thingiverse
makerbot 5th generation print base
thingiverse
free

Batman iPod 5th Generation Case by eee333eee333
...batman ipod 5th generation case by eee333eee333
thingiverse
batman logo on a ipod 5th generation case
thingiverse
free

7 plug holder for 5th wheels by eagle14489
...or 5th wheels by eagle14489
thingiverse
designed to be automotive 3m tapped under the 5th wheel to hold the plug and brake cable
thingiverse
free

5th wheel camper keychain by adiastra
...heel camper keychain i made for my mother. i created the "alternate" version to have better attachment to the keychain.
thingiverse
free

Pergo 5th Anniversary Log by Pergo
...design than to incorporate it into yours.
thanks jzkmath, for the super model!
5th anniversaries are customarily "wood"
Gen
thingiverse
free

power gen by KenLin
...power gen by kenlin
thingiverse
power gen
thingiverse
free

bike power gen by KenLin
...bike power gen by kenlin
thingiverse
bike power gen
thingiverse
free

Nest Mini 2nd Gen
...nest mini 2nd gen
thingiverse
model of the nest mini 2nd gen.
thingiverse
free

Tablet Stand with Gen by yukihiro20200801
...tablet stand with gen by yukihiro20200801
thingiverse
"gen", he is my cat.
thingiverse
free

MKS GEN L by mwsid
...mks gen l by mwsid
thingiverse
mks board gen l 3d project
thingiverse
free
Vaporesso Stand for GEN X by 3DKit
...vaporesso stand for gen x by 3dkit
thingiverse
simple vape stand for vaporesso gen x and gen s
thingiverse
free

TEFAL Steam Gen by Miguelfc
...tefal steam gen by miguelfc
thingiverse
replacement part for tefal steam gen dial rotating dial holder
thingiverse
free

Apple Pencil 2nd Gen
...se
simply an apple pencil 2nd gen
enjoy!
eth: 0x40a6a19c00e0c9cd9dc43e4a3d094983653a3152
btc: 1koukp6tpbyckha8loyd1eieidw578ifbv
thingiverse
free

MKS Gen v1.4 case by Mics78
...mks gen v1.4 case by mics78
thingiverse
mks gen v1.4 case.
thingiverse
free

Mask Band with Gen (v3) by yukihiro20200801
...mask band with gen (v3) by yukihiro20200801
thingiverse
mask band with gen (v3)
Makerbot
thingiverse
free

MakerBot Mixtape by MakerBot
...t.com/makerbot-mixtape.html
designed by john b., matt k. and john d.
a collaborative project with playbutton
www.playbutton.com
thingiverse
free

MakerBot Nameplate by MakerBot
...plicator. this was seen in episode 5 of season 2 of makerbot tv http://www.youtube.com/watch?v=k815gaeelw8
created by todd blatt
thingiverse
free

Makerbot Mixtape Heart by MakerBot
... about a makerbot mixtape in a heart!
made by using the makerbot mixtape negative file
designed by john briscella and matt kroner
thingiverse
free

MakerBot Gnome by MakerBot
...at details that were not lost.
for more information on the makerbot digitizer desktop 3d scanner, visit makerbot.com/digitizer.
thingiverse
free
Makerbot Skate Park by MakerBot
...makerbot skate park by makerbot
thingiverse
a complete fingerboarding skate park.
thingiverse
free
MakerBot BotStep17 REVE by MakerBot
...esigned by harry mulliken.
this is part of the makerbot replicator, which you can find at http://www.thingiverse.com/thing:18813
thingiverse
free
Makerbot Mixtape Negative by MakerBot
...ngiverse
now your can make a makerbot mixtape out of almost any thing on thingiverse.
designed by john briscella and matt kroner
thingiverse
free
MakerBot Man Cupid by MakerBot
...piece at once and get moving parts right off the build plate.
available in the makerbot store gumball machine for a limited time!
thingiverse
free
MakerBot Pendant by MakerBot
...39;t go wrong sporting this necklace! wear it with pride. both dualstrusion and one color models are available.
created by todd
thingiverse
free
MakerBot Dynamo by MakerBot
...
and if a led not exciting enough for you, just think of all the other wonderful things you can power, one hand crank at a time.
Heated
thingiverse
free
NFS Heat
...nfs heat
thingiverse
nfs heat
thingiverse
free
heat by syalovitser
...heat by syalovitser
thingiverse
the miami heat logo. made in printcraft. james,bosh and wade!
thingiverse
free
Heating Rosette by Achiim
...ed stl is designed for standard heating sizes. but you can change the size of your heating rosette by changing the uploaded scad.
thingiverse
free

Heat bed 8x10 glass to 6x9 heat bed by hobbit1968
...heat bed 8x10 glass to 6x9 heat bed by hobbit1968
thingiverse
heat bed, 8x10 glass to 6x9 heat bed.
thingiverse
free

Heat-Tower by JMDesigns
...heat-tower by jmdesigns
thingiverse
heat-tower
thingiverse
free
heating key
...ey
thingiverse
this is a key to vent the heating in the house i hope you enjoy it.
follow me in instagram for more: 3d_print2018
thingiverse
free

Heating faucet by Woodruff
...heating faucet by woodruff
thingiverse
heating faucet replacement
thingiverse
free

Heated Bed by AnyWay
...heated bed by anyway
thingiverse
simple heated bed.
thingiverse
free

Heat Bed to Heat Chamber Adapter-6 fan by 3DCDN
...y 3dcdn
thingiverse
i made this adapter so that i could inject heat generated from my heat bed into the 3d printer heat chamber.
thingiverse
free

heat logo by LeeroyLeBG
...heat logo by leeroylebg
thingiverse
heat logo for 3d printer
Bed
thingiverse
free

bed by
...bed by
thingiverse
pink bed with a white pillow
thingiverse
free

Kossel Plus bed holder for aluminium bed with glass bed
...kossel plus bed holder for aluminium bed with glass bed
thingiverse
pla
thingiverse
free

bed by Syzguru11
...bed by syzguru11
thingiverse
bed
thingiverse
free

bed by callsaul
...bed by callsaul
thingiverse
bed
thingiverse
free
BED by leonk
...bed by leonk
thingiverse
bed
thingiverse
free

Bed by FaserMok
...bed by fasermok
thingiverse
bed
thingiverse
free

Bed by alexdfox
...bed by alexdfox
thingiverse
bed maker
thingiverse
free

bed stanchion
...bed stanchion
thingiverse
top of a bed stanchion
thingiverse
free
bed by bhawkinscds
...bed by bhawkinscds
thingiverse
four post bed
thingiverse
free

bed by EricG
...bed by ericg
thingiverse
bed by eric [created on 3dtin]
thingiverse
free
for print by Kieran20
...for print by kieran20
thingiverse
for printing :)
thingiverse
free

Test Print - Calibration Print by fischer99
...nt settings. includes bridge, overhang, square walls and round walls.
i print with 20% infill, 3 shells, skirt only, no support.
thingiverse
free

Printing by munchanc
...printing by munchanc
thingiverse
things to print
thingiverse
free
Test Print
...test print
thingiverse
much fun by printing
thingiverse
free
Print test
...print test
thingiverse
i use it to test print parameters for new materials
thingiverse
free

PRINTED by t_kondo
...printed by t_kondo
thingiverse
it's just a 3d printing typeface test.
thingiverse
free

3D Printed ball (Print Your own) by 001002003004
...3004
thingiverse
print your own ball
steps
download the size you want to print
double click on the file
click print
thingiverse
free

3d Printing Support Test Print
...can learn more about using supports in cura on the drvax youtube channel and by watching this video:
https://youtu.be/qko_ayibp8k
thingiverse
free
Print on Fabric - small test print by OeG3D
...ingiverse
we tried to print on fabric as shown in https://www.thingiverse.com/thing:2787803
use the link above for instructions.
thingiverse
free

Print Scoop by Gibson1990
...print scoop by gibson1990
thingiverse
scoop for lifting 3d prints off the print bed