Thingiverse
Magnetic Stir Plate - PC Fan & PWM Speed Controller by thehebs
by Thingiverse
Last crawled date: 3 years ago
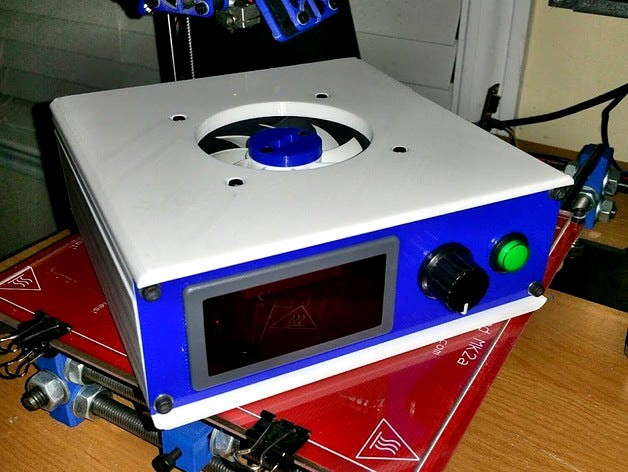
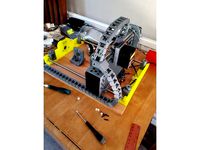
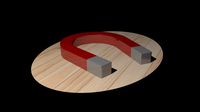
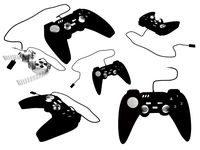
This is a DIY Magnetic Stir Plate. I personally will use this for making yeast starters for home brewing beer. Others use them to make E Liquid for ecigs. The magnetic puck on the pc fan spins a magnetic stir bar which can be placed in any flat bottomed container. The stir bar spins, creating a vortex which mixes liquids extremely well.
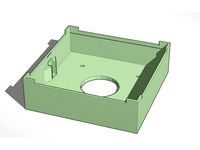
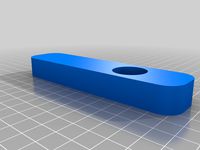
Note: Be sure to orient the files correctly. I just exported them straight out of the SKP in the orientation they were in.
https://www.youtube.com/watch?v=ZQPAgM_KiDU
I used an 80mm fan, pwm speed controller, and some little .7" x .11" neo magnets.
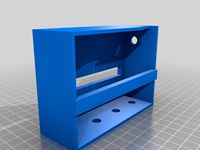
Note: This is a rather large print... The top piece took me 7.5 hours, main body took 12.5 hours, the front and rear plates took 1 hour each, and the magnet puck takes about 15 minutes.
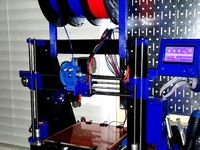
I printed with 3 perims, .25 layer height (.3 first layer), 40% infill, 35 mm/s perims, 40/mm/s infill, on a DIY i3 with e3dv6.
Fan: http://amzn.to/2lh3rBo
Controller: http://www.ebay.com/itm/141645156384
Power Supply: http://amzn.to/2lh3hdc
Power Supply Jack: http://www.ebay.com/itm/271757190320
Magnets: http://www.homedepot.com/p/MASTER-MAGNETICS-0-7-in-Neodymium-Rare-Earth-Magnet-Discs-3-per-Pack-07047HD/202526369
Stir Bar Kit: http://amzn.to/2lh4gdw
I used M3 x 40mm socket cap machine screws, nuts, and washer for the fan, and M3 x 22 socket cap machine screws and washers to mount the front and rear plates.
I personally used binding posts in the rear plate to connect some little banana plug leads to my bench top PSU. Feel free to request any kind of changes to the rear plate for various power options, or the front plate for different types of controllers and displays.
CHANGELOG:
3/12/2016 - The stir plate is complete and I have tested to make sure the fan works, etc... but I have not tested it out with a erlenmeyer flask, stir bar, and liquids yet. My flask should arrive late next week, and I will upload video of the test when complete.
3/17/2016 - I got my 5L flask in today and tested the stir plate. The magnets I was using were too small, at least for my biggest stir bar. It kept throwing the bar to the outside. I ran to home depot and bought some .7" DIA x .11" thick rare earth super magnets and remixed my magnet puck. I still had issues with the biggest stir bar, but then I tried the second largest stir bar and it worked extremely well. I got a decent vortext at 25% on the PWM controller, and it just got better all the way up to 100%. I also added some little rubber feet to the bottom of the stir plate for vibration dampening. I would also like to note that I didnt even glue the magnet puck to the fan. The magnets are strong enough to stick to the fan magnetically.
7/23/2016 - I remixed the rear plate to fit a 5mm 12v jack. See parts list above.
8/2/2016 - I modified the top plate by adding a .25mm support layer for the socket cap screw head recess holes so that they print cleaner. Take a hobby knife and cut them out.
8/29/2016 - I modified the front and rear plates to making them .25mm short on top and bottom.
Thread on HomebrewTalk.com: http://www.homebrewtalk.com/showthread.php?t=575715
Note: Be sure to orient the files correctly. I just exported them straight out of the SKP in the orientation they were in.
https://www.youtube.com/watch?v=ZQPAgM_KiDU
I used an 80mm fan, pwm speed controller, and some little .7" x .11" neo magnets.
Note: This is a rather large print... The top piece took me 7.5 hours, main body took 12.5 hours, the front and rear plates took 1 hour each, and the magnet puck takes about 15 minutes.
I printed with 3 perims, .25 layer height (.3 first layer), 40% infill, 35 mm/s perims, 40/mm/s infill, on a DIY i3 with e3dv6.
Fan: http://amzn.to/2lh3rBo
Controller: http://www.ebay.com/itm/141645156384
Power Supply: http://amzn.to/2lh3hdc
Power Supply Jack: http://www.ebay.com/itm/271757190320
Magnets: http://www.homedepot.com/p/MASTER-MAGNETICS-0-7-in-Neodymium-Rare-Earth-Magnet-Discs-3-per-Pack-07047HD/202526369
Stir Bar Kit: http://amzn.to/2lh4gdw
I used M3 x 40mm socket cap machine screws, nuts, and washer for the fan, and M3 x 22 socket cap machine screws and washers to mount the front and rear plates.
I personally used binding posts in the rear plate to connect some little banana plug leads to my bench top PSU. Feel free to request any kind of changes to the rear plate for various power options, or the front plate for different types of controllers and displays.
CHANGELOG:
3/12/2016 - The stir plate is complete and I have tested to make sure the fan works, etc... but I have not tested it out with a erlenmeyer flask, stir bar, and liquids yet. My flask should arrive late next week, and I will upload video of the test when complete.
3/17/2016 - I got my 5L flask in today and tested the stir plate. The magnets I was using were too small, at least for my biggest stir bar. It kept throwing the bar to the outside. I ran to home depot and bought some .7" DIA x .11" thick rare earth super magnets and remixed my magnet puck. I still had issues with the biggest stir bar, but then I tried the second largest stir bar and it worked extremely well. I got a decent vortext at 25% on the PWM controller, and it just got better all the way up to 100%. I also added some little rubber feet to the bottom of the stir plate for vibration dampening. I would also like to note that I didnt even glue the magnet puck to the fan. The magnets are strong enough to stick to the fan magnetically.
7/23/2016 - I remixed the rear plate to fit a 5mm 12v jack. See parts list above.
8/2/2016 - I modified the top plate by adding a .25mm support layer for the socket cap screw head recess holes so that they print cleaner. Take a hobby knife and cut them out.
8/29/2016 - I modified the front and rear plates to making them .25mm short on top and bottom.
Thread on HomebrewTalk.com: http://www.homebrewtalk.com/showthread.php?t=575715
Similar models
thingiverse
free

Components for Stir Plate by rpgonzo
... weight of large flasks on top.
magnet cradle to hold the magnets that will control the stir bar.
simple box to contain it all.
thingiverse
free
Stir Plate by josephnkho
...a stir plate by building my own.
i recommend gluing the plate to the fan or else it will throw the bar constantly when it shifts.
thingiverse
free

Stir Plate by vanadaar
...ring case fan, 80mm pwm speed control, 31cfm at 22.5dba
12v ac power adapter for maxtor onetouch ii iii hdd,3100 personal storage
thingiverse
free

Simple stir plate by heybeerman04
...e but it's pretty simple. you may have to resize based on the fan you use because the lip has to sit just above the magnets.
thingiverse
free

Magnetic Stirplate by Makake
...fan (pwm controllable)
1 x 12v wall-plug power supply
2 x dia10mmx5mm neodymium magnets
1 x cat for quality assurance. (optional)
thingiverse
free

120mm Fan Magnetic Stir Bar Bracket by Brettarm
...
thingiverse
120mm fan magnetic stir bar bracket
you will need:
1 x 7 blade 120mm fan
2 x 9mm cube magnet
1 x 70mm long stir bar
thingiverse
free

Capsule type Stir Bar by PocketBrain
...ide one. great companion for my stir plate!
let me know if you want different size capsules, or to use different size magnets.
thingiverse
free

Stir Plate / Resin Print Washer Project by inventgeek
...k frame with flanges x 48"https://amzn.to/3dtn2kg
80/20 inc, 9250, quick frame 3 way corner connectorhttps://amzn.to/3dtnusa
thingiverse
free

Stir Bar Catcher by kingbubbatruck
... fermenter.
print with petg. i tried pla, but it snapped. the petg is flexible enough to hold onto the flask without breaking.
thingiverse
free

The BrewStir. It's a magnetic stir plate for homebrew. by PocketBrain
...o use as a speed controller.
try this out with my stir bar. or don't; a real stir bar is best and they can be had for cheap.
Thehebs
thingiverse
free

Parts Drawer - Open Hardware Logos by thehebs
... remix of the parts drawer main body, with open hardware logos recessed into it .25mm
see the remix source files for the drawers.
thingiverse
free

Beer Faucet Shank Spacer by thehebs
...ezer using 2x4's, and i used this spacer to prevent the lid of the freezer from hitting the tap handles upon opening/closing.
thingiverse
free

Temperature Test Tower by thehebs
...ach 10mm section to find the best temperature.
see tom's video for more details: https://www.youtube.com/watch?v=fsopsriiozk
thingiverse
free

Pegboard Loc Line Ball Mount by thehebs
...rue&ref_=oh_aui_detailpage_o03_s00
you can actually unsnap and snap sections apart/together to make them different lengths.
thingiverse
free

Ramps 1.4 Box - Remix - Open Hardware Logo's by thehebs
...l graphics controller board, added holes for graphics controller ribbon cables, added 2mm to screw hole depth to fit 14mm screws.
thingiverse
free

STC1000 Thermostat Temperature Control Box - Heat and Cool by thehebs
...7a-sp-l___?productid=1069901&pl=1&ntt=1107a
the print is pretty lengthy, but its has quite a bit of structural integrity.
thingiverse
free
Nice Guitar String Winder by thehebs
...end printing the body first to see if it fits on your guitar's tuner. feel free to request remixes/tweaks to fit your guitar.
thingiverse
free

40mm Extrusion PSU Mount by thehebs
... i added these files. let me know if you need a remix for a different one. i added some photos and i am marking this as complete.
thingiverse
free

Reprap Prusa I3 Rework - Parts Fan Mounts & Covers - 40mm by thehebs
...er to the extruder mounts. the extruder mounts simply bolt up using the hotend screws.
post a comment if you want the skp's.
thingiverse
free
ThinkyHead's i3 Printable Spool Holder - Extended 40mm - Misc Part Tweaks by thehebs
...e so much material from the top of the beams. i also adjusted the size of the spool adapter to fit better in my hatchbox spools.
Stir
3d_ocean
$4

Realistic Vortex Splash
...fluid frost paint realflow round simulation sphere splash stir stiring swirl symetrical vortex water here is another fluid like...
3d_export
$35

don frog
...don frog 3dexport a frog/toad without a skeleton for stiring on the ground or 3d printing. polys=789306. points=787170. the...
3d_export
$10
Fire Poker 3D Model
...tools indoor antique rod classic stick coal wood fuel stir slice tongs fire poker 3d model download .c4d .max...
3d_export
$6
Kitchen Wok 3D Model
...cook round bottomed vessel chef utensils cookware chinese asia stir frying steaming pan pot deep boil kitchenware kitchen wok...
3d_export
$29
Chemical Glass Reactor
...3dexport hd model of chemical glass reactor it can stir and react under the natural pressure or negative pressure...
3ddd
$1
Eichholtz - Trolley Beverly Hills
...stainless steel drinks trolley. cause a shake and a stir as your entertain in style with the eichholtz beverly...
3ddd
free

Картины Ralf Lauren - Timeless Images
...leg 14 - guggenheim window 15 - shaken not stired roger moore 16 - make-up mirror 17 - paul...
3ddd
$1

HAY Mags Soft Sofa
...and that is its great strength. never shaken, never stired. mags can be more or less stringent, depending on...
3d_export
$946

WG 0005 - Cultivator of continuous processing 300cm
...the soil as they are dragged through it linearly.<br>cultivators stir and pulverize the soil before planting (to aerate the...
thingiverse
free

Paint Stir Stick by EmilDV
...paint stir stick by emildv
thingiverse
small paint stir stick for arts & crafts.
Pwm
thingiverse
free

pwm enclousure
...pwm enclousure
thingiverse
pwm enclousure
thingiverse
free
pwm enclousure
...pwm enclousure
thingiverse
pwm enclousure
3dfindit
free

pwm
...pwm
3dfind.it
catalog: a&t
thingiverse
free

VEX PWM by cronosmx
...vex pwm by cronosmx
thingiverse
base para pwm vex
thingiverse
free
Caja regulador PWM led - PWM led regulator box
...www.amazon.es/gp/product/b01frqv794/ref=ppx_yo_dt_b_search_asin_title?ie=utf8&psc=1
https://www.instagram.com/tecnotalayotic/
thingiverse
free

PWM Board Mount by JedidiahStolzfus
...pwm board mount by jedidiahstolzfus
thingiverse
mount for the popular pwm board used for robots.
thingiverse
free
PWM Case by telboy2002
...ase for pwm controller on a laser machine.
goes well with my laser engraver available athttps://www.thingiverse.com/thing:2912591
thingiverse
free

KNACRO PWM-to-Voltage Module
... knacro pwm-to-voltage module 0% -100% pwm converted to 0-10v voltage. amazon item https://www.amazon.com/gp/product/b06xb6j4fv/
thingiverse
free

pwm wire clip by masterb
...pwm wire clip by masterb
thingiverse
keeps pwm wires organized attaches via zip tie on bottom
thingiverse
free

PWM A20 Case by lacrimosa2k2
...e pwm controller (pwm-a20).
the lid holds without screws.
the knob must be inserted first, then the oblique slide board including
Magnetic
3d_ocean
$2

Magnet
...magnet 3docean 3d 3ds max electric magnet magnetic magnetism max model polygon realistic tesla magnet created in...
turbosquid
$6
Magnet
...
turbosquid
royalty free 3d model magnet for download as obj on turbosquid: 3d models for games, architecture, videos. (1548733)
turbosquid
$6

magnet
...uid
royalty free 3d model magnet for download as 3dm and max on turbosquid: 3d models for games, architecture, videos. (1670606)
turbosquid
$1

Magnet
...y free 3d model magnet for download as 3ds, max, obj, and fbx on turbosquid: 3d models for games, architecture, videos. (1215037)
turbosquid
$7

Magnet
...agnet for download as blend, unitypackage, fbx, gltf, and obj on turbosquid: 3d models for games, architecture, videos. (1576588)
3d_export
$5

magnetic knife holder
...magnetic knife holder
3dexport
ordinary magnetic knife holder
archive3d
free

Fridge magnet 3D Model
...3d model archive3d refrigerator magnet fridge magnet magnet toy magnetic s n280712 - 3d model (*.3ds) for interior 3d...
turbosquid
$35

Magnetic butterflies
...alty free 3d model magnetic butterflies for download as blend on turbosquid: 3d models for games, architecture, videos. (1315792)
turbosquid
$2
Magnetic Board
...quid
royalty free 3d model magnetic board for download as ma on turbosquid: 3d models for games, architecture, videos. (1264141)
turbosquid
$977
Magnetic Lego
...oyalty free 3d model magnetic lego for download as ma and obj on turbosquid: 3d models for games, architecture, videos. (1142761)
Pc
archibase_planet
free
PC
...pc
archibase planet
pc case pc tower pc equipment system unit
pc - 3d model (*.gsm+*.3ds) for interior 3d visualization.
3d_export
free
Pc
...pc
3dexport
pc
archibase_planet
free

PC
...pc
archibase planet
notebook pc computer equipment
pc - 3d model (*.gsm+*.3ds) for interior 3d visualization.
archibase_planet
free
PC
...pc
archibase planet
system unit pc equipment
pc - 3d model (*.gsm+*.3ds) for interior 3d visualization.
archibase_planet
free

PC
...pc
archibase planet
pc equipment cabinet system unit
pc 70 - 3d model (*.gsm+*.3ds) for interior 3d visualization.
3d_export
$5
pc
...pc
3dexport
computer
archibase_planet
free
PC
...pc
archibase planet
cabinet chassis system unit
pc case n241107 - 3d model (*.gsm+*.3ds) for interior 3d visualization.
turbosquid
$3

PC
...id
royalty free 3d model pc for download as ma, obj, and fbx on turbosquid: 3d models for games, architecture, videos. (1159175)
turbosquid
$7

lap top ,pc portable, PC
...ty free 3d model lap top ,pc portable, pc for download as c4d on turbosquid: 3d models for games, architecture, videos. (1352084)
turbosquid
$100
PC
... available on turbo squid, the world's leading provider of digital 3d models for visualization, films, television, and games.
Speed
turbosquid
$50

speed
... available on turbo squid, the world's leading provider of digital 3d models for visualization, films, television, and games.
turbosquid
$50

speed
... available on turbo squid, the world's leading provider of digital 3d models for visualization, films, television, and games.
turbosquid
free

speed
... available on turbo squid, the world's leading provider of digital 3d models for visualization, films, television, and games.
3d_ocean
$8

Speed Camera
...model is separate and named appropriately. this is perfect for any type of scene from a road side, architectural or motorway s...
turbosquid
$25

Speed Buggy
...urbosquid
royalty free 3d model speed buggy for download as on turbosquid: 3d models for games, architecture, videos. (1209512)
turbosquid
$4

Speed Sign
...turbosquid
royalty free 3d model speed sign for download as on turbosquid: 3d models for games, architecture, videos. (1251518)
3d_export
$10
variable speed bicycle
...variable speed bicycle
3dexport
variable speed bicycle
3d_export
$5
High - speed aircraft
...high - speed aircraft
3dexport
high speed plane
turbosquid
$185

Speed Boat
... free 3d model speed boat for download as skp, blend, and obj on turbosquid: 3d models for games, architecture, videos. (1606216)
turbosquid
$5
Speed bag
...y free 3d model speed bag for download as blend, obj, and stl on turbosquid: 3d models for games, architecture, videos. (1577878)
Fan
3d_export
$5

fan
...fan
3dexport
fan 3d model, table fan, fan, electric fan, ventilator
archibase_planet
free

Fan
...fan
archibase planet
fan large fan
fan out n260707 - 3d model for interior 3d visualization.
archibase_planet
free

Fan
...fan
archibase planet
fan ceiling fan ventilator
fan stealth n300615 - 3d model (*.gsm+*.3ds) for interior 3d visualization.
3d_export
$15

fan
...fan
3dexport
is an ancient fan
3ddd
$1

Fan-C-Fan by marco gallegos
...n-c-fan by marco gallegos
3ddd
вентилятор , marco gallegos
fan-c-fan by marco gallegos
3d_export
$10

fan
...fan
3dexport
a detailed fan designed for home or space blowing is now available for only 19.99!
turbosquid
$1

Fan
...fan
turbosquid
free 3d model fan for download as on turbosquid: 3d models for games, architecture, videos. (1427865)
turbosquid
$14

Fan
...fan
turbosquid
royalty free 3d model fan for download as on turbosquid: 3d models for games, architecture, videos. (1415642)
3ddd
$1

Светильник Fan
...светильник fan
3ddd
fan , italamp
светильник fan, производитель italamp
turbosquid
$25

Fan
...fan
turbosquid
royalty free 3d model fan for download as c4d on turbosquid: 3d models for games, architecture, videos. (1483246)
Controller
3d_ocean
$4
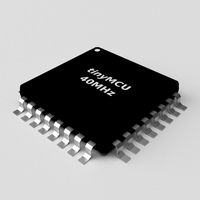
Controller TQFP32
...qfp32
3docean
chip controller cpu electronic gpu mcu micro controller silicon smd tqfp wafer
a micro controller in tqfp32 package
3d_ocean
$4
Controller TQFP44
...44
3docean
chip controller cpu electronic gpu mcu micro controller package smd tqfp tqfp44
a micro controller in a tqfp44 package
3d_export
$15
control unit
...control unit
3dexport
control unit
3ddd
$1
Yacht control
...yacht control
3ddd
yacht control
3d_export
$5
controle pgdm
...controle pgdm
3dexport
carcaca controle pgdm
turbosquid
free
controler
... available on turbo squid, the world's leading provider of digital 3d models for visualization, films, television, and games.
3ddd
$1

Control
...
http://www.schmitz-leuchten.de/html-ru/einzelleuchten-lampentyp-details.php?lamptype_no=700&group;=917&id;=731
3d_ocean
$4
Controller TQFP100
...100
3docean
chip computer cpu electronic gpu mcu micro controller pin platine silicon wafer
a micro controller in tqfp100 package
3d_ocean
$4
Controller TQFP64
...qfp64
3docean
chip computer cpu gpu mcu micro controller package silicon tqfp tqfp64 wafer
a micro controller in a tqfp64 package
3d_ocean
$7

Remote controller
... control switcher tv remote
remote controller for tv, sound systems etc easy to edit textures photo real rendered with mental ray
Plate
archibase_planet
free
Plates
...plates
archibase planet
plates and dishes plate
plates - 3d model (*.gsm+*.3ds) for interior 3d visualization.
3d_export
$5

plate
...plate
3dexport
plate
archibase_planet
free
Plates
...plates
archibase planet
plates and dishes plate kitchen ware
plates - 3d model (*.gsm+*.3ds) for interior 3d visualization.
archibase_planet
free
Plates
...plates
archibase planet
plate plates and dishes crockery
plates 2 - 3d model (*.gsm+*.3ds) for interior 3d visualization.
archibase_planet
free
Plate
...plate
archibase planet
dinner-plate plate kitchen ware
plate n070808 - 3d model (*.gsm+*.3ds) for interior 3d visualization.
3d_export
$6

plate
...plate
3dexport
design of plate
3d_export
$5

plate
...plate
3dexport
plate lowpoly
archibase_planet
free
Plates
...plates
archibase planet
plate dish kitchen-ware
plate - 3d model for interior 3d visualization.
3ddd
$1
Plates
...plates
3ddd
полка , тарелка
african plates
archibase_planet
free
Plate
...plate
archibase planet
plate kitchen ware
plate - 3d model (*.gsm+*.3ds) for interior 3d visualization.