Thingiverse
Magnetic Lithophane Holder by andrew620
by Thingiverse
Last crawled date: 3 years ago
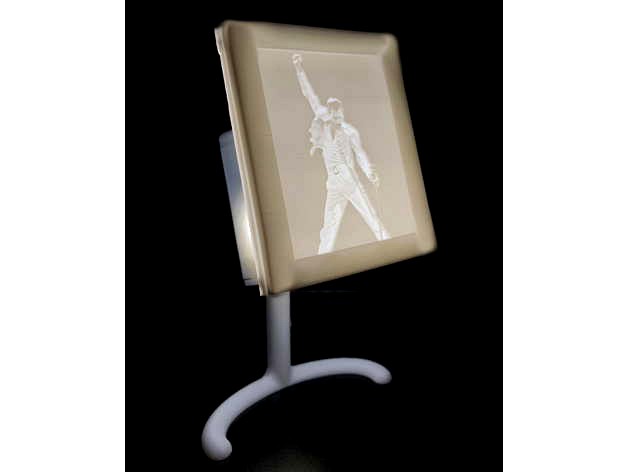
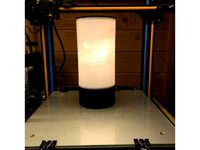
Swappable Magnetic Lithophane Holder
1) Materials needed
2) Tutorial to assemble stand
3) Lithophane tutorial
4) Notes
1) MATERIALS NEEDED:
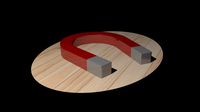
1/4 x 1/16 inch magnets (100 for $7, I used 8 for each lithophane and 8 in stand)
USB LED keychain (10 for $5 | There are smaller packs but these were a good value)
USB extension cable (4 for $5 | Same as above, good value)
Under 50g filament for stand (about $1)
About 20g filament for each additional lithophane (about $0.50)
-Total cost with what I bought: $20 + tax
-Bare minimum if purchasing only what's necessary for one: About $7-8
If you order exactly what I bought, you can make the stand and about 11 lithophanes with 9 extra USB LED keychains and 3 extra cables that can be used for lighting other projects.
(8 magnets for stand + 8 for each lithophane makes 11 lithophanes / 96 magnets)
Links to the listings I got mine from:
Magnets: https://www.ebay.com/itm/163328071279?ssPageName=STRK%3AMEBIDX%3AIT&_trksid=p2060353.m2749.l2649
USB LEDs: https://www.ebay.com/itm/152806606249?ssPageName=STRK%3AMEBIDX%3AIT&_trksid=p2060353.m2749.l2649
USB Extension Cable: https://www.ebay.com/itm/302502564362?ssPageName=STRK%3AMEBIDX%3AIT&_trksid=p2060353.m2749.l2649
2) BUILD TUTORIAL
a. Print all of the pieces included. There is a trapezoidal section on the base and top half that stick together because it's easier to print the pieces separately. You won't see where they join when it's done. Note that depending on the bridging capabilities of your printer, you may have some sagging along the top where the lithophane attaches if you don't print using support. I haven't found this as an issue and I generally just sand or shave it down. It's barely noticeable and when there's a lithophane attached you don't see it at all--worth the saved filament in my opinion.
b. Put two magnets in each hole in the top half of the stand for a total of eight. Polarity doesn't matter, but keep it consistent among the four holes. They fit tightly, but hot glue helps to keep them in the holes and the magnets themselves attached to each other. If the holes are too small based on your printer clearances, you can try to sand or shave down the inside of the hole.
c. Put the USB extension cable and USB LED keychain inside of the top half. It isn't a snug fit, but you can hot glue it in there. Route the cable along the channel on the back. Again, not a tight fit in order to keep the cable from getting damaged, but hot glue keeps it down nicely.
d. The cap file allows you to cover up the top where the cable comes out. You don't really see it regardless, but it's a nice touch to make it more finished.
Note: adding mounting tape to the bottom of the stand helps to keep it stuck to a surface.
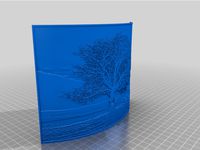
3) PRINTING THE LITHOPHANE
a. Head to https://lithophanemaker.com/Framed%20Lithophane.html
b. Upload your image, making sure it is 8x10 aspect ratio.
c. You'll want to make sure you're printing it with "No Border" as we'll add one after we create the STL.
d. I used 0.2mm resolution, 56mm x 70mm width and height, respectively, and left everything else as default. It works great for me, but you can toy around with these if you'd like to find out what gives you the best results.
e. I used Fusion360 to add the border around the lithophane. Open the "Frame STL" and insert your lithophane STL from lithophanemaker.com
f. Merge the bodies together. The frame is thicker than the lithophane, so you can position it wherever you want depth-wise, but length and width should fit perfectly.
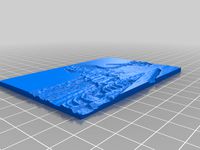
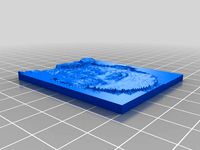
g. Print the lithophane in your slicer software. For my Ender 3 Pro, I have found 4 walls, 0.1 layer height, print speeds about 35-40 mm/s, and no support works fine. I don't use any infill to save a bit of filament, but if you do a higher infill it may make it so that you don't see the silhouette of the magnets (see photos). You may also have issues depending on how great of bed adhesion you have because the surface area is very small, but I'm able to print just fine. Make sure the lithophane is oriented vertically (not down flat on the bed) and the long end going along the y axis. In other words, position it so that the bed is moving the most and not the nozzle so that you get the best quality.
h. After it's done, it is the same process as the stand. Put the magnets in the back (hot glue works great!) and most importantly MAKE SURE THE POLARITY IS CORRECT! Line up the magnets with the stand like they would be with the lithophane, and keep that orientation. They're a pain to get out and it's not going to work if they repel each other.
4) NOTES
a. The LED keychain can be powered via any USB power source, like a port on a computer, a phone charger wall adapter, a USB power bank, or anything else.
b. Making an image black and white before you upload it to Lithophane Maker helps you to see what it will look like when it prints. If the colors are too similar, there won't be enough contrast in the thickness. Not usually an issue, but it's good to double check.
c. I haven't made a specific design for one yet, but it's a nice touch to have something to store extra lithophanes on. Any magnetic surface will do as well.
1) Materials needed
2) Tutorial to assemble stand
3) Lithophane tutorial
4) Notes
1) MATERIALS NEEDED:
1/4 x 1/16 inch magnets (100 for $7, I used 8 for each lithophane and 8 in stand)
USB LED keychain (10 for $5 | There are smaller packs but these were a good value)
USB extension cable (4 for $5 | Same as above, good value)
Under 50g filament for stand (about $1)
About 20g filament for each additional lithophane (about $0.50)
-Total cost with what I bought: $20 + tax
-Bare minimum if purchasing only what's necessary for one: About $7-8
If you order exactly what I bought, you can make the stand and about 11 lithophanes with 9 extra USB LED keychains and 3 extra cables that can be used for lighting other projects.
(8 magnets for stand + 8 for each lithophane makes 11 lithophanes / 96 magnets)
Links to the listings I got mine from:
Magnets: https://www.ebay.com/itm/163328071279?ssPageName=STRK%3AMEBIDX%3AIT&_trksid=p2060353.m2749.l2649
USB LEDs: https://www.ebay.com/itm/152806606249?ssPageName=STRK%3AMEBIDX%3AIT&_trksid=p2060353.m2749.l2649
USB Extension Cable: https://www.ebay.com/itm/302502564362?ssPageName=STRK%3AMEBIDX%3AIT&_trksid=p2060353.m2749.l2649
2) BUILD TUTORIAL
a. Print all of the pieces included. There is a trapezoidal section on the base and top half that stick together because it's easier to print the pieces separately. You won't see where they join when it's done. Note that depending on the bridging capabilities of your printer, you may have some sagging along the top where the lithophane attaches if you don't print using support. I haven't found this as an issue and I generally just sand or shave it down. It's barely noticeable and when there's a lithophane attached you don't see it at all--worth the saved filament in my opinion.
b. Put two magnets in each hole in the top half of the stand for a total of eight. Polarity doesn't matter, but keep it consistent among the four holes. They fit tightly, but hot glue helps to keep them in the holes and the magnets themselves attached to each other. If the holes are too small based on your printer clearances, you can try to sand or shave down the inside of the hole.
c. Put the USB extension cable and USB LED keychain inside of the top half. It isn't a snug fit, but you can hot glue it in there. Route the cable along the channel on the back. Again, not a tight fit in order to keep the cable from getting damaged, but hot glue keeps it down nicely.
d. The cap file allows you to cover up the top where the cable comes out. You don't really see it regardless, but it's a nice touch to make it more finished.
Note: adding mounting tape to the bottom of the stand helps to keep it stuck to a surface.
3) PRINTING THE LITHOPHANE
a. Head to https://lithophanemaker.com/Framed%20Lithophane.html
b. Upload your image, making sure it is 8x10 aspect ratio.
c. You'll want to make sure you're printing it with "No Border" as we'll add one after we create the STL.
d. I used 0.2mm resolution, 56mm x 70mm width and height, respectively, and left everything else as default. It works great for me, but you can toy around with these if you'd like to find out what gives you the best results.
e. I used Fusion360 to add the border around the lithophane. Open the "Frame STL" and insert your lithophane STL from lithophanemaker.com
f. Merge the bodies together. The frame is thicker than the lithophane, so you can position it wherever you want depth-wise, but length and width should fit perfectly.
g. Print the lithophane in your slicer software. For my Ender 3 Pro, I have found 4 walls, 0.1 layer height, print speeds about 35-40 mm/s, and no support works fine. I don't use any infill to save a bit of filament, but if you do a higher infill it may make it so that you don't see the silhouette of the magnets (see photos). You may also have issues depending on how great of bed adhesion you have because the surface area is very small, but I'm able to print just fine. Make sure the lithophane is oriented vertically (not down flat on the bed) and the long end going along the y axis. In other words, position it so that the bed is moving the most and not the nozzle so that you get the best quality.
h. After it's done, it is the same process as the stand. Put the magnets in the back (hot glue works great!) and most importantly MAKE SURE THE POLARITY IS CORRECT! Line up the magnets with the stand like they would be with the lithophane, and keep that orientation. They're a pain to get out and it's not going to work if they repel each other.
4) NOTES
a. The LED keychain can be powered via any USB power source, like a port on a computer, a phone charger wall adapter, a USB power bank, or anything else.
b. Making an image black and white before you upload it to Lithophane Maker helps you to see what it will look like when it prints. If the colors are too similar, there won't be enough contrast in the thickness. Not usually an issue, but it's good to double check.
c. I haven't made a specific design for one yet, but it's a nice touch to have something to store extra lithophanes on. Any magnetic surface will do as well.
Similar models
thingiverse
free
Coin capsule tube 30mm and 33mm by jalla2000
...sspagename=strk%3amebidx%3ait
http://www.ebay.com/itm/182199967698?_trksid=p2060353.m2749.l2649&sspagename=strk%3amebidx%3ait
thingiverse
free

Earphone pad modification / Modification coussinet écouteur by 3D_CC_design
...x%3ait
padhttp://www.ebay.fr/itm/281669764696?_trksid=p2060353.m2749.l2649&var=580675186733&sspagename=strk%3amebidx%3ait
thingiverse
free

Headlamp Rev 3 by shaunmonster
...ll bits tool 0.3mm to 1.2 mm (http://www.ebay.ca/itm/361251633854?_trksid=p2060353.m2749.l2649&sspagename=strk%3amebidx%3ait)
thingiverse
free
DIY 1s Charger / 1s Lader by zaphi
...strk%3amebidx%3ait
power suply:http://www.ebay.de/itm/221961044643?_trksid=p2057872.m2749.l2649&sspagename=strk%3amebidx%3ait
thingiverse
free
5" Retro Raz by Clpetrey
....
this was very fun to build. i think i have everything on here that i used in the build. if i'm missing anything let me know
thingiverse
free

magnet saucepan lid holder for IKEA drawer / support magnetique couvercle pour tiroire IKEA by 3D_CC_design
...dx%3ait
orhttp://www.ebay.fr/itm/311146851253?_trksid=p2060353.m2749.l2649&var=610357121659&sspagename=strk%3amebidx%3ait
thingiverse
free

solar panel mounting bracket by stephenmhall
...50x86x3mm 5v panel from ebayhttp://www.ebay.co.uk/itm/281893744489?_trksid=p2060353.m2749.l2649&sspagename=strk%3amebidx%3ait
thingiverse
free
GaPa Radio32 (KaRadio32) by yamaha_xg
...onverter-step-down-module-adjustable-3v-5v-16v-for-rc/221890985028?sspagename=strk%3amebidx%3ait&_trksid=p2060353.m2749.l2649
thingiverse
free

VonHaus 44 Drawer Organiser Sub-Drawers ! by add1ct3dd
... for this : http://www.ebay.co.uk/itm/282121893575?_trksid=p2060353.m2749.l2649&sspagename=strk%3amebidx%3ait
that's it..
thingiverse
free

LED light for mini mill by frank1927
...tf8&qid=1430778693&sr=1-1&keywords=applied+magnets+%c2%ae+100+rare+earth+neodymium+magnets+1%2f4%22+x+1%2f16%22+discs
Andrew620
thingiverse
free
Soundbar Stand for Bose Solo 500 by andrew620
...soundbar stand for bose solo 500 by andrew620
thingiverse
elevates and angles the bose solo 500 soundbar.
thingiverse
free

Monoprice Mini Delta Cable Clip by andrew620
...monoprice mini delta cable clip by andrew620
thingiverse
clips onto the side of any side of the monoprice mini delta
thingiverse
free

Christmas Light Stake Insert Replacement by andrew620
...candy cane lights, jumbo bulb pathway lights, and more. named online as "enchanted forest® replacement stakes - 3 pack"
thingiverse
free

Flat Blank Cherry MX Keycap by andrew620
...ketches of different logos in fusion360 and extruded them to make them 3d. then, in cura, i put them on top of the blank keycaps.
thingiverse
free

Accessory Connector Dust Cover For Motorola (No Text) by andrew620
...cessory connector dust cover for motorola xts-1500, xts-2500, xts-3000 ,xts-5000" except i removed the text from the object.
thingiverse
free
Monoprice Mini Delta Side Clip for Modular Mounting System by andrew620
...le getting it on, try playing with it in fusion to get it large enough to get on but small enough to stay tight against the frame
Lithophane
3d_export
free

lithophane of elfen lied
...lithophane of elfen lied
3dexport
elfen lied lithophane free
turbosquid
$25
Table Lamp (Bamboo Motif Lithophane Accent - Model 015)
... available on turbo squid, the world's leading provider of digital 3d models for visualization, films, television, and games.
thingiverse
free

at at lithophane by philip3dprinter
...at at lithophane by philip3dprinter
thingiverse
at at lithophane
thingiverse
free
Lithophane universe
...lithophane universe
thingiverse
it is a lithophane if the universe
thingiverse
free
Lithophane Moon
...lithophane moon
thingiverse
lithophane moon
thingiverse
free
Lithophane Sphinx
...lithophane sphinx
thingiverse
lithophane sphinx
thingiverse
free

Lithophane NewYork
...lithophane newyork
thingiverse
lithophane newyork
thingiverse
free
Lithophane by sromanos
...lithophane by sromanos
thingiverse
experimenting with lithophanes
thingiverse
free
Tree Lithophane
...tree lithophane
thingiverse
a lithophane of a tree
thingiverse
free

Toyota Lithophane
...toyota lithophane
thingiverse
toyota lithophane logo print.
Magnetic
3d_ocean
$2

Magnet
...magnet 3docean 3d 3ds max electric magnet magnetic magnetism max model polygon realistic tesla magnet created in...
turbosquid
$6
Magnet
...
turbosquid
royalty free 3d model magnet for download as obj on turbosquid: 3d models for games, architecture, videos. (1548733)
turbosquid
$6

magnet
...uid
royalty free 3d model magnet for download as 3dm and max on turbosquid: 3d models for games, architecture, videos. (1670606)
turbosquid
$1

Magnet
...y free 3d model magnet for download as 3ds, max, obj, and fbx on turbosquid: 3d models for games, architecture, videos. (1215037)
turbosquid
$7

Magnet
...agnet for download as blend, unitypackage, fbx, gltf, and obj on turbosquid: 3d models for games, architecture, videos. (1576588)
3d_export
$5

magnetic knife holder
...magnetic knife holder
3dexport
ordinary magnetic knife holder
archive3d
free

Fridge magnet 3D Model
...3d model archive3d refrigerator magnet fridge magnet magnet toy magnetic s n280712 - 3d model (*.3ds) for interior 3d...
turbosquid
$35

Magnetic butterflies
...alty free 3d model magnetic butterflies for download as blend on turbosquid: 3d models for games, architecture, videos. (1315792)
turbosquid
$2
Magnetic Board
...quid
royalty free 3d model magnetic board for download as ma on turbosquid: 3d models for games, architecture, videos. (1264141)
turbosquid
$977
Magnetic Lego
...oyalty free 3d model magnetic lego for download as ma and obj on turbosquid: 3d models for games, architecture, videos. (1142761)
Holder
archibase_planet
free

Holder
...holder
archibase planet
holder toilet paper holder
holder paper n070712 - 3d model (*.gsm+*.3ds) for interior 3d visualization.
archibase_planet
free

Holder
...e planet
holder rack toilet paper holder
holder toilet roll n240715 - 3d model (*.gsm+*.3ds+*.max) for interior 3d visualization.
archibase_planet
free

Holder
...holder
archibase planet
pen holder support prop
pen holder - 3d model for interior 3d visualization.
archibase_planet
free

Holder
...holder
archibase planet
pole post holder
сhurch cross pole holder - 3d model for interior 3d visualization.
archibase_planet
free

Holder
...holder
archibase planet
holder bathroom ware
shower holder - 3d model (*.gsm+*.3ds) for interior 3d visualization.
archibase_planet
free

Holder
...oilet paper holder
holder paper devon&devon; time black n241113 - 3d model (*.gsm+*.3ds+*.max) for interior 3d visualization.
archibase_planet
free

Holder
...holder
archibase planet
holder hanger hanger for towel
holder 7 - 3d model (*.gsm+*.3ds) for interior 3d visualization.
archibase_planet
free

Holder
...holder
archibase planet
holder hanger hanger for towel
holder 3 - 3d model (*.gsm+*.3ds) for interior 3d visualization.
archibase_planet
free

Holder
...holder
archibase planet
holder towel rack towel-horse
holder - 3d model (*.gsm+*.3ds) for interior 3d visualization.
archibase_planet
free

Holder
...lder
archibase planet
holder hanger hanger for towel
holder towel n250912 - 3d model (*.gsm+*.3ds) for interior 3d visualization.