Thingiverse

Madame Leota Headstone Eye Animatronics by legochuck
by Thingiverse
Last crawled date: 3 years, 4 months ago
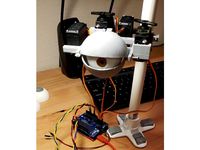
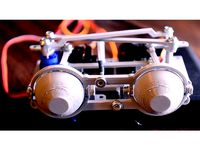
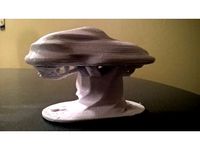
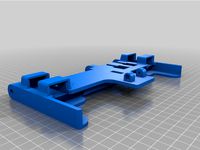
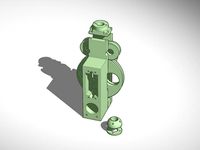
These files were used as part of a larger project to create a working animatronic Madame Leota Headstone from Disney's Haunted Mansion attraction. The rest of the headstone was created using pink insulation foam and vacuformed plastic. The eyes are approximately 52mm apart. Similar to the actual headstone in the theme parks, these eyes only move side to side.
In addition to the printed parts, the following hardware was used:
2 10mm M3 screws
1 18mm M3 screw
3 M3 Lock Nuts
4 M3 Washers
26mm Half Eye Green: https://smile.amazon.com/gp/product/B00EQ28XRK/ref=ppx_yo_dt_b_asin_title_o07_s00?ie=UTF8&psc=1
2 SG90 Servos: https://smile.amazon.com/gp/product/B081ZY23V4/ref=ppx_yo_dt_b_asin_title_o06_s00?ie=UTF8&psc=1
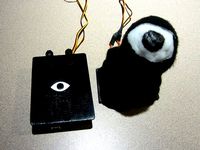
Arduino Nano
5V Power Supply
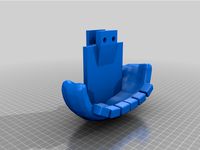
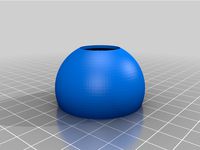
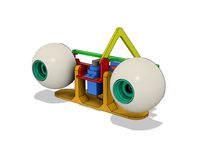
One of each part should be printed with the exception of the eye stalk, which should be printed twice. To assemble, attach the eyelids to the front of the chassis using the longer M3 screw, placing washers in between each eyelid and the chassis. The head of the screw should fit in the right eyelid while the lock nut will fit in the left. Next, attach the eye stalks to the chassis with the shorter M3 screws, with the screw head fitting into the slot on the eye stalk and the lock nut protruding out from the bottom. A washer can be fitted in between the eye stalk and the chassis. Two servos can be added to the chassis slots, the horizontal one controlling the side to side motion of the eyes, while the vertical one controls the eye lid motion. The screws included with the servos should be able to drive into the mounting holes in the chassis. Paper clips can be bent and fed through the actuation holes to connect to the servos. Once everything is in place, the plastic half eyes can be glued onto the eye stalks.
The arduino sketch used for controlling the eyes was also included. Both the servo positions for the gazes and the arduino pins the servos are attached to will most likely need to be changed to fit your specific installation.
Parts were printed on the Prusa i3 mk3s in PETG at .2mm layer height. With correct orientation no supports should be necessary.
In addition to the printed parts, the following hardware was used:
2 10mm M3 screws
1 18mm M3 screw
3 M3 Lock Nuts
4 M3 Washers
26mm Half Eye Green: https://smile.amazon.com/gp/product/B00EQ28XRK/ref=ppx_yo_dt_b_asin_title_o07_s00?ie=UTF8&psc=1
2 SG90 Servos: https://smile.amazon.com/gp/product/B081ZY23V4/ref=ppx_yo_dt_b_asin_title_o06_s00?ie=UTF8&psc=1
Arduino Nano
5V Power Supply
One of each part should be printed with the exception of the eye stalk, which should be printed twice. To assemble, attach the eyelids to the front of the chassis using the longer M3 screw, placing washers in between each eyelid and the chassis. The head of the screw should fit in the right eyelid while the lock nut will fit in the left. Next, attach the eye stalks to the chassis with the shorter M3 screws, with the screw head fitting into the slot on the eye stalk and the lock nut protruding out from the bottom. A washer can be fitted in between the eye stalk and the chassis. Two servos can be added to the chassis slots, the horizontal one controlling the side to side motion of the eyes, while the vertical one controls the eye lid motion. The screws included with the servos should be able to drive into the mounting holes in the chassis. Paper clips can be bent and fed through the actuation holes to connect to the servos. Once everything is in place, the plastic half eyes can be glued onto the eye stalks.
The arduino sketch used for controlling the eyes was also included. Both the servo positions for the gazes and the arduino pins the servos are attached to will most likely need to be changed to fit your specific installation.
Parts were printed on the Prusa i3 mk3s in PETG at .2mm layer height. With correct orientation no supports should be necessary.
Similar models
thingiverse
free
FNAF BonBon animatronic puppet by XMASBAD
...title_o04_s02?ie=utf8&psc=1
https://www.amazon.com/gp/product/b06xcrsd3t/ref=ppx_yo_dt_b_asin_title_o01_s00?ie=utf8&psc=1
thingiverse
free

Clamping Z-Screw Control Knob - Ender 3
...b00nx23hgq/ref=ppx_yo_dt_b_search_asin_title?ie=utf8&psc=1
need:
m3 screw and nut for clamping
m3 x 25 mm for connecting knob
thingiverse
free

Arduino Sensor Shield bumper by froudeg490
...e following arduino sensor shield
https://smile.amazon.com/gp/product/b07kcvj6rr/ref=ppx_yo_dt_b_asin_title_o06?ie=utf8&psc=1
thingiverse
free

Servo Operated Aquarium Valve by rubisco2000
...b00880e10e/ref=oh_aui_search_detailpage?ie=utf8&psc=1
along with a 9g servo, it also requires 4 20mm m3 screws and 4 m3 nuts.
thingiverse
free
Animatronic Eye
... in action:https://youtu.be/t7kjidlbsdo
the controller used in the video was taken from:https://www.thingiverse.com/thing:2669820
thingiverse
free

6DOF Robot arm by ThatNewMaker_101
...on the bracket and then screw in the servo with m4 screws and nuts.
attach the gripper to the last servo with m3 screws and nuts.
thingiverse
free
Animatronic Eye Mechanism V2 by kinetic-mcf
...attach the links to the eyes and eyelids. shrink them with a soldering iron, just be careful not to destroy the parts themselves!
thingiverse
free

Haunted Mansion Headstones Tombstone CNC Madame Leota by marcvw79
...aunted mansion tombstones that i have been creating in vcarve. for madame leota i used https://www.thingiverse.com/thing:3848250.
thingiverse
free

Carling OLED Switch
...no.
ds18b20 temperature sensorhttps://smile.amazon.com/gp/product/b013gb27hs/ref=ppx_yo_dt_b_asin_title_o08_s01?ie=utf8&psc=1
thingiverse
free

Nextion Lap Timer by sp33dfr34k
...https://www.amazon.de/gp/product/b08dhyd73q/ref=ppx_yo_dt_b_asin_title_o08_s02?ie=utf8&psc=1
m3 screws + nuts
micro usb cable
Legochuck
thingiverse
free
Tree of Life by legochuck
...based on the disney tree of life from the walt disney world theme park. the model is split into two pieces for ease of printing.
thingiverse
free

Pound Sterling Coin Display by legochuck
...oinage depicting the royal coat of arms. the coins are arranged in such a way as to line up the shield on the back of each coin.
thingiverse
free

8-Bit Magnets by legochuck
...inted separately and can be glued into their recessed slots on the body. holes for magnets on the back fit 6mm diameter magnets.
thingiverse
free

8 Bit Magnets by legochuck
... printed as a separate piece then glued into a slot on the main body. holes on the back of the body accept 6mm diameter magnets.
thingiverse
free

Space Invaders Speaker Cover by legochuck
...speakers you may be using. the nominal distance between the holes along the diagonal is 84mm, and the screw holes fit #6 screws.
thingiverse
free
Surface Pro 3 Vertical Stand by legochuck
...s mate properly. additional, i used scotch tape to ensure the charging cable and usb hub stay put in their respective locations.
Leota
thingiverse
free

Haunted Mansion - Leota by Anubis_
...haunted mansion - leota by anubis_
thingiverse
haunted mansion - leota tombestone
sketchfab
$5

Sweet Leota Tombstone, Haunted Mansion Disney
...ombstone, haunted mansion disney
sketchfab
sweet leota tombstone, haunted mansion disney - buy royalty free 3d model by frugetto
thingiverse
free
Haunted Mansion Headstones Tombstone CNC Madame Leota by marcvw79
...aunted mansion tombstones that i have been creating in vcarve. for madame leota i used https://www.thingiverse.com/thing:3848250.
thingiverse
free

Madame Leota Headstone
... headstone pieces labelled with hsf for the front and hsb for the back.
i really enjoyed making this print and hope you will too!
cg_trader
$40

Madame Leota | 3D
...madame leota | 3d
cg trader
model for 3d printing.
vertices: 400.000
polygons: 1.000.000
3dwarehouse
free

Madame Leota Seance Room
...e leota seance room
3dwarehouse
haunted mansion effect model #ball #crystal_ball #ghost #haunted_mansion #mansion #scary #seance
3dwarehouse
free

New Orleans Square Haunted Mansion
...#endless #father #ghost #ghostly #ghosty #grand #graveyard #hallway #haunted #leota #library #madame #mansion #new #of #orleans #piano #popular #ride...
3dwarehouse
free
1820 15th st Boulder Colorado
...#boulder #brick #chapel #church #colorado #fe_kidder #first_presbyterian_church #hobart_d_wegner #jr #miss_leotaway #peitro_belluschi #peter_dominick #presbyterian #stained_glass #usa #william_muchow #worship...
3dwarehouse
free

The Entire Haunted Mansion Ride in SketchUp (This is the Disney World version)
...#house #i #imagination #in #is #it #its #just #last #leota #let #library #lightening #madame #mansion #message #metamorphisis #mortal #mortals...
Animatronics
turbosquid
free
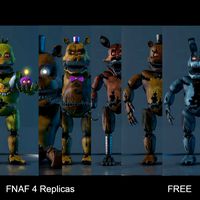
FNAF 4 Animatronic Replicas
... available on turbo squid, the world's leading provider of digital 3d models for visualization, films, television, and games.
thingiverse
free
animatronic eye by Twisttmann
...animatronic eye by twisttmann
thingiverse
this is the mechanic fore a simple animatronic eye.
thingiverse
free
Animatronic Tail by rwinscot
...animatronic tail by rwinscot
thingiverse
for costumes, cosplay, and animatronic cats! well... anything that has a tail.
thingiverse
free
Animatronic Eye Mechanism by Murtaza_Hassan
...animatronic eye mechanism by murtaza_hassan
thingiverse
3d design of a animatronic eye mechanism
thingiverse
free
Animatronic Eye Mechanism by Murtaza_Hassan
...animatronic eye mechanism by murtaza_hassan
thingiverse
3d design of a animatronic eye mechanism.
thingiverse
free
Animatronic Eye by johnbradley
...around when it is controlled by two knobs or via a webserver over a usb connection.
more at:http://makerjohn.com/animatronic-eye/
unity_asset_store
$20

Creepy Animatronic Anims
...low with the creepy animatronic anims asset from ramsterz. find this & other animations options on the unity asset store.
thingiverse
free

Animatronic Sunflower by Hendrikx
...animatronic sunflower by hendrikx thingiverse animatronics sunflower https://youtu.be/bum1gsby8ew for arduino codes, mp3 files and much...
thingiverse
free
Animatronic Eye
... in action:https://youtu.be/t7kjidlbsdo
the controller used in the video was taken from:https://www.thingiverse.com/thing:2669820
thingiverse
free

animatronic shop arduino case by natmaxex
...shop arduino case by natmaxex thingiverse animatronic shop arduino casehttp://www.animatronicsop.com/ ...
Madame
3ddd
$1

Madame
...madame
3ddd
baxter
стул madame от итальянской фабрики baxter
3ddd
free

Alberta Madame
...alberta madame
3ddd
стеллаж
alberta madame
3ddd
$1

Madam Stoltz
...madam stoltz
3ddd
madam stoltz
model: sconce harmonica from madam stoltzhttp://www.madamstoltz.dk/
design_connected
$16

Madam chair
...madam chair
designconnected
baxter madam chair chairs computer generated 3d model. designed by n/a.
3ddd
$1

Rugiano - Madam
...dam
3ddd
rugiano , madam
размеры: 2220 х2230х h 1280
представлена на выставке милан 2015
3ddd
free

Rugiano - Madam
...dam
3ddd
rugiano , madam
размеры: 2220 х2230х h 1280
представлена на выставке милан 2015
turbosquid
$20

Baxter Madame
... available on turbo squid, the world's leading provider of digital 3d models for visualization, films, television, and games.
turbosquid
$10

Madame Mirror
... available on turbo squid, the world's leading provider of digital 3d models for visualization, films, television, and games.
turbosquid
$8

Suspension Madam
... available on turbo squid, the world's leading provider of digital 3d models for visualization, films, television, and games.
3ddd
$1

madam stoltz Wirred
...madam stoltz
corona and vray readyhttp://www.danish-store.ru/collections/lightning/products/wirred-b?variant=1255502628
Headstone
archibase_planet
free

Headstone
...headstone
archibase planet
gravestone headstone
headstone 3 n231209 - 3d model (*.gsm+*.3ds) for exterior 3d visualization.
archibase_planet
free

Headstone
...stone
archibase planet
headstone gravestone tombstone
headstone 1 n231209 - 3d model (*.gsm+*.3ds) for exterior 3d visualization.
turbosquid
$45

Headstone
...y free 3d model headstone for download as blend, fbx, and obj on turbosquid: 3d models for games, architecture, videos. (1641043)
turbosquid
$3

Headstone
... available on turbo squid, the world's leading provider of digital 3d models for visualization, films, television, and games.
turbosquid
free

Headstone
... available on turbo squid, the world's leading provider of digital 3d models for visualization, films, television, and games.
archive3d
free

Headstone 3D Model
...ravestone headstone
headstone 3 n231209 - 3d model (*.gsm+*.3ds) for exterior 3d visualization.
archive3d
free

Headstone 3D Model
...ravestone tombstone
headstone 1 n231209 - 3d model (*.gsm+*.3ds) for exterior 3d visualization.
turbosquid
$40

Headstone and Spider
...odel headstone and spider for download as blend, fbx, and obj on turbosquid: 3d models for games, architecture, videos. (1632666)
turbosquid
$5

Headstones with lichen
...odel headstones with lichen for download as 3ds, obj, and fbx on turbosquid: 3d models for games, architecture, videos. (1155711)
turbosquid
$5

Mossy headstones
...e 3d model mossy headstones for download as 3ds, obj, and fbx on turbosquid: 3d models for games, architecture, videos. (1155710)
Eye
3ddd
$1

Best / Eye Eye
...пристенная best eye eye.
1660 полигонов.
wall mounted range hood best eye eye.
1660 polygons.
file: max 2010, 2012; fbx; obj.
3d_export
$5

eyes
...eyes
3dexport
eyes
3d_ocean
$5

3D EYE
...ocean
body cornia dynamic eye eye eyes human human eye iris nurbs eye organ
detailed eye . purchase and use it for any purpose ..
3d_ocean
$5
3d Eye
...3d eye
3docean
3d eye eyes
this is 3d eye model
3d_export
$5

Human eye
...human eye
3dexport
human eye, iris, eyeball, eye anatomy
turbosquid
free

Eye
...eye
turbosquid
free 3d model eye for download as c4d on turbosquid: 3d models for games, architecture, videos. (1429061)
turbosquid
free

Eyes
...eyes
turbosquid
free 3d model eyes for download as blend on turbosquid: 3d models for games, architecture, videos. (1153269)
turbosquid
$25

eye
...e
turbosquid
royalty free 3d model eye for download as blend on turbosquid: 3d models for games, architecture, videos. (1371896)
turbosquid
$10

Eye
...eye
turbosquid
royalty free 3d model eye for download as c4d on turbosquid: 3d models for games, architecture, videos. (1303492)
turbosquid
$5

Eye
...e
turbosquid
royalty free 3d model eye for download as blend on turbosquid: 3d models for games, architecture, videos. (1343488)