Thingiverse
Lulzbot Taz 4, 5 or 6 Removable Build Bed Upgrade by billyd
by Thingiverse
Last crawled date: 3 years ago
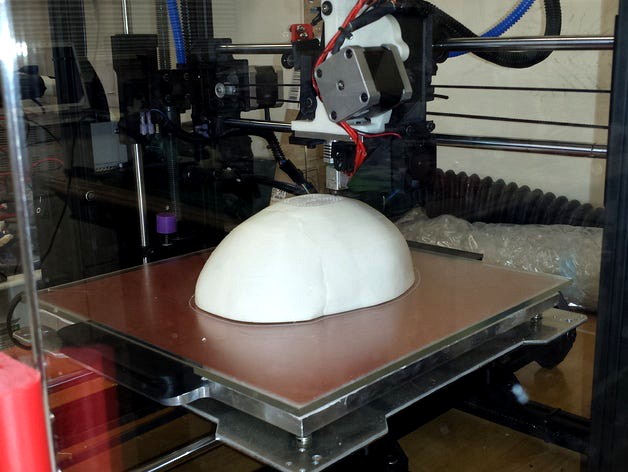
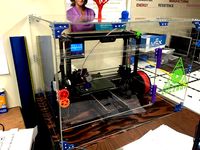
This is a removable build bed design that you can make as an upgrade for your Taz 4, Taz 5 or Taz 6.
It is comprised of a precision machined, level adjustable, ultra lightweight aluminum tray with magnets and separate square glass bed with ABS handles, also with embedded magnets. The glass bed can be simply pulled off the aluminum tray while still hot, immediately post print. No tools are required for removal or leveling. The bed is held firmly in place by the powerful magnets and friction between the silicone heater pad and the glass. Leveling is achieved via three always easily accessible thumb nuts located underneath the stock Y axis tray. This design has been fully tested for several months by me, and I can happily attest that it works flawlessly.
I use hairspray and an enclosure (See my enclosure design here:http://www.thingiverse.com/thing:746922) , which works perfectly and allows the use of any printing material available provided you have the correct extruder. Some materials may require other surfaces however, and there is no reason why you couldn't cover the glass with PEI, PrintinZ (Or anything else), especially if you prefer not to use an enclosure or hairspray.
This is a huge advantage over stock because you can remove your printouts from the printer while they are still attached to the bed, so you remove them and start printing again quickly. And removing the part (along with the bed), will not throw the printer out of level because you do it away from the machine. Sometimes, on the stock Taz, I had to work so hard to remove a print, the printer would no longer be level ! But with this upgrade, the leveling tray itself never leaves the printer. You can remove the part from the bed in an open and unrestricted area, free to pry (if you're using PEI) as hard as you like without upsetting level. You can also use multiple glass beds and swap them out as you want, dramatically decreasing the time between prints, so you can get more parts out of your printer per day.
The only permanent (this upgrade can easily be undone, but you won't want to) mod to the stock printer is to drill 5/32" (4mm) holes (4x) in the existing aluminum Y travel plate for mounting of the aluminum leveling tray. Leveling is achieved via three knurled thumb nuts at three corners located under the stock Y travel tray. The fourth corner is fixed in height via the printed spacer. The glass is borosilicate and can be 1/8" 3/16" or 1/4" thick. Thicker is sturdier, but takes longer to heat. Beware 1/4" thick takes about 30 minutes to heat up, so I don't recommend it. The 1/8th inch thick glass heats to printing temperature very fast, just a couple minutes or so. 3/16th thick is much stronger, but takes about ~10 minutes to get to 105 C. The Z knob adjustment screw needs to be modded taller since this tray sits slightly higher than stock. But this is achieved with a simple 3D printed part that is pressed onto the existing Z knob.
User installation can be done in less than an hour (assembly of the components will take longer, as the adhesives need to cure overnight). Changes to the heated bed PID values via pronterface is recommended but not required. Otherwise the printer operates as stock.
Advantages:
The entire bed is clear of obstruction so the entire print surface can be used regardless of type of extruder or even a dual extruder. Nothing protrudes above the glass bed surface, anywhere. The stock bed had large protrusions at each corner, which can collide with the print head, especially the dual extruder, if you aren't careful. No more collision worries!
PEI can be omitted (with the use of enclosure) so no more hopelessly stuck parts. Use hairspray for trouble free adhesion.
But any type of surface can easily be added to the glass.
Multiple glass beds (perhaps with different surfaces) can be kept on hand and swapped in seconds. The only adjustment would be the Z knob. Actual level would never change with change of glass bed since the leveling portion never leaves the printer.
The bed is held in place by powerful magnets pulling down creating friction with the silicon heater pad which is in direct contact with the glass. So, the bed won't move unless you want it to, because the friction between the silicone rubber and the glass is very high.
Easy to remove glass beds can be lifted out immediately post print without tools for quick cooling and MUCH easier part removal, all without altering bed level in the printer.
Leveling the bed is much easier than stock as well. It can be done in just a few minutes. The stock version took forever to level and required a hex drive to do it. And access to the screws was sometimes obscured making leveling often an exercise in frustration. But, with this upgrade, no tools are necessary, just adjust the three thumb nuts which are always easy to access, to quickly get your bed system ready to print on.
Update 09-21-2015 Upgrade instructions now available for download!Update 10-14-2015 Added file Lulzbedspacer.stl.Update 10-21-2015 Revised Parts list and Instruction manualUpdate: 12-8-2015 Aluminum leveling tray component of this upgrade now available message me for details to purchaseUpdate 04-21-2016 Revised Parts List and Instruction ManualUpdate 07-09-2016 Added trilevelbar-reve.stl to provide 3 point leveling feature. This part mounts to the bottom of the aluminum leveling tray with flat head 6-32 x 3/8" long screws (2, replacing existing 6-32x1.25 screws at two corners), with a 6-32 x 1.25" long screw at the center pointing towards the Y axis tray. Apply spring from parts list and 6-32 thumbscrew under stock Y axis tray to create a 3 point leveling system. Coming soon: Carbon fiber Y axis tray replacement for incredible rigidity greatly simplifying leveling and making 3 point leveling even more effective. See new pictures for more details.Update 12-14-2016 Use with the Taz 6 would require end user to provide mounting for wipe pad. Also if autolevel feature is desired, mounting of conductive pads at corners of bed. The removable bed's mechanical leveling is so simple and stable, the need for auto leveling is questionable at best.Update 06-28-2017 Carbon fiber Y axis replacement tray available message me for details to purchase.
This is a super light super rigid Y axis tray to replace the flimsy aluminum one on the stock Taz printer. Makes leveling super easy with the removable bed system because adjustments to the springs will not flex the Y axis tray which will make leveling more intuitive. Price is $169.25 shipped in USA. This has the same hole pattern as the stock tray at the bearing connections, but has 3 holes for mounting the removable bed system (with the three point leveling print installed on the leveling tray. Do not use the 4 corner mount method with the CF tray you could damage your printer with too low a z setting in the corner with the standoff as there is no flex in the CF tray. The three point method has springs supporting the entire bed providing the necessary safety cushion in case you set Z too low). See last 6 photos on this page to see carbon fiber tray, 3 point leveling and how it looks mounted.Update 07-26-2018 Bed Heater not available. Use 300mm square heater (available on Ebay) and trim 5mm off all 4 sides. No problem to do this, will not effect functionality.
Similar models
thingiverse
free

Printrbot Simple 1405 18"x6" Print Bed by TechMav
...uminum, to hold a steel plate that will give you roughly a 15 1/2" x 6" print surface, if you upgrade your y-axis also.
thingiverse
free

Z-Axis endstop level with glass by NickRimmer
... will use some glass on your hot bed, you will need correct level of z-axis endstop. so that, one of solutions wich can help you.
thingiverse
free

LulzBot TAZ 6 Modular Print Bed Corner Mounts by RepRapTodd
...ulzbot.com/store/parts/lulzbot-taz-modular-print-bed-heaterhttps://www.lulzbot.com/store/parts/lulzbot-taz-glasspei-print-surface
thingiverse
free

Beefier Taz 6 Externally Accessable Y axis belt tensioner by intelinc
...#39;s useful for anyone else. this is based on the metric version, but you can easily change hole size to whatever works for you.
thingiverse
free
Taz 5 Extended bed corner for Printinz Zebra Plate by weekend_warrior1999
...roximately 3mm in case your using a non oem silicone heater and glass to keep the heater from resting on the aluminum base plate.
thingiverse
free
Taz 6 bed corners for magnetic bed by intelinc
...ess of a 3.3mm plate of glass and a pei sheet, there is a gap with the stock bed corners these are sized for just the bare glass.
thingiverse
free

12mm Y-Axis Upgrade for RepRap Printers by BS3DP
... lm12uu linear bearings to support the weight.
the design is for a reprap style printer.
4x corners_12mm.stl
3x lm12uu holder.stl
thingiverse
free

Solid Z-Axis Spring Holder for Lulzbot TAZ by openbionics
...se new z-axis holders.
this work was derived from lulzbot's original taz 2.0 designs. https://download.lulzbot.com/taz/2.0/
thingiverse
free

Bracket to lower Y-axis stepper for Anet E10 by Fort_Design
...rom that, there is no improvement to the printer.
unfortunately it has to be printed with support.
standard screws can be reused.
thingiverse
free

Flashforge Glass Bed Corner Bracket by Makersome
...rts that you need, including the borosilicate glass plate follow the link below:http://makersome.com/store/glass-bed-upgrade-kit/
Billyd
thingiverse
free

Golf Box by billyd
...plify printing.
the lid should be dropped about 1mm into the bed before slicing. the lid will need supports around the perimeter.
thingiverse
free

Nerdcam3D MK2 Mount by billyd
... camera and tricopter!
enjoy
update added file nerdcam3d-mk2_cover_mobius which is a cover with a mount for the mobius hd camera.
thingiverse
free

Filament Saver by billyd
... when not in use. it saves filament because the device does not damage or require bending the filament to keep it from unspooling
thingiverse
free

Facehugger by billyd
...actice with my scanner, i am learning quite a bit. so i've just uploaded a much better quality scan of the facehugger. enjoy!
thingiverse
free

Christmas Tree Star Topper by billyd
...revised it so it could be printed in two halves and glued together to make a whole. note this is a small tree topper. 118mm wide.
thingiverse
free

Exhaust Fitting, Wall Mount by billyd
...t is meant as a means to mount the exhaust tube to a dryer vent or similar on a wall, to carry the printed exhaust fumes outside.
thingiverse
free

Earring Stand by billyd
...would advise using pla or petg for this print.
i also supply the stand with just holes instead of slots for stud earrings.
enjoy!
thingiverse
free

Nerdcam3D Mount for Cinetank MK2 by billyd
...locations on the forward top of the cinetank mk2 upper plate. nerdcam3d with cinetank mk2 frame is an amazing experience. enjoy!!
thingiverse
free
Handle for Lulzbot Taz 4 or 5 enclosure by billyd
...h side of my lulzbot enclosure for taz 4 or 5 (found here: http://www.thingiverse.com/thing:746922 ) for easy lifting and moving.
thingiverse
free

Hero2 mount for the Firefly 6 by billyd
...pt a single "one-wrap" style velcro tie 8x1/2". you can typically find them in retail stores in the craft section.
Taz
3d_ocean
$19

TAZ RIGGED
...ax version only texture is used only for wb logo, taz dont need texture no special render engine needed, just unzip and render...
3d_export
$5

Taz character 3D Model
...taz character 3d model
3dexport
taz toon character cartoon
taz character 3d model supercigale 22095 3dexport
cg_studio
$10

Taz 3D3d model
...taz 3d3d model
cgstudio
.3ds .max - taz 3d 3d model, royalty free license available, instant download after purchase.
cg_studio
$15

Taz Rigged3d model
...ged3d model
cgstudio
.3ds .fbx .max .obj - taz rigged 3d model, royalty free license available, instant download after purchase.
3d_export
$10

Taz Toy Calendar 3D Model
... 3d model
3dexport
taz toy calendar day month year looney tunes cartoon kid child
taz toy calendar 3d model nkfrds 49687 3dexport
3d_export
$10

Taz Tasmanian Devil RIGGED 3D Model
...y tunes anime bunny rigged material fantasy creature diable dessin
taz tasmanian devil rigged 3d model supercigale 28390 3dexport
3d_export
$19

Thylacine 3D Model
...animalia chordata mammalia marsupial dog extinct animals tiger tassie taz thylacine 3d model poly3dmodels 90790...
3d_export
$12

Bowl Decorated 3D Model
...bowl decorated 3d model 3dexport bowl tazn elements ceramics kitchen plastic cup container decorative cake biscuits...
3ddd
$1

Crate & Barrel Serveware
...crate & barrel поднос -http://www.crateandbarrel.com/feast-platter/s186961 набор ножей для сыра -http://www.crateandbarrel.com/tazcheese-knife-3-piece-set/s681377 бокал...
thingiverse
free
TAZ by Taz8373
...taz by taz8373
thingiverse
my 1st print
Lulzbot
thingiverse
free

LulzBot Rocktomek by LulzBot
...lulzbot rocktomek by lulzbot
thingiverse
https://download.lulzbot.com/3d_models/rocktomek/
thingiverse
free
THE Lulzbot spool holder
...the lulzbot spool holder
thingiverse
stl and ipt topmount spool holder for lulzbot
thingiverse
free

Lulzbot logo by Halg199703
...lulzbot logo by halg199703
thingiverse
this is the lulzbot logo. i also have a file for dual extruder.
thingiverse
free

LulzBot Bio printer Model
...lulzbot bio printer model
thingiverse
this is a model of the lulzbot bioprinter
thingiverse
free
Lulzbot Taz Enclosure by MrMcGuire
...lulzbot taz enclosure by mrmcguire
thingiverse
parts for an enclosure for lulzbot taz
thingiverse
free

Lulzbot Spool Holder by MAKE
...lulzbot spool holder by make
thingiverse
a spool holder for your lulzbot.
thingiverse
free

Lulzbot mini spool holder by chewie80524
...lulzbot mini spool holder by chewie80524
thingiverse
this part holds the spool on a lulzbot mini. this design came from lulzbot.
thingiverse
free

Lulzbot Claystruder by 102drewt
...r for the lulzbot taz 4. every thing is snap together, and it only requires a threaded rod, a nut to fit it, and a stepper motor.
thingiverse
free

Lulzbot Mini Enclosure brackets by chewie80524
...lulzbot mini enclosure brackets by chewie80524
thingiverse
lulzbot taz/mini enclosure brackets.
thingiverse
free

Lulzbot mini toolbox by nicsna
...t mini using cura scale down to 0.97.
hope you like it and make sure to leave some feedback or suggestions for my next design. :)
Upgrade
turbosquid
$15

Upgraded Glock
...e 3d model upgraded glock for download as obj, fbx, and blend on turbosquid: 3d models for games, architecture, videos. (1185950)
3ddd
$1

Calligaris / UPGRADE
...calligaris / upgrade
3ddd
calligaris
c материалом
3d_export
free

cz upgrade
...cz upgrade
3dexport
https://www.buymeacoffee.com/mestrezen3d https://linktr.ee/mestrezen3
turbosquid
$80

Custer Tank upgrade
... available on turbo squid, the world's leading provider of digital 3d models for visualization, films, television, and games.
turbosquid
$39

Domestos 1 upgrade
... available on turbo squid, the world's leading provider of digital 3d models for visualization, films, television, and games.
3d_export
$10

Upgraded tea cup
...upgraded tea cup
3dexport
a cup with an unusual design and a unique shape for a more enjoyable tea experience
3d_export
$8

dixy outlander classic style upgraded poplar wood lounge chair
...utlander classic style upgraded poplar wood lounge chair
3dexport
dixy outlander classic style upgraded poplar wood lounge chair
turbosquid
free

AK-12 + Upgrades low-poly 3D model
...ow-poly 3d model for download as fbx, blend, and unitypackage on turbosquid: 3d models for games, architecture, videos. (1501145)
evermotion
$700

Upgrade from V-ray 1.5 to 3.5 for 3ds max
...here is no need to purchase a new dongle - your current dongles will be reprogrammed to carry v-ray 3. evermotion 3d models shop.
evermotion
$300

Upgrade from V-Ray 2.0 to V-ray 3.5 for 3ds Max
... interface (gui) for editing settings on one machine and one render node for rendering on one machine. evermotion 3d models shop.
Removable
turbosquid
$15

Staple Remover
... available on turbo squid, the world's leading provider of digital 3d models for visualization, films, television, and games.
turbosquid
$10

Staple Remover
... available on turbo squid, the world's leading provider of digital 3d models for visualization, films, television, and games.
turbosquid
$1

Staple Remover
... available on turbo squid, the world's leading provider of digital 3d models for visualization, films, television, and games.
3d_export
$25

Staple Remover 3D Model
...remover office supplies pull desk paper remove workplace school work desktop vray
staple remover 3d model plutonius 7699 3dexport
turbosquid
$28
Removable Wall Hatch
... 3d model removable wall hatch for download as , fbx, and obj on turbosquid: 3d models for games, architecture, videos. (1670326)
3d_export
$15
Staple Remover 3D Model
... desktop paper accessories household tool desk workplace instrument equipment pull
staple remover 3d model firdz3d 90012 3dexport
3ddd
free
Missed Maps Remover
...
3ddd
missed maps remover
скрипт находит потерянные карты в файле и позволяет удалить их или открыть в окне редактора материалов.
turbosquid
$29

Eye remover
...bosquid
royalty free 3d model eyeremover for download as 3dm on turbosquid: 3d models for games, architecture, videos. (1695439)
3ddd
$1

Remove Note Track
...аем скрипт чтобы удалить нулевые треки,которые грузят систему при сохранении и файл начинает сохраняться снова нормально и быстро
3d_export
$6

Gas dust removal bag filter
...gas dust removal bag filter
3dexport
gas dust removal, bag filter
Bed
3ddd
$1

bed
...bed
3ddd
bed , постельное белье
bed
3ddd
$1

bed
...bed
3ddd
bed , постельное белье
bed
3ddd
$1

bed
...bed
3ddd
bed , постельное белье
bed
3ddd
$1

bed
...bed
3ddd
bed , постельное белье
bed
3ddd
$1

bed
...bed
3ddd
bed , постельное белье
bed
3ddd
$1

bed
...bed
3ddd
bed , постельное белье
bed
3ddd
free

bed
...bed
3ddd
bed , постельное белье
bed
3ddd
free

bed
...bed
3ddd
bed , постельное белье
bed
3ddd
$1

Bed
...bed
3ddd
bed , постельное белье , постель
bed
3d_export
$7

bed adairs bed
...rs bed
3dexport
bed adairs bed in modern style. if you want a smoother surface, please turn on turbosmooth in the modifier list.
6
3d_export
$18

tulip 6
...tulip 6
3dexport
tulip 6
3d_export
$5
hinge 6
...hinge 6
3dexport
hinge 6
3ddd
$1

MASIERO / FLASHWOOD STL 6 + 6
...6
3ddd
masiero
торшер flashwood stl 6 + 6 фабрики masiero
http://www.masierogroup.com/c87_697/it/flashwood%20stl%206%20+%206.ashx
turbosquid
$110

Atmos Cannon 2000 6*6
...yalty free 3d model atmos cannon 2000 6*6 for download as skp on turbosquid: 3d models for games, architecture, videos. (1528591)
turbosquid
$1

ae 6 6 electric locomotive
... free 3d model ae 6 6 electric locomotive for download as obj on turbosquid: 3d models for games, architecture, videos. (1707537)
turbosquid
$39

A-6
... available on turbo squid, the world's leading provider of digital 3d models for visualization, films, television, and games.
3ddd
$1
6 ковров
...6 ковров
3ddd
ковры , ковер
6 ковров
turbosquid
$12

Calligraphic Digit 6 Number 6
...hic digit 6 number 6 for download as max, obj, fbx, and blend on turbosquid: 3d models for games, architecture, videos. (1389336)
turbosquid
$19

Case For Phone 6 Girl 6
... available on turbo squid, the world's leading provider of digital 3d models for visualization, films, television, and games.
turbosquid
$35

Iphone 6 & 6 Plus All
... available on turbo squid, the world's leading provider of digital 3d models for visualization, films, television, and games.
5
turbosquid
$6

Rock 5-5
...urbosquid
royalty free 3d model rock 5-5 for download as obj on turbosquid: 3d models for games, architecture, videos. (1639063)
3d_export
$5

hinge 5
...hinge 5
3dexport
hinge 5
turbosquid
$10

A-5
... available on turbo squid, the world's leading provider of digital 3d models for visualization, films, television, and games.
turbosquid
$2

A-5
... available on turbo squid, the world's leading provider of digital 3d models for visualization, films, television, and games.
turbosquid
$12

Calligraphic Digit 5 Number 5
...hic digit 5 number 5 for download as max, obj, fbx, and blend on turbosquid: 3d models for games, architecture, videos. (1389333)
3ddd
$1

5 роз
...5 роз
3ddd
5 роз в стеклянной вазе
design_connected
$11

iPhone 5
...iphone 5
designconnected
apple iphone 5 computer generated 3d model.
3ddd
$1

Lola 5
...lola 5
3ddd
miniforms
lola 5 miniforms 300*65*134
3ddd
$1

Nexus 5
...dd
nexus , phone , телефон
google nexus 5 phone
3d_ocean
$15

iPhone 5
...iphone 5
3docean
3d 4d apple cinema iphone model modeling phone screen texture
iphone 5 3d model and texture realistic iphone 5.
4
turbosquid
$9

Office Chair 4-4
... available on turbo squid, the world's leading provider of digital 3d models for visualization, films, television, and games.
3d_export
$5

doors- 4
...doors- 4
3dexport
doors 4
3d_export
$5

hinge 4
...hinge 4
3dexport
hinge 4
3ddd
$1

Штора №4
...штора №4
3ddd
штора №4
3d_export
free

playstation 4
...playstation 4
3dexport
playstation 4
turbosquid
$1

re 4-4 electric locomotive
... free 3d model re 4 4 electric locomotive for download as obj on turbosquid: 3d models for games, architecture, videos. (1707845)
3ddd
$1

nexus 4
...nexus 4
3ddd
lg , телефон
nexus 4
3ddd
$1

4 Poufs
...4 poufs
3ddd
пуф
4 soft poufs
turbosquid
$12

Calligraphic Digit 4 Number 4
...hic digit 4 number 4 for download as max, obj, fbx, and blend on turbosquid: 3d models for games, architecture, videos. (1389332)
3ddd
$1

Dauphin 4+
...dauphin 4+
3ddd
кресло
dauphin 4+ конференц кресло
Build
archibase_planet
free
Building
...building high-rise building office building construction
building n050115 - 3d model (*.gsm+*.3ds) for exterior 3d visualization.
3d_export
$5
building
...building
3dexport
clasic building
3ddd
$1
building
...building
3ddd
здание
building
archibase_planet
free

Building
...lanet
building office office building construction
building n090914 - 3d model (*.gsm+*.3ds+*.max) for exterior 3d visualization.
archibase_planet
free

Building
...net
building tower construction high-rise building
building n100214 - 3d model (*.gsm+*.3ds+*.max) for exterior 3d visualization.
3d_export
free
Building
...building
3dexport
low poly building;
3d_export
free
Building
...building
3dexport
low poly building;
3d_export
free
Building
...building
3dexport
low poly building;
3d_export
free
Building
...building
3dexport
low poly building;
3d_export
free
Building
...building
3dexport
low poly building;