Thingiverse
LoRaWAN Gateway case with GPS by MarkoC
by Thingiverse
Last crawled date: 4 years, 1 month ago
This is my redesign of the excellent case design produced by @Amedee.
I liked the case but wanted to shuffle things around a little - moving the connectors to the rear of the chassis, and adding an indicator panel to the front.
This unit targets the GNZ Pi/iC880a backplane [1] rather than the original coredump.ch variety [2]. Additionally I wanted to add a GPS module [3].
Partial bill of materials
1 x Panel mount micro USB extender [5]
1 x iC880a LoRaWAN concentrator [4]
1 x Raspberry Pi 3 (model 2 should work fine too)
1 x GNZ Pi <-> iC880a backplane [1]
7 x 5mm LEDs (your choice of colours.. I used GRN for power, RED for PPS pulse, BLU for concentrator status
1 x GY-NEO6MV2 Ublox GPS module + ceramic antenna [eg 6]
1 x 20mm pitch Veroboard for mounting LEDs
1 x 30mm x 15mm 5V case fan
Wire, 2.5mm, 3mm screws/nuts etc
Filament - I used Rigid Ink blue PLA for the plates, Florence Tech Marble for the top and bottom, Florence Tech TPU for the feet.
Backplate
I wanted all the connections on the rear of the device. Here we have the Raspi connectors bottom right, power socket bottom left. As this setup is all 5V, I chose a micro-USB power input. The official Raspberry Pi PSU works well.
Along the top are 30mm fan and antenna SMA connector. The GNZ backplane is dumb and doesn't support fan control; I just wire it directly to 5V.
Base
Nothing clever here, just a nice solid base.
Top
The case top has mounts for the GPS module and a holder for the antenna. You may want to use a spot of glue, blue tack or double-sided tape to secure the antenna. Remember to fit it "upside down" so the top faces up when assembled ;)
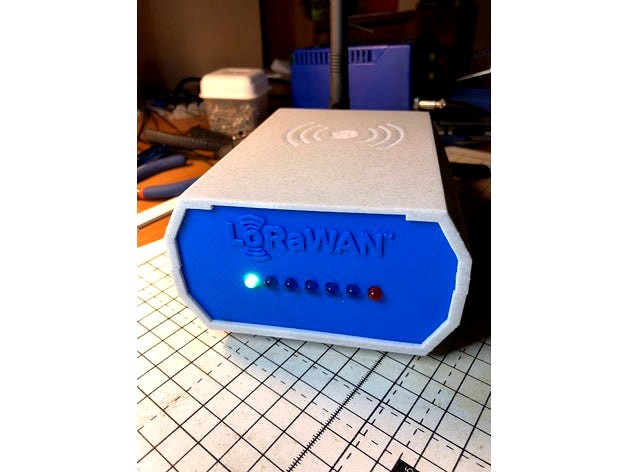
Front Panel
Mount the LEDs to the strip board per your preference. The circuit is simple, just a common GND line with 1k resistors in series with each LED. You may want to vary the resistor values to balance the brightness if you're using different colours. I didn't bother.
I hooked up the connections as follows:
Function Line LED Colour Cable iC880a Pin
POW 1 (Green) ORANGE 21
BACKHAUL PKT 2 (Blue) YELLOW 7
TX PKT 3 (Blue) GREEN 8
RX SENSOR PKT 4 (Blue) BLUE 10
RX FSK PKT 5 (Blue) PURPLE 9
RX BUF !EMPTY 6 (Blue) GREY 11
GPS PPS 7 (Red) WHITE 19
GND 8 (N/A) BLACK 1
PPS is the "pulse per second' GPS output which synchronises the iC880a internal clock. Unfortunately the board doesn't expose this; you need to solder direct to pin 3 on the Neo6 itself (see photos).
[1] https://www.tindie.com/products/gnz/imst-ic880a-lorawan-backplane-kit/
[2] https://shop.coredump.ch/product/ic880a-lorawan-gateway-backplane/
[3] https://www.u-blox.com/sites/default/files/products/documents/NEO-6_DataSheet_(GPS.G6-HW-09005).pdf
[4] http://shop.imst.de/wireless-modules/lora-products/8/ic880a-spi-lorawan-concentrator-868-mhz
[5] https://www.modmypi.com/raspberry-pi/accessories-198/output-adaptors/panel-mount-651/panel-mount-micro-usb-male-to-female
[6] https://www.ebay.co.uk/itm/GY-NEO6MV2-Ublox-GPS-Module-with-Active-Antenna-and-header-pins/231859809745?hash=item35fbebedd1:g:YLsAAOSwoydWsLIc
I liked the case but wanted to shuffle things around a little - moving the connectors to the rear of the chassis, and adding an indicator panel to the front.
This unit targets the GNZ Pi/iC880a backplane [1] rather than the original coredump.ch variety [2]. Additionally I wanted to add a GPS module [3].
Partial bill of materials
1 x Panel mount micro USB extender [5]
1 x iC880a LoRaWAN concentrator [4]
1 x Raspberry Pi 3 (model 2 should work fine too)
1 x GNZ Pi <-> iC880a backplane [1]
7 x 5mm LEDs (your choice of colours.. I used GRN for power, RED for PPS pulse, BLU for concentrator status
1 x GY-NEO6MV2 Ublox GPS module + ceramic antenna [eg 6]
1 x 20mm pitch Veroboard for mounting LEDs
1 x 30mm x 15mm 5V case fan
Wire, 2.5mm, 3mm screws/nuts etc
Filament - I used Rigid Ink blue PLA for the plates, Florence Tech Marble for the top and bottom, Florence Tech TPU for the feet.
Backplate
I wanted all the connections on the rear of the device. Here we have the Raspi connectors bottom right, power socket bottom left. As this setup is all 5V, I chose a micro-USB power input. The official Raspberry Pi PSU works well.
Along the top are 30mm fan and antenna SMA connector. The GNZ backplane is dumb and doesn't support fan control; I just wire it directly to 5V.
Base
Nothing clever here, just a nice solid base.
Top
The case top has mounts for the GPS module and a holder for the antenna. You may want to use a spot of glue, blue tack or double-sided tape to secure the antenna. Remember to fit it "upside down" so the top faces up when assembled ;)
Front Panel
Mount the LEDs to the strip board per your preference. The circuit is simple, just a common GND line with 1k resistors in series with each LED. You may want to vary the resistor values to balance the brightness if you're using different colours. I didn't bother.
I hooked up the connections as follows:
Function Line LED Colour Cable iC880a Pin
POW 1 (Green) ORANGE 21
BACKHAUL PKT 2 (Blue) YELLOW 7
TX PKT 3 (Blue) GREEN 8
RX SENSOR PKT 4 (Blue) BLUE 10
RX FSK PKT 5 (Blue) PURPLE 9
RX BUF !EMPTY 6 (Blue) GREY 11
GPS PPS 7 (Red) WHITE 19
GND 8 (N/A) BLACK 1
PPS is the "pulse per second' GPS output which synchronises the iC880a internal clock. Unfortunately the board doesn't expose this; you need to solder direct to pin 3 on the Neo6 itself (see photos).
[1] https://www.tindie.com/products/gnz/imst-ic880a-lorawan-backplane-kit/
[2] https://shop.coredump.ch/product/ic880a-lorawan-gateway-backplane/
[3] https://www.u-blox.com/sites/default/files/products/documents/NEO-6_DataSheet_(GPS.G6-HW-09005).pdf
[4] http://shop.imst.de/wireless-modules/lora-products/8/ic880a-spi-lorawan-concentrator-868-mhz
[5] https://www.modmypi.com/raspberry-pi/accessories-198/output-adaptors/panel-mount-651/panel-mount-micro-usb-male-to-female
[6] https://www.ebay.co.uk/itm/GY-NEO6MV2-Ublox-GPS-Module-with-Active-Antenna-and-header-pins/231859809745?hash=item35fbebedd1:g:YLsAAOSwoydWsLIc