
Thingiverse
Lithophane System
by Thingiverse
Last crawled date: 6 years, 6 months ago
Original Post March 14, 2020
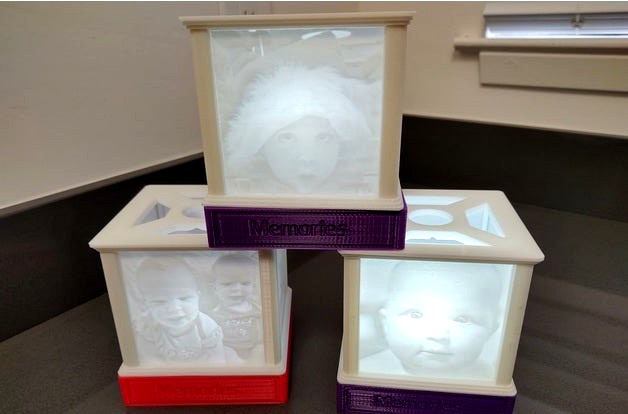
Lithophanes are great! Take a picture, convert it, print and that image now has a 3D effect to it. Lots of oohs and aahs.
I started out by using someone else's design to display my lithophanes. In fact, I originally designed the base to be used with their design. After playing with and printing many lithophanes, I had a wish list of things I wanted to see in a display so I decided it was time for me to try my hand at designing my own.
Some of my requirements...
First and foremost. I wanted more detail in my liths. So they needed to be thicker. After
some trial and error, I settled on 4 mm.
Tough. It needed to be durable but easy to assemble.
Easy to print and assemble.
Ultimately, I wanted to build a lithophane system. A system that gives you all the pieces to display your own lithophanes. Power, lighting, and help converting your images. This is my attempt at trying to make it easy for everyone to print and display there own lithophanes.
These are the components that will have to be purchased...
Lighting - This is the LED board that is used for lighting. The current base will have to have the board soldered but I'm currently working on a new design that will allow it to be assembled without being soldered. Trying to make this as simple as possible.
Power - Originally, I debated about 4 batteries but settled on 3. This battery pack will power the LED for many hours.
To keep the battery pack in the the opening, glue in two 49mm pieces of this fastening tape to the sides of the battery opening.
In order to help you convert your images, I also wrote and included a guide for cropping and converting an image to a lithophane.
In the end, I have printed and assembled lots of these to insure they were ready for prime time. I hope you like it and also find it easy to use.
I only use Paramount filaments.
Lithophanes are great! Take a picture, convert it, print and that image now has a 3D effect to it. Lots of oohs and aahs.
I started out by using someone else's design to display my lithophanes. In fact, I originally designed the base to be used with their design. After playing with and printing many lithophanes, I had a wish list of things I wanted to see in a display so I decided it was time for me to try my hand at designing my own.
Some of my requirements...
First and foremost. I wanted more detail in my liths. So they needed to be thicker. After
some trial and error, I settled on 4 mm.
Tough. It needed to be durable but easy to assemble.
Easy to print and assemble.
Ultimately, I wanted to build a lithophane system. A system that gives you all the pieces to display your own lithophanes. Power, lighting, and help converting your images. This is my attempt at trying to make it easy for everyone to print and display there own lithophanes.
These are the components that will have to be purchased...
Lighting - This is the LED board that is used for lighting. The current base will have to have the board soldered but I'm currently working on a new design that will allow it to be assembled without being soldered. Trying to make this as simple as possible.
Power - Originally, I debated about 4 batteries but settled on 3. This battery pack will power the LED for many hours.
To keep the battery pack in the the opening, glue in two 49mm pieces of this fastening tape to the sides of the battery opening.
In order to help you convert your images, I also wrote and included a guide for cropping and converting an image to a lithophane.
In the end, I have printed and assembled lots of these to insure they were ready for prime time. I hope you like it and also find it easy to use.
I only use Paramount filaments.