Thingiverse

Liquid Colours In Motion by reparator
by Thingiverse
Last crawled date: 3 years, 1 month ago
Liquid Colours In Motion
Video: https://youtu.be/YxlTE78d1ug
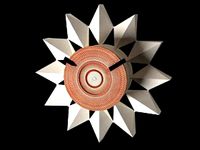
A kinetic art project
designed by Stefan Kneip
This is part one of a Tripthychon of pictures dealing with motion and it is called "Liquid Colours In Motion".
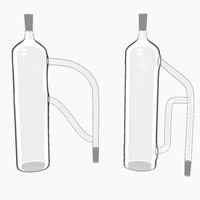
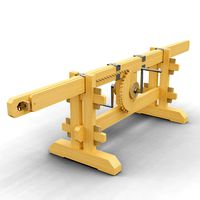
It consists of a moving wheel of glass tubes filled with coloured liquids. It is in the style of the bhaskara wheel. The outer wheel is driven by a planetary gear.
Description
The main part is a big wheel with 12 arms. On each end a test tube with cap is mounted. Inside the test tubes are different coloured liquids. A planetary gear system is turning the main wheel and so the test tubes around the center. By this very slow rotation the liquids are flowing inside the tubes and produce a nice shiny effect. The picture is illuminated by LED strips inside the frame.
In Part one of this installation I used the main colours cyan, magenta and yellow and the corresponding mixing colours (purple, orange and green). Each colour is populating two test tubes to fulfill the circle (as you can see in the video).
Part two is much more impressive. Here I used only magenta and cyan as liquids (alternating). The illumination is changing every 30 sec from white LEDs to UV-LEDs. The UV light leeds to a fluorescence effect and the turning tubes glow in eldritch atmosphere like radioactiv uranium. Very awesome!
The Electronics:
An Arduino based controller electronic is the "brain" of the installation. It can operate in different modes which are adjusted by means of a push-button with integrated LED. By pressing the pushbutton you can circle through the modes. The arduino sketch is attached for operating the circuit as master or slave.
What you need:
Ribba picture frame 50x50cm in black or white from IKEA
LEDberg led strips (4x)
Liquid Ink for inkjet printers in cyan, magenta and yellow
24 glass test tubes of 16 mm diameter and 10 cm length (https://www.tuuters.de/index.php?option=com_virtuemart&view=productdetails&virtuemart_category_id=7&virtuemart_product_id=75&Itemid=121)
cable ties to fix the glass tubes
sheet of AlDibond 50 x 50cm of 3 mm thickness as main assembly board
small geared motor of 2-3 Rpm, 12 V
PIR motion detector (https://www.adafruit.com/product/189)
The circuit board attached (feel free to build one).
Instructions
The printer inc must be diluted with water to get a clear, sligthly coloured liquid. Do not use it too concentrated.
Illumination:
I used in my motion paints the IKEA Ledberg for illumination. My design is for 12 V Ledberg. Unfortunatly since 2015 IKEA sells only the 24 V Version of LEDberg, so a little bit of hacking is necessary to use it with my controller.
First you have to get access to the PCB-strip (where the LEDs are soldered to). Drill with a 1.5 mm drillbit into the small plastic nose which helds the LEDberg PCB in position and remove the plastic pin. Now you can take the PCB out of the plastic cover. With a small solder iron remove the 4300 resistor in the middle of the PCB strip. We don´t need that anymore. Remove carefully a 1 mm part of the paint at both sides of the strip (the continuos + and - rail) with a sharp knife so that the bare copper can be seen. Solder now two 390 Ohm resistors (1206 size fits perfect) from the pads of the former removed resistor to the outer strips (as can seen on the pictures). Take care of polarity: The end which is connected to + at first led must be soldered to - and vice versa.
The white connector at the end can be desoldered either. We will solder wires directly to the PCB strips.
Put the PCB back in the plastic cover and put a small portion of hot melt glue in the former "nose hole" to fix the strip in the plastic.
So modified the ledberg strips can operate at 12 V now. But take care: Connecting it to the provided power supply (within the ledberg package) will destroy the LEDs now! This power supply we will not need anymore for this project!
Use this description at your own risk!
Making Things Is Fun!!!
Video: https://youtu.be/YxlTE78d1ug
A kinetic art project
designed by Stefan Kneip
This is part one of a Tripthychon of pictures dealing with motion and it is called "Liquid Colours In Motion".
It consists of a moving wheel of glass tubes filled with coloured liquids. It is in the style of the bhaskara wheel. The outer wheel is driven by a planetary gear.
Description
The main part is a big wheel with 12 arms. On each end a test tube with cap is mounted. Inside the test tubes are different coloured liquids. A planetary gear system is turning the main wheel and so the test tubes around the center. By this very slow rotation the liquids are flowing inside the tubes and produce a nice shiny effect. The picture is illuminated by LED strips inside the frame.
In Part one of this installation I used the main colours cyan, magenta and yellow and the corresponding mixing colours (purple, orange and green). Each colour is populating two test tubes to fulfill the circle (as you can see in the video).
Part two is much more impressive. Here I used only magenta and cyan as liquids (alternating). The illumination is changing every 30 sec from white LEDs to UV-LEDs. The UV light leeds to a fluorescence effect and the turning tubes glow in eldritch atmosphere like radioactiv uranium. Very awesome!
The Electronics:
An Arduino based controller electronic is the "brain" of the installation. It can operate in different modes which are adjusted by means of a push-button with integrated LED. By pressing the pushbutton you can circle through the modes. The arduino sketch is attached for operating the circuit as master or slave.
What you need:
Ribba picture frame 50x50cm in black or white from IKEA
LEDberg led strips (4x)
Liquid Ink for inkjet printers in cyan, magenta and yellow
24 glass test tubes of 16 mm diameter and 10 cm length (https://www.tuuters.de/index.php?option=com_virtuemart&view=productdetails&virtuemart_category_id=7&virtuemart_product_id=75&Itemid=121)
cable ties to fix the glass tubes
sheet of AlDibond 50 x 50cm of 3 mm thickness as main assembly board
small geared motor of 2-3 Rpm, 12 V
PIR motion detector (https://www.adafruit.com/product/189)
The circuit board attached (feel free to build one).
Instructions
The printer inc must be diluted with water to get a clear, sligthly coloured liquid. Do not use it too concentrated.
Illumination:
I used in my motion paints the IKEA Ledberg for illumination. My design is for 12 V Ledberg. Unfortunatly since 2015 IKEA sells only the 24 V Version of LEDberg, so a little bit of hacking is necessary to use it with my controller.
First you have to get access to the PCB-strip (where the LEDs are soldered to). Drill with a 1.5 mm drillbit into the small plastic nose which helds the LEDberg PCB in position and remove the plastic pin. Now you can take the PCB out of the plastic cover. With a small solder iron remove the 4300 resistor in the middle of the PCB strip. We don´t need that anymore. Remove carefully a 1 mm part of the paint at both sides of the strip (the continuos + and - rail) with a sharp knife so that the bare copper can be seen. Solder now two 390 Ohm resistors (1206 size fits perfect) from the pads of the former removed resistor to the outer strips (as can seen on the pictures). Take care of polarity: The end which is connected to + at first led must be soldered to - and vice versa.
The white connector at the end can be desoldered either. We will solder wires directly to the PCB strips.
Put the PCB back in the plastic cover and put a small portion of hot melt glue in the former "nose hole" to fix the strip in the plastic.
So modified the ledberg strips can operate at 12 V now. But take care: Connecting it to the provided power supply (within the ledberg package) will destroy the LEDs now! This power supply we will not need anymore for this project!
Use this description at your own risk!
Making Things Is Fun!!!
Similar models
thingiverse
free
IKEA "Ledberg" LED Strip Diffuser by 1overcosine_c
... ikea "ledberg" led strips. when printed using translucent filament, it turns the led strips into coloured mood lights!
thingiverse
free

Ikea LedBerg clip for Vertex K8400 by Wirecase
... the strips, though a bit of extra work this works fine! using a wire of 5 cm or 2 inches for the metric impaired will do nicely.
thingiverse
free
1W power led usb case by tcbilge
...led,
led pcb,
4.7 ohm 1w resistor,
led lens and black holder,
usb a connector.
the resistor is soldered between led(+) and usb(+)
thingiverse
free
Ledberg strip 3030 mount 45deg by LazaroFilm
...he hypercube evolution. to mount it insert it like a t-nut then twist it (i had to use pliers) and finally clip the led strip on.
3dwarehouse
free

IKEA LEDBERG 501.920.73
...ikea ledberg 501.920.73
3dwarehouse
ikea's ledberg 3-strip led light w/ cord and transformer. #ikea #led #ledberg
thingiverse
free
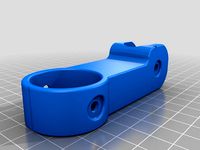
The Geared Head of Feelings by reparator
...ow to assemble the gears on the mount platform:
press the bearings in the gears. assemble everything in the mounting frame first.
thingiverse
free

Tube Clip For LED Strip by ShuttleSpace
...for holding led strip to 1" tube, like on a bike for example.
this is good for non waterproof type since the notch is small.
thingiverse
free

Magic Eye VU Tube Indicator PCB Housing by Van_Houten
...e the screws a 'dummy' inside the top plate because the top plate will snap in place the screws are not really necessary!
grabcad
free

Modular Door Reader
...jected through the thinned plastic.
note the last two assemblies dont appear correct in the online viewer components are missing
thingiverse
free

Bookcase top display IKEA Ledberg holder with directional shade by fiskarn
...gt;< holder>.
the holders are designed for an 19 mm thick shelf.
freecad source included - feel free to change as needed.
Reparator
thingiverse
free

Medaille reparer by Kenzay62
...medaille reparer by kenzay62
thingiverse
medaille reparer
thingiverse
free

Medaille repared by Kenzay62
...medaille repared by kenzay62
thingiverse
medaille repared
thingiverse
free

Eu Adapter Reparation by AndresVH
...eu adapter reparation by andresvh
thingiverse
used for the reparation of a broken adapter with eu plug
thingiverse
free

VesaAdapter75to100 by reparator
...vesaadapter75to100 by reparator
thingiverse
vesa-adapter 75x75 mm to 100 x 100 mm.
thingiverse
free

suport colle repar-EX by mactiti
...suport colle repar-ex by mactiti
thingiverse
suport colle repar-ex + accessoirs
thingiverse
free
Toaster repar part by sellemann
...toaster repar part by sellemann
thingiverse
print toast enjoy
thingiverse
free

Goldfinger reparation by wennes
...goldfinger reparation by wennes
thingiverse
if you want to lie in your bed like james bond...
https://youtu.be/gkn4kcahcei
thingiverse
free

ArduinoBreadboardAdapter by reparator
... not sufficient. the arduino is hold in place with bolds and clips.
lost junction and flying wires are a thing of the past now...
thingiverse
free
babychair repair ( reparation chaise haute ) by franck
...babychair repair ( reparation chaise haute ) by franck
thingiverse
thingiverse
free

Anti-Gravitator by reparator
...lso called levitator or levitron. it lets a small magnet sphere levitate in a magnetic field.
video: https://youtu.be/0ftbobwkf2y
Liquid
turbosquid
$29
Liquid Liquid Extractor
... available on turbo squid, the world's leading provider of digital 3d models for visualization, films, television, and games.
3d_ocean
$5
Liquid Logo
...liquid logo
3docean
liquid logo
liquid logo,you can change your logo
3d_export
$8
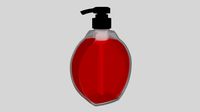
liquid soap
...liquid soap
3dexport
a bottle of liquid soap for any use.
3d_ocean
$5

liquid badge
...liquid badge
3docean
liquid badge you can replace your logo
liquid badge,you can replace your logo
3d_ocean
$4

Abstract Liquid
...ment liquid motion design splash water
high definition of abstract liquid mesh. great for motion graphic and product presentation
3d_export
$5

vape liquid bottle
...vape liquid bottle
3dexport
vape liquid bottle (~100ml)
turbosquid
$45
glass with liquid
...
royalty free 3d model glass with liquid for download as max on turbosquid: 3d models for games, architecture, videos. (1433929)
turbosquid
$39

liquid amber
...squid
royalty free 3d model liquid amber for download as max on turbosquid: 3d models for games, architecture, videos. (1345717)
turbosquid
$39

liquid amber
...squid
royalty free 3d model liquid amber for download as max on turbosquid: 3d models for games, architecture, videos. (1345458)
turbosquid
$20
pump liquid
...osquid
royalty free 3d model pump liquid for download as max on turbosquid: 3d models for games, architecture, videos. (1163602)
Motion
3ddd
$1
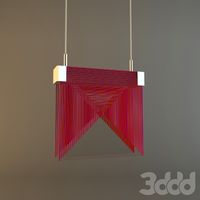
Fabbian Motion
...motion
3ddd
fabbian , motion
светильник fabbian коллекция motion. текстурка в комплекте.
design_connected
$7
Motion Notion
...motion notion
designconnected
howard miller motion notion computer generated 3d model. designed by nelson, george.
turbosquid
$10
motion shark
...squid
royalty free 3d model motion shark for download as rib on turbosquid: 3d models for games, architecture, videos. (1261380)
3d_ocean
$6
Motion Set
...ng face and vertex, three file format are included,very useful for motion graphic artist , total poly 143.952 total vertex 79.952
3d_export
$10
Motion Tracker Aliens
...er out moving objects from stationary background and then displayed them on the monitor as a series of contours of probable loci.
3d_export
$6
motion stand for book and logo
...motion stand for book and logo
3dexport
motion stand for book and logo
turbosquid
$99

Planes of Motion Combo
... available on turbo squid, the world's leading provider of digital 3d models for visualization, films, television, and games.
turbosquid
$50
Rotary-straight motion
...y-straight motion for download as 3ds, obj, fbx, 3dm, and skp on turbosquid: 3d models for games, architecture, videos. (1402602)
3d_export
$6

Reciprocating Motion
...#39;vinci's reciprocating motion contraption the model is used for picking up buckets of water from a well materials included
3d_export
$15
M314 Motion Tracker Aliens
...ng objects from stationary background and then displayed them on the m314's monitor as a series of contours of probable loci.
Colours
3d_export
$5

Diamons colours
...diamons colours
3dexport
diamons colours<br>.blend
design_connected
$16

Add Colour
...add colour
designconnected
stelton add colour computer generated 3d model. designed by jacobsen, arne.
turbosquid
$4

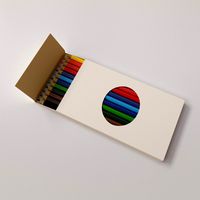
Coloured Pencils
...ty free 3d model coloured pencils for download as max and fbx on turbosquid: 3d models for games, architecture, videos. (1702123)
3d_export
free
colour pencils
...colour pencils
3dexport
turbosquid
$5

Colour Train
...ree 3d model colour train for download as obj, fbx, and blend on turbosquid: 3d models for games, architecture, videos. (1504572)
turbosquid
$12
Colour pencil
... available on turbo squid, the world's leading provider of digital 3d models for visualization, films, television, and games.
turbosquid
$10

Colour pen
...3d model colour pen for download as ma, ma, fbx, obj, and png on turbosquid: 3d models for games, architecture, videos. (1581204)
turbosquid
$9

Coloured vases
...loured vases for download as 3ds, max, obj, c4d, fbx, and skp on turbosquid: 3d models for games, architecture, videos. (1404182)
3ddd
$1

Colour square poufs
...colour square poufs
3ddd
пуф
four colour square poufs: violet, red, pink and yellow.
3ddd
free

KARE / Vintage Coloure
... настенные , часы
настенные часы vintage coloure, kare design