Thingiverse
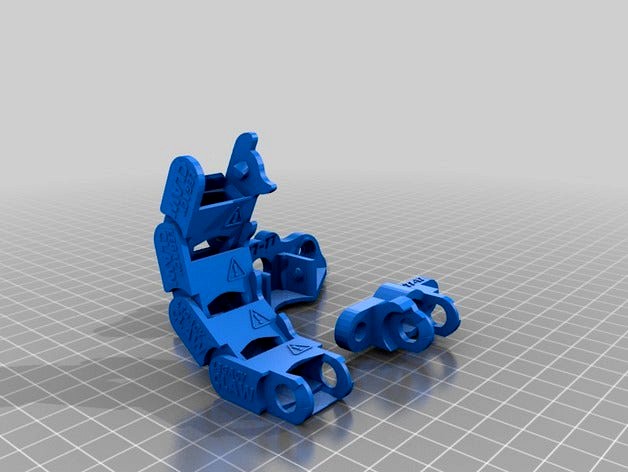
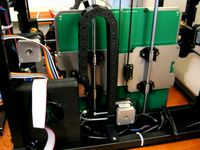
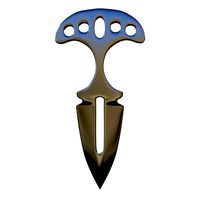
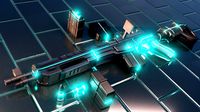
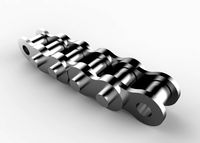
LEGACY CLAW ENERGY CHAIN TESTED by 77-17
by Thingiverse
Last crawled date: 3 years ago
THOROUGHLY RE-FITTED
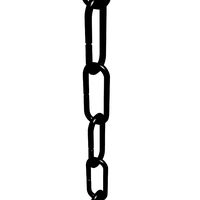
DEFINITIVE ENERGY / CABLE / DRAG CHAIN.
Backwards Compatible (MK-III, MK-II & MP CABLE CHAIN).
UNIVERSAL MOUNTS INCLUDED FOR MOST APPLICATIONS
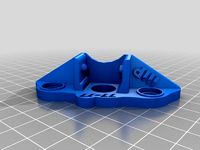
MONOPRICE SELECT MINI HEATED BED BRACKET INCLUDED
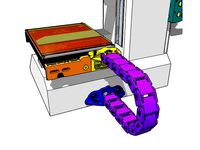
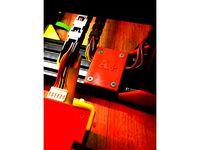
SAFELY REROUTE BADLY PLACED HEATED BED WIRES USING THE CLAW
+PRINTS AS A 4 PACK. Print and give them a little click to start the chain reaction.
+3 PACK & STARTER LINK ALSO INCLUDED
+RADIAL STOPS to repeatedly limit movement.
+UNIVERSAL MOUNTING BRACKETS INCLUDED
-MONOPRICE SELECT MINI MOUNTING BRACKET INCLUDED
INCLUDES
+Clip together construction prints Easily on monoprice bed.
+What dreams are made of.
NOTE
Very positive engagement.
Pay attention to orientation when clippin together. Not Designed to come apart easily.
ABOUT MONOPRICE SELECT MINI INSTALLATION
INSTALLATION GENERAL
+Fitted Monoprice select Mini Bed Mount, Use existing holes as pilot holes for bed mount.
+Three holes need to be drilled into the back of the cabinet below the bed.
+Open bottom of printer using proper sized philips (star) Screwdriver.
+Reposition wires to prevent wire damage during drilling.
+Use step drill to prevent sudden drill penetration.
+Fit these holes AFTER BED MOUNT and CHAIN configuration.
+If you are doing this repair on a new printer and are just adding wire you can appropriate
heat shrink tubing without the use of solder and still have satisfactory results.
+Glue type tube of 3:1 ratio preferred.
Wires sized appropriately similar will not get very hot in use.
CHOICE OF REPAIR SOLUTION
Install a new heated bed power source and relay or solder equivalent longer wires to the bed or use the existing wires. This is a reasonable route for the wires.
Existing wires connector clips should fit through the chain although if you chose to solder in a few more inches of wire it allows for easy cable threading.
BED MOUNT
+Remove the bed to install the Bed mount.
+Drill the four small holes on back of bed with a clearance hole for your smallest nut and
bolts set of four that's at least 3/8" in length.
PRINTING 'ROOF' OF CLAW
+A Bic hex type ball-point pen can be dropped into the claw chain print as the crest of the
side walls begins to show.
The pen is a good size to support the first layer of the top of the chain.
DO NOT use Skirt or Brim or support as these will mess up the chain. All layer height
setting have worked well on this print.
PREFERRED SETTING INFO
+Prints best as positioned in STL File.
+Glass Bed used in testing models.
Multiple links not recommended without a piece of glass.
+3.5mm or greater retract.
+30mm/sec print speed +/- Depending on quality and ambient conditions.
+Clear Tough PLA or PET-G. Top Range of heat for good layer adhesion.
+NO BRIM / NO SKIRT / NO SUPPORT
+.175 layer height works very well.
+4 mm wall
+100% Fill
+Bic pen (Hex shaped) inserted just before first layer of top of chain to ensure support
without getting in the way of the nozzle.
DEFINITIVE ENERGY / CABLE / DRAG CHAIN.
Backwards Compatible (MK-III, MK-II & MP CABLE CHAIN).
UNIVERSAL MOUNTS INCLUDED FOR MOST APPLICATIONS
MONOPRICE SELECT MINI HEATED BED BRACKET INCLUDED
SAFELY REROUTE BADLY PLACED HEATED BED WIRES USING THE CLAW
+PRINTS AS A 4 PACK. Print and give them a little click to start the chain reaction.
+3 PACK & STARTER LINK ALSO INCLUDED
+RADIAL STOPS to repeatedly limit movement.
+UNIVERSAL MOUNTING BRACKETS INCLUDED
-MONOPRICE SELECT MINI MOUNTING BRACKET INCLUDED
INCLUDES
+Clip together construction prints Easily on monoprice bed.
+What dreams are made of.
NOTE
Very positive engagement.
Pay attention to orientation when clippin together. Not Designed to come apart easily.
ABOUT MONOPRICE SELECT MINI INSTALLATION
INSTALLATION GENERAL
+Fitted Monoprice select Mini Bed Mount, Use existing holes as pilot holes for bed mount.
+Three holes need to be drilled into the back of the cabinet below the bed.
+Open bottom of printer using proper sized philips (star) Screwdriver.
+Reposition wires to prevent wire damage during drilling.
+Use step drill to prevent sudden drill penetration.
+Fit these holes AFTER BED MOUNT and CHAIN configuration.
+If you are doing this repair on a new printer and are just adding wire you can appropriate
heat shrink tubing without the use of solder and still have satisfactory results.
+Glue type tube of 3:1 ratio preferred.
Wires sized appropriately similar will not get very hot in use.
CHOICE OF REPAIR SOLUTION
Install a new heated bed power source and relay or solder equivalent longer wires to the bed or use the existing wires. This is a reasonable route for the wires.
Existing wires connector clips should fit through the chain although if you chose to solder in a few more inches of wire it allows for easy cable threading.
BED MOUNT
+Remove the bed to install the Bed mount.
+Drill the four small holes on back of bed with a clearance hole for your smallest nut and
bolts set of four that's at least 3/8" in length.
PRINTING 'ROOF' OF CLAW
+A Bic hex type ball-point pen can be dropped into the claw chain print as the crest of the
side walls begins to show.
The pen is a good size to support the first layer of the top of the chain.
DO NOT use Skirt or Brim or support as these will mess up the chain. All layer height
setting have worked well on this print.
PREFERRED SETTING INFO
+Prints best as positioned in STL File.
+Glass Bed used in testing models.
Multiple links not recommended without a piece of glass.
+3.5mm or greater retract.
+30mm/sec print speed +/- Depending on quality and ambient conditions.
+Clear Tough PLA or PET-G. Top Range of heat for good layer adhesion.
+NO BRIM / NO SKIRT / NO SUPPORT
+.175 layer height works very well.
+4 mm wall
+100% Fill
+Bic pen (Hex shaped) inserted just before first layer of top of chain to ensure support
without getting in the way of the nozzle.
Similar models
thingiverse
free
Monoprice Select Mini Heated Bed Fix Kit Complete (Chain Update) by 77-17
...type tube of 3:1 ratio preferred. wires sized appropriately similar will not get very hot in use. choice of...
thingiverse
free
Monoprice Bed Fix Cable chain bracket A by 77-17
... wires and two small screw holes for bracket.
petg
3mm layer
8mm shell thickness
100% fill
fits chain securely without trimming.
thingiverse
free

Monoprice Select Mini Bed Cable Support by Littlefiver
...he printer bed, but you can mirror it for the left side if you wish.
i secured this with two m3 bolts and nuts. plus a cable tie.
thingiverse
free

Anet A8 Heated Bed Bracket For Soldered Cables by IXChronosXI
...n mind that there are small led's on the bottom side of the heated bed, don't break them off when installing the bracket.
thingiverse
free

Heat Bed Wire Support Bracket - Maker Select, Wanhao, Prusa I3 by wellsja
...heat bed moves back and forth.
can be mounted to the rear of the printer using the two holes or by using double sided foam tape.
thingiverse
free

MPSMv2 Heat Bed External Cable Support by nashville_bill
...nashville_bill
thingiverse
this thing was designed to reduce stress on the new heat bed cables on my monoprice select mini v2.
thingiverse
free

MP Mini Bed Mounting Bracket by brianholley
...ently working on a companion bracket to hold a raspberry pi camera for bed-stabilized timelapses that will mount on this bracket.
thingiverse
free
Tevo Black Widow Heated Bed Cable Chain by 911ordinateur
...revent the wires for been drag by the heated bed level screws.
i also included the solidworks file if any modification is needed.
thingiverse
free
Rigidbot heated bed energy chain mount brackets by W11cE
...l hit the case of the main board.
(i printed an extension for the chain to use less actual chain. do not be confused about this.)
thingiverse
free

Monoprice Select Mini Benchy Spinner
...ts over the extruder feeder bolt on the top of the tower for a monoprice select mini
worked for me if you use a brim and supports
Legacy
turbosquid
$3

Mario Legacy
... available on turbo squid, the world's leading provider of digital 3d models for visualization, films, television, and games.
3ddd
$1

Donghia Acadia Legacy Table
... acadia legacy , журнальный
donghia acadia legacy table, coffee table
3ddd
$1
Legacy HL120
...legacy hl120
3ddd
миксер
професиональный миксер legacy_hl120 mixer
3d_export
free

subaru legacy wagon drift
...subaru legacy wagon drift
3dexport
subaru legacy wagon drift
3d_export
$129

subaru legacy 2020
...subaru legacy 2020
3dexport
3d_ocean
$89

Subaru Legacy tourer 2010
...d on real car base. model is created accurately, in real units of measurement, qualitatively and maximally close to the origin...
cg_studio
$150

Legacy 5003d model
...5003d model
cgstudio
.3ds .c4d .dxf .obj - legacy 500 3d model, royalty free license available, instant download after purchase.
turbosquid
$1
Legacy Game Models
...
royalty free 3d model legacy game models for download as max on turbosquid: 3d models for games, architecture, videos. (1642070)
3d_export
$140

Legacy 500 3D Model
...rt
embraer legacy 500 450 aircraft airplane plane planes business jet bizjet executive
legacy 500 3d model tartino 33621 3dexport
cg_studio
$50

Subaru Legacy 20053d model
...r auto new japan sport sedan
.max - subaru legacy 2005 3d model, royalty free license available, instant download after purchase.
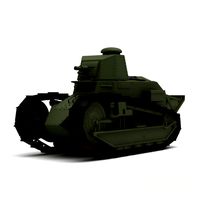
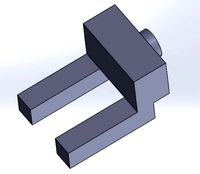
Claw
3d_ocean
$20
Claw Tank
...claw tank
3docean
canons claw tank concept military robot tank vehicle
3d model of a concept claw tank.
3d_export
$5

Claw of Beliar
...claw of beliar
3dexport
the claw of beliar is a sword from the game gothic 2.
turbosquid
free

Youbionic Claw
...
turbosquid
free 3d model youbionic claw for download as stl on turbosquid: 3d models for games, architecture, videos. (1377870)
turbosquid
$5

Hand Claw
...rbosquid
royalty free 3d model hand claw for download as obj on turbosquid: 3d models for games, architecture, videos. (1143701)
turbosquid
$39

Claw Hammer
...royalty free 3d model claw hammer for download as obj and fbx on turbosquid: 3d models for games, architecture, videos. (1296497)
turbosquid
$25

Raptor Claw
...yalty free 3d model raptor claw for download as obj and blend on turbosquid: 3d models for games, architecture, videos. (1449175)
turbosquid
$23

Clawed Frogman
...ty free 3d model clawed frogman for download as obj and blend on turbosquid: 3d models for games, architecture, videos. (1413531)
turbosquid
$2
Iron Claw
...royalty free 3d model iron claw for download as blend and obj on turbosquid: 3d models for games, architecture, videos. (1596543)
turbosquid
$45

Claw Hammer
...y free 3d model claw hammer for download as 3ds, max, and obj on turbosquid: 3d models for games, architecture, videos. (1299970)
turbosquid
$20

Claw Hammer
...y free 3d model claw hammer for download as max, obj, and fbx on turbosquid: 3d models for games, architecture, videos. (1288979)
77
turbosquid
$30
Necklace 77
...osquid
royalty free 3d model necklace 77 for download as 3dm on turbosquid: 3d models for games, architecture, videos. (1547950)
turbosquid
$20

Bath 77
... free 3d model bath 77 for download as max, dxf, fbx, and dwg on turbosquid: 3d models for games, architecture, videos. (1277142)
turbosquid
$100

TAB-77
... available on turbo squid, the world's leading provider of digital 3d models for visualization, films, television, and games.
turbosquid
$39

Decor 77
... available on turbo squid, the world's leading provider of digital 3d models for visualization, films, television, and games.
turbosquid
$35

Earrings 77
... available on turbo squid, the world's leading provider of digital 3d models for visualization, films, television, and games.
turbosquid
$25

Pendant 77
... available on turbo squid, the world's leading provider of digital 3d models for visualization, films, television, and games.
turbosquid
$9

Office 77
... available on turbo squid, the world's leading provider of digital 3d models for visualization, films, television, and games.
turbosquid
$3

chair - 77
... available on turbo squid, the world's leading provider of digital 3d models for visualization, films, television, and games.
turbosquid
$1

Book 77
... available on turbo squid, the world's leading provider of digital 3d models for visualization, films, television, and games.
turbosquid
$7

Vase 77
...odel vase 77 for download as max, max, 3ds, fbx, obj, and stl on turbosquid: 3d models for games, architecture, videos. (1544388)
Energy
3ddd
free
battery energier
...battery energier
3ddd
battery energier , батарейка
battery energier
3ddd
$1

Термостаты ENERGY
... терморегулятор , термостат
термостаты фирмы energy
3d_export
$10

energy capsule
...energy capsule
3dexport
energy capsule
3d_export
$5

energy annon
...energy annon
3dexport
energy cannon
3d_ocean
$6
Energy bulb
...energy bulb
3docean
bulb eco ecological energy bulb lamp light lighting
energy bulb.
3d_ocean
$5

Energy Drink
...energy drink
3docean
biohazard cool drink energy drink fresh ice power soda can
an energy drink can
3d_export
$5

energy drink
...energy drink
3dexport
high poly model of energy drink....
3d_export
$18

boiler-chemical energy-electricity-thermal energy
...iler-chemical energy-electricity-thermal energy
3dexport
boiler-chemical energy-electricity-thermal energy<br>3ds max 2015
3d_export
$6
energy - m14
...rom m14, powered by energy that shoots 10 powerful energy away<br>"take it easy, this will kill you without pain"
3ddd
$1
Jacuzzi Energy
...jacuzzi energy
3ddd
джакузи
белая, прямоугольная акриловая ванна jacuzzi energy 180
17
3d_export
$6

rocks 17
...rocks 17
3dexport
rocks 3d model 17
3ddd
$1

PLANTS 17
...plants 17
3ddd
цветок , горшок
plants 17,, pots in diameter 100,80,60,40cm,,, enjoy
3d_export
$6
tap-17
...tap-17
3dexport
3d_export
$6
set-17
...set-17
3dexport
3d_export
$27

C-17 Globemaster
...c-17 globemaster
3dexport
c-17 globemaster
3ddd
free
Renault FT-17
...renault ft-17
3ddd
ft-17 , renault , танк
turbosquid
$40
cottage 17
...bosquid
royalty free 3d model cottage 17 for download as max on turbosquid: 3d models for games, architecture, videos. (1377003)
turbosquid
$30

Apartment 17
...squid
royalty free 3d model apartment 17 for download as max on turbosquid: 3d models for games, architecture, videos. (1432680)
turbosquid
$7
Rock 17
...turbosquid
royalty free 3d model rock 17 for download as obj on turbosquid: 3d models for games, architecture, videos. (1486522)
turbosquid
$5

Decor 17
...urbosquid
royalty free 3d model decor 17 for download as stl on turbosquid: 3d models for games, architecture, videos. (1677126)
Chain
archibase_planet
free
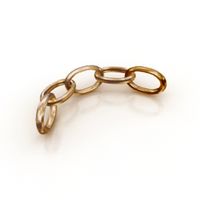
Chain
...chain
archibase planet
chain chain link chain loop
chain n020708 - 3d model (*.gsm+*.3ds) for interior 3d visualization.
3d_export
$5
chain
...chain
3dexport
3d model chain
3d_export
$5
chain
...chain
3dexport
chain. obj,fbx,blend
archibase_planet
free

Chain
...se planet
chain circuit catena
chain - archicad parametrical gdl 3d model (*.gsm). regulation of the length, curvature and angle.
archibase_planet
free
Chain
...n
archibase planet
chain circuit catena
chain - archicad parametrical gdl 3d model(*.gsm). regulation of the length and angle xyz
3d_ocean
$5
Chain
...chain
3docean
3d models chain design elements
3d models, design elements
3d_ocean
$5

Chain
...chain
3docean
3d models chain design elements
3d models, design elements
turbosquid
$10
Chain
...hain
turbosquid
royalty free 3d model chain for download as on turbosquid: 3d models for games, architecture, videos. (1329200)
turbosquid
$9

chain
...hain
turbosquid
royalty free 3d model chain for download as on turbosquid: 3d models for games, architecture, videos. (1549461)
turbosquid
$2
Chain
...hain
turbosquid
royalty free 3d model chain for download as on turbosquid: 3d models for games, architecture, videos. (1148668)
Tested
turbosquid
$99

test
...st
turbosquid
royalty free 3d model test for download as max on turbosquid: 3d models for games, architecture, videos. (1251637)
turbosquid
$63
TEST
...st
turbosquid
royalty free 3d model test for download as max on turbosquid: 3d models for games, architecture, videos. (1446233)
turbosquid
$1
test
...st
turbosquid
royalty free 3d model test for download as fbx on turbosquid: 3d models for games, architecture, videos. (1360941)
3d_export
free

johnny test
...johnny test
3dexport
johnny test 3d
turbosquid
$15
Test
... available on turbo squid, the world's leading provider of digital 3d models for visualization, films, television, and games.
turbosquid
$2

test
... available on turbo squid, the world's leading provider of digital 3d models for visualization, films, television, and games.
turbosquid
free

test
... available on turbo squid, the world's leading provider of digital 3d models for visualization, films, television, and games.
turbosquid
free

Test
... available on turbo squid, the world's leading provider of digital 3d models for visualization, films, television, and games.
turbosquid
free

Test
... available on turbo squid, the world's leading provider of digital 3d models for visualization, films, television, and games.
3d_export
$5
gripper test
...gripper test
3dexport
robot gripper test model