Thingiverse

Large Omni Wheel by bratan
by Thingiverse
Last crawled date: 3 years, 1 month ago
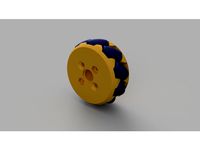
This is my design of Omni Wheel for robotics platform I'm working on (based on Mars Rover).
Omni Wheel as it's name suggest can move in pretty much any direciton. It can roll like a regular wheel forward, but can also slide sideways thanks to small rollers along it's perimeter.
In my case I needed to use omni wheel to overcome "scrub drag" during "skid steering" of 6 wheel platform. Here's a nice and easy to understand article: http://curriculum.vexrobotics.com/curriculum/drivetrain-design/drivetrain-terminology.html
Wheel is about 120mm in diameter and consists of multiple parts most of which can be 3D printed.
Hub is designed to fit 12mm hex shaft motor couplers (like ones used in "Wild Thumper" 6WD toy).
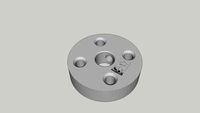
3D Printed Parts:
First half rim with integrated hub (largest part)
Second half rim
Omni Rollers (18 per wheel)
Rim cover (required to hold rollers in place).
I laser cut rim cover from 1/16" delryn (acetal) resin, however it should be easy to print one as well. I've included STL file for it, but never actually printed.
Other Parts:
18 x 5x24 mm stainless pins/axles for roller axis (http://a.co/hJ0sJgK)
18 x M3x8 mm (or 10 mm will work) screws
3 x M4x16 mm (you can use longer) screws
1 x M4x20 mm screw (for attaching to motor shaft coupler if)
How I printed it:
NOTE: rim_w_integrated_hub.stl is upside down, so flip it before printing.
I used PETG to print both Rims and PLA for rollers.
After printing rollers I cleaned up bottom of opening a little with dremel to make sure metal axles are easily rotated inside.
It took about 3.5 hrs for roller to print. Rim with integrated hub 3 hours, other half of rim 2 hours.
Assembly:
Insert axles into a roller and push it into each slot of one half rim. Make sure roller is rotating easily. Place rim cover on top and screw all 9 M3 screws. Plastic seems to hold screws pretty securely, but if you wish you can use longer screws with lock nuts on the ends for ever more secure assembly.
Repeat for second half rim. Insert regular half rim into rim with integrated hub. Rotate so each roller of one half rim is offset (20 degrees) from rollers of the other half rim AND all 6 M4 holes of the inner hub align. Just keep rotating it until you see light shining thru those holes :)
Then use three M4 screws to secure both half rims together. There are 6 holes, but 3 screw are sufficient.
At this point your omni wheel is assembled an can mounted to the motor shaft.
Other thoughts:
This design is not perfect and has not been tested much. You'll probably get much better results if you can print rollers with flexible filament or add rubber coating. Size of rollers and distance between them is not ideal. Smoother rolling and less resistance can be created if rollers made longer, but I didn't find pre-made stainless dowels of the longer size at a reasonable price. I might re-design this in the future.
Video of wheels in action:https://youtu.be/BNUZhnwHvlU
Omni Wheel as it's name suggest can move in pretty much any direciton. It can roll like a regular wheel forward, but can also slide sideways thanks to small rollers along it's perimeter.
In my case I needed to use omni wheel to overcome "scrub drag" during "skid steering" of 6 wheel platform. Here's a nice and easy to understand article: http://curriculum.vexrobotics.com/curriculum/drivetrain-design/drivetrain-terminology.html
Wheel is about 120mm in diameter and consists of multiple parts most of which can be 3D printed.
Hub is designed to fit 12mm hex shaft motor couplers (like ones used in "Wild Thumper" 6WD toy).
3D Printed Parts:
First half rim with integrated hub (largest part)
Second half rim
Omni Rollers (18 per wheel)
Rim cover (required to hold rollers in place).
I laser cut rim cover from 1/16" delryn (acetal) resin, however it should be easy to print one as well. I've included STL file for it, but never actually printed.
Other Parts:
18 x 5x24 mm stainless pins/axles for roller axis (http://a.co/hJ0sJgK)
18 x M3x8 mm (or 10 mm will work) screws
3 x M4x16 mm (you can use longer) screws
1 x M4x20 mm screw (for attaching to motor shaft coupler if)
How I printed it:
NOTE: rim_w_integrated_hub.stl is upside down, so flip it before printing.
I used PETG to print both Rims and PLA for rollers.
After printing rollers I cleaned up bottom of opening a little with dremel to make sure metal axles are easily rotated inside.
It took about 3.5 hrs for roller to print. Rim with integrated hub 3 hours, other half of rim 2 hours.
Assembly:
Insert axles into a roller and push it into each slot of one half rim. Make sure roller is rotating easily. Place rim cover on top and screw all 9 M3 screws. Plastic seems to hold screws pretty securely, but if you wish you can use longer screws with lock nuts on the ends for ever more secure assembly.
Repeat for second half rim. Insert regular half rim into rim with integrated hub. Rotate so each roller of one half rim is offset (20 degrees) from rollers of the other half rim AND all 6 M4 holes of the inner hub align. Just keep rotating it until you see light shining thru those holes :)
Then use three M4 screws to secure both half rims together. There are 6 holes, but 3 screw are sufficient.
At this point your omni wheel is assembled an can mounted to the motor shaft.
Other thoughts:
This design is not perfect and has not been tested much. You'll probably get much better results if you can print rollers with flexible filament or add rubber coating. Size of rollers and distance between them is not ideal. Smoother rolling and less resistance can be created if rollers made longer, but I didn't find pre-made stainless dowels of the longer size at a reasonable price. I might re-design this in the future.
Video of wheels in action:https://youtu.be/BNUZhnwHvlU
Similar models
thingiverse
free

6 Roller 65mm Omni Wheel by anans1
...hough i also recommend super glue especially in the spokes for additional reinforcement if the wheel is going to see much impact.
grabcad
free

Wheel support assembly
... bolts of the wha. when replacing, a wheel hub assembly should be torqued to the vehicle's specifications to prevent failure.
thingiverse
free

Omni-Wheel by BLNorris
...th.
i plan to print this out and thread the holes in the rollers, then use a threaded axle and a little glue to keep it in place.
thingiverse
free
70mm Mecanum Wheel by ab86uk
....
the rollers spin freely on 4mm metal rod cut to 26.5mm lengths.
the shafts are about the same as the 58mm lego nxt omni wheels.
thingiverse
free

Outdoor trailer wheel hub for 3dSets Wheels by Teal69
... withoud making the track wider. you have to use 2x long m4 screws to screw the wheels against the new "wheel hub nut".
grabcad
free

60mm Omni wheel (Omniwheel) for 3mm Shaft
...20 small rollers. the mount is for a 3mm shaft and is a clamp hub from servo city. (https://www.servocity.com/770-clamping-hubs).
thingiverse
free

Flex Coupler by oodanner
... of these will be. i also had a design constraint of no longer than 25mm so the dimensions are 25mm long, 26mm width and height.
grabcad
free

3D Printed flywheel
...n a mendel prusa i2.
rim cut from 3.5" galvanised pipe.
centre collet made of brass with grub screw to secure wheel to axle.
thingiverse
free

Tetrix: axle hub "one has gone missing" - student by rimmer2049
...ne has gone missing",
doesn't have the threading in the screws, however screw will bite as i have tested it with wheels.
3dwarehouse
free
Universal Aluminum Mounting Hub for 5mm Shaft, M3 Holes
... and one 1.5 mm allen wrench for use with the set screws. each hub has four threaded mounting holes for m3 screws (not included).
Bratan
thingiverse
free
Mount for laser beam combiner by bratan
... light object's 25mm beam combiner mount to the sh-g350d laser cutter.
detailed guide can be found here: http://goo.gl/tfdjrx
thingiverse
free
Autel EVO 2 Galaxy Tab 10 Holder by bratan
...2 galaxy tab 10 holder by bratan
thingiverse
redesigned this to work with galaxy tab a 10" tablet with slim protective case
thingiverse
free
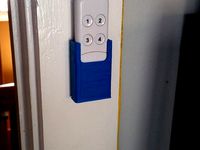
Aeon Labs Minimote wall mount by bratan
... (z-wave remote). can be mounted with 2 screws or double-sided tape.
i only tested it with v1 remote, not sure if it will fit v2.
thingiverse
free

Prusa i3 Spool Mount for 3mm Frame by bratan
...inner (3mm) steel frame (like one sold by replikeo) and also made mount longer with holes at the bottom to secure it with screws.
thingiverse
free

COVID-19 Face Shield by bratan
...n! no chin reinforcement. no logo.
demo: https://youtu.be/xrxesdebrmq
assembly video: https://www.youtube.com/watch?v=d00mecaeyru
thingiverse
free

Filament Spool Enlarger by bratan
...ds both sides together (you can also use threaded rod).
if you don't have access to laser cutter, you can print rims as well.
thingiverse
free

LED Panel Mount by bratan
...hat has standard 1/4" thread. i've mounted lights on mini ball-heads that's capable of holding the weight (barely).
thingiverse
free

Dewalt DW715 Miter Saw vacuum exhaust adapter by bratan
...n the vacuum end. you might want to make it longer too if your printer doesn't have layer separation issue on large objects.
thingiverse
free

E3D V6 Clone Direct Drive Adapter Insert by bratan
...imple one. it screws in using large flat head screwdriver into top of hotend and then you just insert correctly cut ptfe tube...
thingiverse
free

Micromake Delta Printer lasercut Spool Mount by bratan
...ws. speaking of screws, i used three 4-40 1/2" machine screws with nylock nuts, but feel free to use 3m screws/nuts as well.
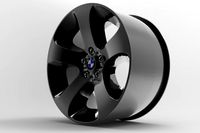
Omni
turbosquid
$10

Omni Wheel
...turbosquid
royalty free 3d model omni wheel for download as on turbosquid: 3d models for games, architecture, videos. (1632961)
turbosquid
$89

Omni Armchair
... available on turbo squid, the world's leading provider of digital 3d models for visualization, films, television, and games.
turbosquid
$79

Omni Bench
... available on turbo squid, the world's leading provider of digital 3d models for visualization, films, television, and games.
turbosquid
$69

Omni Chair
... available on turbo squid, the world's leading provider of digital 3d models for visualization, films, television, and games.
turbosquid
$10

Omni King
... available on turbo squid, the world's leading provider of digital 3d models for visualization, films, television, and games.
turbosquid
$9

OMNI CHAIR
... model omni chair for download as max, max, 3ds, fbx, and obj on turbosquid: 3d models for games, architecture, videos. (1644795)
3ddd
$1

Materia - Omni
...oak top, complement the armchair perfectly, making omni a modern and elegant, eye-catching feature in hotels and reception areas.
turbosquid
$9

Omni black coin
...id
royalty free 3d model omni black coin for download as max on turbosquid: 3d models for games, architecture, videos. (1499436)
turbosquid
$9

Omni gold coin
...uid
royalty free 3d model omni gold coin for download as max on turbosquid: 3d models for games, architecture, videos. (1499434)
turbosquid
$9

Omni Techo chair
...e 3d model omni techo chair for download as max, obj, and fbx on turbosquid: 3d models for games, architecture, videos. (1528704)
Large
3d_export
$15
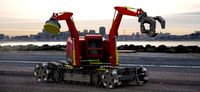
large excavator
...large excavator
3dexport
large excavator
design_connected
$22

Daydream large
...daydream large
designconnected
dedon daydream large computer generated 3d model. designed by frinier, richard.
design_connected
$7
Laccio Large
...laccio large
designconnected
knoll laccio large computer generated 3d model. designed by breuer, marcel.
3ddd
$1

MOLTENI LARGE
... подушка , плед
диван molteni&c; модель large
3ddd
$1

Molteni Large
... подушка , плед
диван molteni&c; модель large
3ddd
$1

CLAUDINE LARGE
...audine large
3ddd
claudine large , arflex
модель сделана в размерах и цветах аналога ...
design_connected
$11

Ovo Large
...ovo large
designconnected
cor ovo large armchairs computer generated 3d model. designed by studio vertijet.
design_connected
$4

Cu Large
...cu large
designconnected
kristalia cu large coffee tables computer generated 3d model. designed by monica graffeo.
3d_ocean
$18

Large sausage
...rge meat mental ray obj photorealistic sausage scanned vray
scanned 3d model of large sausage placed on rectangular wooden board.
design_connected
$16

Filly Large
...onnected
photo-realistic 3d models of the filly large chair from bonaldo for 3d architectural and interior design presentations.
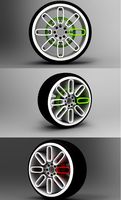
Wheel
archibase_planet
free
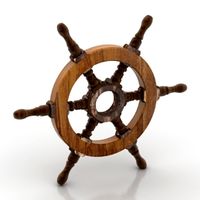
Wheel
...l steering control steering wheel
wheel ship steering wheel n060215 - 3d model (*.gsm+*.3ds+*.max) for exterior 3d visualization.
3d_ocean
$14
Wheel
...wheel
3docean
car rim car wheel rim wheel
high poly car wheel design. 16,840 polys
3d_export
free
wheel
...wheel
3dexport
wheel
3d_export
free
wheel
...wheel
3dexport
wheel
3d_export
free
Wheel
...wheel
3dexport
wheel
3d_export
$5

wheel
...wheel
3dexport
wheel for car.
3d_export
$5
wheel
...wheel
3dexport
car wheel
3d_export
$5
wheel
...wheel
3dexport
car wheel
3d_export
$5

wheel
...wheel
3dexport
car wheel
3d_export
$5

wheel
...wheel
3dexport
car wheel