Thingiverse

Kossel Magnetic Effector by Debio
by Thingiverse
Last crawled date: 3 years, 1 month ago
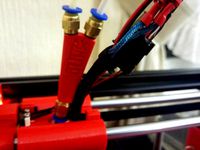
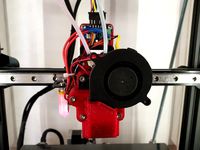
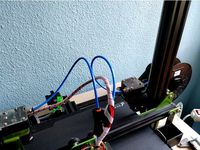
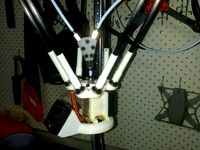
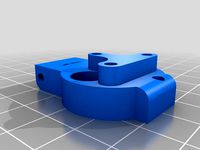
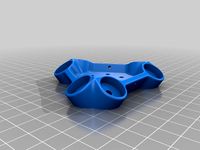
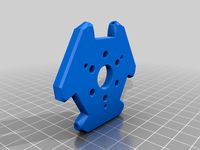
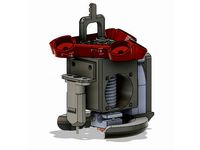
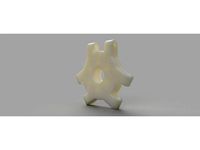
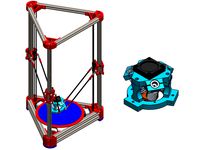
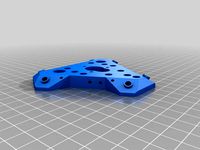
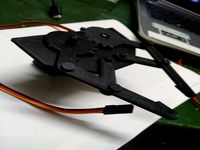
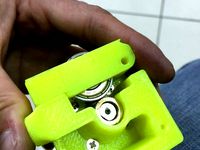
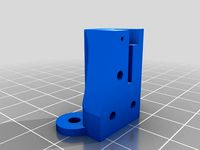
This is my WIP Kossel effector for magnetic arms with ball-studs and an E3D v6. It also features a Y-joint built into the effector mounting bracket to allow for single nozzle dual extrusion.
Note that while the preview screenshot contains a fan, I haven't finished that mount yet.
Here's the gcode I use for tool change in Simplify 3d:
;BEGIN TOOL CHANGE
G92 E0
G1 E-9 F[toolchange_retract_speed] ; retract previous tool
G91
G1 Z5 F[travel_speed] ; lift
G90
G1 E-40 F300
G1 E-[toolchange_retract_distance] F[toolchange_retract_speed]
T[new_tool] ; switch to new tool and offsets
G1 X[next_position_x] Y[next_position_y] F[travel_speed] ; move to next printing location
G92 E0
G1 E[toolchange_prime_distance] F1800 ; prime new tool
G92 E0
G1 Z[next_position_z] F[travel_speed]
;END TOOL CHANGE
Note that this absolutely requires a priming tower.
The key insight in the gcode is to do a normal retraction, a slow retraction to let the filament cool rather than making a long tail, then a long and fast retraction to get it all the way up the Y-joint. It's a balance - if you retract too quickly, you get a long tail on the filament and jam. If you retract too slowly, you get blobs.
In this case, my retraction distance is 8mm, my retraction speed is 40mm/sec, my toolchange retraction distance is 90mm, and my toolchange retraction speed is 50mm/sec.
Similar models
thingiverse
free

Dual material Y joiner remix by hackwell
...ustom gcode
g92 e0 t1
g91
g1 t1 e-140 f3500; unload filament
g90
g92 e0 t1
g0 x{prime_tower_position_x} y{prime_tower_position_y}
thingiverse
free
Dual Extrusion Y Splitter by AxMod3DPrint
...ume printing
g90; absolute coordinates
tool change retraction in s3d is set to 6mm with a 2.5mm extra restart distance at 100mm/s
thingiverse
free

E3D v6 dual extrusion by dunno_k
...g
g1 e-150.000 f12000 ; reatrac fully fast to rip of eventual strings
t[new_tool]
g92 e0
g1 e151.000 f900 ; prime extruder
g92 e0
thingiverse
free
A20M A10M BigMac MKII 5015 Blower
...
g1 e70 f3000
g92 e0
g1 e30 f200
g92 e0
g4 s3
g0 f10000
; end extruder 2
g92 e0
g1 e-5 f6000
g1 x-10.5 f8000
g1 e-70 f3000
g92 e0
thingiverse
free
nozzle cleaning bin by Calo_pc
...
g1 e125 f3000 ;extrude the new selected filament to the nozzle
g92 e0;
g1 e4 f180;
g92 e0;
//g1 e-3 f3600 ; retract the filament
thingiverse
free
TEVO TORNADO CR10 dual extruder by Calo_pc
...
g1 e125 f3000 ;extrude the new selected filament to the nozzle
g92 e0;
g1 e4 f180;
g92 e0;
//g1 e-3 f3600 ; retract the filament
thingiverse
free

Mini dual Y adapter for E3D V6 style hotend with bowden extruders by gimle
...r
slic3r custom tool change gcode:
t[previous_extruder]
g92 e0
g1 e-110 f4200
g92 e0
t[next_extruder]
g92 e0
g1 e110 f4200
g92 e0
thingiverse
free

Purge Bucket for A10M (cleaned up) by carterlewellyn
... e0 ;reset extruder positioning
g1 e-2 f5000 ;retract filament to resting spot
g92 e0 ;reset extruder positioning
i hope it helps
thingiverse
free
Custom start Gcode by monopriceman
... a priming/wiping line to the rear)
g0 z3
g0 y0
g0 z0
g1 x-1;(move a little closer to the print area)
g1 e15 f250;(small retract)
thingiverse
free
Filament mixer / dual extrusion / mixing extruder by techwit
...ge to snap off
g92 e0
---snip---
my setup is a e3d lite using a pair of these extruders http://www.thingiverse.com/thing:1708020
Debio
thingiverse
free
Auto Level Cyclops Effector - 40MM by Debio
...uto leveling, but my arm spacing is 40mm (which is smaller than the original model.
note that the center-to-arm distance is 22mm.
thingiverse
free

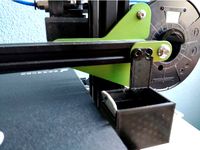
X Axis Belt Tensioner with Bearings by Debio
...sn't get hot enough to matter, but only time will tell if it warps.
you do need two mr63zz bearings. easily found on amazon.
thingiverse
free

XYZ Davinci Duo nozzle carriage by bootsb1980
...for titan extruder and e3d v6 nozzles. remix of debio#39;s single nozzle design. thinner stepper motors are needed, also...
thingiverse
free

Da Vinci 1.0 E3d Titan + V6 Direct Drive "Coyote" Carriage v2 by Debio
...offer feedback and/or call me nasty names at http://www.soliforum.com/topic/15009/e3d-titan-v6-direct-drive-coyote-carriage-beta/
thingiverse
free

Da Vinci 1.0 E3d Titan + V6 Direct Drive "Coyote" Carriage BETA by Debio
...coyote-carriage-beta/
fusion 360 design (which lets you download the model in whatever format you want) at http://a360.co/29wxhqy
thingiverse
free

Pray for Barcelona-Ramblas by aquilea
...la paz y que quiera recordar lo que nunca debio ocurrir. en el verano 17 de agosto de 2017...
thingiverse
free

Da Vinci 1.0 Carriage for Titan extruder/ e3d v6 by Tactical_Pickle_Gaming
...titan + v6 direct drive "coyote" carriage beta by debioquot; i printed and installed the original carriage but ran...
3dwarehouse
free

Torre del Velerin
...torre del velerin 3dwarehouse debio de construirse en el siglo xvi. su construcción tenía...
3dwarehouse
free

Proyecto de Departamento...
...un departamento de dimensiones reducidas, para lo cual se debio adapar para un abuena comodidad, circulacion, y habitabilidad, cumpliendo...
Effector
3d_ocean
$5

Radial Sound Effector
...e spheres will expand with your song. fully customisable, change the color, the size of the spheres or even put in different s...
3d_ocean
$12

3D Customizable Puzzle Set (16x10)
...mograph compatible (you can effect the pieces with mograph effector) - included also a non-mograph version with...
thingiverse
free
Effector by olo2000pm
...effector by olo2000pm
thingiverse
effector
thingiverse
free
CERAMBOT-Effector
...cerambot-effector
thingiverse
cerambot-effector
thingiverse
free

modulize effector by candyasdf
...ulize effector by candyasdf
thingiverse
mount things on effector with m3 screws
effector radius : 25.4mm
rod arm distance : 40mm
thingiverse
free
Delta Effector by zavier
...delta effector by zavier
thingiverse
delta effector with radial fan 50 and bltouch
thingiverse
free
D810 Effector by WhiteTiger13
...d810 effector by whitetiger13
thingiverse
this is d810 effector for d810 without autocalibration, and also cap for it.
thingiverse
free
Effector for Delta Printer
...effector for delta printer
thingiverse
effector for delta printer (3 color)
using diamond hotend
thingiverse
free
Delta effector magnetic by fpassos
...delta effector magnetic by fpassos
thingiverse
effector for e3dv6 hotend. i needed put the spheres (10mm) on the effector.
thingiverse
free
End Effector Gripper
...end effector gripper
thingiverse
end effector gripper
for a robotic arm
uses mg995 servo motor
Kossel
thingiverse
free
kossel bottom by keisukelin
...kossel bottom by keisukelin
thingiverse
kossel bottom
thingiverse
free
Leg for kossel by exelon
...leg for kossel by exelon
thingiverse
leg for kossel
thingiverse
free
Extruder for kossel by spencer_chen7
...extruder for kossel by spencer_chen7
thingiverse
extruder for kossel
thingiverse
free
Kossel parts by breezer83
...kossel parts by breezer83
thingiverse
kossel parts
thingiverse
free

Anycubic Kossel PID calibration
...ir mount:
kossel raspberry camera ir mount
extruder pid calibration.
simple extruder temperature calibration of your 3d printer.
thingiverse
free

Kossel Medium by flux83
...kossel medium by flux83
thingiverse
vertex for upgraded kossel mini
thingiverse
free
Kossel Mini by salesmendesandre
...kossel mini by salesmendesandre
thingiverse
custom kossel mini
frame 20x20
thingiverse
free

leg for kossel by ionulet
...leg for kossel by ionulet
thingiverse
leg for kossel with channel for end- stop cables
thingiverse
free

Optical Endstops Mounts for Kossel (with Better Kossel carriages) by dellfer
...stops on the anycubic kossel with better kossel carriages by codefreak https://www.thingiverse.com/thing:2501337
more precission
thingiverse
free
kossel??????? by wangrui19890704
...kossel??????? by wangrui19890704
thingiverse
??2020?2060???
Magnetic
3d_ocean
$2

Magnet
...magnet 3docean 3d 3ds max electric magnet magnetic magnetism max model polygon realistic tesla magnet created in...
turbosquid
$6

Magnet
...
turbosquid
royalty free 3d model magnet for download as obj on turbosquid: 3d models for games, architecture, videos. (1548733)
turbosquid
$6

magnet
...uid
royalty free 3d model magnet for download as 3dm and max on turbosquid: 3d models for games, architecture, videos. (1670606)
turbosquid
$1

Magnet
...y free 3d model magnet for download as 3ds, max, obj, and fbx on turbosquid: 3d models for games, architecture, videos. (1215037)
turbosquid
$7

Magnet
...agnet for download as blend, unitypackage, fbx, gltf, and obj on turbosquid: 3d models for games, architecture, videos. (1576588)
3d_export
$5

magnetic knife holder
...magnetic knife holder
3dexport
ordinary magnetic knife holder
archive3d
free

Fridge magnet 3D Model
...3d model archive3d refrigerator magnet fridge magnet magnet toy magnetic s n280712 - 3d model (*.3ds) for interior 3d...
turbosquid
$35

Magnetic butterflies
...alty free 3d model magnetic butterflies for download as blend on turbosquid: 3d models for games, architecture, videos. (1315792)
turbosquid
$2
Magnetic Board
...quid
royalty free 3d model magnetic board for download as ma on turbosquid: 3d models for games, architecture, videos. (1264141)
turbosquid
$977
Magnetic Lego
...oyalty free 3d model magnetic lego for download as ma and obj on turbosquid: 3d models for games, architecture, videos. (1142761)