Thingiverse
Kodama Trinus E3D v6 mod v1 by vat_pom
by Thingiverse
Last crawled date: 3 years, 1 month ago
There is no need to talk about the E3D v6, it is a state of the art reference hot end, you won´t get a better one.
What is the use of the mod, what are the differences compared to the trinus hot end:
Even the E3D v6 has a PTFE inliner, it is a full metal hot end and at the time being only the trinus firmware limits its max temperature.
No PTFE degradation, no changing extrusion problems over time
No unstable extrusion/retraction problems, printing speed is only limited by trinus resonance problems and not by the hot/cold end extrusion capacity, I print PETG infill at 230 °C 0.2mm and 80-100 mm/s, before the mod I struggled to achieve 20 mm/s without problems, 80-100 mm/s will only make sense for some prints on such a small build volume, but it makes a huge difference if you print at e.g. 60-80 mm/s in average than compared to <20 mm/s.
Reliable consistent extrusion, not sometime it works and sometimes not
Much quicker heat up time, better temperature control after PID autotune,
with same heater cartridge higher printing temperatures are possible –but right now they are anyhow limited by the firmware
If the fan blows fully to the nozzle, the temperature drops, but much less
At same printing speeds no bleeding edges, bleeding edges occur much later at much higher printing speeds
If you need spare parts you can get them everywhere (nozzles, heat block, heat break….), quick and cheap, no need to wait for Kodama
no jams/clogging (it is still possible depending on what you do, but only if you do something wrong and not because it is a misconstruction)
much better fan duct (evenness of air flow)
reduction of moving masses
more easy maintenance, no black box which blocks sight
#######################################################################
What you need:
E3d v6 1.75mm Universal (normal version with small heat block, not the upgraded heat block) with 100k thermistor. Other name is e.g. "E3D v6 1.75 long distance with PTFE"
The mod was done with the OLD E3D v6, that means with the small heat block and NOT with the new bigger heat block sold since mid 2016. E3D v6 clones use the old heat block.
The thermistor as well as the heater cartridge fits for the trinus.
Why did I use the old one ? Because I had the old version and I don´t see any real advantage for the customer of the new one. It is bigger (and there is not much space for the mod) and is made for a PT100 thermometer or special (more expensive) thermistors.
So if you want to use the moded fan duct, you need the small heat block. E3D v6 clones are available for < 5 Euro, the heat block for < 1 Euro, so that shouldn´t be a problem.
I don´t say you should buy clones or cloned parts at all, as well as I don´t say you are a bad guy doing it. There are 1.75 mm E3D v6 clones available without PTFE - don´t use them !
It there are request for the v6 new version, I will adapt the mod.
For assembly see here https://wiki.e3d-online.com/wiki/E3D-v6_Assembly#HotSide
E3D cold end fan including duct (should be part of the E3D v6 order) or you use the existing 40mm trinus cold end fan, which i recommend
PTFE tube 4/2 mm, some cms, in principle it even works without, but i don´t recommend without.
the thingiverse 3D printed parts shown in the pictures above.
Optional parts
Thermal paste to use in between the E3D heatbreak and the round cooling body
Cardboard or Insulation cotton to insulate the nozzle and as air shield
Spare parts, e.g. if I change the nozzle for a print, i just change the whole hot end, because the clones are anyhow very cheap
#######################################################################
assembly:
remove/disassemble the trinus hot end cold end, strip it down until only the alu-block and mounted extruder remains, according to https://www.kodamaforums.com/phpBB3/viewtopic.php?f=22&t=1721 remove parts L, H, M, N. All other parts on the picture can remain.
remove also the plate which is screwed onto the x-carriage. The part "E3D_fan_extruder_mounting_plate" gets directly screwed to the x-carriage
mount the part "filament_guide_extruder" and the alu-extruder block. Use the 2 existing worm screws to fix it
prepare the 4/2mm PTFE tube and cut it to about 49 mm, push the PTFE tube into the assembled E3D v6, you will need to push it really "hard" to get it into the heatbreak of the E3D. To other end of the PTFE tube is inserted into the "filament path" of the alu/extruder and by that pushed into the end of the part filament_guide_extruder. If necessary adjust the length of the PTFE tube, but 49 mm should fit about +-1mm. If the 49mm seems to be much too long, then you probably didn´t push it into the heatbrake - so push harder;)
The E3D including the PTFE tube should now be fitted to the extruder alu-block.
screw the extruder block to the part "E3D_fan_extruder_mounting_plate" and press the E3D into its snap fit
the E3D snap fit is quite tight, maybe you need to put it to a table and press it into it, when doing my tests, the E3D was mounted without the part "E3D_bracket" (so it works even without), but you should mount it now. Be careful and look which side of the "E3D bracket" needs to be up
mount the fan duct of your choice including the 5015 trinus to the "E3D_fan_extruder_mounting_plate" using the hole which fixes the fan duct to the "E3D_fan_extruder_mounting_plate"
use the upper hole to screw the other end of the 5015 fan to the "E3D_fan_extruder_mounting_plate"
rotate the fan duct to its end position and snap it onto the 5015 fan
check the distance between fan duct and bed, when the nozzle touches the bed, it should be exactly 2mm
mount the cold end fan, if you want to use the trinus 40 mm fan, you have to print the part "trinus_40mm_cold_end_fan_mount_E3D"
use the holes for the zip ties to zip cables as you like
the removed screws of the trinus can be used, you don´t need additional screws, the M3 small screws are used to mount the extruder/alu-block, the bigger M4 screws to mount the 5015 fan and the M3 worm screws are used tofix the filament guide
you will propably need to rewire connectors of the E3D cold fan, or better, use the 40mm trinus fan ("trinus_40mm_cold_end_fan_mount_E3D")
######################################################################
IMPORTANT:
Before you use the E3D v6, you need to change the PID-tuning with gcode commands, e.g. with M106 S255; M303 S200; see here http://www.kodamaforums.com/phpBB3/viewtopic.php?t=1762
readjust your z-end stop
######################################################################
Because the trinus has an 4010 cold end fan, it is an advantage to use it also as E3D cold end fan instead of the standard E3D 30mm cold end fan e.g. --> part "trinus_40mm_cold_end_fan_mount_E3D"
######################################################################
Maintenance position:
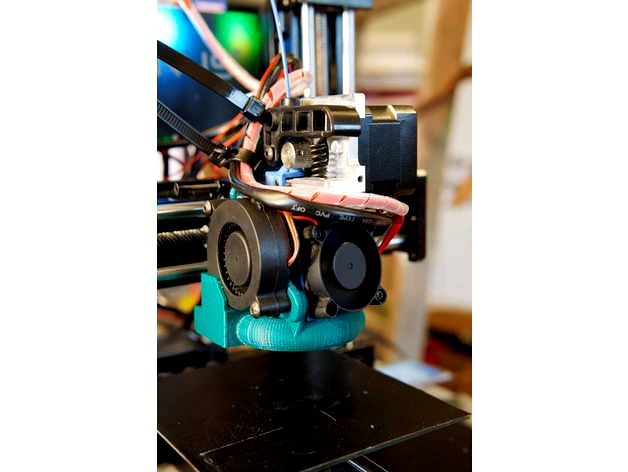
In order ot change nozzles and so on, the fan duct can be easily rotated by 180 ° to give free access to the nozzle/hetaer block, see very last right picture above.
######################################################################
3D printed Parts:
all parts can be printed without supports, i used 3 outlines and 15 % infill, works with 0.4 and 0.5 mm nozzle and various filaments
"Filament_guide_extruder"
Optional, in principle stiff filaments work also without, but there is no disadvantage to use it
can be printed in every filament
i would prefer 0.1 mm layer height, but it works also with e.g. 0.2
"E3D_extruder_fan_mounting_plate"
PLA might not work, or only for low print temperatures (200°C), at least PETG, BDP, ABS, ASA or filaments with high heat resistance
0.1 -0.2 mm layer height
If you use PLA increase number of outer lines to 4/5 and solid top/bottom layers to e.g. 5* 0.2 mm
Infill about >=15%, according to number of top layers and material
"E3D_bracket"
Use filament with at least same heat resistance as 3
0.1 -0.2 mm layer height
It is the only part which could be printed using supports, I don´t use supports, this gives some unwanted bridges on the horizontal overhang, which can be removed easily afterward, so no supports needed
fan ducts
Use a filament with the highest possible heat resistance, PLA might work for a certain time, I use extrudr BDP which survives about 115 °C without problems
like all other circular fan ducts, if the nozzle is close to the bed, the air gets redirected towards the nozzle/heater block, this can lead to
-> Additional cooling load for the cold end (increased risk of jamming), therefore block hot air flow by air shield or mount bigger cold end fan, or increase PSU-Voltage
-> Temperature increase for the base plate (PLA might get problems), therefore block air flow by air shield or mount bigger cold end fan, or increase PSU-Voltage
-> Temperature drops when operating at high temperatures close to the bed, therefore block air flow by air shield already before the nozzle, use cotton insulation of the nozzle
To prevent this, I tested different fan duct designs and ended with the 2 following
"fan_duct_cold_filaments" (PLA) , a fan duct for low-temperature filament, hot air redirection isn´t that big problem because of the lower temperature, can be used with or without hot air shield
"fan_duct_hot_filaments" for higher temp filaments with included air shield, prevents air going upwards towards the heater block and above, material is very close to the nozzle/heater block, so it will get shiny, but that doesn´t matter, this design gives less maximum air flow than the other, but in general high temp filaments need less air flow.
the fan duct design was optimized for evenness of airflow from all directions, design verified with CFD simulation, the target was not to maximize air flow, because this also can disturb the print, it should direct the cold air exactly where it is needed, therefore much less airflow is needed compared to not circular fan ducts
trinus 40mm cold end fan
The E3D should come with a 30 mm cold end fan, which is fine, but the 40 mm trinus fan will provide even better cooling, if you want to use the triuns fan print the part "trinus_40mm_cold_end_fan_mount_E3D". Another advantage of the trinus fan is, that the electric connectors will fit for sure.
hot air shield (not 3Dprinted)
Optional, depending on your needs, if you notice temperature drops when close to the bed, or too high cold end temperatures you should block the air moving upwards
The hot air shield can easily be made of insulation cotton or recycled cardboard or metal, if you are more ambitious. All you need to do is to put e.g. a piece of cardboard between the E3D heat block and the E3D cold on cooling block. If the air cannot move upward, it is not influencing the cold end or heater block anymore.
Used with lower temp fan duct, to prevent air getting towards the heater block/cold end
#######################################################################
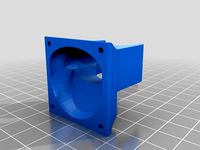
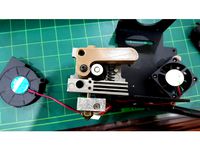
Pictures from left to right
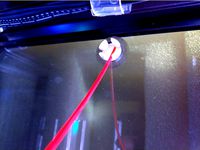
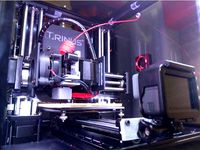
mod in real life with 40 mm cold end fan mounted
mod in real life with 40 mm cold end fan mounted
mod in real life with 40 mm cold end fan mounted
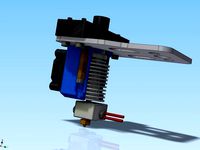
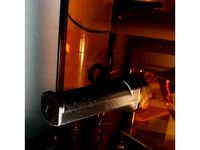
Overview, 40mm fan, extruder/alu block and filament guide not shown
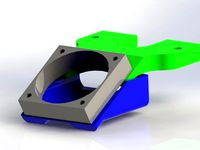
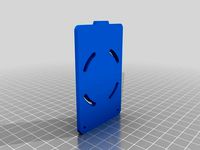
mounting plate for E3D, 5015 hot end fan and fan duct and extruder alu-block
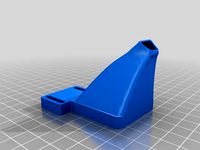
fan duct for higher temperature filaments (> 200 -220 °C)
fan duct for lower temperature filaments
mounting bracket for E3D
filament guide for extruder alu-block
trinus 40 mm cold end fan mount, instead of standard 30 mm E3D fan
Overview, 40 mm fan, extruder/alu block and filament guide not shown, fan rotated to maintenance position
#######################################################################
Outlook and improvement potential
Optimize hot air management further
Improve sight to 1st layer --> modify fan duct further
Move nozzle a few mm up, this needs to change the fan design
Maybe reduce weight further by exchanging the extruder block with 3D printed parts
If some wants add a casing
#######################################################################
If one needs some small mods of the mod, i could probably change it.
What is the use of the mod, what are the differences compared to the trinus hot end:
Even the E3D v6 has a PTFE inliner, it is a full metal hot end and at the time being only the trinus firmware limits its max temperature.
No PTFE degradation, no changing extrusion problems over time
No unstable extrusion/retraction problems, printing speed is only limited by trinus resonance problems and not by the hot/cold end extrusion capacity, I print PETG infill at 230 °C 0.2mm and 80-100 mm/s, before the mod I struggled to achieve 20 mm/s without problems, 80-100 mm/s will only make sense for some prints on such a small build volume, but it makes a huge difference if you print at e.g. 60-80 mm/s in average than compared to <20 mm/s.
Reliable consistent extrusion, not sometime it works and sometimes not
Much quicker heat up time, better temperature control after PID autotune,
with same heater cartridge higher printing temperatures are possible –but right now they are anyhow limited by the firmware
If the fan blows fully to the nozzle, the temperature drops, but much less
At same printing speeds no bleeding edges, bleeding edges occur much later at much higher printing speeds
If you need spare parts you can get them everywhere (nozzles, heat block, heat break….), quick and cheap, no need to wait for Kodama
no jams/clogging (it is still possible depending on what you do, but only if you do something wrong and not because it is a misconstruction)
much better fan duct (evenness of air flow)
reduction of moving masses
more easy maintenance, no black box which blocks sight
#######################################################################
What you need:
E3d v6 1.75mm Universal (normal version with small heat block, not the upgraded heat block) with 100k thermistor. Other name is e.g. "E3D v6 1.75 long distance with PTFE"
The mod was done with the OLD E3D v6, that means with the small heat block and NOT with the new bigger heat block sold since mid 2016. E3D v6 clones use the old heat block.
The thermistor as well as the heater cartridge fits for the trinus.
Why did I use the old one ? Because I had the old version and I don´t see any real advantage for the customer of the new one. It is bigger (and there is not much space for the mod) and is made for a PT100 thermometer or special (more expensive) thermistors.
So if you want to use the moded fan duct, you need the small heat block. E3D v6 clones are available for < 5 Euro, the heat block for < 1 Euro, so that shouldn´t be a problem.
I don´t say you should buy clones or cloned parts at all, as well as I don´t say you are a bad guy doing it. There are 1.75 mm E3D v6 clones available without PTFE - don´t use them !
It there are request for the v6 new version, I will adapt the mod.
For assembly see here https://wiki.e3d-online.com/wiki/E3D-v6_Assembly#HotSide
E3D cold end fan including duct (should be part of the E3D v6 order) or you use the existing 40mm trinus cold end fan, which i recommend
PTFE tube 4/2 mm, some cms, in principle it even works without, but i don´t recommend without.
the thingiverse 3D printed parts shown in the pictures above.
Optional parts
Thermal paste to use in between the E3D heatbreak and the round cooling body
Cardboard or Insulation cotton to insulate the nozzle and as air shield
Spare parts, e.g. if I change the nozzle for a print, i just change the whole hot end, because the clones are anyhow very cheap
#######################################################################
assembly:
remove/disassemble the trinus hot end cold end, strip it down until only the alu-block and mounted extruder remains, according to https://www.kodamaforums.com/phpBB3/viewtopic.php?f=22&t=1721 remove parts L, H, M, N. All other parts on the picture can remain.
remove also the plate which is screwed onto the x-carriage. The part "E3D_fan_extruder_mounting_plate" gets directly screwed to the x-carriage
mount the part "filament_guide_extruder" and the alu-extruder block. Use the 2 existing worm screws to fix it
prepare the 4/2mm PTFE tube and cut it to about 49 mm, push the PTFE tube into the assembled E3D v6, you will need to push it really "hard" to get it into the heatbreak of the E3D. To other end of the PTFE tube is inserted into the "filament path" of the alu/extruder and by that pushed into the end of the part filament_guide_extruder. If necessary adjust the length of the PTFE tube, but 49 mm should fit about +-1mm. If the 49mm seems to be much too long, then you probably didn´t push it into the heatbrake - so push harder;)
The E3D including the PTFE tube should now be fitted to the extruder alu-block.
screw the extruder block to the part "E3D_fan_extruder_mounting_plate" and press the E3D into its snap fit
the E3D snap fit is quite tight, maybe you need to put it to a table and press it into it, when doing my tests, the E3D was mounted without the part "E3D_bracket" (so it works even without), but you should mount it now. Be careful and look which side of the "E3D bracket" needs to be up
mount the fan duct of your choice including the 5015 trinus to the "E3D_fan_extruder_mounting_plate" using the hole which fixes the fan duct to the "E3D_fan_extruder_mounting_plate"
use the upper hole to screw the other end of the 5015 fan to the "E3D_fan_extruder_mounting_plate"
rotate the fan duct to its end position and snap it onto the 5015 fan
check the distance between fan duct and bed, when the nozzle touches the bed, it should be exactly 2mm
mount the cold end fan, if you want to use the trinus 40 mm fan, you have to print the part "trinus_40mm_cold_end_fan_mount_E3D"
use the holes for the zip ties to zip cables as you like
the removed screws of the trinus can be used, you don´t need additional screws, the M3 small screws are used to mount the extruder/alu-block, the bigger M4 screws to mount the 5015 fan and the M3 worm screws are used tofix the filament guide
you will propably need to rewire connectors of the E3D cold fan, or better, use the 40mm trinus fan ("trinus_40mm_cold_end_fan_mount_E3D")
######################################################################
IMPORTANT:
Before you use the E3D v6, you need to change the PID-tuning with gcode commands, e.g. with M106 S255; M303 S200; see here http://www.kodamaforums.com/phpBB3/viewtopic.php?t=1762
readjust your z-end stop
######################################################################
Because the trinus has an 4010 cold end fan, it is an advantage to use it also as E3D cold end fan instead of the standard E3D 30mm cold end fan e.g. --> part "trinus_40mm_cold_end_fan_mount_E3D"
######################################################################
Maintenance position:
In order ot change nozzles and so on, the fan duct can be easily rotated by 180 ° to give free access to the nozzle/hetaer block, see very last right picture above.
######################################################################
3D printed Parts:
all parts can be printed without supports, i used 3 outlines and 15 % infill, works with 0.4 and 0.5 mm nozzle and various filaments
"Filament_guide_extruder"
Optional, in principle stiff filaments work also without, but there is no disadvantage to use it
can be printed in every filament
i would prefer 0.1 mm layer height, but it works also with e.g. 0.2
"E3D_extruder_fan_mounting_plate"
PLA might not work, or only for low print temperatures (200°C), at least PETG, BDP, ABS, ASA or filaments with high heat resistance
0.1 -0.2 mm layer height
If you use PLA increase number of outer lines to 4/5 and solid top/bottom layers to e.g. 5* 0.2 mm
Infill about >=15%, according to number of top layers and material
"E3D_bracket"
Use filament with at least same heat resistance as 3
0.1 -0.2 mm layer height
It is the only part which could be printed using supports, I don´t use supports, this gives some unwanted bridges on the horizontal overhang, which can be removed easily afterward, so no supports needed
fan ducts
Use a filament with the highest possible heat resistance, PLA might work for a certain time, I use extrudr BDP which survives about 115 °C without problems
like all other circular fan ducts, if the nozzle is close to the bed, the air gets redirected towards the nozzle/heater block, this can lead to
-> Additional cooling load for the cold end (increased risk of jamming), therefore block hot air flow by air shield or mount bigger cold end fan, or increase PSU-Voltage
-> Temperature increase for the base plate (PLA might get problems), therefore block air flow by air shield or mount bigger cold end fan, or increase PSU-Voltage
-> Temperature drops when operating at high temperatures close to the bed, therefore block air flow by air shield already before the nozzle, use cotton insulation of the nozzle
To prevent this, I tested different fan duct designs and ended with the 2 following
"fan_duct_cold_filaments" (PLA) , a fan duct for low-temperature filament, hot air redirection isn´t that big problem because of the lower temperature, can be used with or without hot air shield
"fan_duct_hot_filaments" for higher temp filaments with included air shield, prevents air going upwards towards the heater block and above, material is very close to the nozzle/heater block, so it will get shiny, but that doesn´t matter, this design gives less maximum air flow than the other, but in general high temp filaments need less air flow.
the fan duct design was optimized for evenness of airflow from all directions, design verified with CFD simulation, the target was not to maximize air flow, because this also can disturb the print, it should direct the cold air exactly where it is needed, therefore much less airflow is needed compared to not circular fan ducts
trinus 40mm cold end fan
The E3D should come with a 30 mm cold end fan, which is fine, but the 40 mm trinus fan will provide even better cooling, if you want to use the triuns fan print the part "trinus_40mm_cold_end_fan_mount_E3D". Another advantage of the trinus fan is, that the electric connectors will fit for sure.
hot air shield (not 3Dprinted)
Optional, depending on your needs, if you notice temperature drops when close to the bed, or too high cold end temperatures you should block the air moving upwards
The hot air shield can easily be made of insulation cotton or recycled cardboard or metal, if you are more ambitious. All you need to do is to put e.g. a piece of cardboard between the E3D heat block and the E3D cold on cooling block. If the air cannot move upward, it is not influencing the cold end or heater block anymore.
Used with lower temp fan duct, to prevent air getting towards the heater block/cold end
#######################################################################
Pictures from left to right
mod in real life with 40 mm cold end fan mounted
mod in real life with 40 mm cold end fan mounted
mod in real life with 40 mm cold end fan mounted
Overview, 40mm fan, extruder/alu block and filament guide not shown
mounting plate for E3D, 5015 hot end fan and fan duct and extruder alu-block
fan duct for higher temperature filaments (> 200 -220 °C)
fan duct for lower temperature filaments
mounting bracket for E3D
filament guide for extruder alu-block
trinus 40 mm cold end fan mount, instead of standard 30 mm E3D fan
Overview, 40 mm fan, extruder/alu block and filament guide not shown, fan rotated to maintenance position
#######################################################################
Outlook and improvement potential
Optimize hot air management further
Improve sight to 1st layer --> modify fan duct further
Move nozzle a few mm up, this needs to change the fan design
Maybe reduce weight further by exchanging the extruder block with 3D printed parts
If some wants add a casing
#######################################################################
If one needs some small mods of the mod, i could probably change it.
Similar models
thingiverse
free

Kodama Trinus E3D v6 mod v2 by vat_pom
...############################################################
if one needs some small mods of the mod, i could probably change it.
thingiverse
free

E3D v6 Fan Duct (two 30 mm fan extruder and filament cooler ) by pride66
... duct (two 30 mm fan extruder and filament cooler ) by pride66
thingiverse
e3d-v6 fan duct (2 fan extruder and filament cooler )
thingiverse
free
K8200/3Drag E3D v6 HotEnd extruder mount with fan by Area51
...ng the original parts.
here is the version for 40mm fan.
updated: 2015.01.23:
easier to print
stronger grip on e3d cooler
thingiverse
free
Lulzbot TAZ Extended / Adjustable Nozzle Fan Duct for e3D / hexagon hot ends by SuperSolid_3D
...re you can slide it up and down for adjustment, and doesn't require heat-set insert nuts for mounting the fan with m3 screws.
thingiverse
free
Wade extruder J-head fan mount by Dainis
...n.
added air duct that cools the upper part of hot end (cold end). it makes it really cool, if you use additional radiators...
thingiverse
free

40mm Fan Duct - Chinese E3D v6 Hot end by xvsideswipe
...40mm fan duct - chinese e3d v6 hot end by xvsideswipe
thingiverse
40mm fan duct for the chinese e3d v6 hot end
thingiverse
free

Solidoodle Underside Fan Duct by lawsy
...ont mount fan duct. due to the added length, however, room is available under the the extruder carriage to mount a 30 x 5 mm fan.
thingiverse
free
Raise3D E3D v6 adapter 35mm fan duct by Firesped
...e raise3d n-series printers.
so far35mm fan duct for cold end only35mm fan duct with "always on" volcano hotend cooling
thingiverse
free

E3D-v6 Fan Duct Mashup for Orion / Rostock Max Mount by briankb
...
this is a mashup between the provided seemecnc orion peek fan duct and the fan mount that was included with the e3d-v6 hot end.
thingiverse
free

Ez3D Phoenix mount for E3D V6 Hot-End by rkroetch
...e-drill the filament guide to allow the ptfe tube to extend through the guide and into the hot-end direct from the extruder gear.
Kodama
3ddd
$1
Kodama_Zomes_Pod
...ray додаются библиотекой материалов, радии экономии размера архива.
в модели два варианта монтажа, отдельно стоячие и подвесное.
thingiverse
free
Kodama wiht supports
...kodama wiht supports
thingiverse
kodama supports
thingiverse
free

The Kodama Tree by Kodama3D
...o the incredible new ideas and inventions the future will bring in layer by layer, like the rings of the trees kodamas reside in.
thingiverse
free

KODAMA by ccamp104
...a by ccamp104
thingiverse
kodama forest spirit from studio ghibli's princess mononoke. sits flush to the ground when printed
thingiverse
free

Kodama Sitting by LadyDretza
... first scratch design of the kodama in meshmixer.
finished model, painted with stone paint, eyes filled in with permanent marker.
thingiverse
free

Kodama Makercoin by Cbturtle2
...
makercoin with the kodama logo on it. feel free to print as you wish, just upload a photo for everyone to see. happy printing!!!
thingiverse
free

kodama by MisterSister
...kodama by mistersister
thingiverse
sliced and shrunk add mason jar solar light
thingiverse
free

Kodama Forest Spirit by SpaceLord87
...est spirit by spacelord87
thingiverse
kodama forest spirit from princess mononoke. sculpted in zbrush. one file includes a base.
thingiverse
free

Kodama mashup
...kodama mashup
thingiverse
lzys/timfous head on dretzas body. also slightly re-sculpted.
does need support
thingiverse
free

Kodama Planter by kleenecks
...kodama planter by kleenecks
thingiverse
remixed to add a well for your favorite succulent.
Trinus
thingiverse
free

Panowin / Trinus enclosure by vaudered
...panowin / trinus enclosure by vaudered
thingiverse
panowin , trinus enclosure
thingiverse
free
Trinus Extruder Handle by kebs37th
...trinus extruder handle by kebs37th
thingiverse
trinus extruder handle ~
thingiverse
free

Trinus filament guide by Kullamannen
...trinus filament guide by kullamannen
thingiverse
filament guide for the kodama trinus printer.
thingiverse
free

Trinus desktop tool station by BeerPercussion
...trinus desktop tool station by beerpercussion
thingiverse
tool station for kodama trinus essentials.
thingiverse
free
TRINUS filament hole cover by SheepsFeaTheR
...trinus filament hole cover by sheepsfeather
thingiverse
kodama trinus filament hole cover
thingiverse
free

Trinus Rail Bearing Cover by Boyd84
...trinus rail bearing cover by boyd84
thingiverse
simple dust cover for the ends of the trinus rails.
thingiverse
free

Spoleholder Ø55 Trinus 250/750g by Aladeath2000
...spoleholder ø55 trinus 250/750g by aladeath2000
thingiverse
spoleholder for trinus 3d.
thingiverse
free
Trinus Gopro center mount by SheepsFeaTheR
... gopro center mount by sheepsfeather
thingiverse
trinus gopro light center mount
can be installed without removing the enclosure
thingiverse
free
Kodama Trinus Enclosure Spool Holder by ark19
...kodama trinus enclosure spool holder by ark19
thingiverse
this is a spool holder for the kodama trinus enclosure.
thingiverse
free
Trinus Dial Indicator by SgtSiff
...unt for the trinus 3d printer to allow accurate bed levelling.
remove back plate from dial and use screws to affix to this plate.
Pom
3ddd
free

POM POM
...pom "table lamps"
article: cs/8024-t
model: pom pom "suspension lamps"
article: cs/8024-s
www.calligaris.com
turbosquid
$7

Voyage Cushion - Thistles (Pom Pom Pillow)
... available on turbo squid, the world's leading provider of digital 3d models for visualization, films, television, and games.
3d_export
$10

Roland Pom Pom Chrysanthemum Flower
...~ 100,000 model parts: 1 texture format: .png .jpg resolution: 1024*1024 pbr in substance painter formats: .obj .gltf .fbx .blend
turbosquid
$20

Atelierlilu pom pon
... model atelier lilu pom pon for download as max, obj, and fbx on turbosquid: 3d models for games, architecture, videos. (1455870)
3ddd
free

Pom'dor / Iside
...pom'dor. изготавливается из шпона дуба цвета венге. смеситель немецкой фабрики dornbracht. все текстуры и материалы в архиве.
3d_export
$10
Pom Pom Fabric Round Stool
...xture format: .png .jpg<br>resolution: 1024*1024<br>pbr in substance painter<br>formats: .obj .gltf .fbx .blend
3ddd
free

Pom'dor / Fontana
...овина из композита. напольный смеситель немецкой фабрики dornbracht (точную коллекцию не вспомню). материалы и текстуры в архиве.
3ddd
$1

Pom'Dor / Teatro
... коллекции к2, аксессуары на столешнице коллекция iside фабрики pom'dor. раковина из композита на основе тригидрата алюминия.
3ddd
free
POM'dor
...othbrush holder
- полотенцедержатель 38.10.40.002 chrome towel rail 40
- кольцо-полотенцедержатель 38.20.05.002 chrome towel ring
3ddd
$1
Pom'Dor аксессуары - K2, Dina, Micra
...е предметы из коллекции к2, этажерка коллекции dina, а дозатор на этажерке из коллекции micra. материалы и текстуры присутствуют.
Vat
turbosquid
$49
vat
... available on turbo squid, the world's leading provider of digital 3d models for visualization, films, television, and games.
turbosquid
$5

vat
... available on turbo squid, the world's leading provider of digital 3d models for visualization, films, television, and games.
turbosquid
$19

Wooden Vat Closed
...y free 3d model wooden vat closed for download as max and obj on turbosquid: 3d models for games, architecture, videos. (1197266)
turbosquid
$19
Wooden Vat 03
...yalty free 3d model wooden vat 03 for download as max and obj on turbosquid: 3d models for games, architecture, videos. (1197209)
turbosquid
$19
Wooden Vat 02
...yalty free 3d model wooden vat 02 for download as max and obj on turbosquid: 3d models for games, architecture, videos. (1197207)
turbosquid
$280

VAT RASER 02.jpg
... available on turbo squid, the world's leading provider of digital 3d models for visualization, films, television, and games.
turbosquid
$265
VAT SP 07.jpg
... available on turbo squid, the world's leading provider of digital 3d models for visualization, films, television, and games.
turbosquid
$180

VAT LUX 02.jpg
... available on turbo squid, the world's leading provider of digital 3d models for visualization, films, television, and games.
turbosquid
$2
Large Cartoony Oil Vat
... available on turbo squid, the world's leading provider of digital 3d models for visualization, films, television, and games.
turbosquid
$3

Sci-fi cloning vats
...cloning vats for download as 3ds, obj, wrl, x, fbx, and blend on turbosquid: 3d models for games, architecture, videos. (1290168)
E3D
turbosquid
$23

E3D - Google Home
... 3d model e3d - google home for download as max, obj, and c4d on turbosquid: 3d models for games, architecture, videos. (1192509)
cg_studio
free

e3d model
...e3d model
cgstudio
- e 3d model, royalty free license available, instant download after purchase.
turbosquid
$2

Syringe C4D (E3D Ready)
...lty free 3d model syringe c4d (e3d ready) for download as c4d on turbosquid: 3d models for games, architecture, videos. (1336720)
turbosquid
$12

Microphone USB E3D and C4D
...ree 3d model microphone usb e3d & c4d for download as c4d on turbosquid: 3d models for games, architecture, videos. (1568216)
turbosquid
$29

E3D - OnePlus 6 Black
...model e3d - oneplus 6 black for download as max, obj, and c4d on turbosquid: 3d models for games, architecture, videos. (1358534)
turbosquid
$29

E3D - Motorola One 2018
...del e3d - motorola one 2018 for download as max, obj, and c4d on turbosquid: 3d models for games, architecture, videos. (1358533)
turbosquid
$29

E3D - Disney MagicBands 2
...l e3d - disney magicbands 2 for download as max, obj, and c4d on turbosquid: 3d models for games, architecture, videos. (1355515)
turbosquid
$29

E3D - Samsung Z4 Smartphone
...e3d - samsung z4 smartphone for download as max, obj, and c4d on turbosquid: 3d models for games, architecture, videos. (1182179)
turbosquid
$23

E3D - Razer Phone model
...del e3d - razer phone model for download as max, obj, and c4d on turbosquid: 3d models for games, architecture, videos. (1231207)
turbosquid
$23

E3D - Alcatel Idol 5
... model e3d - alcatel idol 5 for download as max, obj, and c4d on turbosquid: 3d models for games, architecture, videos. (1212799)
V6
3d_export
$100

v6 engine
...engine
3dexport
complete v6 engine modeled on solidworks 2017 along with .stl, .sldprt and .sldasm of all th parts and assembly.
3d_export
$10

V6 engine
... the first v6 engines were designed and produced independently by marmon motor car company, deutz gasmotoren fabrik and delahaye.
3d_export
$35

v6 engine
...s a complete model of a v6 engine containing over 400 components. you can contact me for a video of all the components assembling
3d_export
$10

v6 engine
...v6 engine
3dexport
turbosquid
$25

Bed1001-v6
... available on turbo squid, the world's leading provider of digital 3d models for visualization, films, television, and games.
turbosquid
$22

Chair2-v6
... available on turbo squid, the world's leading provider of digital 3d models for visualization, films, television, and games.
turbosquid
$20

V6.mb
... available on turbo squid, the world's leading provider of digital 3d models for visualization, films, television, and games.
3d_export
$20

V6 engine
...rovided in this package is all the parts in sldprt format and assembly in sldasm format. i can also convert the format on demand.
3ddd
$1

Стол V6
...6" в стиле дизельпанк изготовлен из блока двигателя, 4х поршней и 4х шатунов.
столешница изготовлена из стекла толщиной 8мм.
cg_studio
$199

V6 VVTi3d model
...v6 vvti3d model
cgstudio
.3ds - v6 vvti 3d model, royalty free license available, instant download after purchase.
Mod
design_connected
$13

MOD. 4233 - MOD. 4234 Table Lamp
...mod. 4233 - mod. 4234 table lamp
designconnected
arcahorn mod. 4233 - mod. 4234 table lamp computer generated 3d model.
design_connected
$11

MOD.1095
...mod.1095
designconnected
mod.1095 computer generated 3d model. designed by sarfatti, gino.
3ddd
$1

fireplaces mod Spec
...fireplaces mod spec
3ddd
камин
fireplaces mod spec 180x90x125h
3ddd
free

Flos Mod. 2129
... mod
фабрика: flos
модель: mod. 2129
описание: подвесной светильник, металл, белый, черный.
сайт: www.flos.com
turbosquid
$34
Mod Lamp.c4d
... available on turbo squid, the world's leading provider of digital 3d models for visualization, films, television, and games.
turbosquid
$32

MOD A 001
... available on turbo squid, the world's leading provider of digital 3d models for visualization, films, television, and games.
turbosquid
$29

Maars Mod
... available on turbo squid, the world's leading provider of digital 3d models for visualization, films, television, and games.
turbosquid
$15

Mod 70..
... available on turbo squid, the world's leading provider of digital 3d models for visualization, films, television, and games.
turbosquid
$10

MOD Sofa
... available on turbo squid, the world's leading provider of digital 3d models for visualization, films, television, and games.
turbosquid
$1

Mod-Lite
... available on turbo squid, the world's leading provider of digital 3d models for visualization, films, television, and games.
V1
turbosquid
$35

v1
... available on turbo squid, the world's leading provider of digital 3d models for visualization, films, television, and games.
3d_export
$10

street tree v1
...street tree v1
3dexport
street tree v1
3d_export
$5
potato v1
...potato v1
3dexport
turbosquid
$20

Kitchen V1
...bosquid
royalty free 3d model kitchen v1 for download as max on turbosquid: 3d models for games, architecture, videos. (1153622)
turbosquid
$12
sofa v1
...turbosquid
royalty free 3d model sofa v1 for download as max on turbosquid: 3d models for games, architecture, videos. (1283267)
turbosquid
$3

Chair V1
...urbosquid
royalty free 3d model chair v1 for download as fbx on turbosquid: 3d models for games, architecture, videos. (1486093)
turbosquid
$15

Cupboard v1
...royalty free 3d model cupboard v1 for download as max and fbx on turbosquid: 3d models for games, architecture, videos. (1444568)
3d_export
$5
tram v1
...tram v1
3dexport
3d_export
$8
lumber car v1
...lumber car v1
3dexport
lumber car v1 printable, low poly model.
turbosquid
$20

DELTALIGHT v1
...free 3d model deltalight v1 for download as max, max, and obj on turbosquid: 3d models for games, architecture, videos. (1630928)