Thingiverse

keychain_light by creative3Dprints
by Thingiverse
Last crawled date: 3 years, 3 months ago
NL
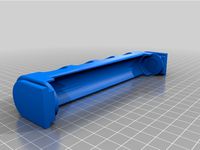
Er zijn twee eenvoudige onderdelen om af te drukken, de hoofdbehuizing en de batterijhouder. Het is een zeer eenvoudige afdruk die zonder ondersteunend materiaal kan worden afgedrukt en duurt slechts ongeveer 30 minuten. Zorg ervoor dat u afdrukt in de natuurlijke richting van de STL-bestanden die u downloadt. Ruim je onderdelen op en zorg ervoor dat de batterijhouder soepel in en uit schuift. Mogelijk moet u de kleine vergrendelingsclip aan de zijkant van de batterijhouder afstemmen met een hobbymes om een mooie interface tussen de twee delen te garanderen.
Voordat u de LED in de behuizing steekt, is het belangrijk om 10 mm van elke poot af te knippen, zodat de LED correct past. Je kunt ze knippen met een tang of een schaar.
BELANGRIJK: aangezien LED's gepolariseerd zijn, is het belangrijk dat de langere poot (de positieve (+) poot) door het bovenste gat van de LED-opening wordt gestoken, zoals weergegeven. Als dit niet het geval is, werkt de LED niet.
U moet dan een kleine schroevendraaier nemen, deze door de sleuf voor de batterijhouder steken en elke poot zo veel mogelijk naar de boven- en onderkant duwen (zie foto). Als dat niet het geval is, zullen de pootjes buigen wanneer u de batterij en batterijhouder in de zijgleuf steekt en uit de weg worden geduwd waardoor de LED niet werkt. (Het is een beetje lastig om de benen dan weer op hun plaats te krijgen !! Het kan worden gedaan, maar met veel geduld!).
De laatste stap is om de batterij en batterijhouder in de behuizing te plaatsen. Zorg ervoor dat de batterij is geplaatst met de positieve (+) kant naar boven. Neem vervolgens een kleine schroevendraaier (of iets dergelijks) en steek deze onder het knoplipje en til zowel het plastic knoplipje als het bovenste LED-been iets omhoog. Schuif de batterij en de houder voorzichtig in de behuizing terwijl u deze vasthoudt. De batterij moet tussen elk van de LED-poten schuiven. BELANGRIJK: Forceer de batterijhouder niet op zijn plaats als de LED-poten elkaar storen, anders buigt en beschadigt u de LED-poten. Zoals gezegd zijn ze dan moeilijk weer op hun plek te buigen! Dus wees geduldig en neem de tijd!
Zodra de batterij en houder correct op hun plaats zitten, zou je in staat moeten zijn om het knoplipje naar beneden te drukken waardoor het bovenste LED-been contact maakt met de bovenkant van de batterij, waardoor de LED aan gaat! Wanneer u de druk op de knop loslaat, gaat de LED uit!
EN
There are two simple parts to print, the main housing and the battery holder. Its a very simple print which can be printed without any support material and will only take around 30 minutes. Be sure to print in the natural orientation of the STL files you download. Clean up your parts and make sure the battery holder slides in and out smoothly. You may have to tune the small locking clip on the side of the battery holder with a craft knife to ensure a nice interface between the two parts.
Before you insert the LED into the housing, its important to trim 10mm off each leg so that the LED fits correctly. You can trim them with pliers or a pair of scissors.
IMPORTANT: As LED's are polarized, its important that the longer leg (the positive (+) leg) is inserted through the top hole of the LED opening as shown. If not, the LED will not work.
You will then need to take a small screw driver, insert it through the battery holder slot and push each leg to the top and bottom surface as much as possible (refer photo). If not, when you insert the battery and battery holder into the side slot, the legs will bend interfere and be pushed out of the way causing the LED to not work. (Its a little tricky to then get the legs back into place!! It can be done but with a lot of patience!).
The final step is to insert the battery and battery holder into the housing. Make sure the battery is inserted with the positive (+) side facing upwards. Next, take a small screwdriver (or similar) and insert it under the button tab and lift both the plastic button tab and the upper LED leg up slightly. Whilst holding, carefully slide the battery and holder into the housing. The battery must slide in between each of the LED legs. IMPORTANT: Do not force the battery holder into place if the LED legs are interfering, otherwise you will bend and damage the LED legs. As mentioned, they are then difficult to bend back into place! So be patient and take your time!
Once the battery and holder is correctly in place you should be able to push down on the button tab which forces the upper LED leg to make contact with the top of the battery, turning the LED on! When you release pressure on the button tab, the LED will turn off!
Similar models
3dwarehouse
free
Riant huis met veranda en schuur
...ing, een veranda en een schuur. het enige wat grappig is, is de hoogte van de ramen op de eerste verdieping, let er maar eens op.
3dwarehouse
free

Deventer - Geert Groote Huis
... een moderne wijze bij aan persoonlijke bezinning. #cultuur #deventer #geert_groote #historie #kapel #meditatie #stadsvernieuwing
3dwarehouse
free

coevorden . bentheimer burcht its correct placed but not in streetvieuw
...jkt het op skechup dat sommige dingen onder het oppervlak ligt . op earth is dit niet zo check it out for u self #castle_bentheim
3dwarehouse
free

house doctor block vloerkleed zwart/wit
...en de kleuren van het vloerkleed dragen bij aan het rauwe en stoere uiterlijk van het vloerkleed. het kleed is gemaakt van katoen
3dwarehouse
free

De Woonmensen, Apeldoorn
...ure #elderly #exposure #health_care #housing #thuiszorg #verzorgen #verzorging #wonen #wooncorporatie #woonmensen #zorginstelling
3dwarehouse
free
Stevelduct
...n containertransport. juist dat type van transport dat zich door de wereldwijde standaardisatie uitstekend leent voor innovaties.
3dwarehouse
free
zeeman/kruidvat veurne
...e ploeg van gedreven collega's. wij garanderen een professionele en uiterst vertrouwelijke behandeling van jouw sollicitatie!
3dwarehouse
free

Plan Terra Nova (Leesten-Oost, Zutphen, Netherlands)
...ts minder belangrijk. #anastaas #beril #cinnaber #dioptaas #leesten #leesten_oost #looër_enk #nieuwbouw #plan_terra_nova #zutphen
3dwarehouse
free
rotsen
...rotsen
3dwarehouse
het zijn rotsen voor het hele gezin om op elkaar te gooien en om seks mee te hebben als een dildo
3dwarehouse
free

Boek A, Architektron Urania
... maakt deel uit van het project stadsmarkeringen, the books of groningen, marking the city boundaries. #groningen #stadsmarkering
Creative3Dprints
thingiverse
free
filament_wall_holder_2,5Kg by creative3Dprints
...by creative3dprints
thingiverse
filament wall holder xl 2.5 kg
this is a remix stand biger and beter
have fun
creative_3dprint’s
thingiverse
free

starwars_lithophane_curved_lamp by creative3Dprints
...imensions of the curved lithophane only
dimensions are:
x100
y99.1885
z121.5105
lots of fun with this creation
creative_3dprint’s
thingiverse
free

Lithophane_foto_usb_desk.frame by creative3Dprints
...on:
0,12mm
infill:
5%
filament_material:
pla
notes:
the lithophane tot must be 77,94/77,94 to fit in the frame
creative_3dprints
thingiverse
free

toy story lithophane lamp by creative3Dprints
...toy story lithophane lamp by creative3dprints
thingiverse
toy story lithophane lamp
thingiverse
free

Filament_stand_2.5Kg by creative3Dprints
...:
10%
filament_brand:
doesn't matter
filament_material:
pla
this is a remix stand biger and beter
have fun
creative_3dprint’s
thingiverse
free

#LikeMe_ketnet_curved lithophane lamp by creative3Dprints
...yes
resolution:
1.2mm
infill:
10%
filament_brand:
doesn't matter
filament_material:
pla
curved_lithophane must be 100% infill
thingiverse
free
lithophane bedside table spotlight cube by creative3Dprints
...tion:
0,16mm
lithophane resolution:
0,12mm
lithophane :
60mmb/70mmh/1,8mmd
infill:
20%
filament_material:
pla
notes:
0,4mm nossle
thingiverse
free
olaf lithophane e27ledlamp by creative3Dprints
...0mm hoog
make sure you put the curved lithograph on these sizes 72mm / 72mm by 120mm high
lots of printen fun
creative_3dprint’s
Keychain
3d_export
$5

vase on a keychain
...vase on a keychain
3dexport
3d model - vase on a keychain
3d_export
$5

Camera keychain
...camera keychain
3dexport
keychain stl ready to print
turbosquid
$10

Keychain
...alty free 3d model keychain for download as max, fbx, and obj on turbosquid: 3d models for games, architecture, videos. (1713893)
turbosquid
$10
Keychain
...3d model keychain for download as 3dm, c4d, obj, fbx, and stl on turbosquid: 3d models for games, architecture, videos. (1600119)
3d_export
$8

tiger keychain
...tiger keychain
3dexport
3d_export
$8

keychain lynx
...keychain lynx
3dexport
3d_export
$7
keychain motorcycle
...keychain motorcycle
3dexport
turbosquid
$15
Cube keychain
...id
royalty free 3d model cube keychain for download as sldpr on turbosquid: 3d models for games, architecture, videos. (1385183)
turbosquid
$12
Vampire Keychain
...
royalty free 3d model vampire keychain for download as sldpr on turbosquid: 3d models for games, architecture, videos. (1391029)
turbosquid
$6
Carabiner keychain
...
royalty free 3d model carabiner keychain for download as 3dm on turbosquid: 3d models for games, architecture, videos. (1462444)
Light
archibase_planet
free

Light
...light
archibase planet
lamp lighting light
light - s2 - 3d model for interior 3d visualization.
archibase_planet
free

Light
...light
archibase planet
light luminaire lighting
light l0465 - 3d model (*.gsm+*.3ds) for interior 3d visualization.
3d_export
$5

lighting
...lighting
3dexport
lighting
3d_export
$5

lighting
...lighting
3dexport
lighting in livingroom
turbosquid
$3

Lighting Tree with Lights
...d model lighting tree with lights for download as max and 3ds on turbosquid: 3d models for games, architecture, videos. (1585507)
archibase_planet
free

Light
...light
archibase planet
luster lighting solution
light - s - 3d model for interior 3d visualization.
archibase_planet
free

Light
...light
archibase planet
luster lamp lighting
light 1 - 3d model for interior 3d visualization.
archibase_planet
free

Lights
...lights
archibase planet
surgical lights surgical lamp
surgical lights (floor) - 3d model for interior 3d visualization.
archibase_planet
free

Light
...light
archibase planet
lighting luminaire candlelight
light l0463 - 3d model (*.gsm+*.3ds) for interior 3d visualization.
3d_export
$18

street light-lighting-light-xia bing
...
3dexport
street light-lighting-light-xia bing<br>max 2015 v-ray 3 max 2015<br>textures<br>all files in zip...