Thingiverse
Kafka DLP printer (360$ Resin Printer) by Corma
by Thingiverse
Last crawled date: 3 years ago
This project is complete as far as I am concerned
So, while I may have missed putting up some of the files, or something else. I am considering this project to be done. Unfortunately even though all my hardware worked very well, it was ultimately the hardware that did me in. Nano DLP is a tricky little thing to work with and made it neigh on impossible to proceed past the hardware and into printing. I would have loved to continue but I don't have the time or energy to rewrite nano dlp or figure it out. If anyone want's more instructions. Please just ask and I will be happy to help. Hopefully someone else can figure out the software.
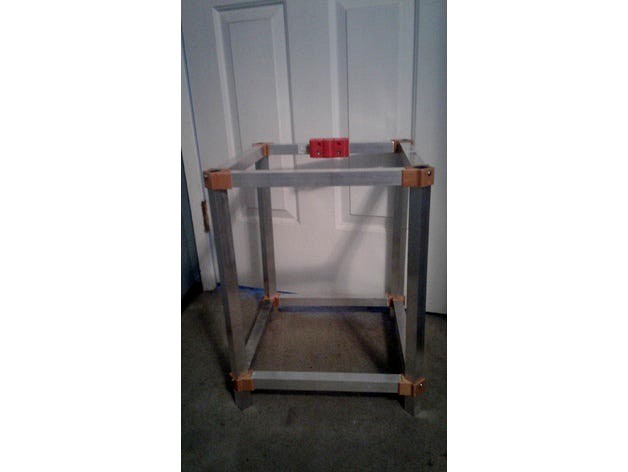
This is my attempt to try and recreate the cristelia 3d printer, which unfortunately seems to have been abandoned. Things I have changed so far. The corners are now made to use 1in tubing that can be found easily in most american hardware stores. I have started to work on my own vat system in order to
Frame
8 x 12" aluminum tubing for top and bottom frames
4 x 17-20" tubing for sides (This is really dependent on how big you want the printer)
Parts
608-2RS Bearing
8mm lead screw with nut about 400mm.
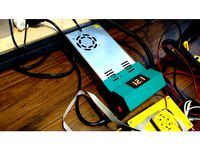
Raspberry pi 3 with wifi (Or zero with wifi)
1 in outer diameter square tubing (8 feet or about 5 metres)
Ramps board
Arduino mega
12v power
Retina display for ipad 3 or 4
Nema 17 motor
Retina display driver (https://www.adafruit.com/product/1716 or https://www.amazon.com/HDMI-Controller-Board-LP097QX1-2048x1536/dp/B06Y426S7Z/ref=pd_sbs_147_1?_encoding=UTF8&psc=1&refRID=ASK896JMF6GD9M9BRJ4E)
SD Card
Limit switch
Update 9/14/2017
Important things I have learned:
-DON'T CHEAP OUT ON THINGS
-Don't use a 12v laptop or led power supply, buy a bigger better one.
-Nanodlp does not work with a rpi zero
-Cheap chinese retina display to hdmi boards do not work, get the adafruit qualia instead
-Hdmi to display port is hard. Get an adapter that needs some sort of power supply.
-MDF does not a good printer base makehttps://github.com/trinityalps/Kafka-DLP-Printer
Update 9/21/2017 Price breakdown
Aluminum tubing~40$
12V to 5V buck converter-2$DC 12V 10A Power Supply-14$HDMI to DisplayPort Converter Adapter with USB Power-40$
RETINA DISPLAY LP097QX1-SPC2-50$
2x12mm shaft 500mm long-15$
1/4 Inch aluminum, 12 x 12 inch sheet-24$
Limit Switch- 0.50$
Flexible Couplings 5mm to 8mm-4$
400mm 8mm Lead Screw-10$R-PI 3-35$2xLMK12LUU linear bearing-10$
Nema 17 stepper 13$RAMPS 1.4 and Mega2560 R3-30$
A4988 Stepper Driver-2$Qualia Board for LP097QX1-80$
FEP Film-10$
Misc Plastic, Screws, filament-10$
Total-359.50$
THINGS IN ITALICS YOU SHOULD NOT CHEAP OUT ON, BUY EXACTLY WHAT IS SAID
Cost Savings
Aluminum is the biggest area to save here. If you can find a cheaper source of aluminum go for it. The 1/4 plate I bought is far to big, you could easily get a 7*9 inch plate and it would work just fine. I cannot stress enough to just buy the qualia board, but you could try the abusemark board, but that still requires the active hdmi to display port with usb power. You can also save money if you can find a local shop that sells a retina display replacement, But be sure it's the right model. All in all you could maybe save 50~100$ depending on the parts you already own and your own creativity in sourcing parts. But I would recommend not cheaping out. Yes it can be under 300$ but sometimes just go for the good stuff.
Update 10/6/2017 Cheaper Alternatives
So the usb car charger exploded for some reason so instead I am switching a 12v to 5v buck converter, hopefully this won't explode. Due to difficulty controlling ramps with nano dlp, I am switching to the cheaper alternative of direct control with the pi through an A4988 stepper driver and attaching that direct to the rpi. It should work fine.
So, while I may have missed putting up some of the files, or something else. I am considering this project to be done. Unfortunately even though all my hardware worked very well, it was ultimately the hardware that did me in. Nano DLP is a tricky little thing to work with and made it neigh on impossible to proceed past the hardware and into printing. I would have loved to continue but I don't have the time or energy to rewrite nano dlp or figure it out. If anyone want's more instructions. Please just ask and I will be happy to help. Hopefully someone else can figure out the software.
This is my attempt to try and recreate the cristelia 3d printer, which unfortunately seems to have been abandoned. Things I have changed so far. The corners are now made to use 1in tubing that can be found easily in most american hardware stores. I have started to work on my own vat system in order to
Frame
8 x 12" aluminum tubing for top and bottom frames
4 x 17-20" tubing for sides (This is really dependent on how big you want the printer)
Parts
608-2RS Bearing
8mm lead screw with nut about 400mm.
Raspberry pi 3 with wifi (Or zero with wifi)
1 in outer diameter square tubing (8 feet or about 5 metres)
Ramps board
Arduino mega
12v power
Retina display for ipad 3 or 4
Nema 17 motor
Retina display driver (https://www.adafruit.com/product/1716 or https://www.amazon.com/HDMI-Controller-Board-LP097QX1-2048x1536/dp/B06Y426S7Z/ref=pd_sbs_147_1?_encoding=UTF8&psc=1&refRID=ASK896JMF6GD9M9BRJ4E)
SD Card
Limit switch
Update 9/14/2017
Important things I have learned:
-DON'T CHEAP OUT ON THINGS
-Don't use a 12v laptop or led power supply, buy a bigger better one.
-Nanodlp does not work with a rpi zero
-Cheap chinese retina display to hdmi boards do not work, get the adafruit qualia instead
-Hdmi to display port is hard. Get an adapter that needs some sort of power supply.
-MDF does not a good printer base makehttps://github.com/trinityalps/Kafka-DLP-Printer
Update 9/21/2017 Price breakdown
Aluminum tubing~40$
12V to 5V buck converter-2$DC 12V 10A Power Supply-14$HDMI to DisplayPort Converter Adapter with USB Power-40$
RETINA DISPLAY LP097QX1-SPC2-50$
2x12mm shaft 500mm long-15$
1/4 Inch aluminum, 12 x 12 inch sheet-24$
Limit Switch- 0.50$
Flexible Couplings 5mm to 8mm-4$
400mm 8mm Lead Screw-10$R-PI 3-35$2xLMK12LUU linear bearing-10$
Nema 17 stepper 13$RAMPS 1.4 and Mega2560 R3-30$
A4988 Stepper Driver-2$Qualia Board for LP097QX1-80$
FEP Film-10$
Misc Plastic, Screws, filament-10$
Total-359.50$
THINGS IN ITALICS YOU SHOULD NOT CHEAP OUT ON, BUY EXACTLY WHAT IS SAID
Cost Savings
Aluminum is the biggest area to save here. If you can find a cheaper source of aluminum go for it. The 1/4 plate I bought is far to big, you could easily get a 7*9 inch plate and it would work just fine. I cannot stress enough to just buy the qualia board, but you could try the abusemark board, but that still requires the active hdmi to display port with usb power. You can also save money if you can find a local shop that sells a retina display replacement, But be sure it's the right model. All in all you could maybe save 50~100$ depending on the parts you already own and your own creativity in sourcing parts. But I would recommend not cheaping out. Yes it can be under 300$ but sometimes just go for the good stuff.
Update 10/6/2017 Cheaper Alternatives
So the usb car charger exploded for some reason so instead I am switching a 12v to 5v buck converter, hopefully this won't explode. Due to difficulty controlling ramps with nano dlp, I am switching to the cheaper alternative of direct control with the pi through an A4988 stepper driver and attaching that direct to the rpi. It should work fine.
Similar models
thingiverse
free

$10 DIY Variable DC Bench Power Supply by tman67234
...er | $5.22 or cheap at thrift store
used 3d printer fan | $2
used alligator test leads | $4.54
1/2" x 1" switch | $5.95
thingiverse
free

power supply case for hrn150 by Dataclone
...l 80 / not supports / not adhesion plate / print speed 100x
i recomended use 0.4mm noozle
send a like and make a better world :-)
thingiverse
free
![Tronxy X1 Base Case [Split & Enhanced] by SrgntBallistic](/t/8254151.jpg)
Tronxy X1 Base Case [Split & Enhanced] by SrgntBallistic
...witch
cut out/mounting for 40mm fan
cut out for fused ac power switch
[wip]screw holes and mounting for 100w or 150w meanwell psu
thingiverse
free

Qualia (iPad Retina) Screen Case by theintrospective
...nctions as a secondary monitor during other times. whatever you want to use it for.
printed on a modified printrbot metal simple.
grabcad
free

3D Printer Ribbon Cable Clip
... the ribbon cable from the display to the pcb board. i have prusa mk3, but will probably work on most printer extruded channels.
thingiverse
free

Printer power supply 12V 30A back cover by lucibrandus
...inter power supply 12v 30a back cover by lucibrandus
thingiverse
printer power supply 12v 30a back cover with small power switch
grabcad
free

Apple TV
...ple tv
grabcad
apple tv concept
screen: 50" retina display
resolution: 3840x2160p
6x hdmi 4x usb 3.1 2x lan
aluminum design
thingiverse
free

Tube Tracer Switch Board
...fill)
you can check some other ideas about audio and diy printed parts for tube audio in my site:http://agalavotti.altervista.org
thingiverse
free
360W PSU Safety cover with fused switch by DRPrinting3D
...xtended the slots so they fit a wider variety of power supplies, the other design had them too close together for some psu's.
thingiverse
free

Corner bracket for 20mm aluminum square tube by mandrav
...ed use. i know it's not the best angle for this thing but i believe you will get the point :)
freecad source file included.
Corma
thingiverse
free

Sierpinski Carpet Castle by Corma
...rpinski carpet using these molds. the second iteration is probably the most practical but i included molds up to four iterations.
thingiverse
free

Complement of Original Series Phaser of Corma. by J_VEGA
...a. by j_vega
thingiverse
this is a collaboration to the original series phaser of corma.http://www.thingiverse.com/thing:1133310
thingiverse
free

Harlech Castle by Corma
...d door tool are included in the files.
https://upload.wikimedia.org/wikipedia/commons/a/ab/harlech_castle_-_cadw_photograph.jpg
thingiverse
free

Gipsy Danger action figure by Corma
...ake my own. note i haaaaave not really test printed it yet. from what i can tell from shapeways it should print fine but i dunno.
thingiverse
free

Rascorder by Corma
...y sensor(unknown part number)
blank cd(for making the spectrometer)
mirror(also for spectrometer)
2-56 screw and nut(roughly 2mm)
thingiverse
free

Memory Gun by Corma
...oor
-1/8" rod for some of the pivots
-.05" rod for the trigger that will connect the spring to the body
-a small spring
thingiverse
free

Victorian O-Scale House by Corma
...w how legal this was so if anyone knows i would love to hear about it.
p.p.s. i can also be commissioned to do this sort of work.
thingiverse
free

Original Series Phaser by Corma
...ts are definitely a work in progress but i cannot really find a good detailed photo yet so i made them based on what i could see.
thingiverse
free
Modular Marble Machine for 8mm Ball Bearings by Corma
...
i hope you enjoy and please give me feed back if you make this or make more parts for it, i am highly curious as to the results.
Kafka
3ddd
$1

kafka wing chair
...kafka wing chair
3ddd
kafka , wing
kafka wing chair
archive3d
free

Bed 3D Model
...bed 3d model archive3d bed bedroom furniture bed kafka - 3d model (*.gsm+*.3ds) for interior 3d...
3d_export
$13
modular livingroom assets - pbr -
...blank bible dictionary dracula homer - iliad - odyssey kafka moby dick oz poems treasure island black blue bright...
3d_sky
free

kafka wing chair
...kafka wing chair
3dsky
wing
kafka wing chair
3d_sky
$8

Bed Kafka
...sible to change the size of the size of the bed: bed standard (lxw): 228x208x83 cm size mattress : bed standard (lxw): 200x180 cm
cg_trader
$10

Franz kafka portrait
...franz kafka portrait
cg trader
this is a portrait for franz kafka 3d model
cg_trader
$7
Cierre Imbottiti Kafka sofa
...cierre imbottiti kafka sofa
cg trader
https://cierreimbottiti.it/product/sofas-and-sectionals/kafka/?lang=en
cg_trader
$20

Franz Kafka Bust | 3D
...franz kafka bust | 3d
cg trader
bust of franz kafka
there is a second a little shorter hair version inside also.
cg_trader
$20

Franz Kafka | 3D
...er, widely regarded as one of the major figures of 20th-century literature. his work fuses elements of realism and the fantastic.
Dlp
archive3d
free
Projector 3D Model
...projector equipment projection apparatus projector vidikron vision model 65 dlp n041110 - 3d model (*.gsm+*.3ds) for interior 3d...
3d_export
$10

cute kitten v2 stl 3d print model
...3dexport solid type (fdm) and hollow type (sla & dlp<br>stl file for 3d print<br>size :<br>x : 66 mm<br>y :...
3d_export
$23
the last engineer 3d printing figurine
...will also receive "assembly manual" for fff/fdm 1.0 and dlpsla 1.0 versions in pdf format. the figurine is saved...
3d_export
$5
groot con grabadora
...some supports enabled, however you can also use a dlp or sla printer with resin as well. for small...
3d_export
$5

deer christmas 3
...some supports enabled, however you can also use a dlp or sla printer with resin as well. you should...
3d_export
$5
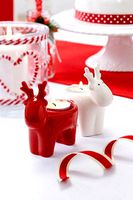
deer christmas 2
...some supports enabled, however you can also use a dlp or sla printer with resin as well. you should...
3d_export
$5
deer christmas
...some supports enabled, however you can also use a dlp or sla printer with resin as well. you should...
3d_export
$5
deer christmas 5
...some supports enabled, however you can also use a dlp or sla printer with resin as well. you should...
3d_export
$5

papa noel - santa claus
...some supports enabled, however you can also use a dlp or sla printer with resin as well. you should...
3d_export
$15
carl and ellie chair - up
...some supports enabled, however you can also use a dlp or sla printer with resin as well. for small...
Resin
turbosquid
$5

Resin table
...royalty free 3d model resin table for download as max and fbx on turbosquid: 3d models for games, architecture, videos. (1433351)
turbosquid
free
Resin Stone Free
...urbosquid
free 3d model resin stone free for download as max on turbosquid: 3d models for games, architecture, videos. (1521898)
turbosquid
$6

Epoxy Resin Table
...
royalty free 3d model epoxy resin table for download as max on turbosquid: 3d models for games, architecture, videos. (1425329)
turbosquid
$9

RESIN CHATEAU CHAIR
...sin chateau chair for download as max, max, 3ds, fbx, and obj on turbosquid: 3d models for games, architecture, videos. (1640415)
3d_export
$39

waraji resin statue sculpture
... sculpture
3dexport
waraji resin statue sculpture file 3dsmax 2014 max - fbx - stl - obj - 3ds polys : 163098 vertices : 85396
turbosquid
$10

Decorative Resin Decorative Box
...ree 3d model decorative resin decorative box for download as on turbosquid: 3d models for games, architecture, videos. (1341022)
turbosquid
$2

Resin Table LOW POLY
...oyalty free 3d model resin table-low poly for download as fbx on turbosquid: 3d models for games, architecture, videos. (1568798)
turbosquid
$1

Doll eye resin and molding
...ree 3d model doll eye (resin and molding) for download as stl on turbosquid: 3d models for games, architecture, videos. (1461887)
turbosquid
$1

Resin Ring - Epoxy Accessory
...odel resin ring - epoxy accessory for download as max and fbx on turbosquid: 3d models for games, architecture, videos. (1422041)
turbosquid
$7

Resin Wicker Dining Set
... available on turbo squid, the world's leading provider of digital 3d models for visualization, films, television, and games.
360
3ddd
$1

360-panoramas_001
...360-panoramas_001
3ddd
панорамная фотография 360 град.
3ddd
$1

360-panoramas_002
...360-panoramas_002
3ddd
панорамная фотография 360 град.
разрешение - 9000х2250 px.
3ddd
$1

360-panoramas_022
...360-panoramas_022
3ddd
панорамная фотография 360 град.
разрешение - 9000х1600 px.
3ddd
$1

360-panoramas_008
...360-panoramas_008
3ddd
панорамная фотография 360 град.
разрешение - 8000х1500 px.
3ddd
$1

360-panoramas_021
...360-panoramas_021
3ddd
панорамная фотография 360 град.
разрешение - 9000х1600 px.
3ddd
$1

360-panoramas_020
...360-panoramas_020
3ddd
панорамная фотография 360 град.
разрешение - 9000х2250 px.
3ddd
$1

360-panoramas_003
...360-panoramas_003
3ddd
панорамная фотография 360 град.
разрешение - 9000х1500 px.
3ddd
$1

360-panoramas_010
...360-panoramas_010
3ddd
панорамная фотография 360 град.
разрешение - 9000х1564 px.
3ddd
$1
/ XBOX 360
... видеоприставка , джойстик
xbox 360,3dmax2011+vray
3ddd
$1

360-panoramas_018
...360-panoramas_018
3ddd
панорамная фотография 360 град.
разрешение - 9000х2250 px.
Printer
archibase_planet
free

Printer
...inter
archibase planet
printer laser printer pc equipment
printer n120614 - 3d model (*.gsm+*.3ds) for interior 3d visualization.
archibase_planet
free

Printer
...rchibase planet
laser printer office equipment computer equipment
printer - 3d model (*.gsm+*.3ds) for interior 3d visualization.
turbosquid
$100

Printer
...er
turbosquid
royalty free 3d model printer for download as on turbosquid: 3d models for games, architecture, videos. (1487819)
turbosquid
$3

Printer
...turbosquid
royalty free 3d model printer for download as max on turbosquid: 3d models for games, architecture, videos. (1670230)
turbosquid
$1

printer
...turbosquid
royalty free 3d model printer for download as max on turbosquid: 3d models for games, architecture, videos. (1595546)
turbosquid
$1

printer
...turbosquid
royalty free 3d model printer for download as max on turbosquid: 3d models for games, architecture, videos. (1595105)
turbosquid
$10

Printer
...id
royalty free 3d model printer for download as max and 3dm on turbosquid: 3d models for games, architecture, videos. (1607146)
turbosquid
$7

Printer
...royalty free 3d model printer for download as ma, ma, and obj on turbosquid: 3d models for games, architecture, videos. (1644580)
turbosquid
$30

Printer
... available on turbo squid, the world's leading provider of digital 3d models for visualization, films, television, and games.
turbosquid
$20

Printer
... available on turbo squid, the world's leading provider of digital 3d models for visualization, films, television, and games.