Thingiverse
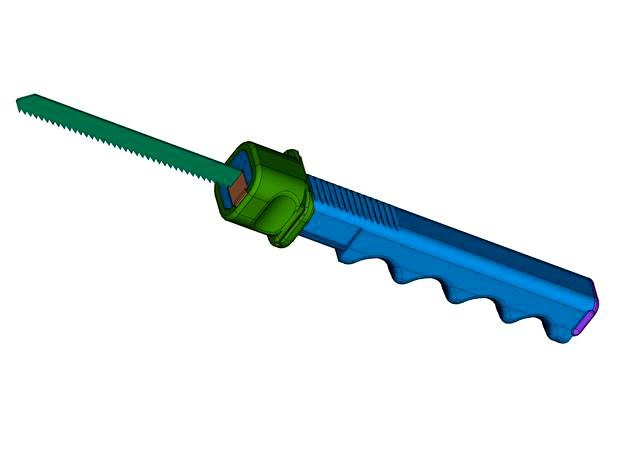
Jig Saw Handle With Blades Magazine by Dagongar
by Thingiverse
Last crawled date: 2 years, 12 months ago
Handle for T-Shank jig saw blades, with blade magazine
Please, see my Improved Jig Saw Handle.
03/22/2018: New version where the size of the saw blade socket has been corrected to the size of the Bosch blades. Now it fits perfectly. The saw body is also available in one piece, not divided.
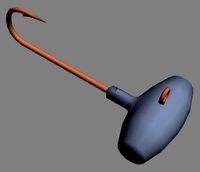
This is a handle for attaching jigsaw blades with a hole inside to store up to 10 blades (depending on thickness).
The wedge jaw and sliding clamp system provides optimum blade grip, preventing the blade from moving when sawing.
The design has been made to be printed on ABS.
Before printing, see the printing instructions.
To avoid the use of difficult to remove substrates, the handle is printed in two halves and then glued with PVC glue or by joining the two parts together and applying acetone to the joint. It will penetrate by capillary action by solidly joining the two pieces.
Before mounting, it may be necessary to sand the front of the handle until the clamp slips off effortlessly.
To assemble the cover, insert the two hooks with the protrusion facing outwards into the restangular holes of the cover, sticking them to the cover as indicated above. They must be slightly divergent from the cover.
In order to obtain an optimum grip on the saw, it is necessary to stick sandpaper grains in the jaw and inside the hole where the saw is embedded.
To achieve this, soak a few pieces of sandpaper (with fabric backing) in water (Sand Image 1). In a few minutes the "sand" will be detached from the fabric (Sand 2). Remove the pieces of cloth, rinse the sand and throw the water away. The sand will remain at the bottom of the container. Put it to dry. (Image Sand 3)
Take the jaw, soak the underside (the non-angled side) with acetone to soften the ABS. Add more acetone if it evaporates. Repeat for 30 seconds. Sprinkle the sand on this face and press a little to make it stick, remove the sand that has not stuck and flatten it by pressing with a saw blade. Repeat the operation with the other side on the handle, where the cradle is seated. Take care that the sand does not stick to the walls and only to the bottom. If this runs, remove the sand from the walls before it dries (Sand Image 4).
The Assembly image shows how to mount a saw on the handle.
Depending on the thickness of the mounted saw, the clamp may not go all the way, but the saw will be securely fastened. It has been tested with 0.8 to 1.5 mm thick saws.
A slightly longer clamp design has been included for use if you don't want to use the sanding trick, but the saw's grip will be worse.
Mango para sierras de caladora de bástago en T, con depósito de hojas.
Por favor, mirar mi Improved Jig Saw Handle.
Se trata de un mango para acoplar hojas de sierra caladora con un hueco en el interior para guardar hasta 10 hojas (dependiendo del grosor).
Con el sistema de mordaza en cuña y abrazadera deslizante se proporciona un agarre óptimo de la hoja, impidiendo que esta se mueva al serrar.
El diseño se ha hecho para ser impreso en ABS.
Antes de imprimir, ver las instrucciones de impresión.
Para evitar el uso de soportes difíciles de retirar, el mango se imprime en dos mitades que luego hay que pegar con pegamento de PVC o uniendo las dos partes y poniendo acetona en la unión. Esta penetrará por capilaridad uniendo las dos piezas sólidamente.
Antes del montaje, puede ser necesario lijar la parte delantera del mango hasta que la abrazadera se deslice sin esfuerzo.
Para montar la tapa, insertar los dos ganchos con el resalte hacia fuera en los huecos restangulares de la tapa, pegandolos a esta de la forma antes indicada. Deben quedar de forma ligeramente divergente con respecto a la tapa.
Para conseguir un agarre óptimo de la sierra, es necesario pegar granos de lija en la mordaza y en el interior del hueco donde va encastrada la sierra.
Para conseguirlo, poner en remojo con agua unos trozos de papel de lija del número 40 (con soporte de tela)(Imagen Sand 1). En unos minutos la "arena" se habrá desprendido de la tela (Imagen Sand 2). Retirar los trozos de tela, enjuagar la arena y tirar el agua. La arena quedará en el fondo del recipiente. Ponerla a secar. (Imagen Sand 3)
Tomar la mordaza, empapar la cara inferior (la cara no inclinada) con acetona para que se reblandezca el ABS. Poner más acetona si ésta se evapora. Repetir durante 30 segundos. Espolvorear la arena sobre esa cara y presionar un poco para que se adhiera, retirar la arena que no se ha pegado y aplanar presionando con el bástago de una hoja de sierra. Repetir la operación con la otra cara en el mango, donse se asienta el bástago. Cuidar que la arena no se pegue en las paredes y lo haga solo en el fondo. Si esto scurre, retirar la arena de las paredes antes de que se seque (Imagen Sand 4).
La imagen Assembly muestra cómo montar una sierra en el mango.
Según el grosor de la sierra montada, la abrazadera puede que no llegue hasta el final, pero la sierra quedará bien sujeta. Se ha probado con sierras de 0,8 a 1,5 mm de grosor.
Se ha incluido un diseño de mordaza un poco más largo para usarla si no se desea usar el truco de la lija, pero el agarre de la sierra será peor.
Please, see my Improved Jig Saw Handle.
03/22/2018: New version where the size of the saw blade socket has been corrected to the size of the Bosch blades. Now it fits perfectly. The saw body is also available in one piece, not divided.
This is a handle for attaching jigsaw blades with a hole inside to store up to 10 blades (depending on thickness).
The wedge jaw and sliding clamp system provides optimum blade grip, preventing the blade from moving when sawing.
The design has been made to be printed on ABS.
Before printing, see the printing instructions.
To avoid the use of difficult to remove substrates, the handle is printed in two halves and then glued with PVC glue or by joining the two parts together and applying acetone to the joint. It will penetrate by capillary action by solidly joining the two pieces.
Before mounting, it may be necessary to sand the front of the handle until the clamp slips off effortlessly.
To assemble the cover, insert the two hooks with the protrusion facing outwards into the restangular holes of the cover, sticking them to the cover as indicated above. They must be slightly divergent from the cover.
In order to obtain an optimum grip on the saw, it is necessary to stick sandpaper grains in the jaw and inside the hole where the saw is embedded.
To achieve this, soak a few pieces of sandpaper (with fabric backing) in water (Sand Image 1). In a few minutes the "sand" will be detached from the fabric (Sand 2). Remove the pieces of cloth, rinse the sand and throw the water away. The sand will remain at the bottom of the container. Put it to dry. (Image Sand 3)
Take the jaw, soak the underside (the non-angled side) with acetone to soften the ABS. Add more acetone if it evaporates. Repeat for 30 seconds. Sprinkle the sand on this face and press a little to make it stick, remove the sand that has not stuck and flatten it by pressing with a saw blade. Repeat the operation with the other side on the handle, where the cradle is seated. Take care that the sand does not stick to the walls and only to the bottom. If this runs, remove the sand from the walls before it dries (Sand Image 4).
The Assembly image shows how to mount a saw on the handle.
Depending on the thickness of the mounted saw, the clamp may not go all the way, but the saw will be securely fastened. It has been tested with 0.8 to 1.5 mm thick saws.
A slightly longer clamp design has been included for use if you don't want to use the sanding trick, but the saw's grip will be worse.
Mango para sierras de caladora de bástago en T, con depósito de hojas.
Por favor, mirar mi Improved Jig Saw Handle.
Se trata de un mango para acoplar hojas de sierra caladora con un hueco en el interior para guardar hasta 10 hojas (dependiendo del grosor).
Con el sistema de mordaza en cuña y abrazadera deslizante se proporciona un agarre óptimo de la hoja, impidiendo que esta se mueva al serrar.
El diseño se ha hecho para ser impreso en ABS.
Antes de imprimir, ver las instrucciones de impresión.
Para evitar el uso de soportes difíciles de retirar, el mango se imprime en dos mitades que luego hay que pegar con pegamento de PVC o uniendo las dos partes y poniendo acetona en la unión. Esta penetrará por capilaridad uniendo las dos piezas sólidamente.
Antes del montaje, puede ser necesario lijar la parte delantera del mango hasta que la abrazadera se deslice sin esfuerzo.
Para montar la tapa, insertar los dos ganchos con el resalte hacia fuera en los huecos restangulares de la tapa, pegandolos a esta de la forma antes indicada. Deben quedar de forma ligeramente divergente con respecto a la tapa.
Para conseguir un agarre óptimo de la sierra, es necesario pegar granos de lija en la mordaza y en el interior del hueco donde va encastrada la sierra.
Para conseguirlo, poner en remojo con agua unos trozos de papel de lija del número 40 (con soporte de tela)(Imagen Sand 1). En unos minutos la "arena" se habrá desprendido de la tela (Imagen Sand 2). Retirar los trozos de tela, enjuagar la arena y tirar el agua. La arena quedará en el fondo del recipiente. Ponerla a secar. (Imagen Sand 3)
Tomar la mordaza, empapar la cara inferior (la cara no inclinada) con acetona para que se reblandezca el ABS. Poner más acetona si ésta se evapora. Repetir durante 30 segundos. Espolvorear la arena sobre esa cara y presionar un poco para que se adhiera, retirar la arena que no se ha pegado y aplanar presionando con el bástago de una hoja de sierra. Repetir la operación con la otra cara en el mango, donse se asienta el bástago. Cuidar que la arena no se pegue en las paredes y lo haga solo en el fondo. Si esto scurre, retirar la arena de las paredes antes de que se seque (Imagen Sand 4).
La imagen Assembly muestra cómo montar una sierra en el mango.
Según el grosor de la sierra montada, la abrazadera puede que no llegue hasta el final, pero la sierra quedará bien sujeta. Se ha probado con sierras de 0,8 a 1,5 mm de grosor.
Se ha incluido un diseño de mordaza un poco más largo para usarla si no se desea usar el truco de la lija, pero el agarre de la sierra será peor.
Similar models
thingiverse
free
Hotbed scraper / Espátula para cama caliente by Kinkakoo
...s dos mitades juntas y es buena idea pegar el mango con un poco de acetona+abs o pegamento.
imprimir la cara interior para abajo.
3dwarehouse
free

mariposa de la psicología
...se diseña un cuaderno con una mariposa que representa la vida y una hoja con un ojo que representa el análisis para el psicólogo.
thingiverse
free

Improved Jig Saw Handle by Dagongar
...de trabajo, ideal por su poco peso, robustez y versatilidad para añadir a la caja de herramientas, equipo de supervivencia o edc.
thingiverse
free
Credit card blade by Dagongar
...rglue.
aviso: las hojas de cutter son una herramienta peligrosa. no son un juguete, ni para uso escolar ni para fines educativos.
thingiverse
free
65mm Drone Frame by PaulDrones
...con la punta de una brida de nylon o similar las partes unidas con acetona tardan muy poco en...
thingiverse
free

Rosas DiYer Originals by DiYerOriginals
...on la decapadora hasta que quedan flexibles.
para juntarlos entre si se hace pasta con abs y acetona y se utiliza como pegamento.
cg_trader
$5

Arbol Tenebroso - Dark Tree
...ura cycles para el tronco y las ramas pequeñas, pudiendo cambiar el color (2 colores) y tamaño de la rugosidad. es muy versatil.
3dwarehouse
free

Icosidodecaedro
...uiáteras. el poliedro tiene 20 caras triangulares y 12 caras pentagonales, formado un total de 32 caras, 60 aristas y 30 vértices
thingiverse
free

Drill Abrasive Drum by Dagongar
...rminar de cortarlo a mano.
en la versión 1,1 se ha reducido el diámetro del agujero del tornillo en 0,2 mm para un mejor ajuste.
thingiverse
free
Mango destornillador y Base soporte para puntas de 4mm Screwdriver handle and holder base for 4mm tips by MaikiBurgos
...iver organized.
the filling for the base is 10% and in the handle 20%.
i attach the freecad file for which you want to modify it.
Dagongar
thingiverse
free

Smoking Pipe Holder by Dagongar
...smoking pipe holder by dagongar
thingiverse
holder for smoking pipe
thingiverse
free
Small Clamps by Dagongar
...on 1 y 5 dientes, normal, con anilla para colgar y con un gancho.
los resortes se han obtenido de las pinzas de la ropa normales.
thingiverse
free
Prusa I3 Steel X & Z axis endstop holder by Dagongar
...st and reliable prusa i3 steel x and z axis mechanical endstop holder.
use 20 mm m3 screw allen head with nylon insert lock nut.
thingiverse
free

Drill bit sharpener for "generic" rotary tool by Dagongar
...common, but the thread to attach accessories is smaller than the dremel one.
see the mgx sharpener description for instructions.
thingiverse
free

Bic Lighter Waterproof Cap by Dagongar
... al que se le ha añadido una junta de goma tórica de 20x2 mm o 20x2,5 mm (20 mm es el diámetro interior y 2/2,5 mm es la altura).
thingiverse
free
Dual Center Finder For Pipes by Dagongar
...e monta cuesta trabajo introducir la regla, poner un poco de grasa en las guías y en la regla, después, se desliza con facilidad.
thingiverse
free
Pocket box by Dagongar
...la parte del botón que sobresale en el interior de la caja.
poner un alambre de 0,7 mm de diámetro como pasador de las bisagras.
thingiverse
free
Credit card blade by Dagongar
...rglue.
aviso: las hojas de cutter son una herramienta peligrosa. no son un juguete, ni para uso escolar ni para fines educativos.
thingiverse
free
Office Desk Organizer by Dagongar
... yo he puesto una lámpara halógena de 42w apuntando a la pieza, para mantenerla caliente entre 70 y 90 º c. (ver imágenes 1 y 2).
thingiverse
free
Wheel and shaft replacement for dishwasher basket by Dagongar
...edor, es necesario cortarlo longitudinalmente y abrirlo en lugar de sacar la pieza tirando, ya que se podrían romper los ganchos.
Jig
turbosquid
$5

Jig Tail
... available on turbo squid, the world's leading provider of digital 3d models for visualization, films, television, and games.
turbosquid
$5
Jig Head
... available on turbo squid, the world's leading provider of digital 3d models for visualization, films, television, and games.
turbosquid
$5

Jig Head
... available on turbo squid, the world's leading provider of digital 3d models for visualization, films, television, and games.
turbosquid
$5
Jig Head
... available on turbo squid, the world's leading provider of digital 3d models for visualization, films, television, and games.
turbosquid
$5
Jig Head
... available on turbo squid, the world's leading provider of digital 3d models for visualization, films, television, and games.
turbosquid
$5

Jig Head
... available on turbo squid, the world's leading provider of digital 3d models for visualization, films, television, and games.
turbosquid
$7

Double Jig Tail
... available on turbo squid, the world's leading provider of digital 3d models for visualization, films, television, and games.
turbosquid
$20

Set of Two Soft Plastic Baits and Jig Head Fishing tackle
... baits and jig head fishing tackle for download as ma and fbx on turbosquid: 3d models for games, architecture, videos. (1611886)
3d_export
$20
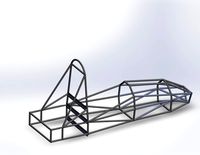
fsae frame
...3dexport fsae frame according to the regulation's measures wooden jig for manufacturing included in...
3d_export
$30

Puzzle 3D Model
...puzzle 3d model 3dexport puzzle pieces jigsaw jig saw game toy piece puzzle 3d model tartino 7006...
Magazine
archibase_planet
free

Magazines
...ibase planet
magazine journal periodical magazines
magazines dual n200111 - 3d model (*.gsm+*.3ds) for interior 3d visualization.
archibase_planet
free
Magazines
...magazines
archibase planet
magazine periodical journal
magazines - 3d model for interior 3d visualization.
3d_ocean
$5
3d magazine
...3d magazine
3docean
3d magazine book journal magazine newspaper
3d magazine model.
turbosquid
$2

magazines
...rbosquid
royalty free 3d model magazines for download as c4d on turbosquid: 3d models for games, architecture, videos. (1264164)
3d_export
$5

Magazine stand
...magazine stand
3dexport
magazine stand
3d_export
$5

magazine stand
...magazine stand
3dexport
magazine stand
3ddd
$1
Stool Magazine
...stool magazine
3ddd
stool magazine дизайнерское кресло
turbosquid
$2

Magazine
... available on turbo squid, the world's leading provider of digital 3d models for visualization, films, television, and games.
archive3d
free

Magazines 3D Model
...magazine periodical journal
magazines n160212 - 3d model (*.3ds) for interior 3d visualization.
archive3d
free

Magazines 3D Model
...agazines periodical journal
magazines n300411 - 3d model (*.3ds) for interior 3d visualization.
Saw
turbosquid
$30

saw
... available on turbo squid, the world's leading provider of digital 3d models for visualization, films, television, and games.
turbosquid
$25

Saw
... available on turbo squid, the world's leading provider of digital 3d models for visualization, films, television, and games.
turbosquid
$20

saw
... available on turbo squid, the world's leading provider of digital 3d models for visualization, films, television, and games.
turbosquid
$20

Saw
... available on turbo squid, the world's leading provider of digital 3d models for visualization, films, television, and games.
turbosquid
$20
saw
... available on turbo squid, the world's leading provider of digital 3d models for visualization, films, television, and games.
turbosquid
$10

saw
... available on turbo squid, the world's leading provider of digital 3d models for visualization, films, television, and games.
turbosquid
free

Saw
... available on turbo squid, the world's leading provider of digital 3d models for visualization, films, television, and games.
turbosquid
free

saw
... available on turbo squid, the world's leading provider of digital 3d models for visualization, films, television, and games.
turbosquid
free

saw
... available on turbo squid, the world's leading provider of digital 3d models for visualization, films, television, and games.
archive3d
free

Saw 3D Model
... saw startwin electric chain saw n310513 - 3d model (*.gsm+*.3ds) for interior 3d visualization.
Blades
3d_export
$20
cossack blades
...
3dexport
cossack blades. the set contains 10 blades with a scabbard. each object (blade + scabbard) has a texture of 2048x2048.
3d_export
free

Blade Katarina
...blade katarina
3dexport
blade
turbosquid
free

Blades
...urbosquid
royalty free 3d model blades for download as blend on turbosquid: 3d models for games, architecture, videos. (1544896)
turbosquid
$40

Blade
...royalty free 3d model blade for download as max, obj, and dwg on turbosquid: 3d models for games, architecture, videos. (1222665)
turbosquid
$35

blade
... available on turbo squid, the world's leading provider of digital 3d models for visualization, films, television, and games.
turbosquid
$32

blade
... available on turbo squid, the world's leading provider of digital 3d models for visualization, films, television, and games.
turbosquid
$20

Blade
... available on turbo squid, the world's leading provider of digital 3d models for visualization, films, television, and games.
turbosquid
$15

Blade
... available on turbo squid, the world's leading provider of digital 3d models for visualization, films, television, and games.
turbosquid
$3

Blade
... available on turbo squid, the world's leading provider of digital 3d models for visualization, films, television, and games.
turbosquid
$2

blade
... available on turbo squid, the world's leading provider of digital 3d models for visualization, films, television, and games.
Handle
archibase_planet
free
Handle
...handle
archibase planet
handle furniture handle
handle 1 - 3d model (*.gsm+*.3ds) for interior 3d visualization.
archibase_planet
free
Handle
...handle
archibase planet
handle furniture handle
handle 5 - 3d model (*.gsm+*.3ds) for interior 3d visualization.
archibase_planet
free
Handle
...handle
archibase planet
handle furniture handle
handle 3 - 3d model (*.gsm+*.3ds) for interior 3d visualization.
archibase_planet
free
Handle
...handle
archibase planet
handle furniture handle
handle 6 - 3d model (*.gsm+*.3ds) for interior 3d visualization.
archibase_planet
free
Handle
...handle
archibase planet
handle furniture handle
handle 4 - 3d model (*.gsm+*.3ds) for interior 3d visualization.
archibase_planet
free
Handle
...handle
archibase planet
handle furniture handle
handle 2 - 3d model (*.gsm+*.3ds) for interior 3d visualization.
archibase_planet
free
Handle
...handle
archibase planet
handle furniture handle knob
handle 2 n140814 - 3d model (*.gsm+*.3ds) for interior 3d visualization.
archibase_planet
free
Handle
...handle
archibase planet
handle door knob door-handle
handle n110413 - 3d model (*.gsm+*.3ds) for interior 3d visualization.
archibase_planet
free
Handle
...handle
archibase planet
door-handle handle door-knob
handle n070209 - 3d model (*.gsm+*.3ds) for interior 3d visualization.
archibase_planet
free
Handle
...handle
archibase planet
door-handle handle door-knob
handle n270309 - 3d model (*.gsm+*.3ds) for interior 3d visualization.