Thingiverse
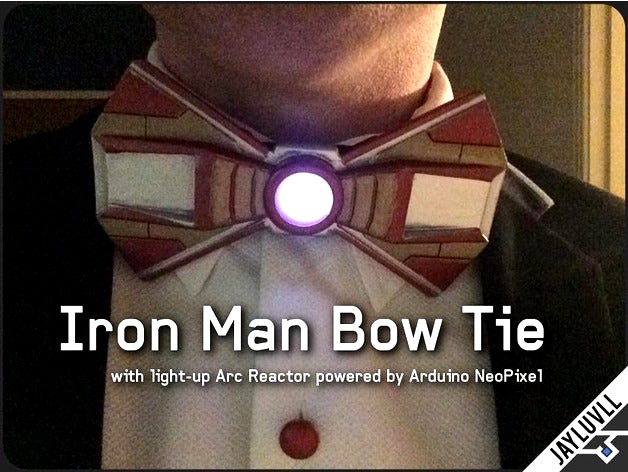
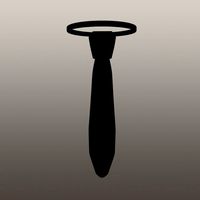
Iron Man Bow Tie by JayLuvLL
by Thingiverse
Last crawled date: 3 years, 1 month ago
For the genius, billionaire, playboy philanthropist who has everything….except something to wear to formal dinners.
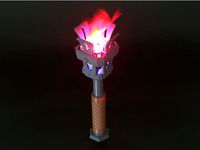
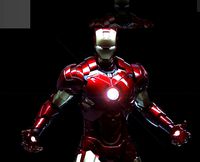
Presenting the Iron Man Bow Tie, a 3D printed bow tie with a space for a miniature glowing arc reactor in the centre.
The light can be powered any way you wish, however I used an Arduino Gemma and Arduino Neopixel to light up the centre. You don’t have to use this method, you can use a simple LED circuit, but the Arduino lets you tune the colour exactly how you want, and even animate/pulse the light.
This model is scaled to print a bow tie 13cm wide, 7.3cm tall and 1cm thick. This size is a little bigger than an average bow tie, however you can scale it to whichever size you wish. Just note that at the current scale, it will perfectly fit an Arduino Neopixel Jewel in the recess at the back (see notes below in the Wiring guide).
The model comes both whole and split into two halves, which allows it to fit on a print bed around 12cm x 12cm (maybe slightly smaller).
There is also a back bracket which allows you to attach an elastic strap and/or clasp onto a collar button. This was too small to fit onto my dress shirt collar button, however yours may fit. In any case, with the elastic, I found I did not need the button clasp.
Now, Tony Stark built this in a cave. With a box of spare parts.
BUT, as we aren’t Tony Stark….here’s what you’ll need to finish the bow tie.
PARTS LIST
3D printed Bow Tie (one piece or two, joined)
3D printed back bracket
white acrylic/Perspex, at least 3cm x 3cm (I scrounged a small offcut from my local hardware store)
around 40cm elastic strapping – I used black, but you could also use red or yellow
1 press stud set (comes in four pieces, two for each side)
THE FOLLOWING IS IF YOU WANT ARDUINO LIGHTING:
Black, small gauge wire
1 Adafruit Arduino Gemma v2https://www.adafruit.com/product/1222
1 LiPo battery, 3.7v. Size is up to you, for a small size I used the 500mAh one from Adafruit:https://www.adafruit.com/product/1578
Adafruit Neopixel, either:
Adafruit Neopixel Flora single light – this is what I used.https://www.adafruit.com/products/1260
OR
Adafruit NeoPixel Jewel 7-light board – for more brightness and animated sequences.https://www.adafruit.com/product/2226
ASSEMBLY GUIDE
1 - Print the Bow Tie and back bracket. I used 0.20 layer height, 3 perimeters and 25% infill. If you printed the tie in two parts, join them using acetone (if printed in ABS) or super glue. The bracket will take the strain off this join, but try to make it a strong connection.
2 – Smooth, finish and paint the bow tie in any way you choose. I used automotive blade putty for the centre join, a light sand all over, then successive coats of automotive spray filler + primer and fine sanding until smooth all over. I used a red base coat, then masked off to spray the gold parts, then masked a final time and sprayed the silver.
3 – Cut the white acrylic into a circle and sand/cut the edge until it fits inside the recess. Glue into place using hot glue or an adhesive of your choice.
4 - If you want to have Arduino lighting, install the NeoPixel now – see section below. Glue the light into place behind the acrylic with the wires oriented to the RIGHT (if looking at the back of the tie).
5 – Measure the circumference of your neck (over your shirt) and cut this length of elastic strapping. Make sure it is firmer rather than looser, or the tie will droop downwards (but obviously don’t strangle yourself).
6 – Install the press stud into each end of the elastic strap. Ensure each side matches the orientation of the other, or the strap will be twisted. Make sure the side with the rounded outer dome is on the RIGHT, and facing out from your neck.
7 - Lay the elastic strap over the centre of the tie, horizontally. For lighting: cut the holes in the strap now – see section below.
8 – Glue the back bracket in place with the triangular cut-out facing downwards. Ensure the strap is inside the bracket. Use a strong glue for this if possible, but I used hot glue and it held fine.
If you have lighting, finish fixing it in place – see section below. Otherwise, you’re all done! Try it on and take it for a test fly!
WIRING GUIDE
Follow these extra steps if you are installing Arduino lighting.
Arduino Basics
The Adafruit Neopixel is a RGB addressable LED that, when powered by an Arduino computer, can be programmed to perform a range of functions – show any RGB color at any brightness, animate, fade or respond to stimuli/commands. Here, we are using a simple Arduino called an Adafruit Gemma to run a basic code to light it to a blue/white hue to match the Iron Man Arc Reactor. The Gemma and Neopixel require a small, Lithium Polymer (LiPo) battery to run it, or alternatively you can use any rechargeable power pack that can output to Micro USB (most phone battery packs are suitable).
When choosing a Neopixel type for this project, I had two choices: a single light Neopixel called a Flora, or a 7-light board called a Jewel. The Flora is simpler and smaller, and more than bright enough on it’s own. However, the Jewel is more versatile in that you can program animated lighting sequences to make a rotating light animation If you wish (I won’t explain that here, see adafruit.com for tutorials on Arduino and Neopixel basics).
The NeoPixel has three wiring channels: positive, negative, and data. Positive and negative are for power, data is to run the code. The wiring diagram for the circuit is in the pictures above:
Connect “GND” on the Gemma to the “-“ on the Flora or “GND” on the Jewel.
Connect “D1” on the Gemma to the inwards facing arrow on the Flora or the “IN” on the Jewel.
Connect “Vout” on the Gemma to the “+” on the Flora or ‘PWR” on the Jewel.
The assembly guide for the lighting is as follows. I will be using the Flora as an example, replace relative terms where necessary:
Solder wires to the “-“, “+” and inwards-facing arrow on the Flora, so all the wires protrude in one direction. Leave about 30cm of wire from each connection.
Glue the Flora onto the back of the acrylic as described in Step 4, with the wires trailing to the RIGHT (if looking at the back of the tie).
Cut a hole in the centre of the elastic strap and poke all three wires through to the inner side of the strap. Cut the other hole about 4cm in from the end of the strap with the round outer dome of the press stud and poke them back through so the wires are on the outside of the strap again.
Program the Adafruit Gemma using the code supplied in the files – this is a modification of the demo code from Adafruit. One code is for the Flora, one is for the Jewel.
You can do this by downloading the Arduino software onto a computer (you may have to download extra libraries to get the Gemma recognised), opening the program, pasting the code in, connecting the Gemma via MicroUSB (ensuring it is in receive mode – rapidly blinking red light), and clicking Upload. The red light onboard will dimly blink every 0.5 seconds if running correctly.
Note: if you want to change the color or brightness of the lighting, look for this line:
pixels.setPixelColor(i, pixels.Color(30,30,35)); // Iron Man arc reactor color in RGB. Increase each number in equal ratios to increase brightness.
Where the number says (30,30,35), this is the Red, Green and Blue values of the light from 0-255. Increase each value in ratio to increase the brightness. These values give a subtle, dim blue (because I didn’t want it blowing out photos) but using (90,90,105) is 3 times as bright.
Put the tie on and measure where the wires end at the rounded dome of the clasp, and cut all three with about 1-2cm extra. Strip and tin the ends of the wires.
Solder the relative wires to the relative connections, taking great care to match the right wires up.
Connect the LiPo battery to the Gemma and flight the On/Off switch on the board. The Neopixel will light up bright white initially, then after about 10 seconds, the light should set to the settings you have used in the code. If this does not happen, ensure you followed the above coding correctly and try again.
If the light works correctly, remove the battery and glue the back of the Gemma onto the outside of the rounded dome of the press stud using hot glue or an adhesive of your choice. Ensure the white battery connector is facing downwards, so the battery trails down your back.
Connect the battery, flick the switch and you’re ready to party!
Designed by JayLuvLL in August/September 2016.
https://www.facebook.com/jayluvll/
Original post/progress build is here:
First: https://www.facebook.com/jayluvll/posts/1097429076989047
Second: https://www.facebook.com/jayluvll/photos/a.868132653252025.1073741830.866372233428067/1098154243583197
Third: https://www.facebook.com/jayluvll/photos/a.868132653252025.1073741830.866372233428067/1108726615859293/
Final: https://www.facebook.com/jayluvll/posts/1112289198836368
Arduino imagery supplied from Adafruit.com.
Code is based off the NeoPixel Ring simple sketch (c) 2013 Shae Erisson, released under the GPLv3 license to match the rest of the AdaFruit NeoPixel library.
I have no affiliation with Marvel, Disney or other companies retaining rights to Iron Man or Arc reactor – this is a fan-made creation only. This design is released for free using the Adobe Creative Commons – Attribution – Non-Commercial – Share Alike licence.
Similar models
thingiverse
free
Adafruit Goggle neopixel bezel and backing disc washer by Microtrol
...e battery clip holds a 1200ma li-poly battery and a gemma processor that i bought from adafruit and clips on to the goggle strap.
thingiverse
free

LED Drum Case for Gemma by adafruit
... for all the parts and tools needed for this project.
our guide has a tutorial and the arduino code needed to run this project.
thingiverse
free

Rainbow Brite Flora Neopixel Stars by AmieDD
...es on each point of the star so you can sew them to your costume or project.starnosewholes: solid star without sewing base holes.
thingiverse
free
NeoPixel Rainbow Ring Pendant by v1kings
...erse.com/thing:79502)
micro switch (8mm/3mm/3mm)
some wire
source code
https://github.com/achorein/rainbowring-arduino
have fun !
thingiverse
free

Mini Lighthouse re-mix lighted with neopixels by bonnette
...ource code for the sign. the arduino code has been modified to display a more pleasant light show. i also added a wiring diagram.
thingiverse
free
Adafruit Gemma case used with Neopixel flora by Microtrol
...plate. used some hot glue to attach it to the original lamp base so that's why it looks kinda ugly. pretty self explanatory
thingiverse
free

Adafruit Feather HUZZAH + Neopixel FeatherWing enclosure by seajseven
...se two modules attached, you can build a wifi arduino-based led display board.
battery pass-through is blocked, usb is available.
thingiverse
free

Doctor Strange - Eye of Agamotto (remix) by nmsr1196
... shown) by adding newopixel jewel 7 [adafruit part#2226] with gemma. i will need to add a recharge board for this future option.
thingiverse
free

Voronoy Lamp by Grogo666
... button is 6mm :https://www.adafruit.com/product/367
i can share the code (derivated from the neopixels example code) if you like
thingiverse
free
NeoPixel LED Torch by adafruit
...://www.adafruit.com/product/1781
inspired by nick dimelow's medieval torch project.https://www.prusaprinters.org/prints/38051
Jayluvll
thingiverse
free

Prusa i3 MK2 / MK2.5 Center Camera Arm by JayLuvLL
.../jayluvll
twitter: https://twitter.com/jayluvll
instagram: https://www.instagram.com/jayluvll/
imgur: https://jayluvll.imgur.com/
thingiverse
free

Archery Target Face Pin by JayLuvLL
... a foam or similar material as a backstop.
prints without supports. would recommend at least 2-3 shells and at least 20% infill.
thingiverse
free

Greyhound Guard Dog Sign by JayLuvLL
...e 180mm x 140 mm, and 12mm thick. the white base of it is only 10mm thick, with the black text/artwork being an extra 2mm on top.
thingiverse
free

Halo Master Chief Helmet - Cortana A.I. Chip Receiver Port by JayLuvLL
...er chief, cortana or unsc are all trademarks of the microsoft corporation - i do not claim ownership for any of these properties.
thingiverse
free

Halo Fredrick Helmet & AI Chip by Jace1969
...come ; ) a big thanks to paulfurn & jayluvll for providing cortana's ai chip and helmet inscertion...
Bow
design_connected
$2
Bow
...bow
designconnected
octate bow computer generated 3d model. designed by sharpe, tim.
3d_export
$5
wooden bow
...wooden bow
3dexport
wooden bow
design_connected
$11
Bow
...signconnected
photo-realistic 3d models of the bow lamp from ligne roset for 3d architectural and interior design presentations.
turbosquid
$10

bow
...bow
turbosquid
royalty free 3d model bow for download as obj on turbosquid: 3d models for games, architecture, videos. (1195174)
turbosquid
$2

Bow
...bow
turbosquid
royalty free 3d model bow for download as obj on turbosquid: 3d models for games, architecture, videos. (1167224)
turbosquid
$1
Bow
...w
turbosquid
royalty free 3d model bow for download as blend on turbosquid: 3d models for games, architecture, videos. (1369091)
turbosquid
$5

Bow
...
royalty free 3d model bow for download as 3ds, max, and obj on turbosquid: 3d models for games, architecture, videos. (1181607)
turbosquid
$1
Bow
...
royalty free 3d model bow for download as png, fbx, and upk on turbosquid: 3d models for games, architecture, videos. (1201026)
turbosquid
$1

bow
...royalty free 3d model bow for download as blend, obj, and fbx on turbosquid: 3d models for games, architecture, videos. (1576089)
turbosquid
$1
Bow
...royalty free 3d model bow for download as fbx, blend, and stl on turbosquid: 3d models for games, architecture, videos. (1142818)
Tie
archibase_planet
free

Tie
...tie
archibase planet
cravat tie scarf
tie n240308 - 3d model (*.gsm+*.3ds) for interior 3d visualization.
design_connected
$13

Tie
...tie
designconnected
bonaldo tie computer generated 3d model. designed by lipparini, mauro.
3d_export
free

tie
...tie
3dexport
turbosquid
$5
tie
... available on turbo squid, the world's leading provider of digital 3d models for visualization, films, television, and games.
archive3d
free
Tie 3D Model
... model
archive3d
necktie tie cravat
tie - 3d model (*.gsm+*.3ds) for interior 3d visualization.
turbosquid
free
TIE Interceptor
...erceptor
turbosquid
free 3d model tie in for download as fbx on turbosquid: 3d models for games, architecture, videos. (1164790)
archive3d
free

Tie 3D Model
...
archive3d
cravat tie scarf
tie n240308 - 3d model (*.gsm+*.3ds) for interior 3d visualization.
turbosquid
$5
Cartoon tie
...urbosquid
royalty free 3d model cartoon tie for download as on turbosquid: 3d models for games, architecture, videos. (1646820)
turbosquid
free

TIE Bomber
...e bomber
turbosquid
free 3d model tie/sa for download as fbx on turbosquid: 3d models for games, architecture, videos. (1164803)
turbosquid
$6

Bow Tie
...turbosquid
royalty free 3d model bow tie for download as stl on turbosquid: 3d models for games, architecture, videos. (1352382)
Iron
archibase_planet
free

Iron
...ase planet
iron flatiron flat iron smoothing-iron
iron scarlett sc1133s n260112 - 3d model (*.3ds) for interior 3d visualization.
archibase_planet
free

Iron
...et
iron flatiron flat iron smoothing-iron
iron black & decker n131213 - 3d model (*.gsm+*.3ds) for interior 3d visualization.
3ddd
free
Iron
...mbo-unlimitedideas.com/produtos_post/iron-console/
в архиве сцена 2011 и 2014, fbx и obj, текстуры
рендер: vray 2.4
3d_ocean
$15

Steam iron
...ign made by me. you can use it for your projects and games as you want. iron, steam iron, philips,siemens, clothes,ironing, tefal
turbosquid
$8
Iron Chandelier - Iron Chandelier
... available on turbo squid, the world's leading provider of digital 3d models for visualization, films, television, and games.
turbosquid
$35

iron
...on
turbosquid
royalty free 3d model iron for download as max on turbosquid: 3d models for games, architecture, videos. (1365250)
3d_export
$20

iron press
...iron press
3dexport
iron press
3d_export
$5
old iron
...old iron
3dexport
old iron
3d_export
free
iron man
...iron man
3dexport
iron man
3d_export
$49

Iron Giant
...iron giant
3dexport
iron giant film
Man
3d_export
$5

Man
...man
3dexport
man
3d_export
$5
man
...man
3dexport
man obj
3d_export
$10

man
...man
3dexport
this is an man for 3d games.
archibase_planet
free

Man
...man
archibase planet
people man
man - 3d model (*.gsm+*.3ds) for interior 3d visualization.
archibase_planet
free

Man
...man
archibase planet
people man
man - 3d model (*.gsm+*.3ds) for interior 3d visualization.
3d_export
$15

Man
...man
3dexport
download man model enjoy....
3d_ocean
$10
Man
...man
3docean
detailed highly layout man uv with
detailed polygon model of a man, with complete uv layout
archibase_planet
free
Man
...man
archibase planet
man people
man sitting n070814 - 3d model (*.gsm+*.3ds) for 3d visualization.
archibase_planet
free
Man
...man
archibase planet
man people
man keyboard n080814 - 3d model (*.gsm+*.3ds) for 3d visualization.
archibase_planet
free
Man
...man
archibase planet
man people
man n060215 - 3d model (*.gsm+*.3ds+*.max) for 3d visualization.