Thingiverse
IoT Gmailbox Remix - With Wemos D1 mini and speaker by Wordon
by Thingiverse
Last crawled date: 3 years, 1 month ago
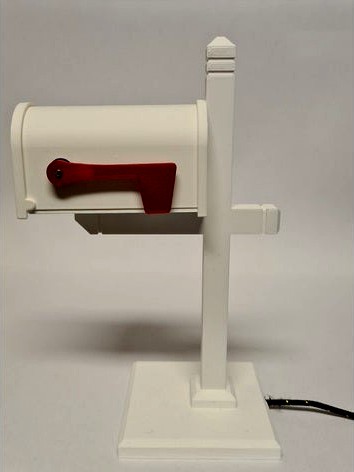
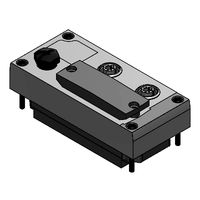
Added a speaker to Adafruit's IoT Gmailbox and using parts from sb43201's remix with the nice post.https://www.thingiverse.com/thing:3067957
Re-made the flag so screw hole would fit the standard screw that comes with the servo.
Modified the casing, removing the back-plate and fixing the slight misalignment for the servo mount (some hanging parts caused problems when printing).
Modified the bottom for the PCB to slide in from the front.
Re-made the pole base for the micro usb slot for power.
I have included a step file and a Fusion 360 file for anyone who would like to modify further.
My version uses the Wemos D1 Mini as a simple web-server that can play a mp3-file from a SD-card while the flag is up. By sending different HTTP attributes, one can play various sound files and create various waving effects for the flag. A HTTP request can commonly be called from scripts, macros, home automation system, etc. For example, when you receive an email or if someone opens the lid on you physical mailbox.
It's a simple build, requiring just a few, cheap and easily sourced parts and a little bit of soldering. I have included the circuit diagram. The code is for the Arduino IDE and based on a combination of a few library examples so it should be easy to expand upon for your own ideas.
List of materials:
1 pcs. Wemos D1 Mini (ESP8266)
1 pcs. DFPlayer Mini (and an SD Card)
1 pcs. SG90 Micro Servo (with gear horn and assorted screws)
1 pcs. Resistor 1K ohm
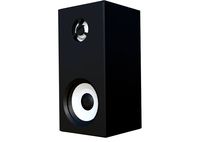
1 pcs. 0.5W 8 ohm 36 mm small trumpet speaker
1 pcs. Micro USB to DIP adapter 5 pin female connector PCB
1 pcs. PCB prototype board 30x70mm
2 pcs. 10mm-15mm M3 hexagon socket screws
2 pcs. 3.5mm M3 flat head screws
Hook-up wires 26 AWG in assorted colors
Note: The pins from the D1 will probably be to long for the PCB to comfortably slide in underneath the servo, so trim them down with cutters before soldering on the wires.
I used only used the micro usb in the base for power, but one could easily wire up all the pins for easy re-programming of the D1.
Re-made the flag so screw hole would fit the standard screw that comes with the servo.
Modified the casing, removing the back-plate and fixing the slight misalignment for the servo mount (some hanging parts caused problems when printing).
Modified the bottom for the PCB to slide in from the front.
Re-made the pole base for the micro usb slot for power.
I have included a step file and a Fusion 360 file for anyone who would like to modify further.
My version uses the Wemos D1 Mini as a simple web-server that can play a mp3-file from a SD-card while the flag is up. By sending different HTTP attributes, one can play various sound files and create various waving effects for the flag. A HTTP request can commonly be called from scripts, macros, home automation system, etc. For example, when you receive an email or if someone opens the lid on you physical mailbox.
It's a simple build, requiring just a few, cheap and easily sourced parts and a little bit of soldering. I have included the circuit diagram. The code is for the Arduino IDE and based on a combination of a few library examples so it should be easy to expand upon for your own ideas.
List of materials:
1 pcs. Wemos D1 Mini (ESP8266)
1 pcs. DFPlayer Mini (and an SD Card)
1 pcs. SG90 Micro Servo (with gear horn and assorted screws)
1 pcs. Resistor 1K ohm
1 pcs. 0.5W 8 ohm 36 mm small trumpet speaker
1 pcs. Micro USB to DIP adapter 5 pin female connector PCB
1 pcs. PCB prototype board 30x70mm
2 pcs. 10mm-15mm M3 hexagon socket screws
2 pcs. 3.5mm M3 flat head screws
Hook-up wires 26 AWG in assorted colors
Note: The pins from the D1 will probably be to long for the PCB to comfortably slide in underneath the servo, so trim them down with cutters before soldering on the wires.
I used only used the micro usb in the base for power, but one could easily wire up all the pins for easy re-programming of the D1.
Similar models
thingiverse
free

D1M BLOCK - SD CARD by IOT123
...ring, and 2 off 8 pin 10mm long needle female pin header strip are required for this build.
instructions
code examples
d1m blocks
grabcad
free

Wemos D1 mini with pin header
...rabcad
wemos d1 mini with pin header.
from the work of simo fe
https://grabcad.com/library/wemos-d1-mini-more-accurate-version-1
thingiverse
free

Wemos D1 mini with DHT22 sensor case
...for wemos d1 mini with dht22 sensor (not shield). wemos d1 mini only fits without headers soldered, dht22 sensor without any pcb.
thingiverse
free

Bitcoin Price Ticker Clock by Unco
...here: https://github.com/unco16/btcpricetickertime
hardware:
wemos d1 mini
max7219 8 digits segment display
micro usb on pcb
wire
thingiverse
free
BIG LED with ESP8266 WeMos-D1-Mini by astro73
...on switches
1 x 330 ohm resistance
lots of wires
in connection with a very successful projecthttps://github.com/toblum/mclighting
thingiverse
free

D1M BLOCK - CH340G by IOT123
...ing, and 2 off 8 pin 10mm long needle female pin header strip are required for this build.
instructions
code examples
d1m blocks
thingiverse
free

Wemos D1 Mini Pro Double Relay Case / Garagentor Steuerung Case
...ointing upwards. the 6mm hole for the external antenna had to be widened with a 6mm drill to allow the antenna to be put through.
grabcad
free

WEMOS D1 MINI V3.0.0
...wemos d1 mini v3.0.0
grabcad
wemos d1 mini v3.0.0 step model. remove/modify pin header components in model to your liking.
thingiverse
free

WeMos D1 Mini - Wled Micro Usb by Ryukenden
...wemos d1 mini - wled micro usb by ryukenden
thingiverse
replaced the power jack opening with an mirco usb one.
thingiverse
free

D1M BLOCK - 1-BUTN by IOT123
...ring, and 2 off 8 pin 10mm long needle female pin header strip are required for this build.
instructions
code examples
d1m blocks
Gmailbox
thingiverse
free

IoT Gmailbox by adafruit
...uit.com/product/2821
submicro servohttps://www.adafruit.com/product/2201
visit the adafruit shop online - http://www.adafruit.com
thingiverse
free

IoT Gmailbox Remix - use WeMos D1 mini and SG90 Servo with Base by sb43201
...esign and the use of adafruit io service with ifttt.
for the original tutorial please visit https://learn.adafruit.com/gmailbox/
Wordon
thingiverse
free

Siemens/Bosch Dishwasher Clip by Wordon
...n the original for extra strength.
i have uploaded a step-file of the model in case someone would like to make some improvements.
thingiverse
free
Among Us bone hairband by Wordon
...ad or alive" by alpokemon thing:4595212 (thingiverse adding remix source files doesn't seem to work at time of writing.)
thingiverse
free

Sodastream bottle label by Wordon
...-file contains a step-by step example of the process. i'm an amateur in f360, so pros will probably have a better method. :-)
Iot
turbosquid
$3
Basic IoT Case
...d
royalty free 3d model basic iot enclosure for download as on turbosquid: 3d models for games, architecture, videos. (1623495)
turbosquid
$15

IOT Wifi Switch
...odel iot wifi switch for download as obj, fbx, blend, and dae on turbosquid: 3d models for games, architecture, videos. (1510115)
turbosquid
$9

iot chain black coin
...oyalty free 3d model iot chain black coin for download as max on turbosquid: 3d models for games, architecture, videos. (1458043)
turbosquid
$9

iot chain gold coin
...royalty free 3d model iot chain gold coin for download as max on turbosquid: 3d models for games, architecture, videos. (1458038)
3dfindit
free
CPX-IOT
...cpx-iot
3dfind.it
catalog: festo
thingiverse
free

Spherical IoT lamp
...spherical iot lamp
thingiverse
bigger foot.
3dfindit
free

IoT Gateway wired
...iot gateway wired
3dfind.it
catalog: weidmueller
thingiverse
free

IoT LED Sign by moononournation
...led sign by moononournation
thingiverse
please find more details at instructables:https://www.instructables.com/id/iot-led-sign/
thingiverse
free

IOT StopWatch by mrcau
...iot stopwatch by mrcau
thingiverse
this is frame to make iotstopwatch
thingiverse
free

Wifiboy IOT Kit housing by jyeh_tw
...f you have wifiboy iot kit , this housing is design for the wifiboy iot kit pcb use.
https://www.facebook.com/wifiboykit/?fref=ts
Wemos
thingiverse
free

wemos by hrubak
...wemos by hrubak
thingiverse
wemos
thingiverse
free

WeMos Ziptie by gguuss
...wemos ziptie by gguuss
thingiverse
this is a tiny enclosure for holding the wemos d1 and r2 mini.
thingiverse
free

Wemos ESP32 Case by 3dprtr
... for a bluetooth tracker for me home automation. the wemos esp32 below is the one that i am using for this design.
wemos esp32.
thingiverse
free

Case for esp8266 WeMos by Apkawa
...case for esp8266 wemos by apkawa
thingiverse
case for esp8266 wemos with pins holder.
thingiverse
free

Wemos D1 enclosure by edelneo
...wemos d1 enclosure by edelneo
thingiverse
this is an enclosure for a wemos d1 mini and the relay shield.
thingiverse
free

Wemos D1 stack by hhravn
...wemos d1 stack by hhravn
thingiverse
a wemos d1 stack, remixed to allow adjustment of usb height.
thingiverse
free

Wemos frame holder
...s board.
the ornaments in the backplane are just to save filament and get some ventilation.
second one is with cuts for the plug.
thingiverse
free

Wemos D1 & Breadboard by doughy2002
...wemos d1 & breadboard by doughy2002
thingiverse
remixed this from a wemos holder as i needed one with a breadboard
thingiverse
free

Wemos Cube Lamp
...onnected to home assistant https://www.home-assistant.io/ for control.
i've also added the template i'm using in esphome.
thingiverse
free

Wemos case with OLED by mikbund
...en the display and the wemos board to avoid glue.
the oled holder was downloadet from thingiverse (will update with link later).
D1
turbosquid
$15

chair d1
...urbosquid
royalty free 3d model chair d1 for download as max on turbosquid: 3d models for games, architecture, videos. (1282621)
turbosquid
$19

Decor D1
...alty free 3d model decor d1 for download as max, obj, and fbx on turbosquid: 3d models for games, architecture, videos. (1230844)
3ddd
free

ODESD2 D1
...нная дубом фанера, мдф, фурнитура blum tandem
размеры: ширина: 450мм, длина: 1050мм, высота: 1180ммhttp://odesd2.com.ua
turbosquid
$15

Alvis Scarab D1
...squid
royalty free 3d model alvis scarab d1 for download as on turbosquid: 3d models for games, architecture, videos. (1363758)
turbosquid
$25

Nissan Sileighty D1
...issan sileighty d1 for download as max, unitypackage, and fbx on turbosquid: 3d models for games, architecture, videos. (1540431)
turbosquid
$15

D1.C4.30 Poster
... available on turbo squid, the world's leading provider of digital 3d models for visualization, films, television, and games.
turbosquid
$5

D1.C3.04 Laptop
... available on turbo squid, the world's leading provider of digital 3d models for visualization, films, television, and games.
3ddd
$1

BSA Bantam D1
...bsa bantam d1
3ddd
мотоцикл
a classic motorcycle. (1948).
3ddd
$1

Мозаика Better B-MOS D1
...os d1
3ddd
better , мозаика
мозаика better b-mos d1.
розтайленая мною.
+ бамп
+ рефлеккт
turbosquid
$16

Current Front Door D1
...model current front door d1 for download as max, c4d, and fbx on turbosquid: 3d models for games, architecture, videos. (1291682)
Speaker
3d_ocean
$12
Speakers
...speakers
3docean
beautiful customizable customizable speakers
speakers 3d model
3d_ocean
$5

Speaker
...speaker
3docean
audio speaker
minimalist audio speaker for your design.
3d_export
$5
speaker
...speaker
3dexport
speaker
archibase_planet
free

Speaker
...er
archibase planet
acoustic system column speaker loud speaker
speaker 3 - 3d model (*.gsm+*.3ds) for interior 3d visualization.
archibase_planet
free

Speaker
...er
archibase planet
column speaker loud speaker acoustic system
speaker 2 - 3d model (*.gsm+*.3ds) for interior 3d visualization.
archibase_planet
free

Speaker
...er
archibase planet
loud speaker column speaker acoustic system
speaker 1 - 3d model (*.gsm+*.3ds) for interior 3d visualization.
archibase_planet
free

Speaker
...speaker
archibase planet
speaker audio
speaker din - 3d model for interior 3d visualization.
archibase_planet
free

Speakers
...speakers
archibase planet
speaker speakers audio
speakers1 - 3d model for interior 3d visualization.
3d_ocean
$6
Speaker
...speaker
3docean
3d model music sound speaker
model,3d,speaker,sound,best,music
3d_ocean
$4
Speaker
...speaker
3docean
audio computer desktop electronic headphone microphone music pc speaker speakers technology
.
Mini
turbosquid
$10

Mini Mini Luceplan
...
royalty free 3d model mini mini luceplan for download as max on turbosquid: 3d models for games, architecture, videos. (1227359)
3d_ocean
$39

Mini Cooper
...mini cooper
3docean
cabrioler cooper mini
mini cooper cabrioler
3d_export
$30

Mini lathe
...mini lathe
3dexport
mini lathe
3d_export
$5

mini mouse
...mini mouse
3dexport
mini mouse
3d_export
$5

mini house
...mini house
3dexport
mini house
3d_export
free

Mini Mecha
...mini mecha
3dexport
concept of mini mecha
3d_ocean
$20

Mini Gun
...mini gun
3docean
gatling gun gun machine gun mini gun weapon
model of a mini gatling gun.
3ddd
free

Herve mini
... кофейный , herve
http://www.mobiliavenanti.it/ru/products/hervè-mini
3d_export
$5

mini wall
...mini wall
3dexport
mini wall for living room
3d_export
$5

mini bank
...mini bank
3dexport
mini bank 3d model
Remix
turbosquid
$5

MODA Collection Remix Chair
... available on turbo squid, the world's leading provider of digital 3d models for visualization, films, television, and games.
3d_export
$12

remix yamaha rm1x
...remix yamaha rm1x
3dexport
geometry triangles 15.2k vertices 7.6k pbr no textures 1 materials 1 uv layers yes
3d_ocean
$5

Vray fabric Kvadrat remix green - tileable
...th vray and 3dsmax. high-resolution texture images (2000×2000 px) file included: shader vray 2.40 texture image 3ds max 2011 file
turbosquid
$20

Gerrit Rietveld 1938 Zig Zag Chair Remix
... available on turbo squid, the world's leading provider of digital 3d models for visualization, films, television, and games.
3d_export
$10

multicolored remix parametric table furniture
... fbx, obj, mtl, archive with textures. the model has no glitches. render and materials - vray . without using plugins. good use!
3ddd
$1

Barovier&Toso / Manhattan Remix 7192
... 004293-142405
в коллекции есть люстры 7, 9, 12 рожковые. диаметр соответственный 1000, 1250, 1500 мм.
3ddd
$1

Muuto fiber chair
...grey/grey, dusty green/dusty green, nature/oak, natural white/oak upholstery options remix 183/black, remix 133/grey, remix 643/dusty red leather options black...
3ddd
$1

Barovier&Toso 7190-7195
...7190-7195 3ddd barovier&toso потолочнай люстра фабрики barovier&toso;, коллекция manhattan remix артикул 7190-7195. размеры в inches: 39"...
3d_export
$5

3D Locking Handle Weatherproof Storage Box Container
...handle weatherproof storage box container 3dexport new, improved and remixd! no screws required. print-in-place. weatherproof. parametric. 2 parts. easy...
cg_studio
$49

HTC One Mini 2 Amber Gold3d model
...cell phone mobile cellular super lcd touchscreen touch screen remix amber gold .max .obj .mb .lwo .fbx .c4d .3ds...