Thingiverse

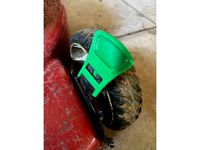
IKEA Lack box for Prusa i3 MK2 - modified for 0.22in thick plexiglass by taxilian
by Thingiverse
Last crawled date: 3 years, 1 month ago
All credit to the original: http://www.thingiverse.com/thing:1914314
This is my remix to use thicker glass (0.22 inch acryllic, which is what I found at home depot).
I love this design, but it did take me a bit to fully figure it out. I made a few of my own modifications to it, and there are a few things I'm strongly considering doing that I either didn't have time or didn't have parts to do on this build (and I need to move to other projects for a bit).
Instructions:
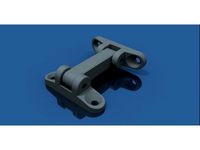
There are 3 models for corner pieces; one is a generic (corner1_0.225in.stl) that holds glass on both sides, the other two (corner2_b_0.225in.stl and corner2_a_0.225in.stl) are left and right that hold glass on one side and have a stop on the other. Print four of corner1 and two each of the others. One will go between each table leg and the table itself and one will go under the leg above the base board.
It wasn't clear to me from the original model, but this enclosure does require a bottom to it. I used a 1/2" MDF board and just cut it to the same dimensions as the LACK table -- more or less. I'm impatient, it was raining, and I normally cut things outside... so I cut it with a circular saw without a table, which produced slightly uneven results. So sue me.
Anyway, I purchased a 72"x48" sheet of 0.22" acrylic / plexiglass clone from Home Depot and cut it in a variety of ways. I think the best easy way is probably to get a halfway decent circular saw blade (one with a lot of teeth) and go slow, but I also tried using a cutting tool (from home depot) to score halfway through the acrylic and breaking it and also using a jigsaw with a special blade. The jigsaw was much easier, but with both saws I ended up being too impatient to get a really clean edge.
All of that said, I think it would have been easier to find a place (quick google search turned up http://www.tapplastics.com/product/plastics/cut_to_size_plastic/acrylic_sheets_clear/508) which would let me order them pre-cut; not just easier, but also only very slightly more expensive. You choose =]
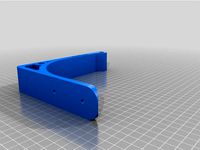
Anyway, putting it together is pretty straightforward; I modified the hinges to lay flat. I used http://a.co/3NQzZaW to hold the hinge to the glass (note the version of the hinge with 3 holes on the glass side) and http://a.co/iwv7c2z to hold the hinge to the wood. Make sure you don't drill too large of a hole for those screws; the legs aren't that robust, so you want as much grip as you can get from the screws. Same with the glass; I didn't need nuts on the other side because those screws will dig into the plastic just fine.
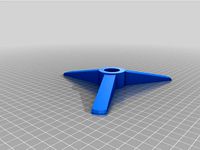
I found that with the thicker glass the original smaller magnet size wasn't good enough so I modified the handle and door stop to use 20x2mm (3/4" x 1/16") neodymium magnets.. mostly because I had them. Search ebay for "3/4 x 1/16 Inch Neodymium" and you'll find plenty of options to buy them.
For the lights I used a pair of LED rigid strip lights from eBay and a 45W 12V LED power supply with a inline rocker switch. I had to cut a notch in the edge of the glass on each side to allow the USB and power cables in; I'll likely do something similar when I add a camera.
Future considered mods:
Move the power supply to the outside of the glass so it isn't affected by the heat
Strap / bolt down the printer to the base so that it can't move and to reduce vibration
Move the rambo (control) board outside of the enclosure, which would probably require lengthening most of the wires
Move the control head outside of the enclosure
Good luck!
This is my remix to use thicker glass (0.22 inch acryllic, which is what I found at home depot).
I love this design, but it did take me a bit to fully figure it out. I made a few of my own modifications to it, and there are a few things I'm strongly considering doing that I either didn't have time or didn't have parts to do on this build (and I need to move to other projects for a bit).
Instructions:
There are 3 models for corner pieces; one is a generic (corner1_0.225in.stl) that holds glass on both sides, the other two (corner2_b_0.225in.stl and corner2_a_0.225in.stl) are left and right that hold glass on one side and have a stop on the other. Print four of corner1 and two each of the others. One will go between each table leg and the table itself and one will go under the leg above the base board.
It wasn't clear to me from the original model, but this enclosure does require a bottom to it. I used a 1/2" MDF board and just cut it to the same dimensions as the LACK table -- more or less. I'm impatient, it was raining, and I normally cut things outside... so I cut it with a circular saw without a table, which produced slightly uneven results. So sue me.
Anyway, I purchased a 72"x48" sheet of 0.22" acrylic / plexiglass clone from Home Depot and cut it in a variety of ways. I think the best easy way is probably to get a halfway decent circular saw blade (one with a lot of teeth) and go slow, but I also tried using a cutting tool (from home depot) to score halfway through the acrylic and breaking it and also using a jigsaw with a special blade. The jigsaw was much easier, but with both saws I ended up being too impatient to get a really clean edge.
All of that said, I think it would have been easier to find a place (quick google search turned up http://www.tapplastics.com/product/plastics/cut_to_size_plastic/acrylic_sheets_clear/508) which would let me order them pre-cut; not just easier, but also only very slightly more expensive. You choose =]
Anyway, putting it together is pretty straightforward; I modified the hinges to lay flat. I used http://a.co/3NQzZaW to hold the hinge to the glass (note the version of the hinge with 3 holes on the glass side) and http://a.co/iwv7c2z to hold the hinge to the wood. Make sure you don't drill too large of a hole for those screws; the legs aren't that robust, so you want as much grip as you can get from the screws. Same with the glass; I didn't need nuts on the other side because those screws will dig into the plastic just fine.
I found that with the thicker glass the original smaller magnet size wasn't good enough so I modified the handle and door stop to use 20x2mm (3/4" x 1/16") neodymium magnets.. mostly because I had them. Search ebay for "3/4 x 1/16 Inch Neodymium" and you'll find plenty of options to buy them.
For the lights I used a pair of LED rigid strip lights from eBay and a 45W 12V LED power supply with a inline rocker switch. I had to cut a notch in the edge of the glass on each side to allow the USB and power cables in; I'll likely do something similar when I add a camera.
Future considered mods:
Move the power supply to the outside of the glass so it isn't affected by the heat
Strap / bolt down the printer to the base so that it can't move and to reduce vibration
Move the rambo (control) board outside of the enclosure, which would probably require lengthening most of the wires
Move the control head outside of the enclosure
Good luck!
Similar models
thingiverse
free

Tevo Tarantula enclosure - frame brace - z motor plate support. by Radem
...agnets to hold the front on, 2 sided tape for the hinges and epoxy for the magnets. printed in abs, saw cut the hdpe and acrylic.
thingiverse
free
3 piece flush hinge for Ikea Lack enclosure by chrismofer
... probably going to go with 3 of these hinges for the acrylic sheet as you don't want the weight of it to pull the screws out.
thingiverse
free

7" PanelDue V1.1 Enclosure by Legrand
...d or a place for the connecting wire, so i added those as well.
once you snap this together it won't be easy to get it apart!
thingiverse
free

Ikea Lack enclosure door hinge (holes) by Kapuzenmann
... enclosure door hinge (holes) by kapuzenmann
thingiverse
i didn't trust the no screw version so i made one with screw holes.
thingiverse
free

Acrylic Glass Holder and Door Hinge (IKEA Lack Enclosure) by Agent_Cain
...ounting method for the acrylic glasses. so curtly i made some simple ones for my needs.
designed to work with m5 screws and nuts.
thingiverse
free

Anyqubic Predator Enclosure
...part which goes on the back of the hing and be glued with hot glue see the pic which i added for it
https://youtu.be/0mgdl3jwriw
thingiverse
free

Simple Delta 3D Printer Enclosure by Verohomie
...by notches and tape. use a box cutter or similar and cut through only one side of each corrugated...
thingiverse
free

Stacking Ikea Lack Printer Enclosure - modified for double door by synsa
...i then removed a whole leg to have a double door with more room. pics of finished product once acrylic cut to size and installed.
grabcad
free

Cutting Machine
...d when u rotate the handle jigsaw can be get the component and when u rotate the shaft saw begins to cut.have fun brothers:))))))
3dwarehouse
free

Glass Shower Door
...d warehouse. this is really for a frameless glass shower enclosure. thanks to 'loftyfang' for the handle & the hinge!
Taxilian
thingiverse
free

Ottoscope toy by taxilian
... ottoscope i made for my 18 month old daughter. nothing really special about it, but easy to print so i thought i'd share =]
thingiverse
free
Filabracket for 10mm rods by taxilian
...lian
thingiverse
all credit to the original, i just made the holes smaller to fit the 10mm rods i happen to have sitting around.
thingiverse
free
Small Christmas Tree Stand by taxilian
...ll (roughly 1' tall) christmas tree at a local thrift store. only problem? the stand was broken.
tinkercad to the rescue....
thingiverse
free

Corner brackets for 2020 extrusions by taxilian
... vulcaman i made my own; i did both a tricorner and a dual corner.
the original file is included so that the openscad files work.
thingiverse
free

ID-5100 radio mounting bracket by taxilian
...hick perimeters for strength! i recommend https://smile.amazon.com/gp/product/b01f5coc42 for mounting hardware, they work great.
thingiverse
free

Lulzbot taz 5 custom print-head plate by taxilian
...g a custom printhead.
note that this is likely completely useless to everyone!
... but if it's useful to you, then great. :-p
thingiverse
free

Leatherman Charge case for wider belt with reinforced handle holster by taxilian
...dle holster with the belt loop hole widened for a larger belt and i reinforced the handle holster a bit since mine keep breaking.
thingiverse
free
Combination coin savings bank by taxilian
... fixed a few mesh issues that the old had. some of my fixes add a slight roughness in places, but i think they're acceptable.
thingiverse
free

DROK DC Buck Converter (step-down regulator) enclosure by taxilian
... just a case to put it in with vents on the side and holes for power in and out.
should fit http://smile.amazon.com/dp/b00c4qvtnu
thingiverse
free

10-30 volt DC laptop power supply by taxilian
...n; most will want the 12v version which has a normal powerpole configuration (you can still put 5-32 volts in and it should work)
22In
turbosquid
$2

22in TW Pipe
... available on turbo squid, the world's leading provider of digital 3d models for visualization, films, television, and games.
3ddd
$1

Tom Dixon / Plump Sofa 3Seater
...w 220cm /86.6in d 96cm /37.8in d (seat) 56cm /22in ...
thingiverse
free

Penny cruiser board 22in wall mount by RC-3D
...ned using onshape. the current design is done taking into account also the griptape, but it should also work normally without it.
thingiverse
free
Toro Height Adjusting Arm Knob by razzard
...arm knob by razzard thingiverse replacement for a toro 22in recycler (model #: 20332) lawnmower hight adjustment knob. the...
thingiverse
free

Link's Master Sword (The Legend of Zelda) by LinkinLake
...twilight princess and skyward sword games). overall length - 22in finest detail - +/-...
thingiverse
free

Gundam Ground Type 100mm Machine Gun by axmaxwell
...not printed this yet, but the dimensions are: length: 22instock folded) 27in(stock extended) width: 3.2in height: 8.7in trigger guard...
3d_sky
free
Tom Dixon / Plump Sofa 3Seater
...inch/16.5in w 220 cm/86.6in d/37.8in d 96cm (seat) 56 cm/22in ...
thingiverse
free

Computer monitors: 20", 22", 24", 27", 29", 29" wide, 30" by MadisK
...29" wide, 30" by madisk thingiverse computer screens: 20in, 22in 24in, 27in, 29in, 29in wide and 30in. selection of...
thingiverse
free

Combination Wrench Organizer Set by bour2420
...between each wrench is shorter. my toolbox drawer is 22in wide by 15in deep. this fit 16 metric wrench...
thingiverse
free

Peg Mount for Louvered Panels
...smaller carbon fiber rod. or rubber coated steel. for .22in bore diameter, the only good non-scratching option i could...
Plexiglass
turbosquid
free

Plexiglass Lamp
...turbosquid
free 3d model plexiglass lamp for download as 3ds on turbosquid: 3d models for games, architecture, videos. (1144847)
turbosquid
$35

plexiglass chair
... available on turbo squid, the world's leading provider of digital 3d models for visualization, films, television, and games.
3d_export
$5

eiffel tower
...eiffel tower 3dexport eiffel tower interior design<br>plexiglass ...
3d_export
$5

Type chair Philippe Starck 3D Model
...type chair philippe starck 3d model 3dexport plexiglass chair philippe starck type chair philippe starck 3d model...
3d_export
$10
Glass Table 09 3D Model
...3d model 3dexport glass table contemporary modern furniture materials plexiglass detailed photoreal vray glass table 09 3d model alekrazum...
3d_export
$10

Glass Table 05 3D Model
...3d model 3dexport glass table contemporary modern furniture materials plexiglass detailed photoreal vray glass table 05 3d model alekrazum...
3d_export
$10
Glass Table 08 3D Model
...3d model 3dexport glass table contemporary modern furniture materials plexiglass detailed photoreal vray glass table 08 3d model alekrazum...
3d_export
$10

Glass Table 07 3D Model
...3d model 3dexport glass table contemporary modern furniture materials plexiglass detailed photoreal vray glass table 07 3d model alekrazum...
3d_export
$10

Glass Table 06 3D Model
...3d model 3dexport glass table contemporary modern furniture materials plexiglass detailed photoreal vray glass table 06 3d model alekrazum...
3d_export
$10

Glass Table 03 3D Model
...3d model 3dexport glass table contemporary modern furniture materials plexiglass detailed photoreal vray glass table 03 3d model alekrazum...
Mk2
turbosquid
$4

Mk2
...
royalty free 3d model mk2 for download as max, obj, and fbx on turbosquid: 3d models for games, architecture, videos. (1305687)
turbosquid
$9
Mk2 Grenade
...osquid
royalty free 3d model mk2 grenade for download as fbx on turbosquid: 3d models for games, architecture, videos. (1175401)
turbosquid
$4

Mk2 Grenade
...quid
royalty free 3d model mk2 grenade for download as blend on turbosquid: 3d models for games, architecture, videos. (1228888)
turbosquid
$2

Grenade Mk2
...osquid
royalty free 3d model grenade mk2 for download as max on turbosquid: 3d models for games, architecture, videos. (1658201)
turbosquid
$2

mk2 Grenade
...osquid
royalty free 3d model mk2 grenade for download as fbx on turbosquid: 3d models for games, architecture, videos. (1329079)
turbosquid
$2

GRENADE MK2
...osquid
royalty free 3d model grenade mk2 for download as fbx on turbosquid: 3d models for games, architecture, videos. (1202615)
turbosquid
$75

Lanchester Mk2
...alty free 3d model lanchester mk2 for download as 3ds and max on turbosquid: 3d models for games, architecture, videos. (1497085)
turbosquid
$10

Grenade MK2
...royalty free 3d model grenade mk2 for download as max and fbx on turbosquid: 3d models for games, architecture, videos. (1146970)
turbosquid
$10

MK2 helmet
...
royalty free 3d model mk2 helmet for download as max and obj on turbosquid: 3d models for games, architecture, videos. (1371428)
turbosquid
free

MK2 Grenade
...
free 3d model mk2 grenade for download as png, obj, and fbx on turbosquid: 3d models for games, architecture, videos. (1225336)
Lack
3d_export
$5

LACK LACK Coffee table white 90x55 cm IKEA
..., white, 90x55 cm ikea<br>https://www.ikea.com/ru/ru/p/lack-lakk-zhurnalnyy-stol-belyy-50449907/?ysclid=l8zshj49w6656165430
turbosquid
$4

Ikea Lack
... available on turbo squid, the world's leading provider of digital 3d models for visualization, films, television, and games.
3ddd
$1

IKEA Lack Coffee Table
... кофейный
ikea lack coffee tablehttp://www.ikea.com/gb/en/catalog/products/00104291
turbosquid
$5

IKEA Lack Table
...ack table for download as blend, blend, unitypackage, and fbx on turbosquid: 3d models for games, architecture, videos. (1623135)
turbosquid
$10

Ikea Lack Set
... available on turbo squid, the world's leading provider of digital 3d models for visualization, films, television, and games.
turbosquid
$3

IKEA Lack Library
... available on turbo squid, the world's leading provider of digital 3d models for visualization, films, television, and games.
turbosquid
$1

IKEA LACK TABLE
... available on turbo squid, the world's leading provider of digital 3d models for visualization, films, television, and games.
turbosquid
free

IKEA Lack Shelf
... available on turbo squid, the world's leading provider of digital 3d models for visualization, films, television, and games.
turbosquid
$9

Ikea Table 5 Lack
... available on turbo squid, the world's leading provider of digital 3d models for visualization, films, television, and games.
turbosquid
$5

IKEA Lack Side Table
... available on turbo squid, the world's leading provider of digital 3d models for visualization, films, television, and games.
I3
3d_export
$10

suv i3
...suv i3
3dexport
suv i3 2013 series
3d_ocean
$89

BMW i3 2012
...y, in real units of measurement, qualitatively and maximally close to the original. model formats: - *.max (3ds max 2008 scanl...
cg_studio
$99

BMW i3 20143d model
...
cgstudio
.3ds .c4d .fbx .lwo .max .obj - bmw i3 2014 3d model, royalty free license available, instant download after purchase.
cg_studio
$99

BMW i3 20123d model
...tudio
.3ds .c4d .fbx .lwo .max .mb .obj - bmw i3 2012 3d model, royalty free license available, instant download after purchase.
cg_studio
$99

BMW i3 20143d model
...tudio
.3ds .c4d .fbx .lwo .max .mb .obj - bmw i3 2014 3d model, royalty free license available, instant download after purchase.
humster3d
$75

3D model of BMW i3 2014
...
buy a detailed 3d model of bmw i3 2014 in various file formats. all our 3d models were created maximally close to the original.
humster3d
$40

3D model of Kitchen Set I3
...uy a detailed 3d model of kitchen set i3 in various file formats. all our 3d models were created maximally close to the original.
3d_ocean
$30

Kitchen set i3
...ensils oven plates shelves sink table ware
kitchen set i3 include 3d models: cooker, oven, sink, cupboards, table, chair, plates.
3d_ocean
$89

BMW i3 2014
...y, in real units of measurement, qualitatively and maximally close to the original. model formats: - *.max (3ds max 2008 scanl...
cg_studio
$99

BMW i3 Concept 20113d model
...i3
.3ds .c4d .fbx .lwo .max .obj - bmw i3 concept 2011 3d model, royalty free license available, instant download after purchase.
Prusa
turbosquid
$2

Frame Filament Guide Clip-On for Prusa Mk3
...rame filament guide clip-on for prusa mk3 for download as stl on turbosquid: 3d models for games, architecture, videos. (1634730)
3d_export
free

prusa i3 mk3s laser mount for opt lasers
...to learn more about the blue laser technology that conceived the cutting and engraving laser heads from opt lasers, please visit:
turbosquid
free

Prusa small printer adapter holder
...er for download as ipt, skp, dwg, dxf, fbx, ige, obj, and stl on turbosquid: 3d models for games, architecture, videos. (1642936)
3d_export
$30

geisha by jonathan adler
...** i did a 3d printing test in the prusa software, you can find it among the attached images.<br>exchange:<br>.blend...
thingiverse
free

Prusa without Prusa (rc2) by madless
...prusa without prusa (rc2) by madless
thingiverse
just the main part of prusa rc2 faceshield, without writing.
enjoy :)
thingiverse
free

Prusa by acejbc
...prusa by acejbc
thingiverse
prusa knob info
m3 8mm screw
thingiverse
free

Prusa house
...prusa house
thingiverse
how prusa house could look like...
thingiverse
free

Prusa Mk2 "Fake Prusa" LCD cover by anraf1001
...r by anraf1001
thingiverse
version of prusa's lcd cover with "fake prusa" instead of "original prusa"
thingiverse
free

Prusa stabilizator by gutiueugen
...prusa stabilizator by gutiueugen
thingiverse
prusa stabilizator
thingiverse
free

Keychain Prusa by rbarbalho
...keychain prusa by rbarbalho
thingiverse
keychain with text prusa.
Ikea
3ddd
$1
IKEA
...ikea
3ddd
ikea , стеллаж
ikea
3ddd
$1
IKEA
...ikea
3ddd
ikea
кухня ikea
3ddd
$1
IKEA
...ikea
3ddd
ikea
осторожно, тяжелая модель
ikea
3ddd
$1
IKEA
...ikea
3ddd
ikea
5 зеркал от ikea
3ddd
$1
IKEA
...ikea
3ddd
ikea , бойа
ikea светильник потолочный
3ddd
$1
IKEA
...ikea
3ddd
ikea , барный
bar stool ikea
3ddd
$1

IKEA
...ikea
3ddd
ikea , зубная щетка , косметика
ikea
3ddd
free
IKEA
...ikea
3ddd
ikea , трюмо
дамский столик ikea.
3ddd
$1
IKEA
...3ddd
ps , декоративный набор , ikea
ikea decor
3ddd
$1

Ikea
...ikea
3ddd
ikea , lagra
модель лампы от ikea
Thick
turbosquid
$38

Thick yellow earrings
...uid
royalty free 3d model thick earrings for download as 3dm on turbosquid: 3d models for games, architecture, videos. (1329983)
turbosquid
$14

Vaulting 5_5 - Gothic, 750cm spaced, with thick arches and thick curbs
... available on turbo squid, the world's leading provider of digital 3d models for visualization, films, television, and games.
turbosquid
$19

Metal thickness gauge
...l thickness gauge for download as 3ds, max, obj, fbx, and stl on turbosquid: 3d models for games, architecture, videos. (1344071)
cg_studio
$50
Dial Thickness Gauges3d model
...
.obj .max .fbx .dxf .c4d .3ds - dial thickness gauges 3d model, royalty free license available, instant download after purchase.
3d_ocean
$6
Thick Marble Pillar
.... this is a low polygonal model. - poly count: 1290 - formats: max /obj /fbx/3ds/dxf - high detail was preserved with 2048×204...
turbosquid
$39

race car thick tire
... available on turbo squid, the world's leading provider of digital 3d models for visualization, films, television, and games.
turbosquid
$24

Thick Stone Cut Diamond
... available on turbo squid, the world's leading provider of digital 3d models for visualization, films, television, and games.
turbosquid
$19

Thickness gauge for metal sheets
... for metal sheets for download as 3ds, max, obj, fbx, and stl on turbosquid: 3d models for games, architecture, videos. (1341732)
turbosquid
$2

1in Thick Unequal Angle
... available on turbo squid, the world's leading provider of digital 3d models for visualization, films, television, and games.
turbosquid
$2

1in Thick Equal Angle
... available on turbo squid, the world's leading provider of digital 3d models for visualization, films, television, and games.
0
turbosquid
$12

Calligraphic Digit 0 Number 0
...hic digit 0 number 0 for download as max, obj, fbx, and blend on turbosquid: 3d models for games, architecture, videos. (1389318)
3d_export
$6

set-0
...set-0
3dexport
turbosquid
$6

hedge 0
...yalty free 3d model hedge 0 for download as max, obj, and fbx on turbosquid: 3d models for games, architecture, videos. (1450353)
turbosquid
$5

Nuber 0
...oyalty free 3d model nuber 0 for download as ma, obj, and fbx on turbosquid: 3d models for games, architecture, videos. (1564674)
turbosquid
$22

0.jpg
... available on turbo squid, the world's leading provider of digital 3d models for visualization, films, television, and games.
turbosquid
free

Steam Locomotive Fowler 4F 0-6-0
... available on turbo squid, the world's leading provider of digital 3d models for visualization, films, television, and games.
turbosquid
$10

Liquid Number 0
... model liquid number 0 for download as c4d, 3ds, fbx, and obj on turbosquid: 3d models for games, architecture, videos. (1689919)
turbosquid
$45

Dragon360_perspShape_tmp.0.jpg
... available on turbo squid, the world's leading provider of digital 3d models for visualization, films, television, and games.
turbosquid
$8

Rocks Debris 0
... available on turbo squid, the world's leading provider of digital 3d models for visualization, films, television, and games.
3d_export
$18

wood-guardrail-fence 0
...wood-guardrail-fence 0
3dexport
wood-guardrail-fence 0<br>3ds max 2015
Modified
turbosquid
$5

modify car
...bosquid
royalty free 3d model modify car for download as max on turbosquid: 3d models for games, architecture, videos. (1390511)
turbosquid
$35

Soleste modified
...e 3d model soleste modified for download as 3dm, stl, and jpg on turbosquid: 3d models for games, architecture, videos. (1646606)
turbosquid
$35

Screwdriver-Modified
... available on turbo squid, the world's leading provider of digital 3d models for visualization, films, television, and games.
turbosquid
$20

APS modified
... available on turbo squid, the world's leading provider of digital 3d models for visualization, films, television, and games.
turbosquid
$5

Modified skull
... available on turbo squid, the world's leading provider of digital 3d models for visualization, films, television, and games.
3d_export
$8

Maruti 800 Modified
...obile engineers. this concept will also helpful to modified car enthusiast. this is made in solidworks & rendered in keyshot.
3d_ocean
$5
Spacecraft with Subdivision Modifier
...raft with subdivision modifier
3docean
fantasy spacecraft vehicle
the model was created in blender using the subdivision modifier
turbosquid
$10
Modified 9mm pistol
...royalty free 3d model modified 9mm pistol for download as fbx on turbosquid: 3d models for games, architecture, videos. (1560956)
3d_export
$10
ak-47 modified
...ak-47 modified
3dexport
turbosquid
$10

modified evo x
...ree 3d model modified evo x for download as obj, fbx, and stl on turbosquid: 3d models for games, architecture, videos. (1461606)
Box
archibase_planet
free

Box
...box
archibase planet
box carton cardboard box
box 2 - 3d model (*.3ds) for interior 3d visualization.
archibase_planet
free

Box
...box
archibase planet
carton cardboard box box
box 1 - 3d model (*.3ds) for interior 3d visualization.
3d_export
$6

box
...box
3dexport
box
3d_export
$5

Box
...box
3dexport
box
3d_export
$5

box
...box
3dexport
box
3d_export
$5

box
...box
3dexport
box
archibase_planet
free

Box
...box
archibase planet
box box for paper notebook pencil
box - 3d model (*.gsm+*.3ds) for interior 3d visualization.
archibase_planet
free

Box
...box
archibase planet
box carton cardboard box
box n170111 - 3d model (*.gsm+*.3ds) for interior 3d visualization.
archibase_planet
free

Box
...box
archibase planet
box carton cardboard box
box n050411 - 3d model (*.gsm+*.3ds) for interior 3d visualization.
archibase_planet
free

Boxes
...boxes
archibase planet
boxes box case bin
boxes n281213 - 3d model (*.gsm+*.3ds+*.max) for interior 3d visualization.