Thingiverse
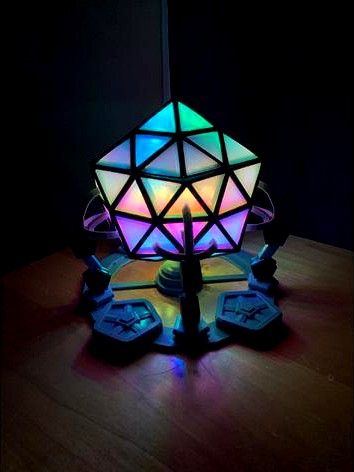
Icosahedron Desk Light by dmich9
by Thingiverse
Last crawled date: 3 years, 4 months ago
ALL STL FILES WERE MODELED IN AUTOCAD AND NEED TO BE SCALED UP IN YOUR SLICER. I RECCOMEND SCALING THE OBJECT TO AROUND 2540%. THIS MAKES THE BASE ROUGHLY 8x8 INCHES.
For the PLA, I used ESUN Black and Gray, found here:https://www.amazon.com/eSUN-1-75mm-Printer-Filament-Colors/dp/B07K642RQPhttps://www.amazon.com/eSUN-1-75mm-Printer-Filament-2-2lbs/dp/B01EKEMUEK
A also used SUNLU brand transparent filament for the tiny triangular panels.https://www.amazon.com/SUNLU-Filament-Transparent-Dimensional-Accuracy/dp/B07ZNG4L9P/
This is an Icosahedron Light for a desk. Other than a 3d printer, you'll need a power supply (5 volts probably) and corresponding LED lights.
Assembly Instructions
Print the ICO Main Base
Print the arms. I'd recommend printing ICO Full Arm 5 times and painting accordingly. If you want, you can print 5 ICO Bendy Connectors, 5 ICO Complicated Spiders, and 10 ICO Pentagonal Connectors. However, this means that there might be inaccuracies that can add up.
Print an ICO Middle Light Support
Print the following: ICO Top, Middle, and Bottom Panel Assemblies. For these 3 parts, you'll need to print the corresponding triangle parts.
This is the hardest part. You'll need to put all of the tiny triangles into their corresponding holes. You may need to sand down the edges to get them to fit correctly. For the middle panels, make sure you alternate. 4 Panels with no indent, than 4 panels with a triangle indent. I'd also recommend using a sort of glue to keep the triangles in place. Just be careful with superglue, as it can whiten PLA parts. This step took me about an hour.
Once all 3 of the panel assemblies have their small triangles in place, you can superglue the arms to the middle panel. Make sure that they are oriented correctly. When the middle panel assembly is right side UP, the 5 panels with triangular indented triangles should face DOWN. Use the triangular indents to match up the arms and orient them correctly. On the same side the arms protrude from, glue the bottom panel assembly. At this point in construction, you should only have 4 pieces: The middle/bottom panel assembly with the arms glued on, the top panel assembly, the main base, and the middle panel support.
Glue the middle/bottom panel assembly to the base. To do so, match up the bottom of the arms with the corresponding protrusions on the man base. They are on 5 pedestals equally spaced around the base.
Wrap your LEDs around the middle light support. I'd recommend wrapping some on the top as well, to make sure that no panels are dull when the lights are illuminated. There is an order to this, though. You need to make sure that the wire goes through the main base and the middle light support BEFORE you wrap the lights. That way, when you glue the middle light support to the middle of the base, there is no extraneous wire. The base has a slot on the bottom for a wire to run through, that way it doesn't sit unevenly.
Once that's all glued, you're done! You can glue the top panel assembly to the top part of the middle panel assembly if you want too. I left it as a friction fit in case I needed to access the lights inside.
If there are any unclear instructions, please tell me.
If anyone does actually make this, I'd love to see it!
Similar models
thingiverse
free

Crystal Tea Lights
... a base and than print about 5 layers of the top to see if it fits. this may very depending on your printer settings or filament.
thingiverse
free

Big Hero 6 - Hiro's bot remix (Easier to print) by MarcElbichon
...need :
16x 9mmx5mm magnet
6x arm
6x arm base
2x head
2x middle
2x bottom
9x pin
a little glue (optionnal)
please post your make !
thingiverse
free

Poke Ball by aaronroma
...cutout on the bottom half of the ball. glue the button to this round face.
magnets:https://www.amazon.com/gp/product/b078bggyh8/
thingiverse
free
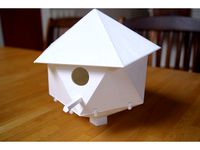
Icosahedron nest box / bird house
...and the like.
these clips are handy when you glue the panels.
i printed all parts in pla with 50% infill, no supports
enjoy!
thingiverse
free
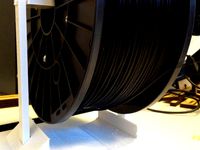
simple smooth filament spooler by vinchlet
...middle to allow flexibility when inserting a filament spool. then i raised the vertical arms by 8mm to allow more spools to fit.
thingiverse
free

Lulzbot Taz 6 Filament Spool Holder by Caleb_3
...cription please ask in the comments. also, i do not currently have access to the taz 6 so i can't get any pictures or videos.
cults
free

Coffee set with stand
...tom/column, column/column, column/top) and you'll have ready stand.
cups made from pet-g (devildesign) can handle hot coffee.
thingiverse
free

Coffee set with stand by kpawel
...tom/column, column/column, column/top) and you'll have ready stand.
cups made from pet-g (devildesign) can handle hot coffee.
thingiverse
free

Led light panel by thenikeboss1234
...
i will make a youtube video on this when i get my printer fixed.
youtubehttps://www.youtube.com/channel/uc09hulclhpimooewi54r4aw
thingiverse
free

ONE PRINT - FILAMENT HOLDER by justyov
...and 5 solid layers for top and bottom and thats it!... easy, fast and no assembly ... i use pla but you can use abs, petg, etc...

Icosahedron
turbosquid
$10

Icosahedron Football
... available on turbo squid, the world's leading provider of digital 3d models for visualization, films, television, and games.
turbosquid
$22

Dragon With Icosahedron
... icosahedron for download as 3ds, max, obj, wrl, fbx, and stl on turbosquid: 3d models for games, architecture, videos. (1483796)
turbosquid
free

Assembly icosahedron by himself!
... available on turbo squid, the world's leading provider of digital 3d models for visualization, films, television, and games.
3ddd
free

SlowWood Acqua Icosahedron
...led lamps are integrated into the 13 vertexes, creating elegant illusions of lights and shadows on the floor and walls around it.
turbosquid
$10

0007 8-Grid Truncated Icosahedron #Grid 7
... available on turbo squid, the world's leading provider of digital 3d models for visualization, films, television, and games.
turbosquid
$64
0010 8-Grid Truncated Icosahedron #Grid All (1-8)
... available on turbo squid, the world's leading provider of digital 3d models for visualization, films, television, and games.
thingiverse
free

Icosahedron by streth11
...icosahedron by streth11
thingiverse
the icosahedron.
thingiverse
free

Icosahedron by busy3DPrinter
...icosahedron by busy3dprinter
thingiverse
this is a simple icosahedron.
thingiverse
free

Icosahedron Vonoroi
...icosahedron vonoroi
thingiverse
icosahedron vonoroi
thingiverse
free

Icosahedron
...icosahedron
thingiverse
yeah
Desk
3d_ocean
$6
Desk
...desk
3docean
bureau desk desktop office plywood study table work desk writing
a desk made of plywood
3d_ocean
$8

Desk
...oom or university. it can be used as an office desk or as a teacher’s desk, for example. the layer names are self explanatory....
3d_export
$5
Desk
...desk
3dexport
desk
3d_export
$5

Desk
...desk
3dexport
desk
3d_export
$5

desk
...desk
3dexport
desk
3d_export
$5
desk
...desk
3dexport
desk
3d_export
free
desk
...desk
3dexport
desk
3d_export
free
desk
...desk
3dexport
desk
3d_export
$5

desk
...desk
3dexport
computer desk
archibase_planet
free
Desk
...rchibase planet
bureau desk writing-desk
desk giorgetti epi 51610 n231010 - 3d model (*.gsm+*.3ds) for interior 3d visualization.
Light
archibase_planet
free

Light
...light
archibase planet
lamp lighting light
light - s2 - 3d model for interior 3d visualization.
archibase_planet
free

Light
...light
archibase planet
light luminaire lighting
light l0465 - 3d model (*.gsm+*.3ds) for interior 3d visualization.
3d_export
$5

lighting
...lighting
3dexport
lighting
3d_export
$5

lighting
...lighting
3dexport
lighting in livingroom
turbosquid
$3

Lighting Tree with Lights
...d model lighting tree with lights for download as max and 3ds on turbosquid: 3d models for games, architecture, videos. (1585507)
archibase_planet
free

Light
...light
archibase planet
luster lighting solution
light - s - 3d model for interior 3d visualization.
archibase_planet
free

Light
...light
archibase planet
luster lamp lighting
light 1 - 3d model for interior 3d visualization.
archibase_planet
free

Lights
...lights
archibase planet
surgical lights surgical lamp
surgical lights (floor) - 3d model for interior 3d visualization.
archibase_planet
free

Light
...light
archibase planet
lighting luminaire candlelight
light l0463 - 3d model (*.gsm+*.3ds) for interior 3d visualization.
3d_export
$18

street light-lighting-light-xia bing
...
3dexport
street light-lighting-light-xia bing<br>max 2015 v-ray 3 max 2015<br>textures<br>all files in zip...