Thingiverse
IBM Selectric typewriter customizable font typeball
by Thingiverse
Last crawled date: 4 years, 3 months ago
TL,DR: * This is purely experimental. Try as I might, I can't get an acceptably fine print from my cheap FDM printer. An SLA (resin) printer should do a lot better but alas, I do not have one.
Your own custom font IBM Selectric 'golfball'! ..sort of.
Have you ever wanted to use your old IBM Selectric II typewriter with a modern font such as Arial, Segoe, Verdana ...or even that perennial favourite, Comic Sans?
Or perhaps try a Dvorak layout without having to have your typewriter's key interposers reconfigured?
How about using an I/O Selectric with a replica of the 988 typeball for APL\360 via Hercules?
Well that was the intention. Now this design is definitely a Work In Progress, so don't expect too much, but the idea is that a good 3D printer ought to be able to make such a typeball using the script presented here. I've pre-generated some STLs but if you do your own, be prepared to be very patient whilst they render.
The typeball filenames record the custom settings eg. LH23 means Letter Height 2.3mm.
Customisable parameters.
The typeball generation script is customisable, so here are the parameters you can tinker with. Make sure you have the Customizer pane open at right.
TYPEBALL_FONT - self explanatory. It's the name of a TrueType font on your machine. Some of the fonts shown here are from ones I have found on the web so you may not have them installed, but there are a few that should be standard on most (Windows) machines.
Edit the script to add your desired font name to the customizer list.
ITALIC - If ticked, produce an Italic typeball (if the font supports it).
BOLD - If ticked, produce a bold typeball (if the font supports it).
DVORAK_LAYOUT - Remap the positions of the letters on the typeball to Dvorak. You would also need to lift and rearrange your Selectric's keycaps.
Note: This is experimental and I haven't actually tried it but it should work.
LETTER_HEIGHT - The size (height on paper) of the letter in mm. This value is used to calculate a (very) rough "points" size for the number on the top.
LETTER_ALTITUDE - The distance the 3D-printed letter protrudes above the surface of the typeball in mm.
ITALIC_BIAS - rotate the face of the character around anticlockwise to give a more italicised lean, or backwards lean.
T0_LATITUDE - If you consider the typeball as a globe, the latitude of the topmost ring of characters (northern hemisphere).
T1_LATITUDE - The latitude of the second-from-top ring of characters (northern hemisphere).
T2_LATITUDE - The latitude of the third-from-top ring of characters. (northern hemisphere).
T3_LATITUDE - The latitude of the bottom ring of characters, which impinge slightly on the detent teeth area (southern hemisphere).
NORTHWARDS_ZENITH_OFFSET - In relation to the surface at the typeball (at any latitude) whether the character "leans" by a few degrees to the North or South.
UPPER_BALL_SOCKET_TOLERANCE - If the printed ball will not smoothly fit onto the upper ball socket (ie. the print head spigot) then this
allows for an extra sub-millimetre increase. IMPORTANT* - SEE NOTE BELOW!
SLOT - If true, add the slot (at the 2pm position from the Del).
CLIP_SCREW_DIA - Adjust to suit the self tapping screws you happen to have at hand.
Font notes.
Unless specified, all typeball character layouts are for the IBM Correspondence code and the IBM Selectric I and II typewriters with 88 characters total (the Selectric III has more characters per tilt position and is not covered here). The exception being the APL\360 font which is specially remapped to PTT/BCD layout as used on the IBM System 360 mainframe console (1052 printer-keyboard), IBM 1130 and variations of the IBM 2741 I/O Selectric terminal.
See the note in the script for where to obtain this font which is part of the MVT4APL package to simulate a 360 using Hercules.
The Dvorak layout remaps a Correspondence layout, see the wikipedia page on Dvorak for this. You would need to lift and reposition your keycaps.
Also note that some fonts do not have an uppercase such as the groovy 1960s Digital Equipment Corporation DEC 'Handbook' font.
Rendering instructions.
Using OpenSCAD version 2019, load the script and expand the Customizer panel on the right so as to see the above parameters.
Press F5 to Preview only (do NOT yet Render) and then adjust values to suit, eg. font and letter size etc.
Once you feel you are happy with the values (and not before!) press F6 to render as once it starts it will take quite a lot of time.
Printing instructions.
This is where you will really need to play with your printer settings. For my cheap ALDI Coocoon (a rebadged Wanhao) FDM printer I slowed the print speed to 30mm/sec to get a finer deposition. I also set to 100% infill as there is not much plastic used in this model.
Print orientation:
If you elect to print the typeball upside-down then no raft or scaffolding is required, but the T0 characters are bad due to the overhang.
With PLA and PETG the detent teeth print acceptably, but when I tried ABS the layer adhesion was not good enough and the teeth broke off easily.
Printing with the detent teeth downwards on the print bed (ie. top face upwards) requires support and a raft, but the teeth do not print as well and the internal scaffolding leaves a mess that must be completely cleaned out or the ball socket will hit the deformations. I found the result was better with upside-down orientation but the T0 (TILT ZERO) characters are not good.
PETG and PLA work ok for printing, ABS did not but it may be different for your situation.
Finishing instructions.
NOTE 1: This is an important step, please don't skip it or you may damage your typewriter trying to force it on.
NOTE 2: Get and study an original typeball to see and understand the Del, slot, notch and detent teeth orientations.
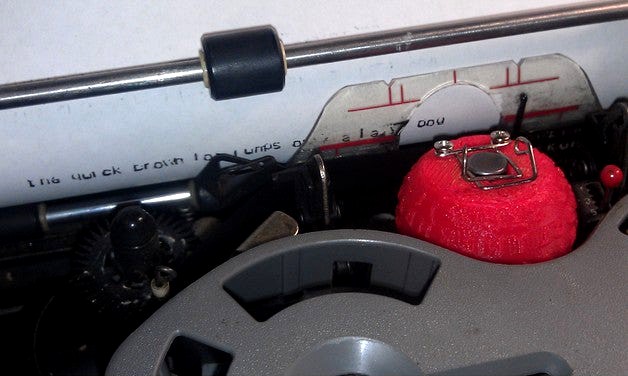
Once the typeball is printed, use an X-acto hobby knife with #11 blade to remove any tiny blobs from inside the socket and also clean flash from the slot (at 2pm position from the Del triangle) and also from the notch (8pm position from the Del). This is so the tiny peg on the upper ball socket spigot can locate the typeball properly.
Mark the slot position and del triangle on the top of the typeball with a permanent marker so you can easily see the slot when attempting to
fit.
DO NOT FORCE IT ON, USE THE BLADE TO CLEAN A LITTLE MORE =OR= REPRINT WITH UPPER BALL SOCKET TOLERANCE.
Almost certainly you will need to clean up the detent teeth. Use the #11 blade to trim the teeth sharp, note that they are OFFSET from the centre of the typeball (refer to a genuine typeball and the diagram figures from the IBM manuals).
Securing the typeball.
Using a medium pair of flat-jawed pliers, straighten a small paperclip into a straight bar. Then using a small pair of round-nosed (beading) pliers fashion a catch as shown in the photos. This type of wire clip was used on the first generation of Selectric typeballs and is sometimes referred to as the "rabbit ear clip". Personally I thought it a very simple and reliable clip. The first lever-clips with the metal pivot outers were extremely fragile (eg. the 988 typeball) but the final design of all-plastic lever-operated typeballs were quite good.
Starting at the middle of the straightened wire, move out about 7mm and bend a small 270 degree loop with a diameter to suit your fixing screw.
Then check the position of the other screw hole and bend the other side. Turn the wire over so the other lengths are going to be flush against the typeball top surface then allow 15mm or so and bend the ends toward eachother, crossing over. Bend the ends upwards and over in the shape of the ears.
Using the two small self-tapping screws (salvaged from e-waste), fix onto the typeball with the section between the screw loops above (away) from the surface.
Keep a good supply of paperclips handy as it will take a few goes to get one that fits properly. Or, you can make a good one and just move it from ball to ball. In the works is a 3D printed jig to make these clips. A small paperclip is required as the wire must be able to fit under the upper ball socket retaining groove. I tried music wire but it way too hard to bend with small pliers, the soft iron paperclip works acceptably.
Important Note.
Do not under any circumstance attempt to force a printed typeball onto your Selectric's print head spigot ("Upper Ball Socket" in IBM parlance).
Especially DO NOT ATTEMPT to twist the printed typeball to fit, or you may damage or even break your rotate tape. Take your time fitting!
If the typeball gets stuck on the spigot do not try pulling it off directly. Use a strong wire such as a hairpin (a straightened paperclip may not be stiff enough) placed under the part of the clip wire between the screws (pivot point) and resting the end on the top of the spigot, then pull up on the other end to lever it off.
Typewriting quality.
OK, I'll sum it up. The type quality using a cheap FDM printer is ...lousy! It just doesn't have the resolution. Please let me know if you get a better result from a resin SLA printer.
Program notes.
Basically a ball is generated with the upper ball socket spigot centre at [0,0,0], some characters placed on it and the detent teeth skirt added with a bit of trimming here and there. There may be manifold errors, I don't know how to resolve those. For the characters I tried some OpenSCAD text wrap libraries but I couldn't figure out how to get any of them to do what I wanted, which was to place a reversed character in a given font at a latitude and longitude on the sphere and with divergence down to the sphere surface. It was easy enough to just do my own placement with a bit of basic geometry.
The symbols diagram gives the salient variable names and features of the script.
If I ever get hold of an IBM Selectric Composer typeball I may fill out that TODO section.
Conclusion.
This is not meant to be used for anything other than a bit of fun playing with your old Selectric, truly one of the most amazing and outstanding mechanical inventions of the 20th century. I still have not got this model right, the results are not really satisfactory.
Maybe I don't have the ball geometry figured correctly or the latitudes measured properly. Sometimes the slicing does not join the detent teeth skirt properly to the typeball. On my list of projects is to make a digital caliper adapter for a surface plate so heights of an original typeball can be determined more accurately than what I have now. So, maybe you can do better with it.
Also please take heed of the fitting instructions as I am not responsible for damage to your typewriter!
Your own custom font IBM Selectric 'golfball'! ..sort of.
Have you ever wanted to use your old IBM Selectric II typewriter with a modern font such as Arial, Segoe, Verdana ...or even that perennial favourite, Comic Sans?
Or perhaps try a Dvorak layout without having to have your typewriter's key interposers reconfigured?
How about using an I/O Selectric with a replica of the 988 typeball for APL\360 via Hercules?
Well that was the intention. Now this design is definitely a Work In Progress, so don't expect too much, but the idea is that a good 3D printer ought to be able to make such a typeball using the script presented here. I've pre-generated some STLs but if you do your own, be prepared to be very patient whilst they render.
The typeball filenames record the custom settings eg. LH23 means Letter Height 2.3mm.
Customisable parameters.
The typeball generation script is customisable, so here are the parameters you can tinker with. Make sure you have the Customizer pane open at right.
TYPEBALL_FONT - self explanatory. It's the name of a TrueType font on your machine. Some of the fonts shown here are from ones I have found on the web so you may not have them installed, but there are a few that should be standard on most (Windows) machines.
Edit the script to add your desired font name to the customizer list.
ITALIC - If ticked, produce an Italic typeball (if the font supports it).
BOLD - If ticked, produce a bold typeball (if the font supports it).
DVORAK_LAYOUT - Remap the positions of the letters on the typeball to Dvorak. You would also need to lift and rearrange your Selectric's keycaps.
Note: This is experimental and I haven't actually tried it but it should work.
LETTER_HEIGHT - The size (height on paper) of the letter in mm. This value is used to calculate a (very) rough "points" size for the number on the top.
LETTER_ALTITUDE - The distance the 3D-printed letter protrudes above the surface of the typeball in mm.
ITALIC_BIAS - rotate the face of the character around anticlockwise to give a more italicised lean, or backwards lean.
T0_LATITUDE - If you consider the typeball as a globe, the latitude of the topmost ring of characters (northern hemisphere).
T1_LATITUDE - The latitude of the second-from-top ring of characters (northern hemisphere).
T2_LATITUDE - The latitude of the third-from-top ring of characters. (northern hemisphere).
T3_LATITUDE - The latitude of the bottom ring of characters, which impinge slightly on the detent teeth area (southern hemisphere).
NORTHWARDS_ZENITH_OFFSET - In relation to the surface at the typeball (at any latitude) whether the character "leans" by a few degrees to the North or South.
UPPER_BALL_SOCKET_TOLERANCE - If the printed ball will not smoothly fit onto the upper ball socket (ie. the print head spigot) then this
allows for an extra sub-millimetre increase. IMPORTANT* - SEE NOTE BELOW!
SLOT - If true, add the slot (at the 2pm position from the Del).
CLIP_SCREW_DIA - Adjust to suit the self tapping screws you happen to have at hand.
Font notes.
Unless specified, all typeball character layouts are for the IBM Correspondence code and the IBM Selectric I and II typewriters with 88 characters total (the Selectric III has more characters per tilt position and is not covered here). The exception being the APL\360 font which is specially remapped to PTT/BCD layout as used on the IBM System 360 mainframe console (1052 printer-keyboard), IBM 1130 and variations of the IBM 2741 I/O Selectric terminal.
See the note in the script for where to obtain this font which is part of the MVT4APL package to simulate a 360 using Hercules.
The Dvorak layout remaps a Correspondence layout, see the wikipedia page on Dvorak for this. You would need to lift and reposition your keycaps.
Also note that some fonts do not have an uppercase such as the groovy 1960s Digital Equipment Corporation DEC 'Handbook' font.
Rendering instructions.
Using OpenSCAD version 2019, load the script and expand the Customizer panel on the right so as to see the above parameters.
Press F5 to Preview only (do NOT yet Render) and then adjust values to suit, eg. font and letter size etc.
Once you feel you are happy with the values (and not before!) press F6 to render as once it starts it will take quite a lot of time.
Printing instructions.
This is where you will really need to play with your printer settings. For my cheap ALDI Coocoon (a rebadged Wanhao) FDM printer I slowed the print speed to 30mm/sec to get a finer deposition. I also set to 100% infill as there is not much plastic used in this model.
Print orientation:
If you elect to print the typeball upside-down then no raft or scaffolding is required, but the T0 characters are bad due to the overhang.
With PLA and PETG the detent teeth print acceptably, but when I tried ABS the layer adhesion was not good enough and the teeth broke off easily.
Printing with the detent teeth downwards on the print bed (ie. top face upwards) requires support and a raft, but the teeth do not print as well and the internal scaffolding leaves a mess that must be completely cleaned out or the ball socket will hit the deformations. I found the result was better with upside-down orientation but the T0 (TILT ZERO) characters are not good.
PETG and PLA work ok for printing, ABS did not but it may be different for your situation.
Finishing instructions.
NOTE 1: This is an important step, please don't skip it or you may damage your typewriter trying to force it on.
NOTE 2: Get and study an original typeball to see and understand the Del, slot, notch and detent teeth orientations.
Once the typeball is printed, use an X-acto hobby knife with #11 blade to remove any tiny blobs from inside the socket and also clean flash from the slot (at 2pm position from the Del triangle) and also from the notch (8pm position from the Del). This is so the tiny peg on the upper ball socket spigot can locate the typeball properly.
Mark the slot position and del triangle on the top of the typeball with a permanent marker so you can easily see the slot when attempting to
fit.
DO NOT FORCE IT ON, USE THE BLADE TO CLEAN A LITTLE MORE =OR= REPRINT WITH UPPER BALL SOCKET TOLERANCE.
Almost certainly you will need to clean up the detent teeth. Use the #11 blade to trim the teeth sharp, note that they are OFFSET from the centre of the typeball (refer to a genuine typeball and the diagram figures from the IBM manuals).
Securing the typeball.
Using a medium pair of flat-jawed pliers, straighten a small paperclip into a straight bar. Then using a small pair of round-nosed (beading) pliers fashion a catch as shown in the photos. This type of wire clip was used on the first generation of Selectric typeballs and is sometimes referred to as the "rabbit ear clip". Personally I thought it a very simple and reliable clip. The first lever-clips with the metal pivot outers were extremely fragile (eg. the 988 typeball) but the final design of all-plastic lever-operated typeballs were quite good.
Starting at the middle of the straightened wire, move out about 7mm and bend a small 270 degree loop with a diameter to suit your fixing screw.
Then check the position of the other screw hole and bend the other side. Turn the wire over so the other lengths are going to be flush against the typeball top surface then allow 15mm or so and bend the ends toward eachother, crossing over. Bend the ends upwards and over in the shape of the ears.
Using the two small self-tapping screws (salvaged from e-waste), fix onto the typeball with the section between the screw loops above (away) from the surface.
Keep a good supply of paperclips handy as it will take a few goes to get one that fits properly. Or, you can make a good one and just move it from ball to ball. In the works is a 3D printed jig to make these clips. A small paperclip is required as the wire must be able to fit under the upper ball socket retaining groove. I tried music wire but it way too hard to bend with small pliers, the soft iron paperclip works acceptably.
Important Note.
Do not under any circumstance attempt to force a printed typeball onto your Selectric's print head spigot ("Upper Ball Socket" in IBM parlance).
Especially DO NOT ATTEMPT to twist the printed typeball to fit, or you may damage or even break your rotate tape. Take your time fitting!
If the typeball gets stuck on the spigot do not try pulling it off directly. Use a strong wire such as a hairpin (a straightened paperclip may not be stiff enough) placed under the part of the clip wire between the screws (pivot point) and resting the end on the top of the spigot, then pull up on the other end to lever it off.
Typewriting quality.
OK, I'll sum it up. The type quality using a cheap FDM printer is ...lousy! It just doesn't have the resolution. Please let me know if you get a better result from a resin SLA printer.
Program notes.
Basically a ball is generated with the upper ball socket spigot centre at [0,0,0], some characters placed on it and the detent teeth skirt added with a bit of trimming here and there. There may be manifold errors, I don't know how to resolve those. For the characters I tried some OpenSCAD text wrap libraries but I couldn't figure out how to get any of them to do what I wanted, which was to place a reversed character in a given font at a latitude and longitude on the sphere and with divergence down to the sphere surface. It was easy enough to just do my own placement with a bit of basic geometry.
The symbols diagram gives the salient variable names and features of the script.
If I ever get hold of an IBM Selectric Composer typeball I may fill out that TODO section.
Conclusion.
This is not meant to be used for anything other than a bit of fun playing with your old Selectric, truly one of the most amazing and outstanding mechanical inventions of the 20th century. I still have not got this model right, the results are not really satisfactory.
Maybe I don't have the ball geometry figured correctly or the latitudes measured properly. Sometimes the slicing does not join the detent teeth skirt properly to the typeball. On my list of projects is to make a digital caliper adapter for a surface plate so heights of an original typeball can be determined more accurately than what I have now. So, maybe you can do better with it.
Also please take heed of the fitting instructions as I am not responsible for damage to your typewriter!
Similar models
thingiverse
free

IBM Selectric - Electric cover by ylric
...or the electric wirings, switch and capacitor.
the misalignment visible on the picture is now modified in the .stl and .stp files
thingiverse
free

IBM Selectric Type Element Tray
...t tray
thingiverse
this is a tray that holds and organizes ibm selectric type element balls. it holds nine type elements in all.
thingiverse
free

IBM Selectric Parts by blackbarlow
... it printed only 2 layers high, i'm surprised it worked, but it did!
the light bracket holds the margin scale light in place.
thingiverse
free

Ball Detent - Tippmann TMC Dummy Mag by Conkerjoey
...by conkerjoey
thingiverse
ball detent to print in plu. i didn't print it, but vary the infill to make it more or less rigid.
thingiverse
free

Press-Fit Bathroom Faucet or Spigot Extension by PrintOnAShoestring
...andle arched spigots and is meant for relatively straight spigots only.
i have been using this since april 2016. so far, so good.
thingiverse
free

Olivetti Lettera 32 Typewriter Ribbon Spool by VendettaSA
... work on other typewriters. if you tell me the dimensions of your typewriter, i'll design a spool for you if i have the time.
thingiverse
free

Pixel XL Ball Socket Mount by cptjellybeans
...n
print
i printed it on a monoprice select mini using pla w/ raft and touching build plate. you can probably make do with less.
thingiverse
free

Paperclip by CME by CreateMoreEverything
...have ultimaker printers, i would be interested in seeing how it prints on other machines. so show me how it came out with a make.
thingiverse
free

Virpil CM2 Throttle Detent by atomic_peach
... far.
i am no longer maintaining this file as i have upgraded to a cm3. feel free to use or modify as you see fit. happy flying!
thingiverse
free
Pentagon Ball
...fect but i tried to do the better! use for your models or whenever you wish. i have included both stl and obj for different uses.
Selectric
thingiverse
free
IBM Selectric Type Element Tray
...t tray
thingiverse
this is a tray that holds and organizes ibm selectric type element balls. it holds nine type elements in all.
thingiverse
free
IBM Selectric - Electric cover by ylric
...or the electric wirings, switch and capacitor.
the misalignment visible on the picture is now modified in the .stl and .stp files
thingiverse
free
IBM Selectric Parts by blackbarlow
... it printed only 2 layers high, i'm surprised it worked, but it did!
the light bracket holds the margin scale light in place.
thingiverse
free

Emco Unimat 3 SL Taig lathe generic boring head adapter by 1944GPW
...task. the photos show a frame from an ibm selectric typewriter being bored to suit a larger mechanism, after...
Typewriter
thingiverse
free

Typewriter by gfisher1
...typewriter by gfisher1
thingiverse
a typewriter.
thingiverse
free

Typewriter
...a small size (2" or 3" wide). thus the lack of details. i created the drawing by looking at photos and approximating.
thingiverse
free

Typewriter by mazels
...typewriter by mazels
thingiverse
cute little typewriter designed by a 9th grade geometry student.
thingiverse
free

Olivetti Typewriter Key by thiagokunz
...olivetti typewriter key by thiagokunz
thingiverse
key from typewriter machine olivetti lettera 32
thingiverse
free

Underwood Typewriter Spool by globalns
...er since it was made after underwood was purchased by olivetti.
photos of the original spool that this was modeled from included.
thingiverse
free

typewriter key. by RJindustres
...typewriter key. by rjindustres
thingiverse
replacement key.
thingiverse
free

Resident Evil 2 typewriter by Kaesefuss
...fuss
thingiverse
this is a typewriter from resident evil 2 the board game that can be used instead of the two dimensional tokens
thingiverse
free

Old Typewriter LEGO compatible by DerSmo
...typewriter compatible with lego.
the prototype in photo was printed in 0,2 mm layerheight - should be 0,12 ;-)
have fun with it !
thingiverse
free

Making a Typewriter from your old 3D printer
...your old 3d printer.
source code:https://github.com/sunnyspeedstudio/3d-typewriter
there is no necessary download from this page.
thingiverse
free

Knob for Platen on Allen Typewriter by EmmaLovelace
...ot included the grub screw hole as this could be easily drilled and taped later.
all measurements taken from the original part.
Ibm
thingiverse
free

ibm oval
...ibm oval
thingiverse
this is the ibm badge it is not necessarily to scale or correct height.
thingiverse
free

Old IBM Computer by AidanSandersSAN
...old ibm computer by aidansanderssan
thingiverse
old ibm computer for post it notes, paper clips and pencils
thingiverse
free

IBM Desk Ornament
...pany ibm. the symbols need supports for their pegs and they should be printed on their back. the base does not need any supports.
thingiverse
free

Key chain IBM Logo by mdietz
...key chain ibm logo by mdietz
thingiverse
this is a key chain with ibm logo.
thingiverse
free

IBM Model M Foot
... model m foot
thingiverse
pla foots for the good old ibm model m keyboard.
on github:https://github.com/h0sch180/3d_print_things
thingiverse
free

IBM 5160 / 5070 Card Holder by Joschi84
...ibm 5160 / 5070 card holder by joschi84
thingiverse
replacement isa card holder for the ibm 5160 / ibm 5150 computer case.
thingiverse
free

IBM 5155 front bumper by S0N1C
...ibm 5155 front bumper by s0n1c
thingiverse
ibm 5155 front bumper, printed using flex
thingiverse
free

I <3 IBM by CippyO
...ght, and a nice heart. the chainhole is reinforced.
print as you like, but i recommend 100% infill for pocket surviving strenght.
thingiverse
free

IBM Logo Reinforced by CippyO
...n of the original ibm keychain logo. just added a backplate, and moved the hole to the end.
printed with 0.25 layer, 100% infill.
thingiverse
free

IBM 5151 Top Screw Cap by Joschi84
...ibm 5151 top screw cap by joschi84
thingiverse
replacement screw cap for ibm 5151 monitor
Font
thingiverse
free

Geert Font - A Font for 3D Printing
...character variants when putting this together.
see this repo for per character svgs, and more: https://github.com/pbz/geert-font.
thingiverse
free

WALT FONT by chubi646
...walt font by chubi646
thingiverse
disney font
thingiverse
free

Star Fonts by alexdfox
...star fonts by alexdfox
thingiverse
star font generator
thingiverse
free

Font Sign by wrdama
...font sign by wrdama
thingiverse
font sign test
thingiverse
free

Font Extrusion by drayde
...font extrusion by drayde
thingiverse
example on how to create 3d things from a windows font.
thingiverse
free

Font Demonstrator by SG1Oniell
...it was designed in solidworks and consists of a various selection of 48 point, bolded fonts. the backing is 8.5" x 11".
thingiverse
free

BTK font 1 by Maztah
...y with curves
file "parts" contain font parts, witch possible to combine to make your own font.
updated some faults
thingiverse
free
Adaptador Para Fonte by WanderleyPatricio
...adaptador para fonte by wanderleypatricio
thingiverse
adaptador para fonte.
thingiverse
free

suporte suspenso fonte atx
...suporte suspenso fonte atx
thingiverse
suporte atx fonte
thingiverse
free

Font Test Cards by DesignMakeTeach
...rtain characteristics of the font? can individual character be recognized by touch? is the font open source or readily available?
Customizable
thingiverse
free

Customizable Rod
...customizable rod
thingiverse
customizable rod
thingiverse
free

Corner (customizable)
...corner (customizable)
thingiverse
a corner of customizable sizes.
thingiverse
free

Customizable box
...customizable box
thingiverse
customizable box with five sides.
thingiverse
free

Customizable handle
...customizable handle
thingiverse
this is a very simple handle with customizable dimensions
thingiverse
free

Customizable DNA
...customizable dna
thingiverse
dna helix with customizable spiral, radius, and colors
thingiverse
free
Letter ring (customizable)
...letter ring (customizable)
thingiverse
a ring with customizable size and a customizable letter on it.
thingiverse
free
Customizable pegboard
...customizable pegboard
thingiverse
customizable pegboard for laser cutting. specify desired size and offsets.
thingiverse
free

Customizable Container with Customizable Lid height
...d i think it is important to write it here) i changed original script by wstein.
as an example is a toothbrush container 190x25mm
thingiverse
free

customizable container by WybowXD
...customizable container by wybowxd
thingiverse
-a maximum of 3 boxes
-customizable plate ( on c4d)
-easy to print
-customizable
thingiverse
free

Parametric Cone (Customizable)
...parametric cone (customizable)
thingiverse
a customizable cone