Thingiverse
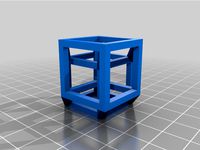
HyperCube X-Carriage - Integrated belt tensioner mod by AnukWolf
by Thingiverse
Last crawled date: 3 years ago
First of all, a huge shoutout to both @Tech2C for his amazing printer, and also @bagwan for this cool tensioner mod that I really got to appreciate a lot!
What is this?
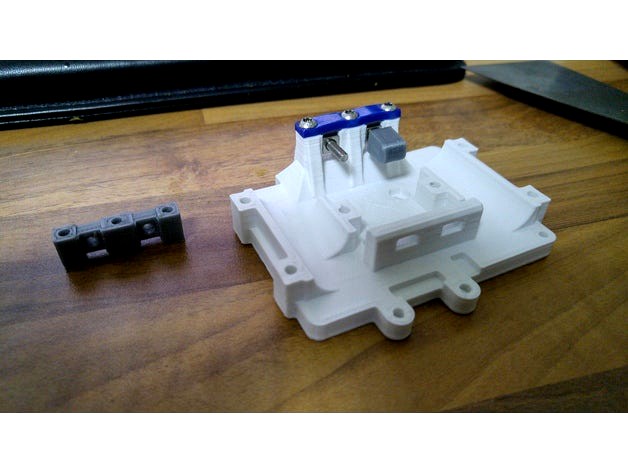
This is a modification of the most current v1.2 X-carriage of the original HyperCube by Tech2C, which combines it with the Hypercube easy Belt tensioner by bagwan built right on top, providing additional strength with bulkier walls and pillars, and also fixes a problem with the nut mounting I had with the original carriage for quite a while. (Read below)
Why is this?
So as I said, I love bagwan's belt tensioner, it's really convenient to use and that's exactly what the original hypercube belt tensioning has been missing. Unfortunately, his modification is only held down by 3 screws on top of the original carriage, which to me seems to be quite unstable under heavy belt pull. Hence the bulkier build in this mod.
The other thing which I already mentioned above is that the three nuts you're supposed to insert into the x-carriage, for the screws holding down the belt clamp, at least for me tended to strip and run loose in their mount, making it impossible to screw the belt down tight (and eventually leading to having to print a whole new carriage...).
That is why I modified the mount in such a way that you insert the nuts (I use square nuts) from the bottom of the carriage into a rock-solid mount and as usual screw the belt clamp down from the top. This way, the nuts can't move one bit.
You may notice that my X-carriage mod is just a tiny bit wider than the original (~5mm) but that's not a problem at all, since even the inductive probe mount protudes much further than that.
PPP - Post-print preperation
Drill all holes with a 3mm drill as usual, including the ones of the belt tensioner.
Insert a nut from the bottom of the carriage.
Take a long M3 screw (25mm+), insert it into the belt clamp holes on the top until it reaches the nut from above. When turning the screw, you'll pull the nut further into the mount. For the Square Nuts part, you'll feel slightly less resistance right before the end but screw it in until it can't move any further.
Pull the screw out, proceed with the other two, and then assemble the rest according to bagwan's post.
If you don't have a long screw laying around, you can always get a soldering iron to push the nut in that way.
Things needed / other notes
The hex nuts version is untested so far, please confirm if you print one! :)
You'll obviously need the flat belt clamp printed part and also the half round idler caps, either the long or short ones (I recommend the long ones, though).
You'll need at least 3x M3x20 screws for mounting the belt clamp, and 2 more (or longer ones) for the belt idlers. I use 5 of the M3x20 and it works just perfect.
You'll also need at least 5x M3 nuts, square or hex doesn't matter. You should also be able to use 3x hexs nuts and 2x square nuts, or the other way around. Just print the part for which you have the 3 nuts.
I'd recommend to double up on the zip ties holding the belt on the other side of the carriage. Or use other methods of fixing them, like printed belt clips.
What is this?
This is a modification of the most current v1.2 X-carriage of the original HyperCube by Tech2C, which combines it with the Hypercube easy Belt tensioner by bagwan built right on top, providing additional strength with bulkier walls and pillars, and also fixes a problem with the nut mounting I had with the original carriage for quite a while. (Read below)
Why is this?
So as I said, I love bagwan's belt tensioner, it's really convenient to use and that's exactly what the original hypercube belt tensioning has been missing. Unfortunately, his modification is only held down by 3 screws on top of the original carriage, which to me seems to be quite unstable under heavy belt pull. Hence the bulkier build in this mod.
The other thing which I already mentioned above is that the three nuts you're supposed to insert into the x-carriage, for the screws holding down the belt clamp, at least for me tended to strip and run loose in their mount, making it impossible to screw the belt down tight (and eventually leading to having to print a whole new carriage...).
That is why I modified the mount in such a way that you insert the nuts (I use square nuts) from the bottom of the carriage into a rock-solid mount and as usual screw the belt clamp down from the top. This way, the nuts can't move one bit.
You may notice that my X-carriage mod is just a tiny bit wider than the original (~5mm) but that's not a problem at all, since even the inductive probe mount protudes much further than that.
PPP - Post-print preperation
Drill all holes with a 3mm drill as usual, including the ones of the belt tensioner.
Insert a nut from the bottom of the carriage.
Take a long M3 screw (25mm+), insert it into the belt clamp holes on the top until it reaches the nut from above. When turning the screw, you'll pull the nut further into the mount. For the Square Nuts part, you'll feel slightly less resistance right before the end but screw it in until it can't move any further.
Pull the screw out, proceed with the other two, and then assemble the rest according to bagwan's post.
If you don't have a long screw laying around, you can always get a soldering iron to push the nut in that way.
Things needed / other notes
The hex nuts version is untested so far, please confirm if you print one! :)
You'll obviously need the flat belt clamp printed part and also the half round idler caps, either the long or short ones (I recommend the long ones, though).
You'll need at least 3x M3x20 screws for mounting the belt clamp, and 2 more (or longer ones) for the belt idlers. I use 5 of the M3x20 and it works just perfect.
You'll also need at least 5x M3 nuts, square or hex doesn't matter. You should also be able to use 3x hexs nuts and 2x square nuts, or the other way around. Just print the part for which you have the 3 nuts.
I'd recommend to double up on the zip ties holding the belt on the other side of the carriage. Or use other methods of fixing them, like printed belt clips.
Similar models
thingiverse
free

Hypercube 3D Printer X Carriage Mod by CJ01
...ine snap right over there when i tighten the belt). it was a pain to insert the nut into those tiny holes in the original design.
thingiverse
free

Hypercube easy Belt tensioner by bagwan
...screw-top side are to secure the screws after adjust the belts.
edit:
added a v2 with longer screw caps. so they can´t fall off.
thingiverse
free

HyperCube Evolution Igus Carriage Clamp tenser by endeffect
...linear bearing).
you'll need
4 m6 nut
4 m6 without head (10mm) screw
the tension can be ajusted with the screws on the shaft
grabcad
free

ShapeOko2 Belt Tensioners
...ension is 4mm hex m5 30mm long
the bolt for the clamp is a 2.5mm hex m3 14mm long
reverse side of clamp 2 locking hex 5mm m3 nuts
thingiverse
free

Hypercube Evolution Mods by Syngenta
... parts:
x carriage with endstop mount ( no brass inserts)
stronger belt clamps
improved belt idler
motor mount with endstop mount
thingiverse
free
Anet A8 Quick-Change Print Head by Generic_Designs
...ws i used are american #6 machine screws and nuts.
the bearing bracket, belt clamp and belt tensioners are for the corexy design.
thingiverse
free

ShapeOko Belt Tensioners by Kardacian
...long
reverse side of clamp 2 locking hex 5mm m3 nuts
here is the youtube showing these in action: https://youtu.be/o4jdh-kc9qa
thingiverse
free

Shapeoko 3 Belt Tensioning System by neilferreri
...al m3x10mm screw and nut in place of the m5x10mm.
easy to print. no supports needed. should be ready to go right off the printer.
thingiverse
free

BLV Ender 3 Y-axis belt clamps by alexdg
...ng it with pliers. fully tighten this end afterwards and adjust the final belt tension with a tensioner or anything else you use.
thingiverse
free

TEVO Tarantula X & Y axis belts tensioners by alejandrosnz
...d the belt through the hole on the other piece. to mount the tensioner onto the y axis you have to ziptie it into the belt hole.
Hypercube
turbosquid
free

HyperCube
... available on turbo squid, the world's leading provider of digital 3d models for visualization, films, television, and games.
3d_export
$5
Hypercube 3D Model
...hypercube 3d model
3dexport
cube hypercube four-dimensional space side geometry edge
hypercube 3d model dmitry87 54991 3dexport
3d_export
$5
tesseract hypercube
...t it. moreover different textures and materials can be added and tesseract can be set in any scene. dimensions: x: 4m y: 4m z: 4m
thingiverse
free
Hypercube
...hypercube
thingiverse
hypercube projected into three dimensional space.
thingiverse
free

Hypercube by alpheccar
...hypercube by alpheccar
thingiverse
projection of an hypercube on an hypersphere.
thingiverse
free
Hypercube by BorisBlavasky
...hypercube by borisblavasky
thingiverse
hypercube. testing the tool.
thingiverse
free

Hypercube by Christian42
...hypercube by christian42
thingiverse
i made a hypercube using rhino3d
thingiverse
free

Hypercube by Christian42
...hypercube by christian42
thingiverse
i made a hypercube using rhino3d
thingiverse
free

HyperCube by wwebber
...hypercube by wwebber
thingiverse
this is the standard perspective projection of the hypercube from 4d to 3d
thingiverse
free
HyperCube scaled by Muzeem
...hypercube scaled by muzeem
thingiverse
customized hypercube
Tensioner
3d_export
$5

adjustable tension lock
...adjustable tension lock
3dexport
adjustable tension lock
turbosquid
$5
tension ring
...oyalty free 3d model tension ring for download as fbx and stl on turbosquid: 3d models for games, architecture, videos. (1553452)
turbosquid
$3

Tension Chair
...free 3d model tension chair for download as obj, c4d, and fbx on turbosquid: 3d models for games, architecture, videos. (1251503)
3d_export
$5
transformador de tension
...transformador de tension
3dexport
transformador de tension entrada 460vac salida 220vac marca audax
turbosquid
$20
Motorbike Chain Tensioner
...y free 3d model motorbike chain tensioner for download as stl on turbosquid: 3d models for games, architecture, videos. (1428322)
turbosquid
$19

Tension engagement ring
...n engagement ring for download as obj, fbx, 3dm, dwg, and stl on turbosquid: 3d models for games, architecture, videos. (1491631)
3d_export
$10

Ruby Tension set Ring 3D Model
...ruby tension set ring 3d model
3dexport
tension set ruby ring in 18k
ruby tension set ring 3d model rehansheikh 25254 3dexport
turbosquid
$20
Superficial Tension Exp. Image.max
... available on turbo squid, the world's leading provider of digital 3d models for visualization, films, television, and games.
cg_studio
$89

BMW M6 Tension by Schnitzer3d model
...cgstudio
.3ds .max .obj - bmw m6 tension by schnitzer 3d model, royalty free license available, instant download after purchase.
3d_export
$89
BMW M6 Tension by Schnitzer 3D Model
...s m6 sport wagon car german european sportive drive vehicle rim carbon
bmw m6 tension by schnitzer 3d model fabelar 7583 3dexport
Carriage
archibase_planet
free

Carriage
...arriage
archibase planet
perambulator baby carriage pram
carriage n250908 - 3d model (*.gsm+*.3ds) for interior 3d visualization.
3d_export
free

carriage
...carriage
3dexport
old fashion carriage model, more files here:
turbosquid
$140

Carriage
...urbosquid
royalty free 3d model carriage for download as max on turbosquid: 3d models for games, architecture, videos. (1482052)
turbosquid
$25

Carriage
...urbosquid
royalty free 3d model carriage for download as max on turbosquid: 3d models for games, architecture, videos. (1285944)
3d_export
free

carriage
...carriage
3dexport
game cart
3d_ocean
$15

Barrel Carriage
...ieval oak old transport wheels wine wood
this model contains a barrel and a carriage. it is a medieval type of wood oak carriage.
turbosquid
$40

Carriage
...ty free 3d model carriage for download as obj, fbx, and blend on turbosquid: 3d models for games, architecture, videos. (1290094)
turbosquid
free

Carriage
...yalty free 3d model carriage for download as ma, obj, and fbx on turbosquid: 3d models for games, architecture, videos. (1239157)
3d_export
$5

Medieval carriage
...medieval carriage
3dexport
medieval carriage in fairy style
turbosquid
$58

Carriage
...d model carriage with scene for download as max, obj, and fbx on turbosquid: 3d models for games, architecture, videos. (1276262)
Mod
design_connected
$13

MOD. 4233 - MOD. 4234 Table Lamp
...mod. 4233 - mod. 4234 table lamp
designconnected
arcahorn mod. 4233 - mod. 4234 table lamp computer generated 3d model.
design_connected
$11

MOD.1095
...mod.1095
designconnected
mod.1095 computer generated 3d model. designed by sarfatti, gino.
3ddd
$1

fireplaces mod Spec
...fireplaces mod spec
3ddd
камин
fireplaces mod spec 180x90x125h
3ddd
free

Flos Mod. 2129
... mod
фабрика: flos
модель: mod. 2129
описание: подвесной светильник, металл, белый, черный.
сайт: www.flos.com
turbosquid
$32

MOD A 001
... available on turbo squid, the world's leading provider of digital 3d models for visualization, films, television, and games.
turbosquid
$29

Maars Mod
... available on turbo squid, the world's leading provider of digital 3d models for visualization, films, television, and games.
turbosquid
$15

Mod 70..
... available on turbo squid, the world's leading provider of digital 3d models for visualization, films, television, and games.
turbosquid
$10

MOD Sofa
... available on turbo squid, the world's leading provider of digital 3d models for visualization, films, television, and games.
turbosquid
$1

Mod-Lite
... available on turbo squid, the world's leading provider of digital 3d models for visualization, films, television, and games.
turbosquid
$1
pc mod
... available on turbo squid, the world's leading provider of digital 3d models for visualization, films, television, and games.
Belt
3d_export
$6
belt
...d then comes off and fastens at the front of the seat. version: 2015 units: millimetres x-form: yes polys: 120 950 verts: 163 944
3d_export
$7
belt grinder
...belt grinder
3dexport
belt grinder
3d_export
$5
Belt conveyor
...belt conveyor
3dexport
belt conveyor
3ddd
$1
column belt
...column belt
3ddd
колонна
column belt
turbosquid
$5
Belt
... available on turbo squid, the world's leading provider of digital 3d models for visualization, films, television, and games.
3d_ocean
$5
Leather Belt
...ather belt is created in 3dsmax 2011 and rendered with vray 1.5 and it has all the texture included with the multiple obj format.
3d_ocean
$5

Belt Ring
...belt ring
3docean
belt jewelry ring
belt ring 3d model. total weight 3.5 gram & 1.1 stone size. 3dm and obj file format.
design_connected
$11
Belt Oval
...belt oval
designconnected
meridiani belt oval computer generated 3d model. designed by parisio, andrea.
design_connected
$11
Belt Round
...belt round
designconnected
meridiani belt round computer generated 3d model. designed by parisio, andrea.
design_connected
$11
Belt Square
...belt square
designconnected
meridiani belt square computer generated 3d model. designed by parisio, andrea.
Integrated
3ddd
$1

+ Integration
...брики poggenpohl . в архиве сама кухня, кухонный остров и встроенная техника miele ( кофемашина, пароварка и микроволновая печь).
3d_export
$57

integral kitchen
...integral kitchen
3dexport
integral kitchen
3ddd
$1
Integrated bath
...integrated bath
3ddd
ванна , подиум
integrated acrylic bath
turbosquid
$15
Facades with integrated handle
...el facades with integrated handle for download as max and fbx on turbosquid: 3d models for games, architecture, videos. (1215935)
turbosquid
$19

Protective Barrier Integrator
...arrier integrator for download as max, obj, fbx, dae, and stl on turbosquid: 3d models for games, architecture, videos. (1507713)
turbosquid
$5
Cabinet with integrated freezer
... available on turbo squid, the world's leading provider of digital 3d models for visualization, films, television, and games.
3d_export
$5

Microchip PIC16F84 integrated 3D Model
...xport
circuit elements integrated pic16f84 microchip electronics
microchip pic16f84 integrated 3d model pluginmax 54764 3dexport
3d_export
$6

integrated signal lamp 20 specifications
...integrated signal lamp 20 specifications
3dexport
integrated signal lamp (20 specifications)
cg_studio
$55

Wolf Integrated Cooktops3d model
...d model
cgstudio
.dxf .max - wolf integrated cooktops 3d model, royalty free license available, instant download after purchase.
3ddd
$1
Cellu M6 Integral
...cellu m6 integral
3ddd
медицина
оборудование lpg для косметологических, медицинских и эстетических центров