Thingiverse
Hypercube Magnetic Quick Mount Printhead X Carriage by butchja
by Thingiverse
Last crawled date: 3 years ago
Hey there,
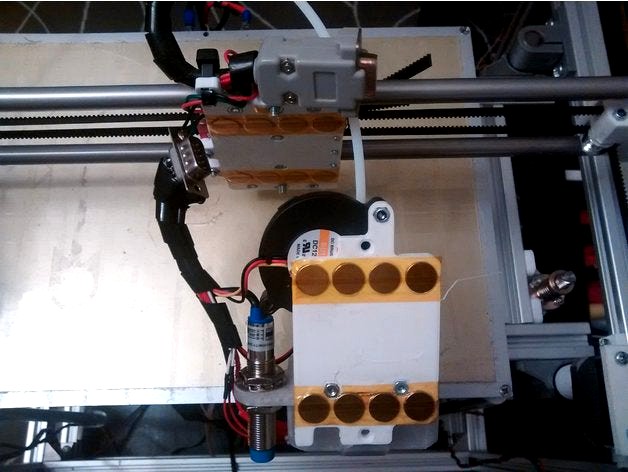
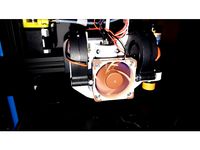
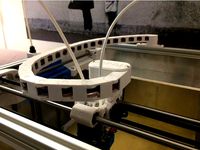
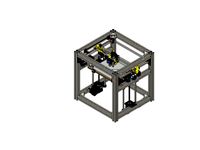
I present my very quick mountable Hypercube magnetic printhead. I personally use it with a lot of different nozzle diameters and V6/vulcano setups. Since you are changing the whole printhead you need following components for each head:
E3D Hotend full kit
Radial Fan
Cooling Fan
Bed Level Sensor
Dowel Pins
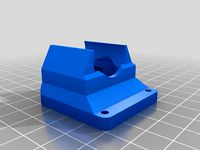
M4 screws are used to mount the E3D Mount centered to the carriage and transmit sideways forces.
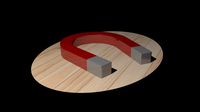
Mount the Magnets
Purchase some magnets anywhere, e.g. from Banggood. The magnets shall be glued in. Consider PETG does not bond to glue so good. PLA shall be a better option in this case. I suggest to orient the magnets with alternating polarities. Additionally I added some tape to the magnet's surface to protect them from damage but this is optional.
Materials you needElectrics
D-Sub 9 Female for the printer side
D-Sub 9 Male for the printhead side
X Carriage
8x Neodymium Magnets (d=12x2mm)
11x M3 Nuts
11x M3x10 Screws
2x M4 Nuts
2x M4x10 Screws
E3D Mount
8x Neodynmium Magnets (d=12x2mm)
2x M3x10
2x M3x16
1x M3x20
You can find my pinout for a d-sub 9 connector in the download section.
Looking for a Fan Duct with Sensor Mount?
E3D V6 https://www.thingiverse.com/thing:1796964
E3D Vulcano https://www.thingiverse.com/thing:2433892
Some further Improvement Ideas
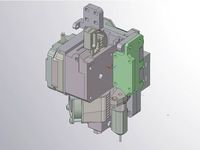
An integrated electric connection with pogo pins would be worth a remix. The source files are for Design Spark Mechanical
I present my very quick mountable Hypercube magnetic printhead. I personally use it with a lot of different nozzle diameters and V6/vulcano setups. Since you are changing the whole printhead you need following components for each head:
E3D Hotend full kit
Radial Fan
Cooling Fan
Bed Level Sensor
Dowel Pins
M4 screws are used to mount the E3D Mount centered to the carriage and transmit sideways forces.
Mount the Magnets
Purchase some magnets anywhere, e.g. from Banggood. The magnets shall be glued in. Consider PETG does not bond to glue so good. PLA shall be a better option in this case. I suggest to orient the magnets with alternating polarities. Additionally I added some tape to the magnet's surface to protect them from damage but this is optional.
Materials you needElectrics
D-Sub 9 Female for the printer side
D-Sub 9 Male for the printhead side
X Carriage
8x Neodymium Magnets (d=12x2mm)
11x M3 Nuts
11x M3x10 Screws
2x M4 Nuts
2x M4x10 Screws
E3D Mount
8x Neodynmium Magnets (d=12x2mm)
2x M3x10
2x M3x16
1x M3x20
You can find my pinout for a d-sub 9 connector in the download section.
Looking for a Fan Duct with Sensor Mount?
E3D V6 https://www.thingiverse.com/thing:1796964
E3D Vulcano https://www.thingiverse.com/thing:2433892
Some further Improvement Ideas
An integrated electric connection with pogo pins would be worth a remix. The source files are for Design Spark Mechanical
Similar models
thingiverse
free

Hypercube Titan Aero V6 and Vulcano Direct Drive Extruder for Flex Mount by butchja
...chieber" and "schieber_klemmplatte" with this parts.https://www.thingiverse.com/thing:2797701
part status
approved
thingiverse
free

Hypercube Vulcano Duct with Sensor Mount by butchja
...t's triple fan duct for an e3d vulcano or clone. shall be printed with support. double check for support in the air channels.
thingiverse
free

Hypercube Evolution E3d v6 mount with bltouch without brass inserts by Bitsize
...e bltouch sensor within the boundaries of the x carriage since in my regular 300x300x300 hypercube it hit the sides of my z rods.
thingiverse
free
E3D V6 40mm Fan Hypercube by NedalLive
...on if you mount a fan directly in 12v it is possible that the latter too cool the e3d v6 in fact it is advisable to turn it in 6v
thingiverse
free
CR-10 E3D V6 mount Dual FAN Mesh by chips777
... socket head bolts (please use treadlock glue for the extruder carrier)
2x m4 socket head bolts
2x m4 washers
2x m4 x 20mm screws
thingiverse
free

IR Probe Mount for E3D V6 Shroud by rs4race
...
ir probehttps://miscsolutions.wordpress.com/mini-height-sensor-board/
e3d v6http://e3d-online.com/e3d-v6/full-kit/v6-3mm-direct
thingiverse
free

Tarantula E3d V6 carriage MGN12H with BLtouch
...heels, so you cant print on full surface, but in future i will do a full mgn12 conversion for the z axis and then it should work.
thingiverse
free

Bowden X-Carriage Mount for E3D V6 - 40mm fan - SN04 sensor by docrenatoms
...emixed the jackwaterfall's "bowden x-carriage mount for e3d v6".
it's a main body with 40mm fan and sn04 mount.
thingiverse
free

E3D V6 Mount with Modular Fan Ducts for Tevo Tarantula Modular X Carriage With 17mm INDUCTIVE SENSOR by carlodp003
...v6 carriage for tarantula (https://www.thingiverse.com/thing:2463575). i have added a mount for 18mm inductive proximity sensor.
thingiverse
free

Bowden E3D V6 Carriage (Autolevel/AllInOne) by Triggerr
...screw to fix 40mm fan (layer fan)
2x embedded knurled m3 5mm (fan duct)
2x m3 screw to fix the duct
i recommended make with abs
Butchja
thingiverse
free

IKEA ALEX more Boxes by butchja
...es by butchja
thingiverse
i added a 4 and 5 unit. since my slicer bugged around with 0.6mm walls i made the walls 0.1mm thicker.
thingiverse
free

TransTEC Frog Landing Gear and Bumper by butchja
...r and bumper by butchja
thingiverse
hi,
i redesignd the original bumpers of the transtec frog frame. i have added landing gears.
thingiverse
free

USB Apple Strain Relief by butchja
... the 13x5.5mm plastic body usb connectors.
added second version with clamping bars. so you do not need to glue the connector in.
thingiverse
free

2020 Bowden Extruder Mount Bracket (E3D Titan) by butchja
...2020 bowden extruder mount bracket (e3d titan) by butchja
thingiverse
for m5 screws and with 5mm thick bottom plate.
thingiverse
free

2020 HP DPS Server Power Supply Holder Mount by butchja
...2020 hp dps server power supply holder mount by butchja
thingiverse
this is a server supply holder for 2020 alumium profile.
thingiverse
free

80mm Fan Booster for Static Pressure by butchja
... of my fume extractor has a high resistance to forced airflow. i added this to raise the throughput by increased static pressure.
thingiverse
free
Hypercube Vulcano Duct with Sensor Mount by butchja
...t's triple fan duct for an e3d vulcano or clone. shall be printed with support. double check for support in the air channels.
thingiverse
free

Spool Holder Mount 2020 by butchja
... extrusions. dimensions are almost identical. i also improved the printability of the transition of the m8 hex nut to the m8 rod.
thingiverse
free

Bike Workstand Maintenance TPU Clamp by butchja
...stand. i printed the clamps from cheap tpu. you might use any other flexible filament. the dimensions are displayed in a picture.
thingiverse
free
Hypercube Flex Mount Laser by butchja
...feedrate of 60mm/min).
https://www.banggood.com/12mm-laser-module-heat-sink-holder-mount-cooling-heatsink-cnc-pats-p-955963.html
Printhead
3d_export
$24
mechanical spider
...to 3d-print complex structures using its integrated spool and printhead it can also be used for all your mechanical...
thingiverse
free
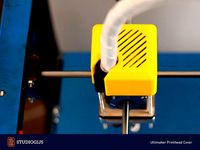
Ultimaker printhead cover by Gijs
...ultimaker printhead cover by gijs
thingiverse
printhead cover to protect the wires on top of the ultimaker printhead
thingiverse
free

Modified printhead clamp by Striffster
... the part that sits on the carriage to make it easier to change printhead. fits http://www.thingiverse.com/thing:793689 carriage.
thingiverse
free

full printhead by bouverat3dprint
...full printhead by bouverat3dprint
thingiverse
printer wanhao 5s. filament ø3mm
thingiverse
free

101hero printhead carrier e3d by workshoptinkerers
...or a 4mm push-fit pneumatic fitting with m6 threads if a non bowden printhead was purchased.
added carrier for e3d v5 printheads.
thingiverse
free

Diamond 3-1 printhead home bracket by robmink
...ngiverse
use to level your bed. only use while the printhead is cold. i used this for the chinese knock off diamond printhead.
thingiverse
free
FLSUN Cube Dual printhead Mount remix by ReneDriessen
...flsun cube dual printhead mount remix by renedriessen
thingiverse
dual printhead carriage for flsun cube
thingiverse
free
Fan-duct E3d Printhead by Straub
...e3d printhead.
the duct is designed for a 12v radial fan who is used in mankati printers.
(manufacturer number: bfb04512hha-dv52)
thingiverse
free
Voron Cablechain Printhead by 3d-workshop
... compartment to store the printhead-connectors.
unfortunately all parts need to be printed with supports except the chain itself.
thingiverse
free

Anycubic Predator effector for Stoneflower3D printhead v2
...flower3d printhead v2
thingiverse
anycubic predator effector to use with stoneflower3d printhead kit v2 for 3d ceramic printers.
Hypercube
turbosquid
free

HyperCube
... available on turbo squid, the world's leading provider of digital 3d models for visualization, films, television, and games.
3d_export
$5

Hypercube 3D Model
...hypercube 3d model
3dexport
cube hypercube four-dimensional space side geometry edge
hypercube 3d model dmitry87 54991 3dexport
3d_export
$5
tesseract hypercube
...t it. moreover different textures and materials can be added and tesseract can be set in any scene. dimensions: x: 4m y: 4m z: 4m
thingiverse
free
Hypercube
...hypercube
thingiverse
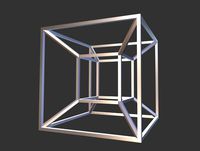
hypercube projected into three dimensional space.
thingiverse
free

Hypercube by alpheccar
...hypercube by alpheccar
thingiverse
projection of an hypercube on an hypersphere.
thingiverse
free
Hypercube by BorisBlavasky
...hypercube by borisblavasky
thingiverse
hypercube. testing the tool.
thingiverse
free

Hypercube by Christian42
...hypercube by christian42
thingiverse
i made a hypercube using rhino3d
thingiverse
free

Hypercube by Christian42
...hypercube by christian42
thingiverse
i made a hypercube using rhino3d
thingiverse
free

HyperCube by wwebber
...hypercube by wwebber
thingiverse
this is the standard perspective projection of the hypercube from 4d to 3d
thingiverse
free
HyperCube scaled by Muzeem
...hypercube scaled by muzeem
thingiverse
customized hypercube
Carriage
archibase_planet
free

Carriage
...arriage
archibase planet
perambulator baby carriage pram
carriage n250908 - 3d model (*.gsm+*.3ds) for interior 3d visualization.
3d_export
free

carriage
...carriage
3dexport
old fashion carriage model, more files here:
turbosquid
$140

Carriage
...urbosquid
royalty free 3d model carriage for download as max on turbosquid: 3d models for games, architecture, videos. (1482052)
turbosquid
$25

Carriage
...urbosquid
royalty free 3d model carriage for download as max on turbosquid: 3d models for games, architecture, videos. (1285944)
3d_export
free

carriage
...carriage
3dexport
game cart
3d_ocean
$15

Barrel Carriage
...ieval oak old transport wheels wine wood
this model contains a barrel and a carriage. it is a medieval type of wood oak carriage.
turbosquid
$40

Carriage
...ty free 3d model carriage for download as obj, fbx, and blend on turbosquid: 3d models for games, architecture, videos. (1290094)
turbosquid
free

Carriage
...yalty free 3d model carriage for download as ma, obj, and fbx on turbosquid: 3d models for games, architecture, videos. (1239157)
3d_export
$5

Medieval carriage
...medieval carriage
3dexport
medieval carriage in fairy style
turbosquid
$58

Carriage
...d model carriage with scene for download as max, obj, and fbx on turbosquid: 3d models for games, architecture, videos. (1276262)
Magnetic
3d_ocean
$2

Magnet
...magnet 3docean 3d 3ds max electric magnet magnetic magnetism max model polygon realistic tesla magnet created in...
turbosquid
$6
Magnet
...
turbosquid
royalty free 3d model magnet for download as obj on turbosquid: 3d models for games, architecture, videos. (1548733)
turbosquid
$6

magnet
...uid
royalty free 3d model magnet for download as 3dm and max on turbosquid: 3d models for games, architecture, videos. (1670606)
turbosquid
$1

Magnet
...y free 3d model magnet for download as 3ds, max, obj, and fbx on turbosquid: 3d models for games, architecture, videos. (1215037)
turbosquid
$7

Magnet
...agnet for download as blend, unitypackage, fbx, gltf, and obj on turbosquid: 3d models for games, architecture, videos. (1576588)
3d_export
$5

magnetic knife holder
...magnetic knife holder
3dexport
ordinary magnetic knife holder
archive3d
free

Fridge magnet 3D Model
...3d model archive3d refrigerator magnet fridge magnet magnet toy magnetic s n280712 - 3d model (*.3ds) for interior 3d...
turbosquid
$35

Magnetic butterflies
...alty free 3d model magnetic butterflies for download as blend on turbosquid: 3d models for games, architecture, videos. (1315792)
turbosquid
$2
Magnetic Board
...quid
royalty free 3d model magnetic board for download as ma on turbosquid: 3d models for games, architecture, videos. (1264141)
turbosquid
$977
Magnetic Lego
...oyalty free 3d model magnetic lego for download as ma and obj on turbosquid: 3d models for games, architecture, videos. (1142761)
Quick
3ddd
$1

Quick-Step / Quadra
...quick-step / quadra
3ddd
quick step
ламинат quick-step, серия quadra. сайт источник -http://www.quick-step.com
3ddd
$1

Quick-Step / Lagune
...quick-step / lagune
3ddd
quick step
ламинат quick-step, серия lagune. сайт источник -http://www.quick-step.com
3ddd
$1

Quick-Step / Classic
...quick-step / classic
3ddd
quick step
ламинат quick-step, серия classic. сайт источник -http://www.quick-step.com
3ddd
$1

Quick-Step / Arte
...quick-step / arte
3ddd
quick step
ламинат quick-step, серия arte. сайт источник -http://www.quick-step.com
3ddd
$1

Quick-Step / Vogue
...quick-step / vogue
3ddd
quick step
ламинат quick-step, серия vogue. сайт источник -http://www.quick-step.com
3ddd
$1

Quick-Step / Rustic
...quick-step / rustic
3ddd
quick step
ламинат quick-step, серия rustic. сайт источник -http://www.quick-step.com
3ddd
$1

Quick-Step / Eligna
...quick-step / eligna
3ddd
quick step
ламинат quick-step, серия eligna. сайт источник -http://www.quick-step.com
turbosquid
$3

Quick Ball
...lty free 3d model quick ball for download as ma, obj, and fbx on turbosquid: 3d models for games, architecture, videos. (1521597)
3ddd
free

Quick-Step / Elite
... ламинат
ламинат quick-step, серия elite. сайт источник -http://www.quick-step.com
turbosquid
$10
Quick Chrome
... available on turbo squid, the world's leading provider of digital 3d models for visualization, films, television, and games.
Mount
3d_export
free

mounting bracket
...mounting plate is the portion of a hinge that attaches to the wood. mounting plates can be used indoors, cabinetry and furniture.
turbosquid
$2

MOUNTING
... available on turbo squid, the world's leading provider of digital 3d models for visualization, films, television, and games.
turbosquid
free

Mounts
... available on turbo squid, the world's leading provider of digital 3d models for visualization, films, television, and games.
turbosquid
free

Mount Fuji
...fuji
turbosquid
free 3d model mount fuji for download as obj on turbosquid: 3d models for games, architecture, videos. (1579977)
3d_export
$5

Headphone mount LR
...headphone mount lr
3dexport
headphone mount l+r
turbosquid
$39

Mount rainier
...quid
royalty free 3d model mount rainier for download as fbx on turbosquid: 3d models for games, architecture, videos. (1492586)
turbosquid
$5

pipe mounting
...quid
royalty free 3d model pipe mounting for download as obj on turbosquid: 3d models for games, architecture, videos. (1293744)
turbosquid
$3

Mounting Tires
...uid
royalty free 3d model mounting tires for download as fbx on turbosquid: 3d models for games, architecture, videos. (1708511)
3d_export
$5

Magnetic GoPro Mount
...pro mount
3dexport
cool magnetic mount for gopro. allows you to mount the camera on flat metal surfaces and get exclusive shots.
turbosquid
$5

Stone Mount
...ty free 3d model stone mount for download as ma, obj, and fbx on turbosquid: 3d models for games, architecture, videos. (1370306)