Thingiverse

Hypercube Evolution/ Hevo BMG direct extruder carriage by BerronGears
by Thingiverse
Last crawled date: 3 years, 2 months ago
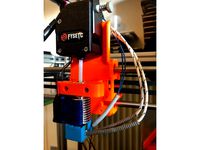
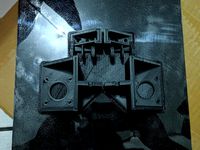
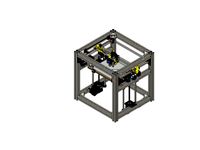
X-carriage for Hypercube Evolution with mount for direct BMG extruder with E3D-V6 hotend.
I wanted my Hypercube to have direct drive. I decided to design it myself as I wanted it to be one part (extruder mount), have a cablechain mount. I also wanted to hide as many wires as possible.
Carriage with cablechain mount is inspired by this design and you can find proper frame mount in there:https://www.thingiverse.com/thing:2793108
Belt tensioning system is the same as original(I know I should put the whole design as remix to it, but for unknown reason I was unable to select it):https://www.thingiverse.com/thing:2254103
Features:
-David Crocker's IR sensor mount
-BL-Touch mount
-internal cable routing for fans
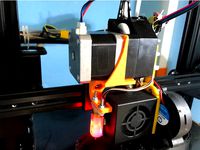
Part list:
-4020 blower fan
-3010 fan
-E3D-V6 hotend assembly
-BMG extruder
-optical enstop(
-3x40mm M3 bolt (for mounting extruder with motor/maximum head high is 3mm)
-5x20mm M3 bolt (for connecting carriage and extuder mount)
-2x15mm M3 bolt (for 30mm fan)
-1x30mm and 1x20mm M3 bolt (for blower fan)
-6x10mm for belt clamps(BL-Touch) or 4x10mm & 2x15mm M3 bolts(IR sensor)
-6x M3-5mm brass inserts
-1x M3 nut
-2x10mm bolt for optical endstop
-optionally 2x10mm M3 bolt and 2x M3 nut for cable chain connection
-2x bolts for connecting BL-touch or IR sensor
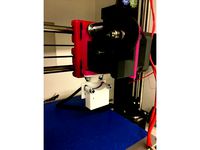
assembly notes
-You have to put hotends assembly through the hole at the bottom and extruder from the top. There is no way to firstly assemble extruder with heatsink and then screw heatblock into it. I know it's not perfect solution, but I was able to do it in one minute (remember about the bowden inside heatsing).
-whole thing is not compatibile with original Hypercube carriage (you can use original belt clamps for IR sensor version)
-the only bolt using nut is the one in the centre connecting carriage and extruder mount (and cable chain ones), rest of them should be screwed directly into plastic and sit tightly.
Other four bolts should sit tightly only inside the carriage and fit into the extruder mount (like in originall hypercube assembly). If the holes in mount are to small you can use a 3mm drill, but don't make the holes too big, unless you want to loss acuraccy.
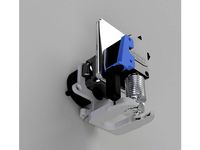
It's my first working carriage/extruder design. I know it is not perfect but works fine for me. I am opened to any suggestions.
I wanted my Hypercube to have direct drive. I decided to design it myself as I wanted it to be one part (extruder mount), have a cablechain mount. I also wanted to hide as many wires as possible.
Carriage with cablechain mount is inspired by this design and you can find proper frame mount in there:https://www.thingiverse.com/thing:2793108
Belt tensioning system is the same as original(I know I should put the whole design as remix to it, but for unknown reason I was unable to select it):https://www.thingiverse.com/thing:2254103
Features:
-David Crocker's IR sensor mount
-BL-Touch mount
-internal cable routing for fans
Part list:
-4020 blower fan
-3010 fan
-E3D-V6 hotend assembly
-BMG extruder
-optical enstop(
-3x40mm M3 bolt (for mounting extruder with motor/maximum head high is 3mm)
-5x20mm M3 bolt (for connecting carriage and extuder mount)
-2x15mm M3 bolt (for 30mm fan)
-1x30mm and 1x20mm M3 bolt (for blower fan)
-6x10mm for belt clamps(BL-Touch) or 4x10mm & 2x15mm M3 bolts(IR sensor)
-6x M3-5mm brass inserts
-1x M3 nut
-2x10mm bolt for optical endstop
-optionally 2x10mm M3 bolt and 2x M3 nut for cable chain connection
-2x bolts for connecting BL-touch or IR sensor
assembly notes
-You have to put hotends assembly through the hole at the bottom and extruder from the top. There is no way to firstly assemble extruder with heatsink and then screw heatblock into it. I know it's not perfect solution, but I was able to do it in one minute (remember about the bowden inside heatsing).
-whole thing is not compatibile with original Hypercube carriage (you can use original belt clamps for IR sensor version)
-the only bolt using nut is the one in the centre connecting carriage and extruder mount (and cable chain ones), rest of them should be screwed directly into plastic and sit tightly.
Other four bolts should sit tightly only inside the carriage and fit into the extruder mount (like in originall hypercube assembly). If the holes in mount are to small you can use a 3mm drill, but don't make the holes too big, unless you want to loss acuraccy.
It's my first working carriage/extruder design. I know it is not perfect but works fine for me. I am opened to any suggestions.
Similar models
thingiverse
free

Ender 3 Direct Drive Mini BMG Extruder mounting plate for E3D V6(V5) with adjustable BL-Touch mount by ru_ace
...www.thingiverse.com/thing:4620308
adjustable bl-touch mount compatible with mounts from https://www.thingiverse.com/thing:3148733
thingiverse
free
BMG Bondtech e3D v6 Hevo Hypercube Hotend Mount Extruder direct drive
...se
i remixed the hotend mount to have a bmg as a direct drive and the extruder screw isnt crashing the extrusion on the front ;)
grabcad
free

Anycubic i3 Mega upgrade Direct Extruder
... mount:
iso7380 m3x20 (2x)
din934 m3 (2x)
energie-chain:
cable chain 10x11mm with 23 segments
din7991 m3x10 (6x)
din934 m3 (6x)
thingiverse
free

BL Touch Mount for E3D Clamp (Hypercube) by BS3DP
...es through from the bltouch to the top of the mount to allow you to plug them in.
tech2c: http://www.thingiverse.com/tech2c/about
thingiverse
free

CR10 Max+BL - Nova Mount by jasonfjh23
...t was to place the nova nozzle at the same location as the stock creality nozzle.
bl touch offsets:
x: -41.65mm
y: -4.75mm
z: 2mm
thingiverse
free

Prusa MK3S MMU2S IR sensor mount (Bondtech, BMG)
...ruder and revised x-axis x-carriage by vekoj https://www.thingiverse.com/thing:3560116
parts required:
m3*8mm screw
m3 square nut
thingiverse
free
Ender3 BMG Direct Extruder_with BLTouch mount by Tommykijima
... extruder_with bltouch mount by tommykijima
thingiverse
direct extruding with bmg extruder for ender3 and bl touch mount in one!
thingiverse
free
Aus3D IR to BL-Touch adapter by JBFUK
...
just a simple adapter to mount the aus3d ir probe to a bl-touch mount-point. just use a few m3 nuts and bolts to hold in place.
thingiverse
free

Ender 3 Direct Drive Mini BMG Extruder mounting plate for stock hotend cover with adjustable BL-Touch mount by ru_ace
...www.thingiverse.com/thing:4613803
adjustable bl-touch mount compatible with mounts from https://www.thingiverse.com/thing:3148733
thingiverse
free
FT5 Bondtech+E3D V6 BL Touch Mount by Snipsey
...t by snipsey
thingiverse
mount designed for the ft-5 with 713maker ultralight carriage, bondtech bmg extruder and e3d v6 hotend.
Hevo
thingiverse
free

powerunit HEVO by Ploegie
...by ploegie
thingiverse
this thing is made for the backside of my hevo and works great
i used neutrik usb and ethernet connectors
thingiverse
free

HEVO Spool Holder by theredguy
...hevo spool holder by theredguy
thingiverse
parts will require gluing
thingiverse
free

HEVO to HevORT 12mm Smooth Rod holder by Rippernz
...older by rippernz
thingiverse
hevo to hevort 12mm smooth rod holder
3030 extrusion
bed 12mm smooth rod holder for hevo to hevort
thingiverse
free

Hevo SupCRprobe Hotendaufnahme by lordduplo
...:https://www.thingiverse.com/thing:2254103
hotendaufnahme + retainer für den hevo mit 12mm bohrung für eine supcrprobe von cr-3d.
thingiverse
free

30x30 Extrusion Foot (HEVO) by brainchecker
...se
a foot which attachs securely to a 30x30mm extrusion. i designed it to give my hevo a little bit of clearance from the floor.
thingiverse
free
Hevo BLV Fusion - Hevo MGN Linear Rail Conversion Kit
...al conversion kit for my hypercube evolution to use mgn12h linear rail, inspired by blv mgn cube, as a replacement for rod shaft.
thingiverse
free

Hypercube Evolution (HEVO) Prusa Mk3s Hotrend mount
... customised for the hypercube evolution (hevo) with a bl-touch probe. this fits the standard hevo plate and bowden configuration.
thingiverse
free

Hevo Double Z Center Bed Support by groovydude1981
...hevo double z center bed support by groovydude1981
thingiverse
this is a simplified center bed support for my double z hevo.
thingiverse
free

hevo wobble wing remix by warham
...hevo wobble wing remix by warham
thingiverse
work in progress
thingiverse
free

HEVO COVER by heisenberg333
...se
this cover is adapted for original hypercube evolution head , no need to modify other part .
protect and hold properly cables
Bmg
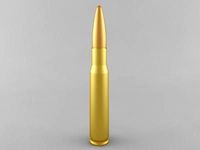
turbosquid
$3

.50 BMG
... available on turbo squid, the world's leading provider of digital 3d models for visualization, films, television, and games.
turbosquid
$2

.50 BMG
... available on turbo squid, the world's leading provider of digital 3d models for visualization, films, television, and games.
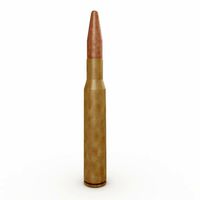
turbosquid
$25
50 BMG Cartridge
...e 3d model 50 bmg cartridge for download as 3ds, max, and obj on turbosquid: 3d models for games, architecture, videos. (1303035)
turbosquid
$30

Sniper 50 bmg
... available on turbo squid, the world's leading provider of digital 3d models for visualization, films, television, and games.
turbosquid
free

Cal 50 BMG
... available on turbo squid, the world's leading provider of digital 3d models for visualization, films, television, and games.
cg_studio
$25
.50 BMG Cartridge3d model
...odel
cgstudio
.3ds .max .obj .wrl - .50 bmg cartridge 3d model, royalty free license available, instant download after purchase.
3d_export
$5
50 caliber BMG round 3D Model
...d 3d model
3dexport
50cal caliber 50 round bullet bmg cartridge browning rifle
50 caliber bmg round 3d model csw92 27660 3dexport
3d_export
$22
.50 BMG Cartridge 3D Model
...ectile rifle round pistol cartridge m2 hb 127x99mm nato browning barrett m82a1
.50 bmg cartridge 3d model plutonius 8091 3dexport
turbosquid
free
LAR Grizzly .50 BMG Sniper
... available on turbo squid, the world's leading provider of digital 3d models for visualization, films, television, and games.
3d_export
$8
cartrige m50 bmg
...aterials are logically named<br>the main format is in 3ds max 2009.<br>satisfcation garranteed..<br>thank you !
Hypercube
turbosquid
free

HyperCube
... available on turbo squid, the world's leading provider of digital 3d models for visualization, films, television, and games.
3d_export
$5
Hypercube 3D Model
...hypercube 3d model
3dexport
cube hypercube four-dimensional space side geometry edge
hypercube 3d model dmitry87 54991 3dexport
3d_export
$5
tesseract hypercube
...t it. moreover different textures and materials can be added and tesseract can be set in any scene. dimensions: x: 4m y: 4m z: 4m
thingiverse
free
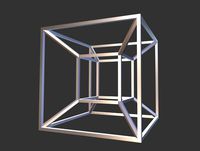
Hypercube
...hypercube
thingiverse
hypercube projected into three dimensional space.
thingiverse
free

Hypercube by alpheccar
...hypercube by alpheccar
thingiverse
projection of an hypercube on an hypersphere.
thingiverse
free
Hypercube by BorisBlavasky
...hypercube by borisblavasky
thingiverse
hypercube. testing the tool.
thingiverse
free

Hypercube by Christian42
...hypercube by christian42
thingiverse
i made a hypercube using rhino3d
thingiverse
free

Hypercube by Christian42
...hypercube by christian42
thingiverse
i made a hypercube using rhino3d
thingiverse
free

HyperCube by wwebber
...hypercube by wwebber
thingiverse
this is the standard perspective projection of the hypercube from 4d to 3d
thingiverse
free
HyperCube scaled by Muzeem
...hypercube scaled by muzeem
thingiverse
customized hypercube
Evolution
3ddd
$1
Evolution
... evolution , комод
комод из каталога emmemobili модель evolution
design_connected
$18

Evolution
...evolution
designconnected
zanotta evolution computer generated 3d model. designed by ïto, ora.
design_connected
$11

Evolute
...evolute
designconnected
danese evolute computer generated 3d model. designed by crasset, matali.
design_connected
$22

Evolution
...evolution
designconnected
emmemobili evolution shelves and storage computer generated 3d model. designed by ferruccio laviani.
3ddd
$1

Zanotta / EVOLUTION
...zanotta / evolution
3ddd
zanotta
zanotta
884 evolution
3ddd
free
Simas Evolution
...simas evolution
3ddd
simas
раковина simas evolution
3ddd
$1

Lancer Evolution
...lancer evolution
3ddd
автомобиль , машина
lancer evolution viii
3ddd
$1
Zanotta Evolution
...zanotta evolution
3ddd
zanotta
современное кресло evolution фабрики zanotta
turbosquid
$25
Evolution Dragon
...d
royalty free 3d model evolution dragon for download as obj on turbosquid: 3d models for games, architecture, videos. (1212928)
turbosquid
$6

Flowers Evolution
...
royalty free 3d model flowers evolution for download as obj on turbosquid: 3d models for games, architecture, videos. (1214159)
Carriage
archibase_planet
free

Carriage
...arriage
archibase planet
perambulator baby carriage pram
carriage n250908 - 3d model (*.gsm+*.3ds) for interior 3d visualization.
3d_export
free

carriage
...carriage
3dexport
old fashion carriage model, more files here:
turbosquid
$140

Carriage
...urbosquid
royalty free 3d model carriage for download as max on turbosquid: 3d models for games, architecture, videos. (1482052)
turbosquid
$25

Carriage
...urbosquid
royalty free 3d model carriage for download as max on turbosquid: 3d models for games, architecture, videos. (1285944)
3d_export
free

carriage
...carriage
3dexport
game cart
3d_ocean
$15

Barrel Carriage
...ieval oak old transport wheels wine wood
this model contains a barrel and a carriage. it is a medieval type of wood oak carriage.
turbosquid
$40

Carriage
...ty free 3d model carriage for download as obj, fbx, and blend on turbosquid: 3d models for games, architecture, videos. (1290094)
turbosquid
free

Carriage
...yalty free 3d model carriage for download as ma, obj, and fbx on turbosquid: 3d models for games, architecture, videos. (1239157)
3d_export
$5

Medieval carriage
...medieval carriage
3dexport
medieval carriage in fairy style
turbosquid
$58

Carriage
...d model carriage with scene for download as max, obj, and fbx on turbosquid: 3d models for games, architecture, videos. (1276262)
Direct
design_connected
free
Compas Direction
...compas direction
designconnected
free 3d model of compas direction by vitra designed by prouvé, jean.
design_connected
$18
Direction Pivotant
...direction pivotant
designconnected
vitra direction pivotant computer generated 3d model. designed by prouvé, jean.
turbosquid
$6
not direct the front
...oyalty free 3d model not direct the front for download as max on turbosquid: 3d models for games, architecture, videos. (1213034)
turbosquid
$10

Rails Direct
... available on turbo squid, the world's leading provider of digital 3d models for visualization, films, television, and games.
3d_export
$5

Picto toilet directions
...lude 3d files next to rhino6: x3dv, step, igus, obj and stl. double-sided, flipping changes the gender directions to the toilets.
3ddd
$1
fauteuli direction
...d
chair , vitra , fauteuli
fauteuli vitra chair
design_connected
$18
Fauteuil Direction, 1951
...fauteuil direction, 1951
designconnected
vitra fauteuil direction, 1951 computer generated 3d model. designed by prouvé, jean.
3d_export
$5
Directional tactile 3D Model
...tactile 3d model
3dexport
directional tactile braille tile flooring interior
directional tactile 3d model renob000 71068 3dexport
turbosquid
$26

Radio direction finder A
...ty free 3d model radio direction finder a for download as fbx on turbosquid: 3d models for games, architecture, videos. (1212490)
turbosquid
$7

Wooden direction signage
...ty free 3d model wooden direction signage for download as max on turbosquid: 3d models for games, architecture, videos. (1453747)
Extruder
3ddd
$1

Extruded Chair
...extruded chair
3ddd
extruded , tom dixon
inspired by tom dixon extruded chair
turbosquid
$15

Extruded Table
... extruded table for download as blend, dae, fbx, obj, and stl on turbosquid: 3d models for games, architecture, videos. (1634137)
turbosquid
$2

3D Printer Extruder
...d
royalty free 3d model 3d printer extruder for download as on turbosquid: 3d models for games, architecture, videos. (1537359)
turbosquid
$1

Zombie extruded text
...oyalty free 3d model zombie extruded text for download as obj on turbosquid: 3d models for games, architecture, videos. (1322198)
turbosquid
$4

Extruder conical screw
...el extruder conical screw for download as sldpr, ige, and stl on turbosquid: 3d models for games, architecture, videos. (1524433)
turbosquid
$50

3d PRINTER - Extruder
... available on turbo squid, the world's leading provider of digital 3d models for visualization, films, television, and games.
turbosquid
$15

Extruded Table 2
...xtruded table 2 for download as blend, dae, fbx, obj, and stl on turbosquid: 3d models for games, architecture, videos. (1621846)
turbosquid
$10

Maya Extrude Tool
... available on turbo squid, the world's leading provider of digital 3d models for visualization, films, television, and games.
3d_export
$5

world earth extrude map
...world earth extrude map
3dexport
3ddd
$1

Simply Elegant Extruded Tree Coffee Table Design
...ble by link studios. the silhouette of a tree is visible at one angle, extruded from the surface to create the support structure.