Thingiverse

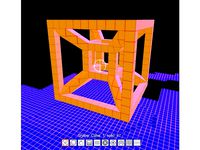
Hypercube EVO LM10 10mm X-Carriage by geoffsim
by Thingiverse
Last crawled date: 3 years, 1 month ago
Please show your appreciation of my work by sending a beer token
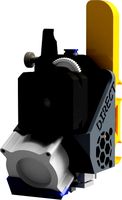
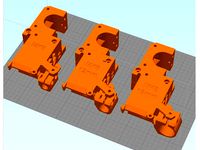
A 10mm X-Carriage for the Hypercube EVO, drawing heavily from the original 8mm carriage design, along with influences from the Prusa i3 MK2 X-Carriage.
Bill Of Materials:
1 off LM10LUU bearing.
1 off LM10UU bearing.
5 off 100mm x 2mm zip ties (the holes are 4mm wide, and so may accept other sizes).
4 off M3 x 12mm pins (carriage/extruder mount alignment pins).
14 off M3 nuts. Square nuts are preferred for the hotend/sensor clamp.
2 off M3 x 10mm bolts (optical sensors).
6 off M3 x 12mm bolts (belt adjusters & cooling fan nozzle mount).
2 off M3 x 20mm bolts (hotend/sensor clamp),
1 off M3 x 25mm bolt (carriage to extruder mount fixing).
2 off M3 x 30mm bolts (belt clamps).
1 off E3Dv6 hotend.
1 off 12mm sensor.
1 off 50mm blower fan.
1 off part cooling fan nozzle from original Hypercube EVO post.
Once printed,
Clean out the belt guides with a small flat file.
Enlarge the 4 alignment holes only on the X carriage to 3mm using a 3mm drill bit.
Enlarge all the other holes to 3.2mm using a 3.2mm drill bit.
Push/hammer the pins into the appropriate holes on the X carriage.
Push/hammer all the nuts into their respective holes.
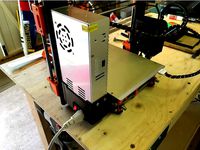
Pop the X carriage onto the rails, upper LM10LUU 1st.
Fit the zip ties with heads facing away from the carriage (see photo), tighten and trim.
Note that this carriage is 6mm wider, and the nozzle 2mm forwards, compared to the LM8UU version. Make sure you use the modified X end-stop flags, or the sensors will not trigger.
Please show your appreciation of my work by sending a beer token
A 10mm X-Carriage for the Hypercube EVO, drawing heavily from the original 8mm carriage design, along with influences from the Prusa i3 MK2 X-Carriage.
Bill Of Materials:
1 off LM10LUU bearing.
1 off LM10UU bearing.
5 off 100mm x 2mm zip ties (the holes are 4mm wide, and so may accept other sizes).
4 off M3 x 12mm pins (carriage/extruder mount alignment pins).
14 off M3 nuts. Square nuts are preferred for the hotend/sensor clamp.
2 off M3 x 10mm bolts (optical sensors).
6 off M3 x 12mm bolts (belt adjusters & cooling fan nozzle mount).
2 off M3 x 20mm bolts (hotend/sensor clamp),
1 off M3 x 25mm bolt (carriage to extruder mount fixing).
2 off M3 x 30mm bolts (belt clamps).
1 off E3Dv6 hotend.
1 off 12mm sensor.
1 off 50mm blower fan.
1 off part cooling fan nozzle from original Hypercube EVO post.
Once printed,
Clean out the belt guides with a small flat file.
Enlarge the 4 alignment holes only on the X carriage to 3mm using a 3mm drill bit.
Enlarge all the other holes to 3.2mm using a 3.2mm drill bit.
Push/hammer the pins into the appropriate holes on the X carriage.
Push/hammer all the nuts into their respective holes.
Pop the X carriage onto the rails, upper LM10LUU 1st.
Fit the zip ties with heads facing away from the carriage (see photo), tighten and trim.
Note that this carriage is 6mm wider, and the nozzle 2mm forwards, compared to the LM8UU version. Make sure you use the modified X end-stop flags, or the sensors will not trigger.
Please show your appreciation of my work by sending a beer token
Similar models
thingiverse
free

Hypercube E3D Titan carriage by diegotrap
...u clamp
1x belt clamp
more info, updates and mods can be found in my hypercube repository: https://github.com/diegotrap/hypercube
thingiverse
free

E3D Hotend Holder by ichicken
...or attaching the hotend holder to the x-plate, and two m3 20mm bolts + locking nuts for attaching the clamp to the hotend holder.
thingiverse
free
Hypercube Evolution/ Hevo BMG direct extruder carriage by BerronGears
...'s my first working carriage/extruder design. i know it is not perfect but works fine for me. i am opened to any suggestions.
thingiverse
free
XY-Idler Remix
...removed insert nut holes.
added slots for m3 nuts.
corrected depths for usage of m3x16 for lm10luu-clamp an m3x8 for 10mm-clamps.
thingiverse
free

improved hypercube evolution x carriage
...volution x carriage
thingiverse
improved hypercube evolution x carriage designed for bearing clamping and use of normal m3 nuts.
thingiverse
free

Hypercube LM10LUU Z carriage by diegotrap
... bearings) in the hypercube 3d printer.
use it in conjunction with this 10mm z axis mod: http://www.thingiverse.com/thing:1950819
thingiverse
free

ANET A8 E3D carriage by toosha
...lamp for 8mm inductive sensor, calibration x +30mm (right) of the nozzle
note: please leave a feedback and proposals in comments.
thingiverse
free

Reach 3D Hot End Carriage, Fan Mount, and Z Probe Carriage by ngoconwood
... not interfere with the z probe.
materials:
1 x m3x50 bolt
1 x m3 lock nut
1 x #4 screw
2 x m5x30 bolt
4 x m5 washers
2 x m5 nuts
thingiverse
free

Modified x-carriage and Nozzle-mounting by yzorg
...r to the parts later... or maybe i design airchannels to reuse the air from the active-cold-end directing it to the print surface
thingiverse
free
Gregs wade extruder by tripstar76
...ing for the idler.
all that needs to be added is the stepper motor and small gear!
any other info or pictures you need, just ask.
Geoffsim
thingiverse
free

SCRU-FE Ping Pong Ball Castor by geoffsim
...y in place of the original wheel, using two self-tapping screws.
please show your appreciation of my work by sending a beer token
thingiverse
free

Da Vinci 1.0 Pro Front Camera Mount by geoffsim
...file so that you can easily change the mount to fit your webcam.
please show your appreciation of my work by sending a beer token
thingiverse
free

Da Vinci 1.0 Pro Cable Chain Attachment by geoffsim
...you still use this endstop, you will have to use another method.
please show your appreciation of my work by sending a beer token
thingiverse
free

Prusa i3 MK2 Clone Brass TR8 Nut Adapter by geoffsim
...ss, quite quickly. the photo shows the nut and adapter in place.
please show your appreciation of my work by sending a beer token
thingiverse
free

Da Vinci 1.0 Pro MKS and Pi Mount by geoffsim
...s to the left of the bracket are used to fit a 40mm cooling fan.
please show your appreciation of my work by sending a beer token
thingiverse
free
Prusa i3 MK2 Clone 360W 24V PSU Cover by geoffsim
...ditional files, which can be found in the prusa git repository.
please show your appreciation of my work by sending a beer token
thingiverse
free

Prusa i3 MK2 Clone Ramps 1.4 Cover Base + Door by geoffsim
...fy the original designer. i will remedy this if/when i find out.
please show your appreciation of my work by sending a beer token
thingiverse
free
Prusa i3 MK2 Clone Extruder for 8/12/18 mm sensors and MK8 Hobbed Pulley by geoffsim
...ditional files, which can be found in the prusa git repository.
please show your appreciation of my work by sending a beer token
thingiverse
free

Da Vinci 1.0 Pro Drop-in E3D Mount with Cooling Fan by geoffsim
...original cad design. please ensure you credit me in any remixes.
please show your appreciation of my work by sending a beer token
Lm10
thingiverse
free
LM10 linear bearing for vase mode printing by peremenov
...r bearing for vase mode printing by peremenov
thingiverse
lm10 linear bearing (l: 29mm) for vase mode printing with 0.4mm nozzle
thingiverse
free

LM8/LM10 Y-Carriage for Mendelmax by tommyc
...onding spacers.
i uses the lm10x3 version with misumi lmu-mx10 self lubricating bearings.
more pictures here: http://goo.gl/jrg97
thingiverse
free

VORON 1.0 - LM10 Bearing Upgrades by themakeproject
...ter to insert them into to fit the lm8uu bearing size on the carriage. this will keep it compatible with future and v1.5 updates.
thingiverse
free

Coolice Hypercube Evolution Rev.3 Aero & BLtouch Holder LM10 Bearings
...nk i have uploaded all that is needed to make this change, all other parts are as per the original design.
have fun.
ian contessa
thingiverse
free

Flyingbear Tornado holder for IGUS LM10UU bearings (bed upgrade) by vooon
...le still have problem with non parallel lifting (in y axis direction).
longer lm10 (55mm) maybe solve that problem, need to test.
thingiverse
free

Igus chain mount for 'HyperCube Evolution Upgrade All parts' by Ken536
...projects ( https://www.thingiverse.com/thing:2437440 ) it mounts on the standard lm10 xcarriage on the added holes should mount 16mm e045...
thingiverse
free

i3 X Axis Linear Rail System by Kureigu
...of 22mm between lead screw and smooth rod centres. lm10 version now availiable. 2016/11/15 now with even more overkill....
thingiverse
free

3018 upgraded X and Z-axis by Snakedad
...spindle. parts needed: 4x lmh10uu (you can reuse the lm10 found in the x-axis carriage, but they are pretty...
thingiverse
free

CNC 3018 PRO x cariage 12mm rod by marenio
...bearing i used the kh1026pp. it is smaller than lm10 bearings. be aware: you need to know your printer....
Hypercube
turbosquid
free

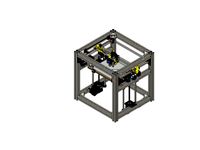
HyperCube
... available on turbo squid, the world's leading provider of digital 3d models for visualization, films, television, and games.
3d_export
$5

Hypercube 3D Model
...hypercube 3d model
3dexport
cube hypercube four-dimensional space side geometry edge
hypercube 3d model dmitry87 54991 3dexport
3d_export
$5
tesseract hypercube
...t it. moreover different textures and materials can be added and tesseract can be set in any scene. dimensions: x: 4m y: 4m z: 4m
thingiverse
free
Hypercube
...hypercube
thingiverse
hypercube projected into three dimensional space.
thingiverse
free

Hypercube by alpheccar
...hypercube by alpheccar
thingiverse
projection of an hypercube on an hypersphere.
thingiverse
free
Hypercube by BorisBlavasky
...hypercube by borisblavasky
thingiverse
hypercube. testing the tool.
thingiverse
free

Hypercube by Christian42
...hypercube by christian42
thingiverse
i made a hypercube using rhino3d
thingiverse
free

Hypercube by Christian42
...hypercube by christian42
thingiverse
i made a hypercube using rhino3d
thingiverse
free

HyperCube by wwebber
...hypercube by wwebber
thingiverse
this is the standard perspective projection of the hypercube from 4d to 3d
thingiverse
free
HyperCube scaled by Muzeem
...hypercube scaled by muzeem
thingiverse
customized hypercube
Evo
turbosquid
$49

Evo
... available on turbo squid, the world's leading provider of digital 3d models for visualization, films, television, and games.
turbosquid
$15

evo
... available on turbo squid, the world's leading provider of digital 3d models for visualization, films, television, and games.
3ddd
$1

brummel diamond evo
...ddd
brummel , diamond , evo
brummel diamond evo
3ddd
$1
brummel diamond evo
... diamond , evo , стол
стол brummel diamond evo
turbosquid
$99

Lancer EVO
...evo
turbosquid
royalty free 3d model evo for download as max on turbosquid: 3d models for games, architecture, videos. (1152821)
turbosquid
$20

Spaceship EVO
...free 3d model spaceship evo for download as max, obj, and fbx on turbosquid: 3d models for games, architecture, videos. (1227644)
turbosquid
$7

Enosi Evo
...lty free 3d model enosi evo for download as max, obj, and fbx on turbosquid: 3d models for games, architecture, videos. (1213451)
turbosquid
$3

Evo X
... available on turbo squid, the world's leading provider of digital 3d models for visualization, films, television, and games.
turbosquid
$2

EVO Armchair
... available on turbo squid, the world's leading provider of digital 3d models for visualization, films, television, and games.
3d_export
$30

Mitsubishi Lancer Evo X
...mitsubishi lancer evo x
3dexport
mitsubishi lancer evo x
Carriage
archibase_planet
free

Carriage
...arriage
archibase planet
perambulator baby carriage pram
carriage n250908 - 3d model (*.gsm+*.3ds) for interior 3d visualization.
3d_export
free

carriage
...carriage
3dexport
old fashion carriage model, more files here:
turbosquid
$140

Carriage
...urbosquid
royalty free 3d model carriage for download as max on turbosquid: 3d models for games, architecture, videos. (1482052)
turbosquid
$25

Carriage
...urbosquid
royalty free 3d model carriage for download as max on turbosquid: 3d models for games, architecture, videos. (1285944)
3d_export
free

carriage
...carriage
3dexport
game cart
3d_ocean
$15

Barrel Carriage
...ieval oak old transport wheels wine wood
this model contains a barrel and a carriage. it is a medieval type of wood oak carriage.
turbosquid
$40

Carriage
...ty free 3d model carriage for download as obj, fbx, and blend on turbosquid: 3d models for games, architecture, videos. (1290094)
turbosquid
free

Carriage
...yalty free 3d model carriage for download as ma, obj, and fbx on turbosquid: 3d models for games, architecture, videos. (1239157)
3d_export
$5

Medieval carriage
...medieval carriage
3dexport
medieval carriage in fairy style
turbosquid
$58

Carriage
...d model carriage with scene for download as max, obj, and fbx on turbosquid: 3d models for games, architecture, videos. (1276262)
10Mm
turbosquid
$3

10mm socket
...osquid
royalty free 3d model 10mm socket for download as skp on turbosquid: 3d models for games, architecture, videos. (1191445)
turbosquid
$5

Flower Of Life 10mm
... available on turbo squid, the world's leading provider of digital 3d models for visualization, films, television, and games.
turbosquid
$6

10mm Hex Key
...hex key for download as max, 3dm, c4d, lxo, obj, 3ds, and fbx on turbosquid: 3d models for games, architecture, videos. (1686655)
turbosquid
$2

10mm Sci-fi PDW
...odel 10mm sci-fi pdw for download as blend, obj, dae, and 3ds on turbosquid: 3d models for games, architecture, videos. (1636456)
turbosquid
$10

10mm Cd Jewel Case
... available on turbo squid, the world's leading provider of digital 3d models for visualization, films, television, and games.
3d_export
$29
Nikkor 1 10mm lens 3D Model
...te black lens digital camera lense optic nikon photo photography objective
nikkor 1 10mm lens 3d model 3dlogicline 44222 3dexport
turbosquid
$1

10mm-box CG CAD data
... dxf, ige, lwo, obj, wrl, x, rib, fbx, cob, dwg, dae, and stl on turbosquid: 3d models for games, architecture, videos. (1200349)
3d_export
$95
Nikon V1 with Nikkor 10mm and 1030mm lens 3D Model
...0mm photo mirrorless interchangeable compact new j1
nikon v1 with nikkor 10mm and 1030mm lens 3d model 3dlogicline 44587 3dexport
3d_export
$45

Nikkor 1 10mm and 1030mm lenses for Nikon V1 J1 3D Model
... nikon photo photography objective collection
nikkor 1 10mm and 1030mm lenses for nikon v1 j1 3d model 3dlogicline 44596 3dexport
3d_export
$5
Spanner 6mm-32mm 10mm spanner vs nomber
... vs nomber
3dexport
spanner 3ds max 2021 model with textures all models, formats, textures, converted formats in 1 rar. archive.