Thingiverse

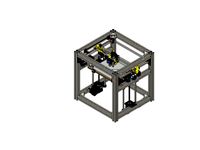
HyperCube Evo Cable Chain by Iamturbo
by Thingiverse
Last crawled date: 3 years ago
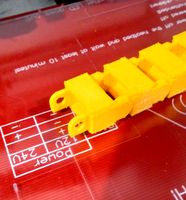
I wanted a good cable chain setup for my Hypercube Evolution, but I couldn't find anything I liked. I didn't want a chain that just flops around in the wind. I wanted it more constrained to give a better look. So I designed my own.
It was brought up to my attention that there are a couple flaws in my first design.
1) The fan will hit the chain on the right side
2) the right optical endstop can not be triggered because of problem #1
3) the chain can hit the belts in the back on some cases.
Because of these problems I have decided to design a new version. It will be a few weeks before I am done and happy with version 2. I'm still working on Version 2, I just cant come up with a design I'm happy with and that takes care of the issues of Version 1
Some people were asking for a video of the chain in motion. You ask, and you shall receive.... https://youtu.be/J3iaaZ_WJgY
This setup will work with Scott_3D's standard setup with very little work.
Access to the bolt on the carriage for tool changing is still accessible with a little work and planing.
I took the measurements from ModelStation's chains, redrew them, and did some changes in the opening for the wires. It should prevent the wires from being snagged while in use. Everywhere the wire can touch is now rounded.
HARDWARE NEEDED
(2) M5 x 10mm bolts
(2) M5 hammer nuts for 3030 extrusion
(2) M3 x 4mm grub screws
ASSEMBLY
X-axis carriage;
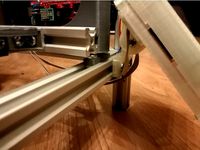
The "HEVO_CableChain_X-Mount" is placed on the back of the X carriage. Remove the middle screws from both belt clamps, and slide the X-Mount into the holes. Then reinstall the screws(might need longer screws). Make sure the screws are flush, or the chain could bind.
XY carriage:
The "HEVO_CableChain_XY-Mount" clamps onto the upper X-axis linear rail. Slide the upper rail to the left, and slide the XY-Mount over the rail. Replace the rail, and tighten the grub screws.
Frame Mount;
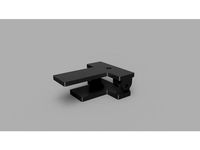
The "HEVO_CableChain_FrameMount" attaches to the top of the top frame rail. Use the M5 bolts and the hammer nuts to attach it to the frame. There are slots in the mount to allow the chain to be straight.
EDIT
11-5-2018; Added STEP files for all the parts so others can make changes. If changes are made, all I ask is to link it as a remix back to me.
8-7-2018; Thanks to THIERUS for adding a 10mm rod version. Awesome Job!
3-13-2018; Added 1mm extensions to grub screw holes, and reduced hole size for upper bearing rod by 0.1mm on XY Carriage.
3-13-2018; changed orientation of links to better fit multiple copies.
It was brought up to my attention that there are a couple flaws in my first design.
1) The fan will hit the chain on the right side
2) the right optical endstop can not be triggered because of problem #1
3) the chain can hit the belts in the back on some cases.
Because of these problems I have decided to design a new version. It will be a few weeks before I am done and happy with version 2. I'm still working on Version 2, I just cant come up with a design I'm happy with and that takes care of the issues of Version 1
Some people were asking for a video of the chain in motion. You ask, and you shall receive.... https://youtu.be/J3iaaZ_WJgY
This setup will work with Scott_3D's standard setup with very little work.
Access to the bolt on the carriage for tool changing is still accessible with a little work and planing.
I took the measurements from ModelStation's chains, redrew them, and did some changes in the opening for the wires. It should prevent the wires from being snagged while in use. Everywhere the wire can touch is now rounded.
HARDWARE NEEDED
(2) M5 x 10mm bolts
(2) M5 hammer nuts for 3030 extrusion
(2) M3 x 4mm grub screws
ASSEMBLY
X-axis carriage;
The "HEVO_CableChain_X-Mount" is placed on the back of the X carriage. Remove the middle screws from both belt clamps, and slide the X-Mount into the holes. Then reinstall the screws(might need longer screws). Make sure the screws are flush, or the chain could bind.
XY carriage:
The "HEVO_CableChain_XY-Mount" clamps onto the upper X-axis linear rail. Slide the upper rail to the left, and slide the XY-Mount over the rail. Replace the rail, and tighten the grub screws.
Frame Mount;
The "HEVO_CableChain_FrameMount" attaches to the top of the top frame rail. Use the M5 bolts and the hammer nuts to attach it to the frame. There are slots in the mount to allow the chain to be straight.
EDIT
11-5-2018; Added STEP files for all the parts so others can make changes. If changes are made, all I ask is to link it as a remix back to me.
8-7-2018; Thanks to THIERUS for adding a 10mm rod version. Awesome Job!
3-13-2018; Added 1mm extensions to grub screw holes, and reduced hole size for upper bearing rod by 0.1mm on XY Carriage.
3-13-2018; changed orientation of links to better fit multiple copies.
Similar models
thingiverse
free

MINI-x-end new version by DanielSan_84
...3h and you do not have to take the x-carriage halfway apart because of the belt.
required parts:
4x m5 x 4mm grub screw (din 913)
thingiverse
free

titan mount for hypercube by jinx
...ma 17, it bolts on just like the orginal hypercube carriage 4 bolt. should make it more secure.
print at your own pearls
jinx
thingiverse
free

Hypercube XY gantry Cable chains by peronedj
... the right y carriage is used to pass the wires between the 2 cable chains and the wires will be held in place by plastic straps.
thingiverse
free

Hyperrail Evolution by Imak
...an aluminum crossbar, remove one mgn12 rail from the x-axis assembly, so that a possible conversion to a toolchanger is possible.
thingiverse
free
Tiltable Camera Mount by Geldar0124
...crew 10mm
4 x m5 nut
1 x 1/4" to 3/8" reducer bushing screw
1 x 1/4'' male to 1/4'' male threaded screw
grabcad
free

Tiltable Camera Mount
...crew 10mm
4 x m5 nut
1 x 1/4" to 3/8" reducer bushing screw
1 x 1/4'' male to 1/4'' male threaded screw
thingiverse
free

Titan Aero head mount for Hypercube Evolution - Cable chain Addon
...in. i used m3x12 socket head screws and nyloc nuts.
edit : added a 2nd part to mount the chain to a 3030 extrusion with m5 screw.
thingiverse
free

CTC XY-Shaft Replacement for 24mm LM8UU by BernyR
...screws. now it's possible to adjust the right fixity for a good slide without loosing of the bearings if the screw too slack.
thingiverse
free
2020 single rail mount adapter for Pablo's RepRapDiscount LCD case by mukha521
...s with a big head, 1x m5 nut and 2x of those weird nuts for t-slot). also changed hole diameters for m3 screws with a big head...
thingiverse
free

Enhanced X-Carriage for TAZ printers by superpirson
...ith the exception of the three main screws that mount the back plate to the carriage, which are m5 screws and m5 thermal inserts.

Hypercube
turbosquid
free

HyperCube
... available on turbo squid, the world's leading provider of digital 3d models for visualization, films, television, and games.
3d_export
$5

Hypercube 3D Model
...hypercube 3d model
3dexport
cube hypercube four-dimensional space side geometry edge
hypercube 3d model dmitry87 54991 3dexport
3d_export
$5
tesseract hypercube
...t it. moreover different textures and materials can be added and tesseract can be set in any scene. dimensions: x: 4m y: 4m z: 4m
thingiverse
free
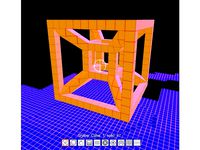
Hypercube
...hypercube
thingiverse
hypercube projected into three dimensional space.
thingiverse
free

Hypercube by alpheccar
...hypercube by alpheccar
thingiverse
projection of an hypercube on an hypersphere.
thingiverse
free
Hypercube by BorisBlavasky
...hypercube by borisblavasky
thingiverse
hypercube. testing the tool.
thingiverse
free

Hypercube by Christian42
...hypercube by christian42
thingiverse
i made a hypercube using rhino3d
thingiverse
free

Hypercube by Christian42
...hypercube by christian42
thingiverse
i made a hypercube using rhino3d
thingiverse
free

HyperCube by wwebber
...hypercube by wwebber
thingiverse
this is the standard perspective projection of the hypercube from 4d to 3d
thingiverse
free
HyperCube scaled by Muzeem
...hypercube scaled by muzeem
thingiverse
customized hypercube
Evo
turbosquid
$49

Evo
... available on turbo squid, the world's leading provider of digital 3d models for visualization, films, television, and games.
turbosquid
$15

evo
... available on turbo squid, the world's leading provider of digital 3d models for visualization, films, television, and games.
3ddd
$1

brummel diamond evo
...ddd
brummel , diamond , evo
brummel diamond evo
3ddd
$1
brummel diamond evo
... diamond , evo , стол
стол brummel diamond evo
turbosquid
$99

Lancer EVO
...evo
turbosquid
royalty free 3d model evo for download as max on turbosquid: 3d models for games, architecture, videos. (1152821)
turbosquid
$20

Spaceship EVO
...free 3d model spaceship evo for download as max, obj, and fbx on turbosquid: 3d models for games, architecture, videos. (1227644)
turbosquid
$7

Enosi Evo
...lty free 3d model enosi evo for download as max, obj, and fbx on turbosquid: 3d models for games, architecture, videos. (1213451)
turbosquid
$3

Evo X
... available on turbo squid, the world's leading provider of digital 3d models for visualization, films, television, and games.
turbosquid
$2

EVO Armchair
... available on turbo squid, the world's leading provider of digital 3d models for visualization, films, television, and games.
3d_export
$30

Mitsubishi Lancer Evo X
...mitsubishi lancer evo x
3dexport
mitsubishi lancer evo x
Chain
archibase_planet
free
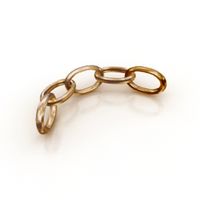
Chain
...chain
archibase planet
chain chain link chain loop
chain n020708 - 3d model (*.gsm+*.3ds) for interior 3d visualization.
3d_export
$5
chain
...chain
3dexport
3d model chain
3d_export
$5
chain
...chain
3dexport
chain. obj,fbx,blend
archibase_planet
free

Chain
...se planet
chain circuit catena
chain - archicad parametrical gdl 3d model (*.gsm). regulation of the length, curvature and angle.
archibase_planet
free
Chain
...n
archibase planet
chain circuit catena
chain - archicad parametrical gdl 3d model(*.gsm). regulation of the length and angle xyz
3d_ocean
$5
Chain
...chain
3docean
3d models chain design elements
3d models, design elements
3d_ocean
$5

Chain
...chain
3docean
3d models chain design elements
3d models, design elements
turbosquid
$10
Chain
...hain
turbosquid
royalty free 3d model chain for download as on turbosquid: 3d models for games, architecture, videos. (1329200)
turbosquid
$9
chain
...hain
turbosquid
royalty free 3d model chain for download as on turbosquid: 3d models for games, architecture, videos. (1549461)
turbosquid
$2
Chain
...hain
turbosquid
royalty free 3d model chain for download as on turbosquid: 3d models for games, architecture, videos. (1148668)
Cable
3d_export
free

Cables
...cables
3dexport
cables for your purposes
3d_export
free
cable belt for cable organization
...ze your cables in 3d printers. it will bend only to one direction. the area to put the cables per piece is aprox. 1,6cmx2,6cmx1cm
3d_ocean
$16
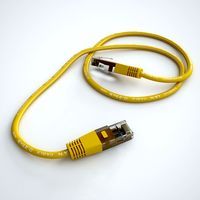
Ethernet Cable
...ethernet cable
3docean
cable computer electronics ethernet internet network connected
ethernet cable 3d model
3d_export
$65

cable
...cable
3dexport
simple rendering of the scene file
turbosquid
$14

Cable
...l cable for download as ma, max, fbx, 3ds, gltf, obj, and stl on turbosquid: 3d models for games, architecture, videos. (1631358)
3ddd
$1
Cable Cover
...cable cover
3ddd
кабель
vertebra passacavo - cable cover
max + vray 2.20.03
3d_export
$15
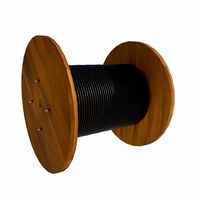
Cable reel
...without cable. textures 4k 4096x4096 targa, png, jpeg.<br>number of polygons without cable: 2896<br>with cable: 35328
3d_export
$7

short cable
...short cable
3dexport
rubber cord. very detailed. cable thickness: 2.55 mm total length: 55mm
3d_export
$5

USB CABLE
...usb cable
3dexport
turbosquid
$25
cable clip
...squid
royalty free 3d model cable clip for download as sldpr on turbosquid: 3d models for games, architecture, videos. (1232374)