Thingiverse
HyperCube Adjustable Z Endstop by TechGirl_Mods
by Thingiverse
Last crawled date: 3 years ago
Update 18-01-18
I have been asked to explain how the parts fit together.
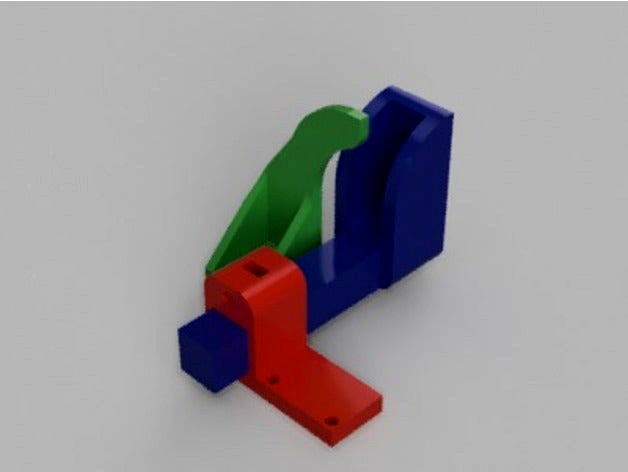
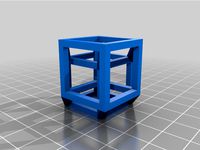
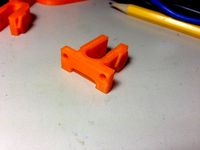
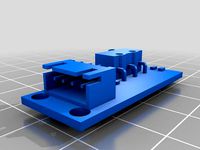
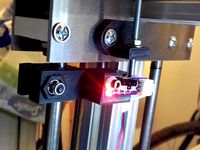
If you look at the first picture above you will see how the red and blue parts are fitted.
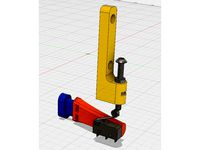
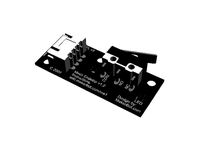
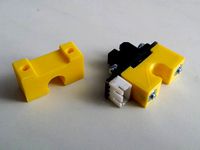
The endstop micro switch is mounted on the endstop mount as shown in the second picture. The M3 nut is inserted in the slot in the back of the endstop mount.
Before fitting the endstop mount insert the M3x70 screw into the Adjustable mount V2 and fit the spring to the screw. Fit the endstop to the Adjustable mount and adjust the height with the M3x70 screw. Attach the assembled parts to the frame with an M5x10 and an M5 drop in hammer nut as shown in the second picture.
The trigger is bolted to the back bed rail with the remaining M5x10 and M5 drop in hammer nut and aligned to trigger the micro-swich as shown in the second picture.
Update 17-12-23
After using the end stop since August I found that the end stop trigger was not sturdy enough and as I started off a print it finally the upright trigger broke off the base and I had to power off my printer to prevent damage to my hotend and bed.
So I came up with the latest design which strengthens the join between the upright and the base.
Update 17-08-27
Change to the picture showing the correct orientation for the limit switch mount when in use.
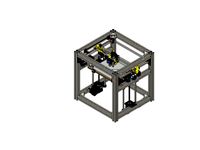
I was getting annoyed having to drop the bed every time I needed to make a minor adjustment to the Z height, so I came up with this design. The design moves the adjustment from the bed to the frame of the printer.
The endstop switch and fixings from the existing limit switch are re-used in my design.
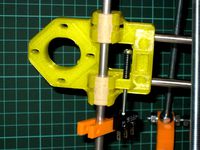
The endstop trigger bolts onto the extrusion that has the lead screw mounting.
Now I can make those small minor adjustments without having to lower the bed.
Additional parts required:
2 x M5 x 10mm bolt
2 x Tslot M5 hammer nut
1 x M3 x 70mm fully threaded bolt
1 x M3 nut
1 x long compression spring or 2 x bed levelling springs, fitted to the 70mm bolt for
tensioning the limit switch
I had problems sourcing a 70mm fully treaded bolt so I purchased an ordinary bolt and threaded it myself.
I have been asked to explain how the parts fit together.
If you look at the first picture above you will see how the red and blue parts are fitted.
The endstop micro switch is mounted on the endstop mount as shown in the second picture. The M3 nut is inserted in the slot in the back of the endstop mount.
Before fitting the endstop mount insert the M3x70 screw into the Adjustable mount V2 and fit the spring to the screw. Fit the endstop to the Adjustable mount and adjust the height with the M3x70 screw. Attach the assembled parts to the frame with an M5x10 and an M5 drop in hammer nut as shown in the second picture.
The trigger is bolted to the back bed rail with the remaining M5x10 and M5 drop in hammer nut and aligned to trigger the micro-swich as shown in the second picture.
Update 17-12-23
After using the end stop since August I found that the end stop trigger was not sturdy enough and as I started off a print it finally the upright trigger broke off the base and I had to power off my printer to prevent damage to my hotend and bed.
So I came up with the latest design which strengthens the join between the upright and the base.
Update 17-08-27
Change to the picture showing the correct orientation for the limit switch mount when in use.
I was getting annoyed having to drop the bed every time I needed to make a minor adjustment to the Z height, so I came up with this design. The design moves the adjustment from the bed to the frame of the printer.
The endstop switch and fixings from the existing limit switch are re-used in my design.
The endstop trigger bolts onto the extrusion that has the lead screw mounting.
Now I can make those small minor adjustments without having to lower the bed.
Additional parts required:
2 x M5 x 10mm bolt
2 x Tslot M5 hammer nut
1 x M3 x 70mm fully threaded bolt
1 x M3 nut
1 x long compression spring or 2 x bed levelling springs, fitted to the 70mm bolt for
tensioning the limit switch
I had problems sourcing a 70mm fully treaded bolt so I purchased an ordinary bolt and threaded it myself.
Similar models
thingiverse
free

Monoprice MP Select Mini Z Axis Adjustable Endstop by divide
...o keep the spring from binding on the head of the screw.
reused:
limit switch m2 screws and nuts
x carriage shield plastic screw
thingiverse
free

Ender 3 Adjustable Z limit switch by luotzkie
...z limit switch by luotzkie
thingiverse
adjustable z limit switch from repurposed bed level spring and some 26mm m3 bolt and nut.
thingiverse
free
Anet A8 Z Axis End Stop Adjuster by FredGenius
...a knob to make adjusting easier.
you will need:
2x m3x18mm screws
2x m3 nuts
2x m3x25mm screws
1x m5x40mm hex bolt
1x m5 half nut
thingiverse
free

AM8 RAMPS Y axis endtop mount and target by PapaJohn88
...h
2 x m5 x 10mm screws
2 x m5 square nuts
printer:
anet a8
rafts:
no
supports:
no
resolution:
0.2 (i printed at .12)
infill:
20%
thingiverse
free

AM8 Y-Rod Endstop by cmccr88
...g bed thumb screws instead of the wingnuts.
2x m5x10 button head screws
2x m5 square nuts
1x m3x18 screw (from a8)
1x m3 hex nut
thingiverse
free

Limit Switch Brackets for CNC1310 by Sa2raKitsune
...the link below.
(mounting hole pitch: 19mm, cap bolts m3x8mm )
the limit switches:https://ja.aliexpress.com/item/32975619290.html
thingiverse
free

Shapeoko 2 -- Y Home/Limit Switch Mount by iquizzle
...sides of the machine.
this mount places the endstop in the ideal position to maximize the travel without hitting the belt clip.
thingiverse
free

2020 Delta bed retainer clip by joochung
... be positioned far enough away from an heated bed to allow for pla to be used to print it. otherwise go for petg, abs, or ht pla.
thingiverse
free

Re-X Carriage Adjustable Mount for Mini Differential IR Height Sensor by rkrammes
...ll fit. the bolt should move freely in the hole at the top of the bracket but should be tight where it screws into the carriage.
thingiverse
free
Huxley LM6UU X-ends by 3DAndy
...m3-nut, a small spring and a m3-bolt to have a fine adjustable endstop. make sure your endstop-switch is exactly below the screw.
Hypercube
turbosquid
free

HyperCube
... available on turbo squid, the world's leading provider of digital 3d models for visualization, films, television, and games.
3d_export
$5
Hypercube 3D Model
...hypercube 3d model
3dexport
cube hypercube four-dimensional space side geometry edge
hypercube 3d model dmitry87 54991 3dexport
3d_export
$5
tesseract hypercube
...t it. moreover different textures and materials can be added and tesseract can be set in any scene. dimensions: x: 4m y: 4m z: 4m
thingiverse
free
Hypercube
...hypercube
thingiverse
hypercube projected into three dimensional space.
thingiverse
free

Hypercube by alpheccar
...hypercube by alpheccar
thingiverse
projection of an hypercube on an hypersphere.
thingiverse
free
Hypercube by BorisBlavasky
...hypercube by borisblavasky
thingiverse
hypercube. testing the tool.
thingiverse
free

Hypercube by Christian42
...hypercube by christian42
thingiverse
i made a hypercube using rhino3d
thingiverse
free

Hypercube by Christian42
...hypercube by christian42
thingiverse
i made a hypercube using rhino3d
thingiverse
free

HyperCube by wwebber
...hypercube by wwebber
thingiverse
this is the standard perspective projection of the hypercube from 4d to 3d
thingiverse
free
HyperCube scaled by Muzeem
...hypercube scaled by muzeem
thingiverse
customized hypercube
Endstop
thingiverse
free
Endstop-holder for endstop v1.2 by albiuz
...endstop-holder for endstop v1.2 by albiuz
thingiverse
endstop-holder designed for mech endstop v1.2
thingiverse
free
Endstop by 3dboxpro
...endstop by 3dboxpro
thingiverse
endstop
thingiverse
free
Endstop by 1sPiRe
...endstop by 1spire
thingiverse
endstop model for conceptions
thingiverse
free

Endstop holder for Opto or Mechanical endstops by LulzBot
... endstops by lulzbot
thingiverse
these are the standard 1.0 prusa endstops with an added mounting hole for mechanical endstops.
thingiverse
free

Endstop Holder by onurhamdiuzun
...endstop holder by onurhamdiuzun
thingiverse
endstop holder for makerbot endstop and other endstops
thingiverse
free

Endstop Cover
...endstop cover
thingiverse
cover for endstop boards for makerbot design.
thingiverse
free
Endstop Mount for optical Endstops by Whitehawk2000
...whitehawk2000
thingiverse
use two 20mm m3 screws and nuts to screw the endstop onto the mount and just clip it onto the 8mm rod.
thingiverse
free

C-beam endstop mount for Makerbot type endstops
...c-beam endstop mount for makerbot type endstops
thingiverse
c-beam endstop mount for makerbot type endstop boards.
thingiverse
free

Endstop Mount for MakerBot Mecanical Endstop. by nka
...v-slots carriage.
endstop is screw with m3 (8mm) tapped hole and the endstop hold on the extrusion using a m5 (8mm) and t-nuts.
thingiverse
free
ENDSTOP 10mm by desert500
...endstop 10mm by desert500
thingiverse
endstop
Mods
design_connected
$13

MOD. 4233 - MOD. 4234 Table Lamp
...mod. 4233 - mod. 4234 table lamp
designconnected
arcahorn mod. 4233 - mod. 4234 table lamp computer generated 3d model.
design_connected
$11

MOD.1095
...mod.1095
designconnected
mod.1095 computer generated 3d model. designed by sarfatti, gino.
3ddd
$1

fireplaces mod Spec
...fireplaces mod spec
3ddd
камин
fireplaces mod spec 180x90x125h
3ddd
free

Flos Mod. 2129
... mod
фабрика: flos
модель: mod. 2129
описание: подвесной светильник, металл, белый, черный.
сайт: www.flos.com
turbosquid
$34
Mod Lamp.c4d
... available on turbo squid, the world's leading provider of digital 3d models for visualization, films, television, and games.
turbosquid
$32

MOD A 001
... available on turbo squid, the world's leading provider of digital 3d models for visualization, films, television, and games.
turbosquid
$29

Maars Mod
... available on turbo squid, the world's leading provider of digital 3d models for visualization, films, television, and games.
turbosquid
$15

Mod 70..
... available on turbo squid, the world's leading provider of digital 3d models for visualization, films, television, and games.
turbosquid
$10

MOD Sofa
... available on turbo squid, the world's leading provider of digital 3d models for visualization, films, television, and games.
turbosquid
$1

Mod-Lite
... available on turbo squid, the world's leading provider of digital 3d models for visualization, films, television, and games.
Z
3d_export
$5

nissan z
...nissan z
3dexport
nissan z
3ddd
$1

Vase Z
...vase z
3ddd
vase z
3ddd
$1

полотенцесушить Z
...полотенцесушить z
3ddd
полотенцесушитель
полотенцесушить z
design_connected
free

Z-Chair
...z-chair
designconnected
free 3d model of z-chair designed by karman, aleksei.
design_connected
$11

Z Lamp
...z lamp
designconnected
phillips z lamp computer generated 3d model. designed by kalff, louis.
3d_export
$5

Dragon balls z
...dragon balls z
3dexport
dragon ball z
turbosquid
$20

Fighter Z
...
turbosquid
royalty free 3d model fighter z for download as on turbosquid: 3d models for games, architecture, videos. (1292563)
turbosquid
$9

Pen Z
...pen z
turbosquid
free 3d model pen z for download as obj on turbosquid: 3d models for games, architecture, videos. (1686775)
turbosquid
free

z chair
...z chair
turbosquid
free 3d model z chair for download as max on turbosquid: 3d models for games, architecture, videos. (1410230)
turbosquid
$5

Letter Z
...urbosquid
royalty free 3d model letter z for download as max on turbosquid: 3d models for games, architecture, videos. (1408540)
Adjustable
3d_ocean
$7
Adjustable Wrench
...adjustable wrench
3docean
adjustable wrench highly detailed wrench
highly detailed adjustable wrench.
3ddd
$1
Adjustable Stool
...adjustable stool
3ddd
табурет
wooden adjustable stool.
3d_ocean
$20

Adjustable Gym Bench
...st adjustable bench black equipement gym gymnastic indoor silver sport workout
3d model of black and silver adjustable gym bench.
3d_ocean
$20
Adjustable Gym Bench
...st adjustable bench black equipement gym gymnastic indoor silver sport workout
3d model of black and silver adjustable gym bench.
3d_ocean
$16

Adjustable Weight Bench
...arbell bench black equipement gym gymnastic indoor sport weight workout
3d model of black adjustable weight bench with a barbell.
turbosquid
$5

Adjustable wrench
...
royalty free 3d model adjustable wrench for download as fbx on turbosquid: 3d models for games, architecture, videos. (1313414)
3d_export
$5

adjustable tension lock
...adjustable tension lock
3dexport
adjustable tension lock
turbosquid
$1

Adjustable Wrench
...free 3d model adjustable wrench for download as obj and blend on turbosquid: 3d models for games, architecture, videos. (1446736)
turbosquid
$1

Adjustable Wrench
...y free 3d model adjustable wrench for download as c4d and fbx on turbosquid: 3d models for games, architecture, videos. (1379022)
3d_export
$5

Adjustable key
...adjustable key
3dexport