Thingiverse
Huge Cheap Home CNC (#hchcnc) by Enic
by Thingiverse
Last crawled date: 3 years, 2 months ago
Project: Huge Cheap Home CNC (#hchcnc)
(continue of my Project: https://www.thingiverse.com/thing:2781630
some files listed can be found there)
The best guide for beginners: just start already ;-)
..and don't forget to press Like button ;-)
Design advantages:
Only 3 Steppers for XYZ
Strong construction (almost no plastic parts for frame and legs)
Small number of parts and parts types
Really small parts size, print time, filament amount
Small and cheap bollbearings
Less screws and nuts
Balanced Head Mount
Universal Head Mount
Mobility
Self designed hotbed from scratch
... ets.
Possibilities / features
New: MIG Welding !!!https://youtu.be/7JIfTCqgZAc
New: Foam cutting operationhttps://youtu.be/GZXX6x-DWQc
Foam Cutting Head: https://www.thingiverse.com/thing:3339841
3D Printing:https://youtu.be/j36U9geLij4https://youtu.be/kaJyCJsM_6M (all parts are visible here i hope ;-)
Laser Engravinghttps://youtu.be/N4sjGfpQQ8g
Drilling by Dremel 4300https://youtu.be/VoB-7SFKuH0
Wood Engraving by Dremel 4300https://youtu.be/m8kS548m90w
Wood Milling by Dremel 4300https://youtu.be/IL2M5LSuGdYhttps://youtu.be/nneKpp0wLkA
The Idea:
The Idea is based on
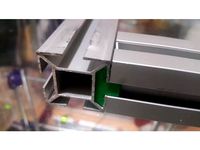
C-23.5mm OD https://www.thingiverse.com/thing:724999
F-25mm OD https://www.thingiverse.com/thing:790533
Borrowed parts, solutions and Thankses
Quick fit carriage systemhttps://www.thingiverse.com/thing:1670305
Thanks to Lukas https://www.thingiverse.com/lukie80/about
Dasaki Ramps 1.4 Enclosure / Box / Casehttps://www.thingiverse.com/thing:761806
Thanks to David Sanz Kirbis https://www.thingiverse.com/dasaki/about
Case for the Full Graphic Smart LCD Controllerhttps://www.thingiverse.com/thing:87250
Thanks to Michael Christou https://www.thingiverse.com/wersy/about
Parametric Z-axis coupler (stepper and threaded rod coupling) https://www.thingiverse.com/thing:1329750
Thanks to Lorenzo Aspesi https://www.thingiverse.com/aspesilorenzo/about
Printrbot Simple Metal GT2 Belt Cliphttps://www.thingiverse.com/thing:746423
Thanks to Spanner Hands https://www.thingiverse.com/SpannerHands/about
MiniDrill Mountingshttps://www.tinkercad.com/things/kVAEjzTXiO7#/
Thanks to Miguel Braidot https://www.thingiverse.com/mabraidot/about
TUSH - The Ultimate Spool Holderhttps://www.thingiverse.com/thing:2047554
Thanks to Vassil Gounev https://www.thingiverse.com/filamentry/about
UPGRADING YOUR RAMPS WITH HIGH POWER COMPONENTShttp://www.instructables.com/id/Upgrading-Your-RAMPS-With-High-Power-Components/
Thanks to AndJoeG http://www.instructables.com/member/AndJoeG/
INCREASING VOLTAGE SERVER SWITCHED POWER SUPPLYhttps://pa0fri.home.xs4all.nl/Diversen/DPS-800GB%20A%20Server%20sypply/DPS-800GB%20A%20PSU%20eng.htm
Thanks to Frits, PAØFRI https://pa0fri.home.xs4all.nl/
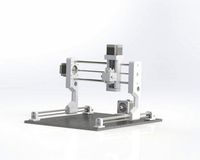
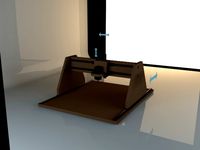
The DESIGN & CONSTRUCTION
All parts design was made by myself from scratch with OpenSCAD.
Designed Parts (0x04..0x19):
Part 04: 3xBearing_Ring
cnc_laser_04_3xBearing_Ring.scad
cnc_laser_04_3xBearing_Ring.stl
Quantity: 12 pcs
Params/1: Supports: No Layer: 0.2 Infill 20% Time: 30 min Weight: 4.45 g Length 1.75: 1480.6mm
Purpose: Main housing for MR83ZZ bearing to slide over d25 tubes
Assemble guide: Push 3 x MR83ZZ bearing into the holes, fix with M3 screw and nut gently. Put 2x on every of 6x d25 1 meter tubes.
Part 05: hole_helper (not a permanent part, used only during building)
cnc_laser_05_hole_helper.scad
cnc_laser_05_hole_helper.stl
Quantity: 2 pcs
Params/1: Supports: No Layer: 0.2 Infill 20% Time: 15 min Weight: 2.41 g Length 1.75: 802.1mm
Purpose: To achieve exactly parallel holes on both ends of a tubes
Assemble guide: Measure and cut d25 tube first. Fit 2 hole helpers on the both ends of the tube. The end of each tube shuld exectly match with hole helper. Put a tube an a horizontal surface. Drill first upper hole with 2mm drill. Insert a short 2mm nail in a hole (don’t remove hole helper). Drill the second upper hole on another end of a tube. Insert a short 2mm nail in a hole (don’t remove hole helper). Accuratly turn the tube upside down and drill both end bottom holes (currently they are on the top) with 2mm drill. Remove both nails. Remove both hole helpers. Drill a holes smoothly increasing drill sizes until you got ~10.5mm holes.
Part 06: BaseGasket
cnc_laser_06_BaseGasket.scad
cnc_laser_06_BaseGasket.stl
Quantity: 4 pcs
Params/1: Supports: No Layer: 0.2 Infill 100% Time: 1 min Weight: 0.09 g Length 1.75: 31.5mm
Purpose: To fill clearance between aluminum u-profiles of the base
Assemble guide: Сombine a holes in an aluminum u-profiles of a base, insert gasket and then insert M10 threaded rod from top. Fix with M10 nut from bottom.
Part 07: FixtureRing
cnc_laser_07_FixtureRing.scad
cnc_laser_07_FixtureRing.stl
Quantity: 8 pcs
Params/1: Supports: No Layer: 0.2 Infill 20% Time: 31 min Weight: 5.00 g Length 1.75: 1661.8mm
Purpose: 1)To fix 2 moving tubes and 2) fix rubber belts
Assemble guide: 1) Fix 4 pcs to StepperFrame_v3a (after complete assemble of GuideRoller_v3 and Stepper fixture) with M3 screws and nuts then fix to the tube with upper holes M3 screw and nut. 2) Fix to the front and back tubes near each end with upper holes M3 screw and nut.
Part 08: StepperFrame
cnc_laser_08_StepperFrame_v3a.gcode
cnc_laser_08_StepperFrame_v3a.scad
cnc_laser_08_StepperFrame_v3a.stl
Quantity: 4 pcs
Params/1: Supports: Yes, Brim: Yes (included in provided .gcode file) Layer: 0.2 Infill 20% Time: 57 min Weight: 10.12 g Length 1.75: 3366.2mm
Purpose: To fix steppers and free ends of moving tubes
Assemble guide: Insert assembled GuideRoller_v3 screws. Fix stepper on stepper end only. Fix FixtureRing.
Part 09: GuideRoller
cnc_laser_09_GuideRoller_v3.scad
cnc_laser_09_GuideRoller_v3.stl
Quantity: 8 pcs
Params/1: Supports: No Layer: 0.15 Infill 100% Time: 14 min Weight: 0.37 g Length 1.75: 123.2mm
Purpose: To hold and guide a belts to GT2 timing pulley
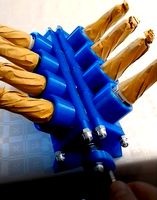
Assemble guide: Fix a MR83ZZ bearing on a 32mm M3 screw with two M3 nuts. Push GuideRoller on a MR83ZZ bearing gently until stop. Insert two assembled Rollers into StepperFrame_v3a according a picture provided.
Part 0A: FixtureFrame
cnc_laser_0A_FixtureFrame.scad
cnc_laser_0A_FixtureFrame.stl
Quantity: 12 pcs
Params/1: Supports: No Layer: 0.2 Infill 20% Time: 13 min Weight: 2.25 g Length 1.75: 746.9mm
Purpose: 1)To fix a space between each pair of 3xBearing_Rings on a static tubes 2) To hold ends of front and back rubber belts.
Assemble guide: 1)Attach two of FixtureFrame to the both bottom MR83ZZ bearing “ears” of the 3xBearing_Rings on a static tubes.2) Push FixtureFrame on the top of each FixtureRing on a ends of front and back static tubes.
Part 0B: HeadPlate (middle)
cnc_laser_0B_HeadPlate.scad
cnc_laser_0B_HeadPlate.stl
Quantity: 1 pcs
Params/1: Supports: No Layer: 0.2 Infill 20% Time: 1h 9 min Weight: 11.22 g Length 1.75: 3730.5 mm
Purpose: Head middle plate.
Assemble guide: Insert 4 M8 threaded rods into the bottom HeadPlate. Collect all 4 3xBearing_Ring symmetrically add four HeadFixers (two 2a and two 2b). Insert M8 threaded rods of bottom plate into four HeadFixers holes from bottom. Attach middle HeadPlate and then top the top. Fix with M8 nuts from both sides. Look at the pictures provided.
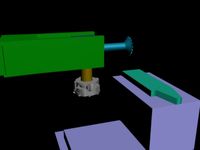
Part 0C: LaserMount
cnc_laser_0C_LaserMount.scad
cnc_laser_0C_LaserMount.stl
Quantity: 1 pcs
Params/1: Supports: No Layer: 0.2 Infill 20% Time: 1h 26 min Weight: 14.31 g Length 1.75: 4760.7 mm
Purpose: Mount Laser on a Head.
Assemble guide: Attach Laser with M3 screws. Attach LaserMount on two diagonal M8 threaded rods and fix with M8 nuts.
Part 0D: OptSensorFixture
cnc_laser_0D_OptSensorFixture.scad
cnc_laser_0D_OptSensorFixture.stl
Quantity: 2 pcs
Params/1: Supports: No Layer: 0.2 Infill 20% Time: 27 min Weight: 2.87 g Length 1.75: 953.9 mm
Purpose: Mount Optical Endstop Sensor to M10 threaded rod.
Assemble guide: Attach Sensor with M3 screw and nut. Attach OptSensorFixture to the M10 threaded rod with two M10 nuts. According to the picture.
Part 0E: OptSensorFlag
cnc_laser_0E_OptSensorFlag.scad
cnc_laser_0E_OptSensorFlag.stl
Quantity: 2 pcs
Params/1: Supports: No Layer: 0.2 Infill 20% Time: 7 min Weight: 0.40 g Length 1.75: 133.1 mm
Purpose: Cover IR beam of Optical Endstop sensors.
Assemble guide: Paint with black nail polish from both sides! Attach to Stepper with M3 screw Adjust to be in a middle of Optical Sensor in a zero position.
Part 0F: HeadFixer
cnc_laser_0F_HeadFixer_v2a.scad
cnc_laser_0F_HeadFixer_v2a.stl
cnc_laser_0F_HeadFixer_v2b.scad
cnc_laser_0F_HeadFixer_v2b.stl
Quantity: 4 pcs (2a + 2b)
Params/1: Supports: No Layer: 0.2 Infill 20% Time: 35 min Weight: 5.89 g Length 1.75: 1958.3 mm
Purpose: Fix .four 3xBearing_Rings together
Assemble guide: Insert 4 M8 threaded rods into the bottom HeadPlate. Collect all 4 3xBearing_Ring symmetrically add four HeadFixers (two 2a and two 2b). Insert M8 threaded rods of bottom plate into four HeadFixers holes from bottom. Attach top HeadPlate on the top. Fix with M8 nuts from both sides. Look at the pictures provided.
Part 10: StepperPlate (top)
cnc_laser_10_StepperPlate1.scad
cnc_laser_10_StepperPlate1.stl
Quantity: 1 pcs
Purpose: Fix Z-axis Stepper
Params/1: Supports: No Layer: 0.2 Infill 20% Time: 1h 45 min Weight: 26.43 g Length 1.75: 8789.2 mm
Assemble guide: Attach Z-axis Stepper with 4 M3 screews. Insert 4 M8 threaded rods into the bottom HeadPlate. Collect all 4 3xBearing_Ring symmetrically add four HeadFixers (two 2a and two 2b). Insert M8 threaded rods of bottom plate into four HeadFixers holes from bottom. Attach middle HeadPlate and then top the top. Fix with M8 nuts from both sides. Look at the pictures provided.
Part 11: HeadPlate_Bottom
cnc_laser_11_HeadPlate_Bottom.scad
cnc_laser_11_HeadPlate_Bottom.stl
Quantity: 1 pcs
Params/1: Supports: No Layer: 0.2 Infill 20% Time: 2h 34 min Weight: 33.35 g Length 1.75: 11092.4 mm
Assemble guide: Insert 4 M8 threaded rods into the bottom HeadPlate. Collect all 4 3xBearing_Ring symmetrically add four HeadFixers (two 2a and two 2b). Insert M8 threaded rods of bottom plate into four HeadFixers holes from bottom. Attach middle HeadPlate and then top the top. Fix with M8 nuts from both sides. Look at the pictures provided.
Part 12: Z_Plate
cnc_laser_12_Z_Plate.scad
cnc_laser_12_Z_Plate.stl
Quantity: 1 pcs
Params/1: Supports: No Layer: 0.2 Infill 20% Time: 1h 4 min Weight: 15.70 g Length 1.75: 5220.5 mm
Assemble guide: Insert M8 nut in a hole. Wind on Z-axis threaded rod. Fit tight on Z-axis d25 tubes with 4x M3 nuts and 4x M3 screws.
Part 13: SplittedFixture (for optical X,Y endstop sensors)
cnc_laser_13_SplittedFixture.scad
cnc_laser_13_SplittedFixture.stl
Quantity: 2 pcs
Params/1: Supports: No Layer: 0.2 Infill 20% Time: 26 min Weight: 5.76 g Length 1.75: 1917.3 mm
Assemble guide: Insert 2 x M3 nuts in a holes. Put parts from both sides of d25 tube near 0.0 by XY coords and fix with 2 x M3 screws. Attach optical endstop sensor.
Part 14: EndStopZ (fixture for Z Endstop)
cnc_laser_14_EndStopZ.scad
cnc_laser_14_EndStopZ.stl
Quantity: 1 pcs
Params/1: Supports: No Layer: 0.2 Infill 20% Time: 11 min Weight: 0.81 g Length 1.75: 269.0 mm
Assemble guide: use one of Z stepper screw to fix EndStopZ holder. Attach Z Endstop Optical sensor with m3 screw and nut. Use a piece of insulation tape to prevent electrical contacts.
Part 15: SpindleFixture (Optional: to fix custom 12v motor spindle)
cnc_laser_15_SpindleFixture.scad
cnc_laser_15_SpindleFixture.stl
Quantity: 2 pcs
Params/1: Supports: No Layer: 0.2 Infill 20% Time: 31 min Weight: 6.79 g Length 1.75: 2258.4 mm
Part 16: DremelFlexibleFixture (Optional: to fix Dremel flex shaft)
cnc_laser_16_DremelFlexibleFixture.scad
cnc_laser_16_DremelFlexibleFixture.stl
Quantity: 2 pcs
Params/1: Supports: No Layer: 0.2 Infill 20% Time: 17 min Weight: 3.43 g Length 1.75: 1141.8 mm
Assemble guide: Attach to the custom plate from "Quick fit carriage system" with pair of M3 screws and nuts
Part 17: marker (Optional: to fix pencil or marker)
cnc_laser_17_marker.scad
cnc_laser_17_marker.stl
Quantity: 1 pcs (3 sizes)
Params/1: Supports: No Layer: 0.2 Infill 20% Time: 9 min Weight: 1.74 g Length 1.75: 579.7 mm
Assemble guide: use acetone as a glue to glue to the custom plate from "Quick fit carriage system"
Part 18.3: coupler3 top M10 to 2x M8 threaded rod ridgepole fixtures
cnc_laser_18_coupler3_ok.scad
cnc_laser_18_coupler3.stl
Quantity: 4 pcs
Params/1: Supports: No Layer: 0.2 Infill 20% Time: 22 min Weight: 3.04 g Length 1.75: 1010.8 mm
Assemble guide: cut the internal thread with a tap on M8. Screw M8 threaded rod into 18.3 on the top and 18.4 at the bottom. Drill a M3 hole in the base in place. Fix with M3 screw and nut.
Part 18.4: coupler4 bottom M8 threaded rod ridgepole fixtures
cnc_laser_18_coupler4.scad
cnc_laser_18_coupler4.stl
Quantity: 8 pcs
Params/1: Supports: Yes Layer: 0.2 Infill 20% Time: 23 min Weight: 2.77 g Length 1.75: 922.6 mm
Assemble guide: cut the internal thread with a tap on M8. Screw M8 threaded rod into 18.3 on the top and 18.4 at the bottom. Drill a M3 hole in the base in place. Fix with M3 screw and nut.
Part 19: heated_table_connector_strip1
cnc_laser_19_heated_table_connector_strip1.scad
cnc_laser_19_heated_table_connector_strip1.stl
Quantity: 4 pcs
Params/1: Supports: Yes Layer: 0.2 Infill 20% Time: 31 min Weight: 5.89 g Length 1.75: 1959.1 mm
Assemble guide: Use a kitchen cutting board from strained glass. Remove a picture with hot air gun. (Don't remove glue). Attach to 1-1.2 mm alluminium plate. Cover alluminium with 2-3 layers of captone tape. Use nichrome wires. Look at a pictures for detailes ;-)
Firmware:
Marlin_1.1.8_Configuration.zip - My Configuration files for Marlin Firmware
Laser PWM control is attached to D6 at Servos ramps 1.4 connector.
Laser power is controlled by:
M3 Sxxx - Laser On: xxx=0..255, 255 - max
M5 - Laser Off
Test code:
PowerTestCode.zip - Code to generate Laser power test .gcode files (windows)
TestGcode.zip - Test files to start with
CAM Software Used:
Laser GRBL 2.8.35: Vectorize mode only (without filling).
Postprocess:
Replace:
"M5 S255" -> "M3 S0"
"M3" -> "M3 S255"
"M5" -> "M3 S0"
Rename: .nc -> .gcode
Av's SVG to GCODE v 1.2.6
Preprocess:
check initial svg units (Marlin works in mm only):
Replace 'width="4in" height="3in"'
(continue of my Project: https://www.thingiverse.com/thing:2781630
some files listed can be found there)
The best guide for beginners: just start already ;-)
..and don't forget to press Like button ;-)
Design advantages:
Only 3 Steppers for XYZ
Strong construction (almost no plastic parts for frame and legs)
Small number of parts and parts types
Really small parts size, print time, filament amount
Small and cheap bollbearings
Less screws and nuts
Balanced Head Mount
Universal Head Mount
Mobility
Self designed hotbed from scratch
... ets.
Possibilities / features
New: MIG Welding !!!https://youtu.be/7JIfTCqgZAc
New: Foam cutting operationhttps://youtu.be/GZXX6x-DWQc
Foam Cutting Head: https://www.thingiverse.com/thing:3339841
3D Printing:https://youtu.be/j36U9geLij4https://youtu.be/kaJyCJsM_6M (all parts are visible here i hope ;-)
Laser Engravinghttps://youtu.be/N4sjGfpQQ8g
Drilling by Dremel 4300https://youtu.be/VoB-7SFKuH0
Wood Engraving by Dremel 4300https://youtu.be/m8kS548m90w
Wood Milling by Dremel 4300https://youtu.be/IL2M5LSuGdYhttps://youtu.be/nneKpp0wLkA
The Idea:
The Idea is based on
C-23.5mm OD https://www.thingiverse.com/thing:724999
F-25mm OD https://www.thingiverse.com/thing:790533
Borrowed parts, solutions and Thankses
Quick fit carriage systemhttps://www.thingiverse.com/thing:1670305
Thanks to Lukas https://www.thingiverse.com/lukie80/about
Dasaki Ramps 1.4 Enclosure / Box / Casehttps://www.thingiverse.com/thing:761806
Thanks to David Sanz Kirbis https://www.thingiverse.com/dasaki/about
Case for the Full Graphic Smart LCD Controllerhttps://www.thingiverse.com/thing:87250
Thanks to Michael Christou https://www.thingiverse.com/wersy/about
Parametric Z-axis coupler (stepper and threaded rod coupling) https://www.thingiverse.com/thing:1329750
Thanks to Lorenzo Aspesi https://www.thingiverse.com/aspesilorenzo/about
Printrbot Simple Metal GT2 Belt Cliphttps://www.thingiverse.com/thing:746423
Thanks to Spanner Hands https://www.thingiverse.com/SpannerHands/about
MiniDrill Mountingshttps://www.tinkercad.com/things/kVAEjzTXiO7#/
Thanks to Miguel Braidot https://www.thingiverse.com/mabraidot/about
TUSH - The Ultimate Spool Holderhttps://www.thingiverse.com/thing:2047554
Thanks to Vassil Gounev https://www.thingiverse.com/filamentry/about
UPGRADING YOUR RAMPS WITH HIGH POWER COMPONENTShttp://www.instructables.com/id/Upgrading-Your-RAMPS-With-High-Power-Components/
Thanks to AndJoeG http://www.instructables.com/member/AndJoeG/
INCREASING VOLTAGE SERVER SWITCHED POWER SUPPLYhttps://pa0fri.home.xs4all.nl/Diversen/DPS-800GB%20A%20Server%20sypply/DPS-800GB%20A%20PSU%20eng.htm
Thanks to Frits, PAØFRI https://pa0fri.home.xs4all.nl/
The DESIGN & CONSTRUCTION
All parts design was made by myself from scratch with OpenSCAD.
Designed Parts (0x04..0x19):
Part 04: 3xBearing_Ring
cnc_laser_04_3xBearing_Ring.scad
cnc_laser_04_3xBearing_Ring.stl
Quantity: 12 pcs
Params/1: Supports: No Layer: 0.2 Infill 20% Time: 30 min Weight: 4.45 g Length 1.75: 1480.6mm
Purpose: Main housing for MR83ZZ bearing to slide over d25 tubes
Assemble guide: Push 3 x MR83ZZ bearing into the holes, fix with M3 screw and nut gently. Put 2x on every of 6x d25 1 meter tubes.
Part 05: hole_helper (not a permanent part, used only during building)
cnc_laser_05_hole_helper.scad
cnc_laser_05_hole_helper.stl
Quantity: 2 pcs
Params/1: Supports: No Layer: 0.2 Infill 20% Time: 15 min Weight: 2.41 g Length 1.75: 802.1mm
Purpose: To achieve exactly parallel holes on both ends of a tubes
Assemble guide: Measure and cut d25 tube first. Fit 2 hole helpers on the both ends of the tube. The end of each tube shuld exectly match with hole helper. Put a tube an a horizontal surface. Drill first upper hole with 2mm drill. Insert a short 2mm nail in a hole (don’t remove hole helper). Drill the second upper hole on another end of a tube. Insert a short 2mm nail in a hole (don’t remove hole helper). Accuratly turn the tube upside down and drill both end bottom holes (currently they are on the top) with 2mm drill. Remove both nails. Remove both hole helpers. Drill a holes smoothly increasing drill sizes until you got ~10.5mm holes.
Part 06: BaseGasket
cnc_laser_06_BaseGasket.scad
cnc_laser_06_BaseGasket.stl
Quantity: 4 pcs
Params/1: Supports: No Layer: 0.2 Infill 100% Time: 1 min Weight: 0.09 g Length 1.75: 31.5mm
Purpose: To fill clearance between aluminum u-profiles of the base
Assemble guide: Сombine a holes in an aluminum u-profiles of a base, insert gasket and then insert M10 threaded rod from top. Fix with M10 nut from bottom.
Part 07: FixtureRing
cnc_laser_07_FixtureRing.scad
cnc_laser_07_FixtureRing.stl
Quantity: 8 pcs
Params/1: Supports: No Layer: 0.2 Infill 20% Time: 31 min Weight: 5.00 g Length 1.75: 1661.8mm
Purpose: 1)To fix 2 moving tubes and 2) fix rubber belts
Assemble guide: 1) Fix 4 pcs to StepperFrame_v3a (after complete assemble of GuideRoller_v3 and Stepper fixture) with M3 screws and nuts then fix to the tube with upper holes M3 screw and nut. 2) Fix to the front and back tubes near each end with upper holes M3 screw and nut.
Part 08: StepperFrame
cnc_laser_08_StepperFrame_v3a.gcode
cnc_laser_08_StepperFrame_v3a.scad
cnc_laser_08_StepperFrame_v3a.stl
Quantity: 4 pcs
Params/1: Supports: Yes, Brim: Yes (included in provided .gcode file) Layer: 0.2 Infill 20% Time: 57 min Weight: 10.12 g Length 1.75: 3366.2mm
Purpose: To fix steppers and free ends of moving tubes
Assemble guide: Insert assembled GuideRoller_v3 screws. Fix stepper on stepper end only. Fix FixtureRing.
Part 09: GuideRoller
cnc_laser_09_GuideRoller_v3.scad
cnc_laser_09_GuideRoller_v3.stl
Quantity: 8 pcs
Params/1: Supports: No Layer: 0.15 Infill 100% Time: 14 min Weight: 0.37 g Length 1.75: 123.2mm
Purpose: To hold and guide a belts to GT2 timing pulley
Assemble guide: Fix a MR83ZZ bearing on a 32mm M3 screw with two M3 nuts. Push GuideRoller on a MR83ZZ bearing gently until stop. Insert two assembled Rollers into StepperFrame_v3a according a picture provided.
Part 0A: FixtureFrame
cnc_laser_0A_FixtureFrame.scad
cnc_laser_0A_FixtureFrame.stl
Quantity: 12 pcs
Params/1: Supports: No Layer: 0.2 Infill 20% Time: 13 min Weight: 2.25 g Length 1.75: 746.9mm
Purpose: 1)To fix a space between each pair of 3xBearing_Rings on a static tubes 2) To hold ends of front and back rubber belts.
Assemble guide: 1)Attach two of FixtureFrame to the both bottom MR83ZZ bearing “ears” of the 3xBearing_Rings on a static tubes.2) Push FixtureFrame on the top of each FixtureRing on a ends of front and back static tubes.
Part 0B: HeadPlate (middle)
cnc_laser_0B_HeadPlate.scad
cnc_laser_0B_HeadPlate.stl
Quantity: 1 pcs
Params/1: Supports: No Layer: 0.2 Infill 20% Time: 1h 9 min Weight: 11.22 g Length 1.75: 3730.5 mm
Purpose: Head middle plate.
Assemble guide: Insert 4 M8 threaded rods into the bottom HeadPlate. Collect all 4 3xBearing_Ring symmetrically add four HeadFixers (two 2a and two 2b). Insert M8 threaded rods of bottom plate into four HeadFixers holes from bottom. Attach middle HeadPlate and then top the top. Fix with M8 nuts from both sides. Look at the pictures provided.
Part 0C: LaserMount
cnc_laser_0C_LaserMount.scad
cnc_laser_0C_LaserMount.stl
Quantity: 1 pcs
Params/1: Supports: No Layer: 0.2 Infill 20% Time: 1h 26 min Weight: 14.31 g Length 1.75: 4760.7 mm
Purpose: Mount Laser on a Head.
Assemble guide: Attach Laser with M3 screws. Attach LaserMount on two diagonal M8 threaded rods and fix with M8 nuts.
Part 0D: OptSensorFixture
cnc_laser_0D_OptSensorFixture.scad
cnc_laser_0D_OptSensorFixture.stl
Quantity: 2 pcs
Params/1: Supports: No Layer: 0.2 Infill 20% Time: 27 min Weight: 2.87 g Length 1.75: 953.9 mm
Purpose: Mount Optical Endstop Sensor to M10 threaded rod.
Assemble guide: Attach Sensor with M3 screw and nut. Attach OptSensorFixture to the M10 threaded rod with two M10 nuts. According to the picture.
Part 0E: OptSensorFlag
cnc_laser_0E_OptSensorFlag.scad
cnc_laser_0E_OptSensorFlag.stl
Quantity: 2 pcs
Params/1: Supports: No Layer: 0.2 Infill 20% Time: 7 min Weight: 0.40 g Length 1.75: 133.1 mm
Purpose: Cover IR beam of Optical Endstop sensors.
Assemble guide: Paint with black nail polish from both sides! Attach to Stepper with M3 screw Adjust to be in a middle of Optical Sensor in a zero position.
Part 0F: HeadFixer
cnc_laser_0F_HeadFixer_v2a.scad
cnc_laser_0F_HeadFixer_v2a.stl
cnc_laser_0F_HeadFixer_v2b.scad
cnc_laser_0F_HeadFixer_v2b.stl
Quantity: 4 pcs (2a + 2b)
Params/1: Supports: No Layer: 0.2 Infill 20% Time: 35 min Weight: 5.89 g Length 1.75: 1958.3 mm
Purpose: Fix .four 3xBearing_Rings together
Assemble guide: Insert 4 M8 threaded rods into the bottom HeadPlate. Collect all 4 3xBearing_Ring symmetrically add four HeadFixers (two 2a and two 2b). Insert M8 threaded rods of bottom plate into four HeadFixers holes from bottom. Attach top HeadPlate on the top. Fix with M8 nuts from both sides. Look at the pictures provided.
Part 10: StepperPlate (top)
cnc_laser_10_StepperPlate1.scad
cnc_laser_10_StepperPlate1.stl
Quantity: 1 pcs
Purpose: Fix Z-axis Stepper
Params/1: Supports: No Layer: 0.2 Infill 20% Time: 1h 45 min Weight: 26.43 g Length 1.75: 8789.2 mm
Assemble guide: Attach Z-axis Stepper with 4 M3 screews. Insert 4 M8 threaded rods into the bottom HeadPlate. Collect all 4 3xBearing_Ring symmetrically add four HeadFixers (two 2a and two 2b). Insert M8 threaded rods of bottom plate into four HeadFixers holes from bottom. Attach middle HeadPlate and then top the top. Fix with M8 nuts from both sides. Look at the pictures provided.
Part 11: HeadPlate_Bottom
cnc_laser_11_HeadPlate_Bottom.scad
cnc_laser_11_HeadPlate_Bottom.stl
Quantity: 1 pcs
Params/1: Supports: No Layer: 0.2 Infill 20% Time: 2h 34 min Weight: 33.35 g Length 1.75: 11092.4 mm
Assemble guide: Insert 4 M8 threaded rods into the bottom HeadPlate. Collect all 4 3xBearing_Ring symmetrically add four HeadFixers (two 2a and two 2b). Insert M8 threaded rods of bottom plate into four HeadFixers holes from bottom. Attach middle HeadPlate and then top the top. Fix with M8 nuts from both sides. Look at the pictures provided.
Part 12: Z_Plate
cnc_laser_12_Z_Plate.scad
cnc_laser_12_Z_Plate.stl
Quantity: 1 pcs
Params/1: Supports: No Layer: 0.2 Infill 20% Time: 1h 4 min Weight: 15.70 g Length 1.75: 5220.5 mm
Assemble guide: Insert M8 nut in a hole. Wind on Z-axis threaded rod. Fit tight on Z-axis d25 tubes with 4x M3 nuts and 4x M3 screws.
Part 13: SplittedFixture (for optical X,Y endstop sensors)
cnc_laser_13_SplittedFixture.scad
cnc_laser_13_SplittedFixture.stl
Quantity: 2 pcs
Params/1: Supports: No Layer: 0.2 Infill 20% Time: 26 min Weight: 5.76 g Length 1.75: 1917.3 mm
Assemble guide: Insert 2 x M3 nuts in a holes. Put parts from both sides of d25 tube near 0.0 by XY coords and fix with 2 x M3 screws. Attach optical endstop sensor.
Part 14: EndStopZ (fixture for Z Endstop)
cnc_laser_14_EndStopZ.scad
cnc_laser_14_EndStopZ.stl
Quantity: 1 pcs
Params/1: Supports: No Layer: 0.2 Infill 20% Time: 11 min Weight: 0.81 g Length 1.75: 269.0 mm
Assemble guide: use one of Z stepper screw to fix EndStopZ holder. Attach Z Endstop Optical sensor with m3 screw and nut. Use a piece of insulation tape to prevent electrical contacts.
Part 15: SpindleFixture (Optional: to fix custom 12v motor spindle)
cnc_laser_15_SpindleFixture.scad
cnc_laser_15_SpindleFixture.stl
Quantity: 2 pcs
Params/1: Supports: No Layer: 0.2 Infill 20% Time: 31 min Weight: 6.79 g Length 1.75: 2258.4 mm
Part 16: DremelFlexibleFixture (Optional: to fix Dremel flex shaft)
cnc_laser_16_DremelFlexibleFixture.scad
cnc_laser_16_DremelFlexibleFixture.stl
Quantity: 2 pcs
Params/1: Supports: No Layer: 0.2 Infill 20% Time: 17 min Weight: 3.43 g Length 1.75: 1141.8 mm
Assemble guide: Attach to the custom plate from "Quick fit carriage system" with pair of M3 screws and nuts
Part 17: marker (Optional: to fix pencil or marker)
cnc_laser_17_marker.scad
cnc_laser_17_marker.stl
Quantity: 1 pcs (3 sizes)
Params/1: Supports: No Layer: 0.2 Infill 20% Time: 9 min Weight: 1.74 g Length 1.75: 579.7 mm
Assemble guide: use acetone as a glue to glue to the custom plate from "Quick fit carriage system"
Part 18.3: coupler3 top M10 to 2x M8 threaded rod ridgepole fixtures
cnc_laser_18_coupler3_ok.scad
cnc_laser_18_coupler3.stl
Quantity: 4 pcs
Params/1: Supports: No Layer: 0.2 Infill 20% Time: 22 min Weight: 3.04 g Length 1.75: 1010.8 mm
Assemble guide: cut the internal thread with a tap on M8. Screw M8 threaded rod into 18.3 on the top and 18.4 at the bottom. Drill a M3 hole in the base in place. Fix with M3 screw and nut.
Part 18.4: coupler4 bottom M8 threaded rod ridgepole fixtures
cnc_laser_18_coupler4.scad
cnc_laser_18_coupler4.stl
Quantity: 8 pcs
Params/1: Supports: Yes Layer: 0.2 Infill 20% Time: 23 min Weight: 2.77 g Length 1.75: 922.6 mm
Assemble guide: cut the internal thread with a tap on M8. Screw M8 threaded rod into 18.3 on the top and 18.4 at the bottom. Drill a M3 hole in the base in place. Fix with M3 screw and nut.
Part 19: heated_table_connector_strip1
cnc_laser_19_heated_table_connector_strip1.scad
cnc_laser_19_heated_table_connector_strip1.stl
Quantity: 4 pcs
Params/1: Supports: Yes Layer: 0.2 Infill 20% Time: 31 min Weight: 5.89 g Length 1.75: 1959.1 mm
Assemble guide: Use a kitchen cutting board from strained glass. Remove a picture with hot air gun. (Don't remove glue). Attach to 1-1.2 mm alluminium plate. Cover alluminium with 2-3 layers of captone tape. Use nichrome wires. Look at a pictures for detailes ;-)
Firmware:
Marlin_1.1.8_Configuration.zip - My Configuration files for Marlin Firmware
Laser PWM control is attached to D6 at Servos ramps 1.4 connector.
Laser power is controlled by:
M3 Sxxx - Laser On: xxx=0..255, 255 - max
M5 - Laser Off
Test code:
PowerTestCode.zip - Code to generate Laser power test .gcode files (windows)
TestGcode.zip - Test files to start with
CAM Software Used:
Laser GRBL 2.8.35: Vectorize mode only (without filling).
Postprocess:
Replace:
"M5 S255" -> "M3 S0"
"M3" -> "M3 S255"
"M5" -> "M3 S0"
Rename: .nc -> .gcode
Av's SVG to GCODE v 1.2.6
Preprocess:
check initial svg units (Marlin works in mm only):
Replace 'width="4in" height="3in"'
Similar models
thingiverse
free

Just Another One Mostly Printed CNC (jaoMPCNC). Laser engraver cutter XY 1m x 1m x 0.5m d25 version. by Enic
...0 pcs ) abec-5 skate stroller miniature 608 zz ball bearings 608z 608 2z bearing https://www.aliexpress.com/item/*/549643998.html
thingiverse
free

Articulated arm by mroc
...figured it'd be fun to try to make something similar by 3d printing. i made three different versions with...
thingiverse
free
Prusa i3 Hephestos on M8 Threaded Rods by 3DIYOriginal
...al prusa i3 hephestos modified for m8 threaded rods with reinforced long m8 nut.
the m8 nut is the one in the picture.
enjoy !!!
thingiverse
free
![{[Fast Print]} Fillament Spool Holder with 608zz and M8 rod by mr2clean](/t/8983894.jpg)
{[Fast Print]} Fillament Spool Holder with 608zz and M8 rod by mr2clean
... placed on the back of my chassi.
but for now i am using it on my prusa i3 with m8 rod angles.
update 20140717: bowden_m5 fitting
thingiverse
free
Spool holder for HyperCube Evolution by Alderoth
...ted twice
assembly
you will need :
4 f628zz ball bearings
200mm m8 threaded rod
1 m8 butterfly nut
3 standard m8 nuts
4 m8 washer
thingiverse
free

Kossel Mini Spool Holder by mccarmo
...ce assembled in part 2;
fix the other piece of the spool holder;
fix the spool holder in the piece assempled in part 1.
enjoy! :)
thingiverse
free
Artillery Sidewinder X1 V4 Gantry Support by Minkio95
...olution, the top surface of the diagonal hole will be "stepped" and you will have more grip when you will fix the nuts.
thingiverse
free

CUBICON STYLE SPOOL-HOLDER, BEARINGS, M8 THREADED ROD by 77-17
... 130mm threaded rod (uxcell1.25mm pitch m8 x 130mm threaded rod bar)
3 of m8 nuts 13mm x 7mm
2 of 608zz bearings
thread locker
thingiverse
free
Underberg V8 by jaasball
...6 bolt for crank handle
a handfull of 8mm washers
you need to print:
8 pcs sylinder
2 pcs ende
1 piece sveiv
4 pcs kam.
good luck
thingiverse
free

M8 bolts, nuts, threaded rods, standoffs, spacers and washer by Hersheljr
... standoffs in case i need them later.
i printed them with 0.2 layer height, they aren't loose or tight and works quite well.
Enic
thingiverse
free

power supply stand by Enic
...upply stand by enic
thingiverse
stand for hitachi storage array power supply
abs 0.2 resolution 55% infill
no supports was used
thingiverse
free

Cat Dish Support (rubber replace) by Enic
...cat dish support (rubber replace) by enic
thingiverse
stainless steel cat dish support (rubber replace)
thingiverse
free

Aquarium Castle by Enic
... for your fish tank size:
$d=50; // tower tube diameter
$dw=4; // doubled wall width
$h=100; // tower height & tunnel length
thingiverse
free
Metric Square Tube 40x40 Plug end cover by Enic
...metric square tube 40x40 plug end cover by enic
thingiverse
metric square tube 40x40 plug end cover
thingiverse
free
HDD Spindle Mount for DIY by Enic
...lic domain.
can be used for futher development of any diy projects.
supports required.
brim is optional.
0.2mm layer
abs 110/225c
thingiverse
free

Jumping Bugs by Enic
...nd of the tip on the back of a bug and slide the stick backwards.
just look a video, print and enjoy.https://youtu.be/h-iabyb1cys
thingiverse
free
Bicycle bell 20mm gear by Enic
...elical gear and involute rack)
// version 1.1
// by leemon baird, 2011, leemon@leemon.com
//http://www.thingiverse.com/thing:5505
thingiverse
free
universal connector for aluminium profile system 32x32 mm by Enic
...is included)
.gcode files for 1psc and for 27pcs are also included
i use abs 110/225c 20% infill 0,2mm layer.
no supports needed.
thingiverse
free

Arduino+RFM69HW+MySensors IoT Home Node Boxes: Freezer node, Universal node by Enic
...giverse
arduino+rfm69hw+mysensors iot home node boxes: freezer node, universal node
thanks to mark gaffney for parametric box!!!
thingiverse
free

vacuum cleaner adapter (for hard to reach places) by Enic
...se (source file included)
use a glue gun to glue a bunch of plastic drinking straws together and then glue to the printed adapter
Huge
turbosquid
$4

Huge Fungus
...royalty free 3d model huge fungus for download as 3ds and max on turbosquid: 3d models for games, architecture, videos. (1310036)
3d_export
$5

Huge Treee 3D Model
...huge treee 3d model
3dexport
huge tree
huge treee 3d model nikkistinger19 38424 3dexport
turbosquid
$3

Sofa huge grey
...osquid
royalty free 3d model sofa huge grey for download as on turbosquid: 3d models for games, architecture, videos. (1526303)
turbosquid
$149

Huge City 03
... available on turbo squid, the world's leading provider of digital 3d models for visualization, films, television, and games.
turbosquid
$70

Stillux GliOri Huge
... available on turbo squid, the world's leading provider of digital 3d models for visualization, films, television, and games.
3ddd
$1

Huge Dispenser
...huge dispenser
3ddd
диспенсер
designer: mr. jin-seok kwon
design type: public space design
launch year: 2013
turbosquid
$549

HUGE CUTE ROBOT II
...3d model huge cute robot ii for download as max, obj, and fbx on turbosquid: 3d models for games, architecture, videos. (1500470)
3ddd
$1

Stillux GliOri Huge Art. 7801 8
... huge
люстра итальянской фабрики stillux, коллекция gliori, серия huge арт. 7801
размеры: d78 h70
3ddd
$1

Stillux GliOri Huge Art. 8800 6
... huge
люстра итальянской фабрики stillux, коллекция gliori, серия huge арт.8800
размеры: d70 h60
turbosquid
$550

Huge Bridge Collection 1
... available on turbo squid, the world's leading provider of digital 3d models for visualization, films, television, and games.
Cheap
turbosquid
$10

Cheap Desk
...
royalty free 3d model cheap desk for download as c4d and fbx on turbosquid: 3d models for games, architecture, videos. (1602631)
turbosquid
$30

Cheap Apartment
... available on turbo squid, the world's leading provider of digital 3d models for visualization, films, television, and games.
turbosquid
$20

CHEAP PEN.c4d
... available on turbo squid, the world's leading provider of digital 3d models for visualization, films, television, and games.
turbosquid
$1

Cheap terrain
... available on turbo squid, the world's leading provider of digital 3d models for visualization, films, television, and games.
turbosquid
$3

Cheap Baseball Bat
... available on turbo squid, the world's leading provider of digital 3d models for visualization, films, television, and games.
turbosquid
$2

Basic Cheap Cellphone
... available on turbo squid, the world's leading provider of digital 3d models for visualization, films, television, and games.
turbosquid
$1

Cheap Ballpoint Pen
... available on turbo squid, the world's leading provider of digital 3d models for visualization, films, television, and games.
turbosquid
$12

Cheap looking table and chair
...del cheap looking table and chair for download as max and fbx on turbosquid: 3d models for games, architecture, videos. (1439884)
3d_export
$5

Cheap laser sword 3D Model
...cheap laser sword 3d model
3dexport
star wars
cheap laser sword 3d model gettinqdown 79283 3dexport
turbosquid
$45

Cheap-A$$-Guitar II.3dm
... available on turbo squid, the world's leading provider of digital 3d models for visualization, films, television, and games.
Cnc
3d_export
$35

Cnc
...cnc
3dexport
the cnc machine is unfinished
3d_export
$10
cnc router
...cnc router
3dexport
prototipe cnc router
3d_export
$10

cnc machine
...cnc machine
3dexport
cnc machine model with individual model files with assembly
3d_export
$5
Cnc 3D Model
...cnc 3d model
3dexport
cnc
cnc 3d model csiszar 61289 3dexport
turbosquid
$10

cnc bedroom
...osquid
royalty free 3d model cnc bedroom for download as max on turbosquid: 3d models for games, architecture, videos. (1494981)
turbosquid
$9
cnc(wood)
...rbosquid
royalty free 3d model cnc(wood) for download as max on turbosquid: 3d models for games, architecture, videos. (1189189)
turbosquid
$1

CNC Frame
...rbosquid
royalty free 3d model cnc frame for download as stl on turbosquid: 3d models for games, architecture, videos. (1371706)
turbosquid
free
cnc table
...rbosquid
royalty free 3d model cnc table for download as max on turbosquid: 3d models for games, architecture, videos. (1500926)
turbosquid
$30

CNC Lathe
...
royalty free 3d model cnc lathe for download as max and obj on turbosquid: 3d models for games, architecture, videos. (1284634)
turbosquid
$25
CNC Machine
...
royalty free 3d model cnc machine for download as ma and fbx on turbosquid: 3d models for games, architecture, videos. (1307199)
Home
3d_export
$8

Home
...home
3dexport
home
3d_export
$8

Home
...home
3dexport
home
3d_export
$5

home
...home
3dexport
home
3d_export
free

Home
...home
3dexport
this is home.
3d_export
$5

home
...home
3dexport
home god izi
3d_export
$5

home
...home
3dexport
3d model home
3d_export
free

home
...home
3dexport
home. render and cycles
3ddd
free

Zara Home
...home , zara home , декоративный набор
zara home
3d_export
$5
Home sweet home 3D Model
...home sweet home 3d model
3dexport
home model made in google sketch up
home sweet home 3d model snakeplease 100984 3dexport
3ddd
$1

Ambella Home
...ambella home
3ddd
ambella home , консоль
ambella home