Thingiverse

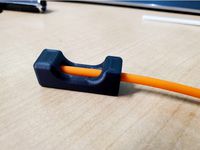
HTProbe Bed Level Probe
by Thingiverse
Last crawled date: 4 years, 2 months ago
This probe can soon be purchased from https://hightemp3d.com/
This is a challenging build. You can get help on Discord or you can wait and buy it when it is available. The prototype of the probe works amazingly well. The probe is completely unafected by magnetic fields and only thermal expansion influence it. No electronic parts inside the enclosure so this probe handles the temperature of the 3D printed plastic and the string.
This is a remix of Steve Whites Marionette probe. You will need:
M5 brass washer
Long M2 thread insert
Short M2 thread insert
M2 shoulder bolt 25 mm long
Spring. Thread diameter:0,32 mm Inner diameter 3,68 mm Length 19.8 mm
1.5 mm2 copper wire. Only a few mm needed.
Wires
Connector
Soldering Iron
Solder
MG996 servo
Bowden tube
Braided fishing line or Kevlar line
Sand paper
Steve Whites servo mount for the Marionette probe.
I used ABS for the two printed parts. It is very challenging print, the threads are difficult to get right at the same time as the strength.
Print the two parts
Solder the two thread inserts together such that the small insert is on top of the long thread insert. The short insert functions as an eye for the line.
take the 1.5 mm2 copper wire and give it a 90 degrees bend. Then solder it to the thread insert with one wire tip pointing down(away from the small insert) The tip needs to be lower than the bottom of the long insert. This tip is the contact point with the washer.
Solder a wire to the thread insert above the copper tip. The wire must be exactly on the same side as the copper tip.
Solder a wire to the washer
Put the washer into the bottom part of the print with the wire facing down.
Put the sprint on the shoulder bolt.
Put the shoulder bolt through the hole in the bottom part of the print
Screw the thread insert assembly to the top of the shoulder bolt.
Make sure the washer is flat against the bottom of the 3d bottom part.
Attach a line to the top of the pin.
pull the line through the top part
Screw the top part and the bottom part together
pull the line through the bowden tube.
Push the bowden tube into the top of the probe.
Connect the line to Steve whites Servo mount/Servo
Print with a raft and then use the sand paper to grind away the bottom part. The bottom part is conical inside so the more you grind the larger the hole. Grind until the shoulder bolt drops freely when inserted from the top of the bottom part.
Similar models
thingiverse
free

Spot welding probes by magborresen
...shaft (i used copper nails with the head cut off) through the small hole on the bottom of the print. then clamp that to the wire.
thingiverse
free

Solder Cableholder remix wire holder station by MeisnerX
... bottom for added weight.
hole should allow an ~8mm rod..
scaled object is a few mm larger to allow for easier insertion of rod..
thingiverse
free

ECX Temper GEN2 axle servo battery tray by GRay_111111
...st doing this mod - use 3mm threaded rod, bend to shape to fit over the axle and sit below this tray between the axle stand offs.
thingiverse
free

Simple H0-scale Bridge Pillar - adjustable by flash24
... part, you may need to
minimize the depth of the m2 holes (10 mm. is probably deep enough) in
sketchup to print this part faster.
thingiverse
free
Eryone Thinker S hotend fix
...eos and this is the same fix. i've included the gcodes alread sliced for the thinker if you want to just print it right away.
thingiverse
free

Machine Support M8 (adjustable with square tube insert) by 3DBobCZ
...24, nut. the support is screwed and sealed with ca adhesive, the insert will be pressed into the foot of the table (by a hammer).
grabcad
free

Threaded Insert M2 x 4mm for 3D printed parts
...threaded insert m2 x 4mm for 3d printed parts
grabcad
ruthex threaded insert.
dimensions:
m2 x 4mm x 3.6mm
thingiverse
free

Improved Luke's hotend fix for stock Ender by MathiasM74
...the fitting and washer and then the tubing as you screw down the fitting. lastly insert the bowden tube running to your extruder.
grabcad
free

insert M2
...ed parts by heat or ultrasound.
screw thread m2, dia 3,6mm, height 4mm.
m3 version, see: https://grabcad.com/library/insert-m3-2
thingiverse
free

TS100 Soldering Station by sunbart
... ts100 soldering iron - i'd also recommend getting the ts-bc2 tip
copper wire tip cleaner
400g solder spool
flux pen
tweezers
Probe
turbosquid
$25

Probe
... available on turbo squid, the world's leading provider of digital 3d models for visualization, films, television, and games.
turbosquid
$12
Mars probe space space exploration lunar probe
...be space space exploration lunar probe for download as max on turbosquid: 3d models for games, architecture, videos. (1630876)
turbosquid
$35
Space Probe
...osquid
royalty free 3d model space probe for download as c4d on turbosquid: 3d models for games, architecture, videos. (1571168)
turbosquid
$15
Space Probe
...osquid
royalty free 3d model space probe for download as obj on turbosquid: 3d models for games, architecture, videos. (1314864)
turbosquid
$25
Robot Probe
...y free 3d model robot probe for download as fbx, obj, and dae on turbosquid: 3d models for games, architecture, videos. (1537490)
turbosquid
$1

Dental Probe
...e 3d model dental probe for download as ma, obj, fbx, and stl on turbosquid: 3d models for games, architecture, videos. (1312400)
turbosquid
$60
Police Probe
... available on turbo squid, the world's leading provider of digital 3d models for visualization, films, television, and games.
turbosquid
$10

Dental Probe
... available on turbo squid, the world's leading provider of digital 3d models for visualization, films, television, and games.
turbosquid
$9

Space probe
... available on turbo squid, the world's leading provider of digital 3d models for visualization, films, television, and games.
turbosquid
free

Cassini Probe
... available on turbo squid, the world's leading provider of digital 3d models for visualization, films, television, and games.
Level
design_connected
$11

Levels
...levels
designconnected
one nordic levels computer generated 3d model. designed by form us with love.
design_connected
$7
Level
...level
designconnected
zanotta level shelves and storage computer generated 3d model. designed by arik levy.
turbosquid
$29
level
...ty free 3d model level for download as 3ds, obj, c4d, and fbx on turbosquid: 3d models for games, architecture, videos. (1272856)
turbosquid
$1
level
... available on turbo squid, the world's leading provider of digital 3d models for visualization, films, television, and games.
3d_export
$5

Mario level
...mario level
3dexport
mario level low quality for fun videos
3ddd
$1
LEVELS OF DISCOVERY
...етская мебель "levels of discovery". rab10003 princess mini rocker
кресло-качалка (мини) "принцесса навсегда"
3d_export
$19

level design
...level design
3dexport
you can use this design (level design) in your own game.
turbosquid
$60
Desert level
...squid
royalty free 3d model desert level for download as fbx on turbosquid: 3d models for games, architecture, videos. (1208131)
turbosquid
$15
Transit Level
...quid
royalty free 3d model transit level for download as max on turbosquid: 3d models for games, architecture, videos. (1158112)
turbosquid
$14

Districts Level
...id
royalty free 3d model districts level for download as max on turbosquid: 3d models for games, architecture, videos. (1408410)
Bed
3ddd
$1

bed
...bed
3ddd
bed , постельное белье
bed
3ddd
$1

bed
...bed
3ddd
bed , постельное белье
bed
3ddd
$1

bed
...bed
3ddd
bed , постельное белье
bed
3ddd
$1

bed
...bed
3ddd
bed , постельное белье
bed
3ddd
$1

bed
...bed
3ddd
bed , постельное белье
bed
3ddd
$1

bed
...bed
3ddd
bed , постельное белье
bed
3ddd
free

bed
...bed
3ddd
bed , постельное белье
bed
3ddd
free

bed
...bed
3ddd
bed , постельное белье
bed
3ddd
$1

Bed
...bed
3ddd
bed , постельное белье , постель
bed
3d_export
$7

bed adairs bed
...rs bed
3dexport
bed adairs bed in modern style. if you want a smoother surface, please turn on turbosmooth in the modifier list.