Thingiverse
Hot Shoe to 1/4-20 Magnetic Quick Release / LumeCube Magnetic Mount
by Thingiverse
Last crawled date: 4 years, 3 months ago
Video:https://www.youtube.com/watch?v=OAIydsQTraw
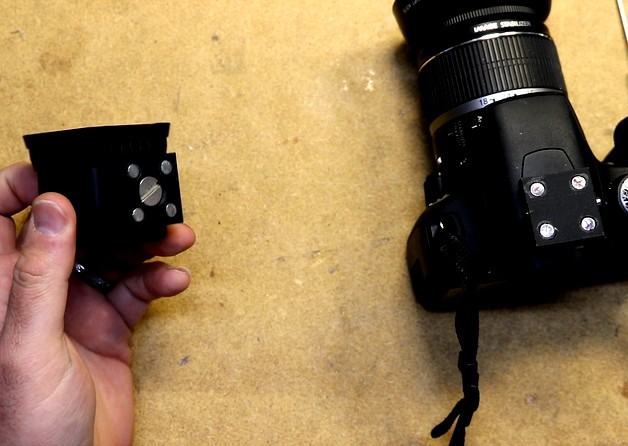
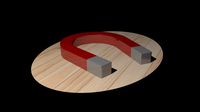
These are some mounts that I developed to use as a magnetic quick-release mount for a LumeCube v2 on my Canon DSLR. One piece of the mount is placed on top of the DSLR camera. The other piece is screwed into the bottom of the LumeCube. Each half has four magnets and when placed together they will be securely connected.
I made two versions of the mount, for 6mm x 3mm and for 10mm x 3mm magnets respectively. The 10mm variant is much stronger (which is both a plus and a minus). The 6mm variant can come loose if the camera is shaken violently.
The base is secured to the camera using a screw and a wedge-shaped plastic piece. Tightening the screw places addition pressure from the wedge onto the camera's hot shoe, and secures the base. You may or may not find this wedge/screw system necessary, the base will kinda stay there on it's own, but the wedge will make it more solid.
In addition to 3D printed parts you will need the following:
Neewer Stainless Steel 1/4" Mounting Screw. This is a 1/4-20 "camera screw". A regular 1/4-20 bolt of the appropriate length will do.
Magnets, either 6mm x 3mm or 10mm x 3mm. Eight magnets total.
M2.5x30 machine screw for the 6mm variant or M2.5x34 machine screw for the 10mm variant. Longer is fine, though it will stick out.
M2.5 heat-set threadsert. You can buy these on ebay. You set them with a soldering iron. An m2.5 nut may also suffice.
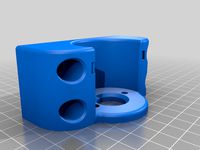
The parts are designed to print in the orientation depicted, yes the base is supposed to print vertically like that -- it puts the layer lines in the orientation I wanted them. On the base there will be a small "pillar" across the wedge shot that should snap or cut out cleanly. It's used to support the overhang that prints above it. All of these pieces are intended to be printed without supports.
The magnet packets are designed slightly oversize to allow for some tolerance, be careful you do not set your magnets too deep (if you do, the magnet will usually happily pull back up before your glue sets). Secure the magnets with cyanoacrylate superglue.
I recommend printing the parts in PETG. For the models depicted in the video I used Priline Carbon Fiber PETG. The Carbon Fiber is likely not necessary, but I do recomment PETG or Polycarbonate over PLA. I would be worried about durability of the base if printed in PLA.
I did use raster's "Hot Shoe Mount" (Thing 33823) as a basis for developing the part of the base that interfaces with the camera.
These are some mounts that I developed to use as a magnetic quick-release mount for a LumeCube v2 on my Canon DSLR. One piece of the mount is placed on top of the DSLR camera. The other piece is screwed into the bottom of the LumeCube. Each half has four magnets and when placed together they will be securely connected.
I made two versions of the mount, for 6mm x 3mm and for 10mm x 3mm magnets respectively. The 10mm variant is much stronger (which is both a plus and a minus). The 6mm variant can come loose if the camera is shaken violently.
The base is secured to the camera using a screw and a wedge-shaped plastic piece. Tightening the screw places addition pressure from the wedge onto the camera's hot shoe, and secures the base. You may or may not find this wedge/screw system necessary, the base will kinda stay there on it's own, but the wedge will make it more solid.
In addition to 3D printed parts you will need the following:
Neewer Stainless Steel 1/4" Mounting Screw. This is a 1/4-20 "camera screw". A regular 1/4-20 bolt of the appropriate length will do.
Magnets, either 6mm x 3mm or 10mm x 3mm. Eight magnets total.
M2.5x30 machine screw for the 6mm variant or M2.5x34 machine screw for the 10mm variant. Longer is fine, though it will stick out.
M2.5 heat-set threadsert. You can buy these on ebay. You set them with a soldering iron. An m2.5 nut may also suffice.
The parts are designed to print in the orientation depicted, yes the base is supposed to print vertically like that -- it puts the layer lines in the orientation I wanted them. On the base there will be a small "pillar" across the wedge shot that should snap or cut out cleanly. It's used to support the overhang that prints above it. All of these pieces are intended to be printed without supports.
The magnet packets are designed slightly oversize to allow for some tolerance, be careful you do not set your magnets too deep (if you do, the magnet will usually happily pull back up before your glue sets). Secure the magnets with cyanoacrylate superglue.
I recommend printing the parts in PETG. For the models depicted in the video I used Priline Carbon Fiber PETG. The Carbon Fiber is likely not necessary, but I do recomment PETG or Polycarbonate over PLA. I would be worried about durability of the base if printed in PLA.
I did use raster's "Hot Shoe Mount" (Thing 33823) as a basis for developing the part of the base that interfaces with the camera.
Similar models
thingiverse
free

DSLR Controller - TP Link hot shoe mount by lubosjerabek
...dslr controller - tp link hot shoe mount by lubosjerabek
thingiverse
hot shoe tp-link on dslr camera
thingiverse
free

Roofrack for RC Crawler by Kev_Pe
...screws
glue
happy printing and "makes" would be appreciated. feel free to share feedback and questions in the comments.
thingiverse
free

Raspberry Pi with Sense Hat and Camera combine case by r9kawai
...m2 10mm screw and nut x 4
m2 10mm tapping screw x 2
this model designed with "freecad".
(attached freecad format file)
thingiverse
free

Flash Hot Shoe Adapter 90° Tripod by CaptainRoot
...4 screw hole to hot shoe or cold shoe
i use this for mounting my zoom h1 to my video camera in oder to see the display an the led
thingiverse
free

Camera Hot Shoe Fan Bracket by lenosrep
... by lenosrep
thingiverse
camera hot shoe mounted bracket for usb powered cooling fan. applicable for dslr or mirrorless cameras.
thingiverse
free

Pi Camera Telescope Mount by scottpreston
...ed 2mm screws to mount the camera to the base. i used 6-32 1" standoffs with 6-32 3/8" socket head cap screws to mount.
thingiverse
free
775 DC Motor Mount for DIY Dremel CNC
...nto the lower side of the holder. you need two halves of the shoe. use 4 10mm neodymium magnets to secure the dust shoe in place.
thingiverse
free

Hot-Shoe GoPro Mount by AllCity-Maker
...f the attached device disconnecting.
the holes are designed for an m5 x 20mm bolt and locknut.
print it and go do something cool!
thingiverse
free

Magnet Knob by Tidangerous
...magnetic camera arm build i just finished. after printing use a #8 x 3/4" machine screw to secure the magnetic to the knob.
thingiverse
free

Magnetic Hook by Tidangerous
...magnetic camera arm build i just finished. after printing use a #8 x 3/4" machine screw to secure the magnetic to the hook.
Lumecube
thingiverse
free

HomeMade LumeCube Housing
... the files needed to assemble a housing. the video in which i designed the housing can be found here:https://youtu.be/s1rlheo03zo
thingiverse
free

Yuneec Typhoon H520 Droniq HOD4track and LumeCube Carrier by pose
...ack.
lumecube carrier remixed from https://www.thingiverse.com/thing:4221708. i added the rear carrier for the droniq hod4track.
thingiverse
free

Yuneec Typhoon LumeCube Ring / Carrier
...usion 360 sketch also uploaded.
printed with petg with 4 walls, 10% infill, 0.4mm nozzle and 0.2 mm layerhight
-> weight ~25g:
thingiverse
free

LumeCube housing & magnetic filter plate & holder by Jeyell
...lots, front magnetic plate and frear filter housing to carry a few around. also added a hole for screw-mounting on the underside.
Shoe
3d_ocean
$10
Shoes
...shoes
3docean
adidas colorful shoes nike shoe shoes sports
3d model of sports shoes
3d_ocean
$8
Shoes
...shoes
3docean
cloth shoes
women shoes
archibase_planet
free
Shoes
...shoes
archibase planet
shoes open shoes open toed shoes
shoes n151112 - 3d model (*.gsm+*.3ds) for interior 3d visualization.
archibase_planet
free
Shoes
...shoes
archibase planet
shoes open shoes open toed shoes
shoes n120513 - 3d model (*.gsm+*.3ds) for interior 3d visualization.
archibase_planet
free
Shoes
...shoes
archibase planet
shoes open shoes open toed shoes
shoes n280614 - 3d model (*.gsm+*.3ds) for interior 3d visualization.
archibase_planet
free

Shoes
...shoes
archibase planet
court shoes footwear shoes
shoes - 3d model for interior 3d visualization.
archibase_planet
free
Shoes
...base planet
shoes high heels evening shoes high heels shoes
shoes n140713 - 3d model (*.gsm+*.3ds) for interior 3d visualization.
archibase_planet
free

Shoes
...chibase planet
shoes open shoes high heels high heels shoes
shoes n231013 - 3d model (*.gsm+*.3ds) for interior 3d visualization.
archibase_planet
free
Shoes
...shoes
archibase planet
court shoes patent-leather shoes footwear
black shoes n060707 - 3d model for interior 3d visualization.
3d_export
$7

shoes
...shoes
3dexport
shoes man
Release
turbosquid
$39
Sofa. Updated release
... available on turbo squid, the world's leading provider of digital 3d models for visualization, films, television, and games.
turbosquid
$8

Film releasing mechanism
...asing mechanism for download as 3ds, ige, obj, stl, and sldas on turbosquid: 3d models for games, architecture, videos. (1227251)
3d_export
$5

shift lock release kia soul
...shift lock release kia soul
3dexport
shift lock release kia soul
turbosquid
$14

Quick release swivel carabiner with ring
...ease swivel carabiner with ring for download as sldpr and stl on turbosquid: 3d models for games, architecture, videos. (1668426)
turbosquid
$60

AUTOMATIC AIR RELEASE VALVE GRP33-07
...odel automatic air release valve grp33-07 for download as ipt on turbosquid: 3d models for games, architecture, videos. (1404884)
3d_export
$10

Kitchen Release Mat
...xture format: .png .jpg<br>resolution: 1024*1024<br>pbr in substance painter<br>formats: .obj .gltf .fbx .blend
3d_export
$5
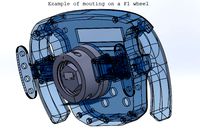
logitech g27-g29 quick release
...r and the other wheel adaptor.<br>files are in stl format, but if you want to edit parts i give you files in sldprt format.
3d_export
$20
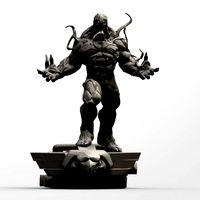
mutante veneno
...model created in zbrush 33cm ready for printing, previously release in 6...
3d_export
$5

Drowned Plush Minecraft
...for microsoft windows, macos and linux, and was later re-release for a wide variety of platforms. it is the...
3d_export
$7

Toy drone for kids
...drone for kids. based on only 3 d models. release for toy...
Magnetic
3d_ocean
$2

Magnet
...magnet 3docean 3d 3ds max electric magnet magnetic magnetism max model polygon realistic tesla magnet created in...
turbosquid
$6
Magnet
...
turbosquid
royalty free 3d model magnet for download as obj on turbosquid: 3d models for games, architecture, videos. (1548733)
turbosquid
$6

magnet
...uid
royalty free 3d model magnet for download as 3dm and max on turbosquid: 3d models for games, architecture, videos. (1670606)
turbosquid
$1

Magnet
...y free 3d model magnet for download as 3ds, max, obj, and fbx on turbosquid: 3d models for games, architecture, videos. (1215037)
turbosquid
$7

Magnet
...agnet for download as blend, unitypackage, fbx, gltf, and obj on turbosquid: 3d models for games, architecture, videos. (1576588)
3d_export
$5

magnetic knife holder
...magnetic knife holder
3dexport
ordinary magnetic knife holder
archive3d
free

Fridge magnet 3D Model
...3d model archive3d refrigerator magnet fridge magnet magnet toy magnetic s n280712 - 3d model (*.3ds) for interior 3d...
turbosquid
$35

Magnetic butterflies
...alty free 3d model magnetic butterflies for download as blend on turbosquid: 3d models for games, architecture, videos. (1315792)
turbosquid
$2
Magnetic Board
...quid
royalty free 3d model magnetic board for download as ma on turbosquid: 3d models for games, architecture, videos. (1264141)
turbosquid
$977
Magnetic Lego
...oyalty free 3d model magnetic lego for download as ma and obj on turbosquid: 3d models for games, architecture, videos. (1142761)
Hot
turbosquid
$1

HOT
... available on turbo squid, the world's leading provider of digital 3d models for visualization, films, television, and games.
3d_export
$12
Hot Tub
...hot tub
3dexport
hot tub - 4k png/tif textures
3d_export
$9
Hot Tub
...hot tub
3dexport
hot tub - 4k png/tif textures
3d_export
free
hot chili
...hot chili
3dexport
hot chili<br>for fruits and getegables collection
3d_export
$5

hot air balloon
...hot air balloon
3dexport
hot air balloon
3d_export
free
Hot dog shop
...hot dog shop
3dexport
hot dog shop
turbosquid
$90
hot venue
...rbosquid
royalty free 3d model hot venue for download as fbx on turbosquid: 3d models for games, architecture, videos. (1336949)
turbosquid
$20

Hot Rod
...
turbosquid
royalty free 3d model hot rod for download as ma on turbosquid: 3d models for games, architecture, videos. (1351690)
turbosquid
$14

Hot Pepper
...bosquid
royalty free 3d model hot pepper for download as obj on turbosquid: 3d models for games, architecture, videos. (1611643)
turbosquid
$1

Hot dog
...turbosquid
royalty free 3d model hot dog for download as max on turbosquid: 3d models for games, architecture, videos. (1450961)
Quick
3ddd
$1

Quick-Step / Quadra
...quick-step / quadra
3ddd
quick step
ламинат quick-step, серия quadra. сайт источник -http://www.quick-step.com
3ddd
$1

Quick-Step / Lagune
...quick-step / lagune
3ddd
quick step
ламинат quick-step, серия lagune. сайт источник -http://www.quick-step.com
3ddd
$1
Quick-Step / Classic
...quick-step / classic
3ddd
quick step
ламинат quick-step, серия classic. сайт источник -http://www.quick-step.com
3ddd
$1
Quick-Step / Arte
...quick-step / arte
3ddd
quick step
ламинат quick-step, серия arte. сайт источник -http://www.quick-step.com
3ddd
$1
Quick-Step / Vogue
...quick-step / vogue
3ddd
quick step
ламинат quick-step, серия vogue. сайт источник -http://www.quick-step.com
3ddd
$1
Quick-Step / Rustic
...quick-step / rustic
3ddd
quick step
ламинат quick-step, серия rustic. сайт источник -http://www.quick-step.com
3ddd
$1
Quick-Step / Eligna
...quick-step / eligna
3ddd
quick step
ламинат quick-step, серия eligna. сайт источник -http://www.quick-step.com
turbosquid
$3

Quick Ball
...lty free 3d model quick ball for download as ma, obj, and fbx on turbosquid: 3d models for games, architecture, videos. (1521597)
3ddd
free

Quick-Step / Elite
... ламинат
ламинат quick-step, серия elite. сайт источник -http://www.quick-step.com
turbosquid
$10
Quick Chrome
... available on turbo squid, the world's leading provider of digital 3d models for visualization, films, television, and games.
20
3d_export
$15
rocks 20
...rocks 20
3dexport
rocks 3d model 20
3ddd
$1

DECOR MEDIEVO 20*20 MIX
...ллекция: bolonia
фабрика: mainzu
страна: испания
размер: 20x20 см
ссылка:http://www.mainzu.com/bolonia.php#prettyphoto
3d_export
$6
tap-20
...tap-20
3dexport
3ddd
$1

Bed 20
...bed 20
3ddd
постельное белье
bed 20. i hope you like it
software : 3dsmax + md + vray 2.4
turbosquid
$40

20 Shields
...turbosquid
royalty free 3d model 20 shields for download as on turbosquid: 3d models for games, architecture, videos. (1305068)
3d_export
$5

houseberg home 20
...houseberg home 20
3dexport
houseberg home 20
turbosquid
$96

J-20
...20
turbosquid
royalty free 3d model j-20 for download as max on turbosquid: 3d models for games, architecture, videos. (1658873)
turbosquid
$10

Decor 20
...urbosquid
royalty free 3d model decor 20 for download as stl on turbosquid: 3d models for games, architecture, videos. (1677149)
turbosquid
$10

building 20
...osquid
royalty free 3d model building 20 for download as max on turbosquid: 3d models for games, architecture, videos. (1362227)
turbosquid
$6

Bedcloth 20
...osquid
royalty free 3d model bedcloth 20 for download as max on turbosquid: 3d models for games, architecture, videos. (1522681)
Mount
3d_export
free

mounting bracket
...mounting plate is the portion of a hinge that attaches to the wood. mounting plates can be used indoors, cabinetry and furniture.
turbosquid
$2

MOUNTING
... available on turbo squid, the world's leading provider of digital 3d models for visualization, films, television, and games.
turbosquid
free

Mounts
... available on turbo squid, the world's leading provider of digital 3d models for visualization, films, television, and games.
turbosquid
free

Mount Fuji
...fuji
turbosquid
free 3d model mount fuji for download as obj on turbosquid: 3d models for games, architecture, videos. (1579977)
3d_export
$5

Headphone mount LR
...headphone mount lr
3dexport
headphone mount l+r
turbosquid
$39

Mount rainier
...quid
royalty free 3d model mount rainier for download as fbx on turbosquid: 3d models for games, architecture, videos. (1492586)
turbosquid
$5

pipe mounting
...quid
royalty free 3d model pipe mounting for download as obj on turbosquid: 3d models for games, architecture, videos. (1293744)
turbosquid
$3

Mounting Tires
...uid
royalty free 3d model mounting tires for download as fbx on turbosquid: 3d models for games, architecture, videos. (1708511)
3d_export
$5

Magnetic GoPro Mount
...pro mount
3dexport
cool magnetic mount for gopro. allows you to mount the camera on flat metal surfaces and get exclusive shots.
turbosquid
$5

Stone Mount
...ty free 3d model stone mount for download as ma, obj, and fbx on turbosquid: 3d models for games, architecture, videos. (1370306)
4
turbosquid
$9

Office Chair 4-4
... available on turbo squid, the world's leading provider of digital 3d models for visualization, films, television, and games.
3d_export
$5

doors- 4
...doors- 4
3dexport
doors 4
3d_export
$5

hinge 4
...hinge 4
3dexport
hinge 4
3ddd
$1

Штора №4
...штора №4
3ddd
штора №4
3d_export
free

playstation 4
...playstation 4
3dexport
playstation 4
turbosquid
$1

re 4-4 electric locomotive
... free 3d model re 4 4 electric locomotive for download as obj on turbosquid: 3d models for games, architecture, videos. (1707845)
3ddd
$1

nexus 4
...nexus 4
3ddd
lg , телефон
nexus 4
3ddd
$1

4 Poufs
...4 poufs
3ddd
пуф
4 soft poufs
turbosquid
$12

Calligraphic Digit 4 Number 4
...hic digit 4 number 4 for download as max, obj, fbx, and blend on turbosquid: 3d models for games, architecture, videos. (1389332)
3ddd
$1

Dauphin 4+
...dauphin 4+
3ddd
кресло
dauphin 4+ конференц кресло
1
turbosquid
$69

armchairs(1)(1)
... available on turbo squid, the world's leading provider of digital 3d models for visualization, films, television, and games.
turbosquid
$15

ring 1+1
... available on turbo squid, the world's leading provider of digital 3d models for visualization, films, television, and games.
turbosquid
$10

chair(1)(1)
... available on turbo squid, the world's leading provider of digital 3d models for visualization, films, television, and games.
turbosquid
$8

Chair(1)(1)
... available on turbo squid, the world's leading provider of digital 3d models for visualization, films, television, and games.
turbosquid
$2

RING 1(1)
... available on turbo squid, the world's leading provider of digital 3d models for visualization, films, television, and games.
turbosquid
$1

house 1(1)
... available on turbo squid, the world's leading provider of digital 3d models for visualization, films, television, and games.
turbosquid
$1

Table 1(1)
... available on turbo squid, the world's leading provider of digital 3d models for visualization, films, television, and games.
turbosquid
$59

Formula 1(1)
...lty free 3d model formula 1 for download as max, fbx, and obj on turbosquid: 3d models for games, architecture, videos. (1567088)
design_connected
$11

No 1
...no 1
designconnected
sibast no 1 computer generated 3d model. designed by sibast, helge.
turbosquid
$2

desert house(1)(1)
...3d model desert house(1)(1) for download as 3ds, max, and obj on turbosquid: 3d models for games, architecture, videos. (1055095)