Cults
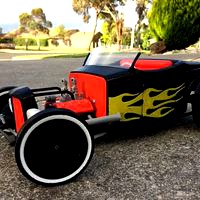
Hot Rod
by Cults
Last crawled date: 6 years, 1 month ago
a model Hot Rod for the pinshape cosplay comp ( Tony Starks ) , I have used parts from my Freedom Roadster to produce it. The model is for personal use only ! It has complete Printing and assembly instructions. You could user finer setting on your printer other than suggested to produce a smoother finish. It can be printed over a number of days , You will need a few basic tools and small screws to assemble it. ( it could also be heat staked together with a soldering iron, make sure the area is well ventilated )
All stl files are numbered to easily find on your printer read out and follow in the instructions.
Model sizes
Front track- 185mm
Rear track- 193mm
Overall length-370mm
Body height-110mm
over all height-135mm
Max body width 147mm
front wheel dia. 75mm by 14mm wide ( white wall)
rear wheel dia.85mm by 19mm wide (white wall)
If you decide to paint make sure you use a undercoat or spray putty and sand super smooth before applying the top coat.
If Painting the flames should be done before you stick them to the body, You could also hand paint the flames on if you like.
I really enjoy designing for 3D printing and assembling, most parts have a flat surface to print from and only a few have support. It also has flex tires.
Don't be daunted by the number of parts, it assemblies together beautifully and you will enjoy the experience and the pleasure of viewing the model once finished.
As an option you can add your RC control gear to it can be housed in the boot and a servo near the drivers feet position. ( I am currently working to add this to the design)
Hotrod Model Assembly instructions By Chris Mc Connell
step procedure Part no.s Hardware tools
1 Attach and screw both front and rear rails to the floor - 1,2,3,4, 4g brass counter sunk brass wood screw 12mm long*4
2 Slide Drop Axle and Radiator on to front rails- 5-3,4
3 Place fins into grill surround (goes in on angle)
Clip on to Drop Axle and Radiator- 7,6,-5
4 Attach stub axles to drop axle- 9,10-5 M4 20mm long pan head
5 Attach long steering arm to both stub axles- 8 4g pan head self-taper*2
6 Attach steering arm to LHS stub axle- 11 4g pan head self-taper
7 Insert front beam into holes on front rails- 19,-4,3
8 Locate dowel pins of front stabilizers into floor holes and drop axle holes( take note of Left and right)- 38-1,5
9 Locate RHS and LHS head lights in locating holes in drop axle/front rails - 12-1,3,4
10 Locate rear stabilizers on rear spacers- 37,14
11 Locate rear stabilizers on to floor, from below into rear most slot, close to outside edge of floor- 37,1
12 Place long axle through rear spacers and rear rails (hole)- 13-14,37
13 Assemble front wheels and click on to stub axle
( Hold stub axle and push assembled wheel until home, then rotate until free to turn)-
15rimfront,
15front-white wall
17front-tyre
14 Assemble rear wheels & click on to rear axle (prt13)-
16rimrear
16rear-whitewall
18rear-tyre
15 Assemble red firewall and cowl together- 26,27 4g by 6mm long Pan head self-taper*2
16 Attach doors to cowl you need to cut down small brass/steel flat nails to 7.0 mm long. Then position the nail in the door hinge hole and locate it in position with the cowl hinge hole and push the nail through the hole to from the rotating pin for the door hinges, repeat for both doors.- 28,29-27 20mm long by 1.5mm dia. Brass nail ( cut down),
17 Locate steering wheel on dash steering mount and push dash into hole in cowl from behind. - 22,21-27
18 Locate together, cowl assembly to floor and screw together.
(*make sure the steering arm,8, is free to slide through the opening on the steering wheel side)- 27-1
19 Option push in pedals and pedals blank if required, in slots LHS,RHS - 24,25-1
20 Screw seat supports to base of seat Note Left and right sides place in slots on floor and screw into place form the sides.-
20,20a-1 4g 12mm long pan head self-taper*2
4g 6mm long pan head self-taper*2
21 Assemble block, heads, inlet manifold, joiner & auto
(Use 1.75 filament 8 mm long as dowel pins to locate block to heads and inlet.
Glue in joiner and auto to rear of block.
Use PVA glue and locate assembly on to chassis.- 31,32,33,35,34 PVA
22 Push the gear lever in to auto.- 23-34
23 locate boot and secure it with screws to the floor- 30-1 4g pan head self-taper*2
24 Option, and door handles to inside of doors
Screw into handle first then hold it on door and screw in, use care.- 41-28,29 4g counter sunk brass wood screw 12mm long*2
25 Glue in radiator pipes to radiator heads- 42,43 -32 -5 PVA
26 Locate window frames and position in holes in cowl- 39-27
27 Use template to cut out windscreen a fit to frames-
28 Position flames and mark door lines .Using a cutting board and Stanley knife cut to fit and glue into position-
Alternatively use the flames as a template and paint the flames, which could look better. 40 PVA or other
29 Fit exhaust manifolds to block push into place- 36 -31
30 Use some filament to add a couple of fuel lines to the carbies.
Hotrod Model
Printing Instructions
By Chris McConnell
number Name instructions colour settings
0.3mm layer height, with raft, 10 % infill
1 Floor Build flat on base
2 Rear rail 2 required Build on side
3 Front arm LHS Build on side with engine mount up Use supports
4 Front arm RHS Build on side with engine mount up Use supports
5 Drop Axle and Radiator Build flat on back face
6 Grill surround Lay on flat edge ( back ) 0.2mm layer,
use supports
7 Fins grill Lay on flat back RED 0.2mm layer
8 Long steering arm Lay flat on bed with supports use support
9 Front stub LHS Has supports modelled on it ( break off later)
10 Front stub RHS Has supports modelled on it ( break off later)
11 Steering arm Needs support have end boss flat on bed ( this is for servo option) 0.2mm layer
12 Head Lights Rotate stl file so dome sits on bed Neutral
(or paint chrome) 0.2mm layer
13 Long rear axle Flat on bed as opens
14 Rear spacer 2 required
Build standing up
15 Rim front
White wall 2 required. (black)
2 front-white walls inserts Inserts white
16 Rim rear
White wall 2 required. (black)
2 rear-white walls inserts Inserts white
17 Front tyre 2 required semi flex As per manufactures instructions. (15% infill)
18 Rear tyre 2 required semi flex As per manufactures instructions. (15% infill)
19 Front beam Flat on bed Grey
(or paint chrome) 0.2mm layer
20 Seat support 2 required, build on end standing up
20a seat Build on end standing up Red
21 dash Back of dash flat on bed neutral 0.2 layer
22 Steering wheel Build flat on bed 0.2 layer
23 Gear stick Build on flat side with knob up 0.2 layer
24 pedals Option, build standing on END
25 Pedals blank Option build standing on end
26 Firewall red Build flat side to bed red
27 Front cowl Build with firewall flat to bed, with supports use supports
28 LHS door Build standing on end with hinges at top
29 RHS door Build standing on end with hinges at top
30 boot Build on angle of 50 degrees does require cleaning up. builds quickest with minimal support.
31 V8 block Rear flat face on build table
32 Heads Build flat on bed
( modelled on an angle of 41dregees) RED
33 Inlet carb set flat face on build table
(has supports built on it, break off later) grey
(or paint chrome) 0.2layer
34 Auto Flat face on build table
35 Joiner Used to align block and auto
36 exhaust Build with supports, rotate to best build Grey (or paint chrome) 0.2 layer, use supports
37 Rear stabilizer 2 required ( lay flat)
38 Front stabilizers ( modelled on an angle of 7 degrees)
Rotate to flat on bed, use supports Neutral
(or paint chrome) 0.2 layer, use supports
39 Window frames Build standing up on round base
40 flames 2 required. Build flat on bed
Take care when removing from raft yellow 0.2 layer
41 Door handles 2 required (optional)
42 Wind screen Recycled clear plastic (box packaging sheet)
Similar models
cults
$6
Car Phone Holder
... spring,
4 whell, 1 crosspiece direction,
1 left wheel triangle, 1 right whell triangle,
2 pine 2.92 lg 11
have fun
cults
$2

SUPPORT FOR 2 TURBINES 50X15 FOR TEVO TARANTULA modifiable V.1
...e and the original print head.
it is simple to print thanks to a totally flat side.
the file is easily modifiable with solidworks
cults
free

Support for 2 turbines 50x15 for Tevo Tarantula V.1
...e is the modifiable file: https://cults3d.com/en/mod%c3%a8le-3d/tool/support-for-turbines-50x15-for-tevo-tarantula-modifiable-v-1
cults
$6

Picatinny Rail for TIBERIUS T8.1
...screw requires the tapping of the cylinder head cap. the fixing by screw is recommended for a better maintenance of the assembly.
cults
free

Marco's Wand
...s can be painted easily using acrylic paint.
i made an imgur album showing the assembly process! https://imgur.com/gallery/oi3hi
cults
free

Calvin and Hobbes
...in the pictures section will help in assembling the model and is quite straightforward.
-the model is meant to be glued together.
cults
free

The Coin Slide Operated Jelly Bean Machine
...t head screw and the jar lock and be secured with a 4-40 x 1/2" button head screw and nut.
enjoy...... and reap the profits.
cults
free
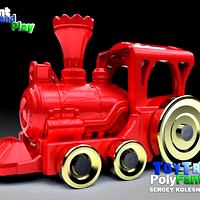
BRIO like Steam Engine - Upgrade and assembled
...d more towards the center avoiding cowcatcher
-cowcatcher is a bit higher
remixed from: https://www.thingiverse.com/thing:359557
cults
free
Support Steampod 3.0 l'Oréal
...the steampod straightener from l'oréal.
2 hole diameter 4mm int. screwed head.
internal mounting dimensions: 46 * 41 * 60mm
cults
free
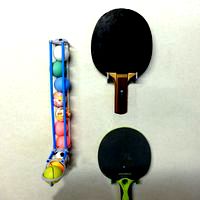
Ping pong accessories
...nted elements.
thickness of layer 0.3
shell thickness 1
fill rate 25
print temperature 220c °
media type everywhere.
Hotrod


V8
cults
free

V8 engine 1/10
...v8 engine 1/10
cults
modelisme
v8 engine 1/10
cults
free

Strange tree V8 Low poly
...range tree v8 low poly
cults
tree strange lowly
in my declination of the tree, here is the lowpoly ...
i have not printed it yet.
cults
free

Titan + bltouch mount compatible with greg's carriage
...in the picture, please give them a like. introduced v8 with hardened supports to prevent vibrations and ghosting. do...
1930
cults
free

Betty Boop Year '80
...betty boop year '80 cults 1930 betty boop star cinema disco music movie animation. betty...
cults
free

Betty Boop Evening
...betty boop evening cults 1930 betty boop star cinema black white music movie annimation...
cults
free

Parahyaena brunnea, Brown Hyena skull
...was collected during the vernay-lang expedition on 18 april 1930 to damara pan, ghanzi, botswana. it was made available...
cults
free

Bakelite Jewelry (3d printed)
...today. the height of bakelite jewelry was the late 1930, up until the end of the art deco period....
cults
free

LZ-129 Hindenburg - scale 1/1000
...dixmude in 1923 (52 dead), the british r101 in 1930 (48 dead), and the us akron in 1933 (73...
Ford
cults
free

Ford keychain
...ford keychain
cults
lavero logo ford
keychain with ford logo.
cults
$1

Ford Keychain
...ford keychain
cults
ford keychain
design in catia v5
cults
$12

Ford Fiesta
...ford fiesta
cults
roda buffer
cults
$10

ford mustang gt 500
...odel gt500
a 100% printable model! a ’ford shelby mustang gt 500, with a lot of details, designed especially for fdm 3d printers.
cults
$12

Handle for car seat Ford Focus
...handle for car seat ford focus
cults
handle car seat ford focus part replacement
part for car seat in ford focus
cults
$8

RICK DECARD
...rick decard cults blade runner harrison ford chest science fiction movie actor bust of harrison ford...
cults
$2

blinkers
...blinkers cults botao cllignotantes ford ...
cults
free

Bronco Classic Badge
...classic badge cults this is a beautiful recreation of ford#39;s bronco logo. this is an iconic design. enjoy! please...
cults
free
Da (not-quite-so-fast) Gangster Getaway 2
...da (not-quite-so-fast) gangster getaway 2 cults 1920s 28mm ford gangster historical wargaming no, not every gangster could afford...
cults
free

Modular Water
...section with rustic wooden bridge straight river section with ford curved river sections x2 marsh/bog with - rushes (note...
Auto
cults
free

DIY Auto Plant Waterer
...diy auto plant waterer
cults
diy auto plant waterer
diy auto plant waterer
cults
free

Cookie cutter auto car
...cookie cutter auto car
cults
cookie cutter car auto
a cookie cutter in the shape of a car/auto
cults
free

Auto Book marker_ver1
...r1
cults
now, you don't have to do nothing for marking page!
here is a video about how to use.
https://youtu.be/ssf40tka01e
cults
$1

Auto Bumper Car Token 2017
...auto bumper car token 2017
cults
a small car token bumper; d
cults
$1

PLP AUTO 2
... art automotive because car adventure cross jewelry
rally cross car.
everything forms a nice keychain.
no vertical support
cults
free

PLP AUTO BAROUDOR
...
you can marry many colors, it's nice
you can also do it on a larger scale for your children
keychain easy to print.
cults
free

Army Jeep
...army jeep cults toy jeep auto old school army jeep, inspired by my favorite tv...
cults
$2

Christmas magnet
...christmas magnet cults art. toy auto magnet gif 3d print new magnet of two colors....
cults
free

Nissan 350Z keychain
...nissan 350z keychain cults 350z 370z amazing auto autootive black blue car crazy creative this is a basic...
cults
free

WRX Key Chain
...wrx key chain cults amazing auto autootive car cars cool creative jdm sti subaru wrx this...
Rc
cults
free

RCS Malebot
...rcs malebot
cults
rcs malebot
rcs malebot
cults
free

RCS Hex Chain
...rcs hex chain
cults
rcs hex chain
rcs hex chain
cults
free

RCS Tree Ornaments
...rcs tree ornaments
cults
rcs tree ornaments
rcs tree ornaments
cults
free
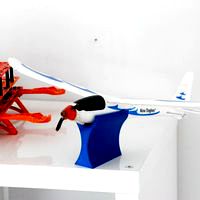
RC Plane Stand
...rc plane stand
cults
rc plane stand
rc plane stand
cults
free

Skis for RC planes
...skis for rc planes
cults
skis for rc planes
skis for rc planes
cults
free

RCS Vacuum mold
...rcs vacuum mold
cults
rcs vacuum mold
rcs vacuum mold
cults
$2

Rc dashboard ladybug / beetle for RC 1/10
... drift scale beetle vw classic car rc car
dashboard and fly for rc 1/10 tamiya ladybug / bettle
attention to l scale of the fly
cults
$21
Flying Wings RC
...flying wings rc
cults
flying wings rc
cults
$3

Nitro RC horns
...nitro rc horns
cults
aileron modeling rc traxxas
3d model of an aleron for an automodelo rc 1/10 or 1/8.
cults
free

RC model engine
...rc model engine
cults
this is a mockup of an enya rc model engine.
Hot
cults
$3

HOT ROD
...hot rod
cults
hot rod
i like hot rods and i made one very simple, i hope you like it
cults
free

hot spring with monkey
...hot spring with monkey
cults
hot spring with monkey
hot spring with monkey
cults
free

Flash Hot Shoe Cover
...flash hot shoe cover
cults
flash hot shoe cover
flash hot shoe cover
cults
$2

Hot glue gun
...hot glue gun
cults
piece interior
cults
free

Hot Shoe Mount for canon with sync
...hot shoe mount for canon with sync
cults
hot shoe mount for canon with sync
hot shoe mount for canon with sync
cults
free

Hot Wheels GoPro Car
...deos by fivemadmoviemakers on youtube. this project doesn’t use any parts from a hot wheels car, but instead is fully 3d printed.
cults
free

Hot End repair holder
...o need 2x m3x10mm and nuts. if you use the little bracket to hold the arduino in place, you also need a little “wood like” screw.
cults
free

Hot sale moon ball with LED light
...hot sale moon ball with led light
cults
hot sale moon ball with led light
hot sale moon ball with led light
cults
free

Hot dog
... download this 3d printer file and make it with 3d printing. let’s enjoy!
this 3d model was originally shared on poly by google.
cults
free

Hot Wheels Corkscrew Ramp
...o make something that will help me recreate famous corkscrew jump from the man with the golden gun!
https://youtu.be/p8-glwbdnf8
Rod
cults
$1

curtain rod
...curtain rod
cults
rod curtain cleat house bedroom
bracket for curtain rod,
the rod must be a 1cm by 2cm bracket.
cults
$3
HOT ROD
...hot rod
cults
hot rod
i like hot rods and i made one very simple, i hope you like it
cults
free

Support curtain rod
...tain veiling rod support
a small support to hold the curtain rods (curtain). to be positioned directly on the top of the windows.
cults
free

Curtain Rod Holder
...hese brackets that will fit into the top of the window. no tolerance to the nest therefore do not hesitate to join them in force.
cults
free

Rod Tripod
...end using the pads at the end of the legs for better bed adhesion, you can detach them later if you prefer the clean tripod look.
cults
free

Curtain Rod Slider
...curtain rod slider
cults
.
cults
free

Crank rod - Crank rod - mechanism
... take directly the gcode or stl files with 1/10 scale.
do not hesitate to put a small drop of oil on the rubbing parts.
a +
nop21
cults
free

ZYYX Crab Rod
...or 3d printing.
don't forget to release the little critters back in the water!
https://www.youtube.com/watch?v=ee2w7jdthu8
cults
free
Overhead Spool Holder For Closet Rod
...overhead spool holder for closet rod
cults
overhead spool holder for closet rod
overhead spool holder for closet rod
cults
free
RigidBot Z-rod Filament Guard
...rigidbot z-rod filament guard
cults
rigidbot z-rod filament guard
rigidbot z-rod filament guard
Car
cults
free

Car Wheel, Well Car
...car wheel, well car
cults
car
pdf and plan piece made by config on solidworks
cults
free

Garage cars
...garage cars
cults
cars car arrangement box
car storage garage
cults
$4

Little Car
...little car
cults
little car
little car
cults
free

EUMAKERS' Car - Toy car
... of available colours, so have fun customising your eumakers' car!
designed by: [serena fanara](http://www.serenafanara.it/)
cults
$1

Car keychain
...car keychain
cults
new design keychain 4 * 4 car
cults
free
Sports Car pull-back car toy
...sports car pull-back car toy
cults
car_toyn pull-back car sports_car toys
my 123d design portfolio - sports car pull-back toy
cults
free

Puzzle car
...puzzle car
cults
puzzle poly because make
make your car
cults
$4
homer car the homero car
...sis (only supports for the chassis)
any comments are welcome! have fun printing !!
final size of the model 18 cm approx
cults
free
Car pencil pot / Car pencil box
...car pencil pot / car pencil box
cults
pot toy pencil
achievements of a pencil pot in the shape of a car.
cults
free

car mockups
...ckups
cults
hubcaps model car
realization of two type hubcap for car model diameter 100 mm height 40 mm printed scale 0.1 and 0.2
Toy
cults
free
Fidget Toy
...fidget toy
cults
fidget toy
fidget toy
cults
free
Toy Piston
...toy piston
cults
toy piston
toy piston
cults
free
Toy Train
...toy 3d toy train toy train tains
you have a baby? print his toy train! experience your 3d printer. my author's toy. wild west
cults
free
Tramway Toy
...tramway toy
cults
toy thu streetcar
a simple old style tramway toy.
an easy old school tram toy
cults
$1
Toy boat
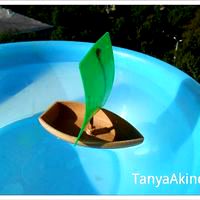
...toy boat
cults
toy boat 3d printing
toy boat for young captains!
cults
$1
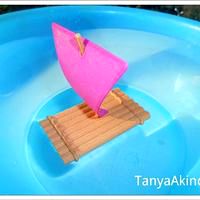
Toy raft
...toy raft
cults
toy raft 3d printing
toy raft for young travelers!
cults
free
Miniature toy
...miniature toy
cults
toy mignion schtrumph dragon thu
objects, toy, souvenir
cults
free

Toy Tools
...toy tools
cults
hammer screwdriver pliers toy
toy tools: hammer, screwdriver, pliers.
cults
$6

Drift Toy
...drift toy
cults
drift cute toy
cults
$1
Robot toy
...robot toy
cults
toy robot
enjoy