Thingiverse
Homemade Panelolu 2 I2C 20x4 LCD with sound for less then 12 euro (incl. simple shematic + sound modefication) ! by ooxtcoo
by Thingiverse
Last crawled date: 3 years, 1 month ago
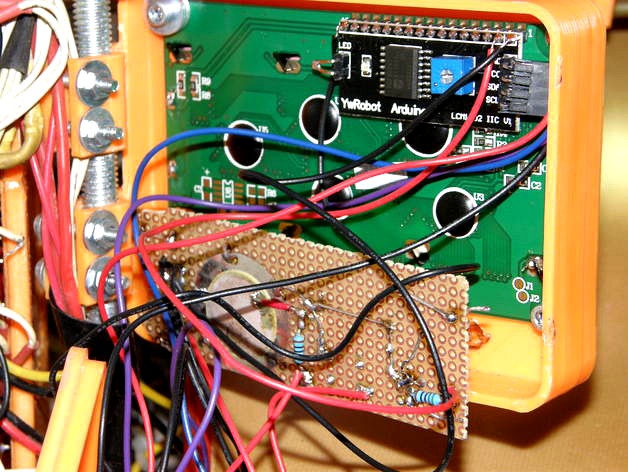
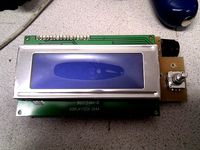
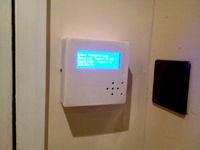
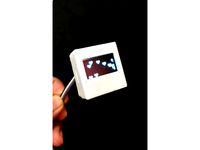
here i whant to show you how to make a panelolu 2 (like) LCD for your printer easy and very cheap by your self!
i payed for everything less then 12€ !!!
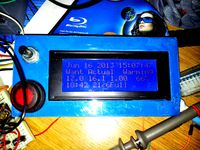
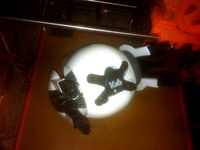
http://youtu.be/fPHAXKJ23Ak
and i show you, how to modeficate your marlin firmware to play a sound...
1.) when printer starts, a short beep
2.) after its init again beep beep (now you know, printer is ready!)
3.) you can add "M9999 S3" when printer finished printing, then it plays a nice sound and you hear your printer finished its work.
you can play also some melodys with M codes..
Like "M9999 S1"
S1 = song 1 / TETRIS
S2 = song 2 / CREAZY FROG
S3 = success sound, when printer is finished with printing
S4 = bad sound, when something failed
first about the lcd:
its very easy to make the i2c lcd supported...
get the cheapst i2c lcd from ebay...
i buyed mine from china for 8âÃÂì
i buyed exaktly this one from him:
20x4 I2C LCD
http://www.ebay.de/itm/Neu-Arduino-Blau-Display-Bildschirm-IIC-I2C-Serie-2004-20x4-Character-LCD-Modul-/370953200452?pt=Bauteile&hash=item565e88a344
7,68 euro
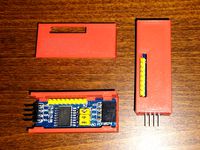
Lochrasterplatine:
http://www.ebay.de/itm/Lochraster-RM-2-54-mm-Platine-Kupfer-Grose-125x57-mm-Experimentierplatine-LEI1-/251438598192?pt=Elektromechanische_Bauelemente&hash=item3a8ae88830
1 euro
Alps Drehgeber Encoder, mechanisch 24 Impulse/U ohne Index Flachschaft, Durchsteckmontage
https://at.rs-online.com/web/p/mechanische-drehgeber/6234237/?searchTerm=EC12E2424407&relevancy-data=636F3D3226696E3D4931384E4B6E6F776E41734D504E266C753D6465266D6D3D6D61746368616C6C7061727469616C26706D3D5E5B5C707B4C7D5C707B4E647D2D2C2F255C2E5D2B2426706F3D313326736E3D592673743D4D414E5F504152545F4E554D4245522677633D424F5448267573743D45433132453234323434303726
1,98 euro
1 LED
1 Resistor for the LED
1 Piezzo / or some old mini speaker from some old motherboard / computer case...
you can also use the leds used it some old computer case..
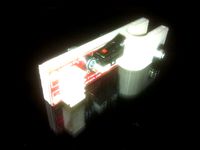
solder it, like shown in the shematic.png picture!
its realy easy, just folow the traces i made.
i have extra painted it fast with win paintshop, its more easy to understand for non electronic peoples then real shematics (i hope so)
in my example, i connected it to the melzi board, thanks to i2c there are still pins free, so i already thinking what iam doing with this free pins.. (maybe bed auto level and learning my printer to speech instead of beeping)
NOW THE PART TO MAKE THE LCD WORK IN THE MARLIN FIRMWARE:
______________________________________________________________
in "configuration.h" file, you need to change:
//LCD and SD support
//
#define ULTRA_LCD //general LCD support, also 16x2
//#define DOGLCD // Support for SPI LCD 128x64 (Controller ST7565R graphic Display Family)
//
#define SDSUPPORT // Enable SD Card Support in Hardware Console
//#define SDSLOW // Use slower SD transfer mode (not normally needed - uncomment if you're getting volume init error)
//#define ENCODER_PULSES_PER_STEP 1 // Increase if you have a high resolution encoder
//#define ENCODER_STEPS_PER_MENU_ITEM 5 // Set according to ENCODER_PULSES_PER_STEP or your liking
//#define ULTIMAKERCONTROLLER //as available from the Ultimaker online store.
//#define ULTIPANEL //the UltiPanel as on Thingiverse
//
#define LCD_FEEDBACK_FREQUENCY_HZ 1000 // this is the tone frequency the buzzer plays when on UI feedback. ie Screen Click
//
#define LCD_FEEDBACK_FREQUENCY_DURATION_MS 100 // the duration the buzzer plays the UI feedback sound. ie Screen Click
______________________________________________________________
so this means you need to enable this lines:
#define ULTRA_LCD //general LCD support, also 16x2
#define LCD_FEEDBACK_FREQUENCY_HZ 1000 // this is the tone frequency the buzzer plays when on UI feedback. ie Screen Click
#define LCD_FEEDBACK_FREQUENCY_DURATION_MS 100 // the duration the buzzer plays the UI feedback sound. ie Screen Click
first one, for the general LCD support and the 2 others for the speaker (sound)
______________________________________________________________
to get this lcd working with the i2c chip used in this lcd, we must modeficate the panelolu 2 code part, for your i2c chip:
// PANELOLU2 LCD with status LEDs, separate encoder and click inputs
//
#define LCD_I2C_PANELOLU2
#ifdef LCD_I2C_PANELOLU2
// This uses the LiquidTWI2 library v1.2.3 or later ( https://github.com/lincomatic/LiquidTWI2 )
// Make sure the LiquidTWI2 directory is placed in the Arduino or Sketchbook libraries subdirectory.
// (v1.2.3 no longer requires you to define PANELOLU in the LiquidTWI2.h library header file)
// Note: The PANELOLU2 encoder click input can either be directly connected to a pin
// (if BTN_ENC defined to != -1) or read through I2C (when BTN_ENC == -1).
//#define LCD_I2C_TYPE_MCP23017
//#define LCD_I2C_ADDRESS 0x20 // I2C Address of the port expander
//#define LCD_USE_I2C_BUZZER //comment out to disable buzzer on LCD
#define LCD_I2C_TYPE_PCF8575
#define LCD_I2C_ADDRESS 0x27 // I2C Address of the port expande
#define NEWPANEL
#define ULTIPANEL
#ifndef ENCODER_PULSES_PER_STEP
#define ENCODER_PULSES_PER_STEP 4
#endif
#ifndef ENCODER_STEPS_PER_MENU_ITEM
#define ENCODER_STEPS_PER_MENU_ITEM 1
#endif
#ifdef LCD_USE_I2C_BUZZER
#define LCD_FEEDBACK_FREQUENCY_HZ 1000
#define LCD_FEEDBACK_FREQUENCY_DURATION_MS 100
#endif
#endif
______________________________________________________________
so instead of:
the MCP23017 i2c chip we use this one: PCF8575
dont care about the different number, this i2c type is compatible with our chip which we whant to use...
______________________________________________________________
the last thing now is to tell marlin what pins we are using for our rotary click encode and beeper:
for the LCD you simply connect SDA to SDA, SCL to SCL, VCC to VCC (+5V) and Ground to Ground on the melzi board!
you find all connections on the same socket!
i didnt found how to control the backlight, just jumper it to always on on the lcd directly..
#ifdef ULTRA_LCD
#ifdef NEWPANEL
//we have no buzzer installed
//#define BEEPER -1
#define BEEPER 28 //we have a buzzer and its connected to pin 28 like show in the shematic.png
//LCD Pins
#ifdef DOGLCD
// Pins for DOGM SPI LCD Support
#define DOGLCD_A0 30
#define DOGLCD_CS 29
// GLCD features
#define LCD_CONTRAST 1
// Uncomment screen orientation
// #define LCD_SCREEN_ROT_0
// #define LCD_SCREEN_ROT_90
#define LCD_SCREEN_ROT_180
// #define LCD_SCREEN_ROT_270
#else // standard Hitachi LCD controller
//
#define LCD_PINS_RS 4
#define LCD_PINS_ENABLE 17
#define LCD_PINS_D4 30
#define LCD_PINS_D5 29
#define LCD_PINS_D6 28
#define LCD_PINS_D7 27
#endif
//The encoder and click button
#define BTN_EN1 11 // we connect it to D11 on melzi
#define BTN_EN2 10 // we connect it to D10 on melzi
#ifdef LCD_I2C_PANELOLU2
#ifdef MELZI
#define BTN_ENC 29 //the click switch
#define SDSS 30 //to use the SD card reader on the Panelolu2 rather than the melzi board (we use the reader on the melzi board, we dont need a 2nd reader)
#else
#define BTN_ENC 30 //the click switch
#endif
#else
#define BTN_ENC 16 //the click switch
#endif //Panelolu2
//not connected to a pin
#define SDCARDDETECT -1
#endif //Newpane
#endif //Ultipanel
______________________________________________________________
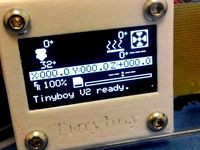
thats all for the LCD!
if you whant, you can upload the firmware to your board and test it..
it should now display already everything and the rotary click encoder should work too!
you also should alread hear some beep sounds, but no melodys...
______________________________________________________________
NEXT STEP:
making your printer playing some sounds / melodys:
______________________________________________________________
insert this code into "Marlin_main.cpp"
...
case 350: // M350 Set microstepping mode. Warning: Steps per unit remains unchanged. S code sets stepping mode for all drivers.
{
#if defined(X_MS1_PIN) && X_MS1_PIN > -1
if(code_seen('S')) for(int i=0;i<=4;i++) microstep_mode(i,code_value());
for(int i=0;i if(code_seen('B')) microstep_mode(4,code_value());
microstep_readings();
#endif
}
//////////////////////////////////////////////////////////////////////////////////
case 9999: // M9999: tone fun part!
{
#if defined ULTIPANEL
LCD_MESSAGEPGM("playing sound!"); //remove this!
lcd_update();
//TETRIS
if(code_seen('S')) switch((int)code_value())
{
case 1: //TETRIS
sound(1320,500);
sound(990,250);
sound(1056,250);
sound(1188,250);
sound(1320,125);
sound(1188,125);
sound(1056,250);
sound(990,250);
sound(880,500);
sound(880,250);
sound(1056,250);
sound(1320,500);
sound(1188,250);
sound(1056,250);
sound(990,750);
sound(1056,250);
sound(1188,500);
sound(1320,500);
sound(1056,500);
sound(880,500);
sound(880,500);
delay(250);
sound(1188,500);
sound(1408,250);
sound(1760,500);
sound(1584,250);
sound(1408,250);
sound(1320,750);
sound(1056,250);
sound(1320,500);
sound(1188,250);
sound(1056,250);
sound(990,500);
sound(990,250);
sound(1056,250);
sound(1188,500);
sound(1320,500);
sound(1056,500);
sound(880,500);
sound(880,500);
delay(500);
sound(1320,500);
sound(990,250);
sound(1056,250);
sound(1188,250);
sound(1320,125);
sound(1188,125);
sound(1056,250);
sound(990,250);
sound(880,500);
sound(880,250);
sound(1056,250);
sound(1320,500);
sound(1188,250);
sound(1056,250);
sound(990,750);
sound(1056,250);
sound(1188,500);
sound(1320,500);
sound(1056,500);
sound(880,500);
sound(880,500);
delay(250);
sound(1188,500);
sound(1408,250);
sound(1760,500);
sound(1584,250);
sound(1408,250);
sound(1320,750);
sound(1056,250);
sound(1320,500);
sound(1188,250);
sound(1056,250);
sound(990,500);
sound(990,250);
sound(1056,250);
sound(1188,500);
sound(1320,500);
sound(1056,500);
sound(880,500);
sound(880,500);
delay(500);
sound(660,1000);
sound(528,1000);
sound(594,1000);
sound(495,1000);
sound(528,1000);
sound(440,1000);
sound(419,1000);
sound(495,1000);
sound(660,1000);
sound(528,1000);
sound(594,1000);
sound(495,1000);
sound(528,500);
sound(660,500);
sound(880,1000);
sound(838,2000);
sound(660,1000);
sound(528,1000);
sound(594,1000);
sound(495,1000);
sound(528,1000);
sound(440,1000);
sound(419,1000);
sound(495,1000);
sound(660,1000);
sound(528,1000);
sound(594,1000);
sound(495,1000);
sound(528,500);
sound(660,500);
sound(880,1000);
sound(838,2000);
break;
case 2: //CREAZY FROG
sound(676,460);
sound(804,340);
sound(676,230);
sound(676,110);
sound(902,230);
sound(676,230);
sound(602,230);
sound(676,460);
sound(1012,340);
sound(676,230);
sound(676,110);
sound(1071,230);
sound(1012,230);
sound(804,230);
sound(676,230);
sound(1012,230);
sound(1351,230);
sound(676,110);
sound(602,230);
sound(602,110);
sound(506,230);
sound(758,230);
sound(676,760);
break;
case 3: //SUCCSSES
sound(1000,180);
delay(5);
sound(1500,180);
delay(5);
sound(1600,180);
delay(50);
sound(1500,100);
delay(50);
sound(1800,80);
delay(50);
sound(1500,100);
delay(50);
sound(1800,350);
break;
case 4: //FAIL
sound(400,180);
delay(5);
sound(300,180);
delay(5);
sound(100,1000);
break;
}
#endif
}
///////////////////////////////////////////////////////////////////////////////////
break;
case 351: // M351 Toggle MS1 MS2 pins directly, S# determines MS1 or MS2, X# sets the pin high/low.
{
...
______________________________________________________________
to play beep sound at start and after finished init, add this (anywhere in the Routines part of "Marlin_main.cpp":
//===========================================================================
//=============================Routines======================================
//===========================================================================
//make beep sound for buzzer (ooxtcoo)
void sound(int S, int P, int D = 0)
{
#if (LARGE_FLASH == true && ( BEEPER > 0 || defined(ULTRALCD) || defined(LCD_USE_I2C_BUZZER)))
int beepS = S;
int beepP = P;
if (beepS > 0)
{
#if BEEPER > 0
tone(BEEPER, beepS);
delay(beepP);
noTone(BEEPER);
#elif defined(ULTRALCD)
lcd_buzz(beepS, beepP);
#elif defined(LCD_USE_I2C_BUZZER)
lcd_buzz(beepP, beepS);
#endif
}
else
{
delay(beepP);
}
delay(D);
#endif
}
______________________________________________________________
and here at:
void setup()
{
sound(1000,50); //<- add this code, to make first short beep after power on!
setup_killpin();
setup_powerhold();
MYSERIAL.begin(BAUDRATE);
SERIAL_PROTOCOLLNPGM("start");
SERIAL_ECHO_START;
______________________________________________________________
and at the end of the setup routine add this:
#ifdef DIGIPOT_I2C
digipot_i2c_init();
#endif
sound(1000,50); //<-- this code
delay(100); //<-- this code
sound(1100,80); //<- and this code
}
______________________________________________________________
then your hear the beep sound at startup like shown in the video!
______________________________________________________________
so if you whant to have a melody when the printer is finished with its printing, add
M9999 S3
to the gcode editor..
in cura you can easy edit it by clicking to "Start/End-GCode"
and add like this:
;End GCode
M104 S0 ;extruder heater off
M140 S0 ;heated bed heater off (if you have it)
G91 ;relative positioning
G1 E-1 F300 ;retract the filament a bit before lifting the nozzle, to release some of the pressure
G1 Z+0.5 E-5 X-20 Y-20 F{travel_speed} ;move Z up a bit and retract filament even more
G28 X0 Y0 ;move X/Y to min endstops, so the head is out of the way
M84 ;steppers off
G90 ;absolute positioning
;Play Success Sound!
M9999 S3
;Put Finished message on LCD screen
M117 Finished!
______________________________________________________________
so i just added 2 lines:
M9999 S3 <- for the melody song 3 which is the success tone
M117 Finished! <- which prints "Finsihed!" to the lcd screen... cause it always stayed "Printing..." also when it was already finished, i dont liked that...
now it plays a nice sound and display "finished"
______________________________________________________________
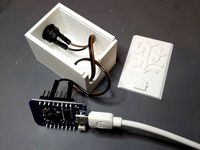
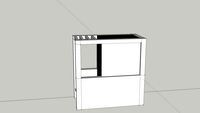
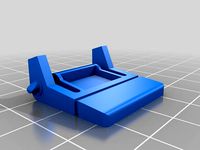
about the LCD case for the Prusa...
i designed it to be as small als possible, i dont made holes for the reset, led and rotary click encoder, cause this way you can put it anywhere
you whant into the case by just drilling holes into the case where you whant it.
______________________________________________________________
the switch is the kill switch... if you press it, the printer will instant stop and after 10 seconds it will restart..
i had first connected it to the killswitch pin, but this pin just stops the printer and it freezes... so its just a waste of a free pin...
instead we use the reset pin, which will also restart the printer and you dont loose an extra pin for that.
______________________________________________________________
if you are interessted how to install a bluetooth modul, let me know, maybe thats my next tutorial if someone needs it.
maybe i add wlan to it too... i need to check and see if it is useful...
may next plans to add is for shure the auto bed leveling and maybe instead of beep sounds i make the printer speeching.
but that need some extra microcontroller and will be a bit more work then this... but is also possible to make it very cheap for just some euros...
______________________________________________________________
i payed for everything less then 12€ !!!
http://youtu.be/fPHAXKJ23Ak
and i show you, how to modeficate your marlin firmware to play a sound...
1.) when printer starts, a short beep
2.) after its init again beep beep (now you know, printer is ready!)
3.) you can add "M9999 S3" when printer finished printing, then it plays a nice sound and you hear your printer finished its work.
you can play also some melodys with M codes..
Like "M9999 S1"
S1 = song 1 / TETRIS
S2 = song 2 / CREAZY FROG
S3 = success sound, when printer is finished with printing
S4 = bad sound, when something failed
first about the lcd:
its very easy to make the i2c lcd supported...
get the cheapst i2c lcd from ebay...
i buyed mine from china for 8âÃÂì
i buyed exaktly this one from him:
20x4 I2C LCD
http://www.ebay.de/itm/Neu-Arduino-Blau-Display-Bildschirm-IIC-I2C-Serie-2004-20x4-Character-LCD-Modul-/370953200452?pt=Bauteile&hash=item565e88a344
7,68 euro
Lochrasterplatine:
http://www.ebay.de/itm/Lochraster-RM-2-54-mm-Platine-Kupfer-Grose-125x57-mm-Experimentierplatine-LEI1-/251438598192?pt=Elektromechanische_Bauelemente&hash=item3a8ae88830
1 euro
Alps Drehgeber Encoder, mechanisch 24 Impulse/U ohne Index Flachschaft, Durchsteckmontage
https://at.rs-online.com/web/p/mechanische-drehgeber/6234237/?searchTerm=EC12E2424407&relevancy-data=636F3D3226696E3D4931384E4B6E6F776E41734D504E266C753D6465266D6D3D6D61746368616C6C7061727469616C26706D3D5E5B5C707B4C7D5C707B4E647D2D2C2F255C2E5D2B2426706F3D313326736E3D592673743D4D414E5F504152545F4E554D4245522677633D424F5448267573743D45433132453234323434303726
1,98 euro
1 LED
1 Resistor for the LED
1 Piezzo / or some old mini speaker from some old motherboard / computer case...
you can also use the leds used it some old computer case..
solder it, like shown in the shematic.png picture!
its realy easy, just folow the traces i made.
i have extra painted it fast with win paintshop, its more easy to understand for non electronic peoples then real shematics (i hope so)
in my example, i connected it to the melzi board, thanks to i2c there are still pins free, so i already thinking what iam doing with this free pins.. (maybe bed auto level and learning my printer to speech instead of beeping)
NOW THE PART TO MAKE THE LCD WORK IN THE MARLIN FIRMWARE:
______________________________________________________________
in "configuration.h" file, you need to change:
//LCD and SD support
//
#define ULTRA_LCD //general LCD support, also 16x2
//#define DOGLCD // Support for SPI LCD 128x64 (Controller ST7565R graphic Display Family)
//
#define SDSUPPORT // Enable SD Card Support in Hardware Console
//#define SDSLOW // Use slower SD transfer mode (not normally needed - uncomment if you're getting volume init error)
//#define ENCODER_PULSES_PER_STEP 1 // Increase if you have a high resolution encoder
//#define ENCODER_STEPS_PER_MENU_ITEM 5 // Set according to ENCODER_PULSES_PER_STEP or your liking
//#define ULTIMAKERCONTROLLER //as available from the Ultimaker online store.
//#define ULTIPANEL //the UltiPanel as on Thingiverse
//
#define LCD_FEEDBACK_FREQUENCY_HZ 1000 // this is the tone frequency the buzzer plays when on UI feedback. ie Screen Click
//
#define LCD_FEEDBACK_FREQUENCY_DURATION_MS 100 // the duration the buzzer plays the UI feedback sound. ie Screen Click
______________________________________________________________
so this means you need to enable this lines:
#define ULTRA_LCD //general LCD support, also 16x2
#define LCD_FEEDBACK_FREQUENCY_HZ 1000 // this is the tone frequency the buzzer plays when on UI feedback. ie Screen Click
#define LCD_FEEDBACK_FREQUENCY_DURATION_MS 100 // the duration the buzzer plays the UI feedback sound. ie Screen Click
first one, for the general LCD support and the 2 others for the speaker (sound)
______________________________________________________________
to get this lcd working with the i2c chip used in this lcd, we must modeficate the panelolu 2 code part, for your i2c chip:
// PANELOLU2 LCD with status LEDs, separate encoder and click inputs
//
#define LCD_I2C_PANELOLU2
#ifdef LCD_I2C_PANELOLU2
// This uses the LiquidTWI2 library v1.2.3 or later ( https://github.com/lincomatic/LiquidTWI2 )
// Make sure the LiquidTWI2 directory is placed in the Arduino or Sketchbook libraries subdirectory.
// (v1.2.3 no longer requires you to define PANELOLU in the LiquidTWI2.h library header file)
// Note: The PANELOLU2 encoder click input can either be directly connected to a pin
// (if BTN_ENC defined to != -1) or read through I2C (when BTN_ENC == -1).
//#define LCD_I2C_TYPE_MCP23017
//#define LCD_I2C_ADDRESS 0x20 // I2C Address of the port expander
//#define LCD_USE_I2C_BUZZER //comment out to disable buzzer on LCD
#define LCD_I2C_TYPE_PCF8575
#define LCD_I2C_ADDRESS 0x27 // I2C Address of the port expande
#define NEWPANEL
#define ULTIPANEL
#ifndef ENCODER_PULSES_PER_STEP
#define ENCODER_PULSES_PER_STEP 4
#endif
#ifndef ENCODER_STEPS_PER_MENU_ITEM
#define ENCODER_STEPS_PER_MENU_ITEM 1
#endif
#ifdef LCD_USE_I2C_BUZZER
#define LCD_FEEDBACK_FREQUENCY_HZ 1000
#define LCD_FEEDBACK_FREQUENCY_DURATION_MS 100
#endif
#endif
______________________________________________________________
so instead of:
the MCP23017 i2c chip we use this one: PCF8575
dont care about the different number, this i2c type is compatible with our chip which we whant to use...
______________________________________________________________
the last thing now is to tell marlin what pins we are using for our rotary click encode and beeper:
for the LCD you simply connect SDA to SDA, SCL to SCL, VCC to VCC (+5V) and Ground to Ground on the melzi board!
you find all connections on the same socket!
i didnt found how to control the backlight, just jumper it to always on on the lcd directly..
#ifdef ULTRA_LCD
#ifdef NEWPANEL
//we have no buzzer installed
//#define BEEPER -1
#define BEEPER 28 //we have a buzzer and its connected to pin 28 like show in the shematic.png
//LCD Pins
#ifdef DOGLCD
// Pins for DOGM SPI LCD Support
#define DOGLCD_A0 30
#define DOGLCD_CS 29
// GLCD features
#define LCD_CONTRAST 1
// Uncomment screen orientation
// #define LCD_SCREEN_ROT_0
// #define LCD_SCREEN_ROT_90
#define LCD_SCREEN_ROT_180
// #define LCD_SCREEN_ROT_270
#else // standard Hitachi LCD controller
//
#define LCD_PINS_RS 4
#define LCD_PINS_ENABLE 17
#define LCD_PINS_D4 30
#define LCD_PINS_D5 29
#define LCD_PINS_D6 28
#define LCD_PINS_D7 27
#endif
//The encoder and click button
#define BTN_EN1 11 // we connect it to D11 on melzi
#define BTN_EN2 10 // we connect it to D10 on melzi
#ifdef LCD_I2C_PANELOLU2
#ifdef MELZI
#define BTN_ENC 29 //the click switch
#define SDSS 30 //to use the SD card reader on the Panelolu2 rather than the melzi board (we use the reader on the melzi board, we dont need a 2nd reader)
#else
#define BTN_ENC 30 //the click switch
#endif
#else
#define BTN_ENC 16 //the click switch
#endif //Panelolu2
//not connected to a pin
#define SDCARDDETECT -1
#endif //Newpane
#endif //Ultipanel
______________________________________________________________
thats all for the LCD!
if you whant, you can upload the firmware to your board and test it..
it should now display already everything and the rotary click encoder should work too!
you also should alread hear some beep sounds, but no melodys...
______________________________________________________________
NEXT STEP:
making your printer playing some sounds / melodys:
______________________________________________________________
insert this code into "Marlin_main.cpp"
...
case 350: // M350 Set microstepping mode. Warning: Steps per unit remains unchanged. S code sets stepping mode for all drivers.
{
#if defined(X_MS1_PIN) && X_MS1_PIN > -1
if(code_seen('S')) for(int i=0;i<=4;i++) microstep_mode(i,code_value());
for(int i=0;i
microstep_readings();
#endif
}
//////////////////////////////////////////////////////////////////////////////////
case 9999: // M9999: tone fun part!
{
#if defined ULTIPANEL
LCD_MESSAGEPGM("playing sound!"); //remove this!
lcd_update();
//TETRIS
if(code_seen('S')) switch((int)code_value())
{
case 1: //TETRIS
sound(1320,500);
sound(990,250);
sound(1056,250);
sound(1188,250);
sound(1320,125);
sound(1188,125);
sound(1056,250);
sound(990,250);
sound(880,500);
sound(880,250);
sound(1056,250);
sound(1320,500);
sound(1188,250);
sound(1056,250);
sound(990,750);
sound(1056,250);
sound(1188,500);
sound(1320,500);
sound(1056,500);
sound(880,500);
sound(880,500);
delay(250);
sound(1188,500);
sound(1408,250);
sound(1760,500);
sound(1584,250);
sound(1408,250);
sound(1320,750);
sound(1056,250);
sound(1320,500);
sound(1188,250);
sound(1056,250);
sound(990,500);
sound(990,250);
sound(1056,250);
sound(1188,500);
sound(1320,500);
sound(1056,500);
sound(880,500);
sound(880,500);
delay(500);
sound(1320,500);
sound(990,250);
sound(1056,250);
sound(1188,250);
sound(1320,125);
sound(1188,125);
sound(1056,250);
sound(990,250);
sound(880,500);
sound(880,250);
sound(1056,250);
sound(1320,500);
sound(1188,250);
sound(1056,250);
sound(990,750);
sound(1056,250);
sound(1188,500);
sound(1320,500);
sound(1056,500);
sound(880,500);
sound(880,500);
delay(250);
sound(1188,500);
sound(1408,250);
sound(1760,500);
sound(1584,250);
sound(1408,250);
sound(1320,750);
sound(1056,250);
sound(1320,500);
sound(1188,250);
sound(1056,250);
sound(990,500);
sound(990,250);
sound(1056,250);
sound(1188,500);
sound(1320,500);
sound(1056,500);
sound(880,500);
sound(880,500);
delay(500);
sound(660,1000);
sound(528,1000);
sound(594,1000);
sound(495,1000);
sound(528,1000);
sound(440,1000);
sound(419,1000);
sound(495,1000);
sound(660,1000);
sound(528,1000);
sound(594,1000);
sound(495,1000);
sound(528,500);
sound(660,500);
sound(880,1000);
sound(838,2000);
sound(660,1000);
sound(528,1000);
sound(594,1000);
sound(495,1000);
sound(528,1000);
sound(440,1000);
sound(419,1000);
sound(495,1000);
sound(660,1000);
sound(528,1000);
sound(594,1000);
sound(495,1000);
sound(528,500);
sound(660,500);
sound(880,1000);
sound(838,2000);
break;
case 2: //CREAZY FROG
sound(676,460);
sound(804,340);
sound(676,230);
sound(676,110);
sound(902,230);
sound(676,230);
sound(602,230);
sound(676,460);
sound(1012,340);
sound(676,230);
sound(676,110);
sound(1071,230);
sound(1012,230);
sound(804,230);
sound(676,230);
sound(1012,230);
sound(1351,230);
sound(676,110);
sound(602,230);
sound(602,110);
sound(506,230);
sound(758,230);
sound(676,760);
break;
case 3: //SUCCSSES
sound(1000,180);
delay(5);
sound(1500,180);
delay(5);
sound(1600,180);
delay(50);
sound(1500,100);
delay(50);
sound(1800,80);
delay(50);
sound(1500,100);
delay(50);
sound(1800,350);
break;
case 4: //FAIL
sound(400,180);
delay(5);
sound(300,180);
delay(5);
sound(100,1000);
break;
}
#endif
}
///////////////////////////////////////////////////////////////////////////////////
break;
case 351: // M351 Toggle MS1 MS2 pins directly, S# determines MS1 or MS2, X# sets the pin high/low.
{
...
______________________________________________________________
to play beep sound at start and after finished init, add this (anywhere in the Routines part of "Marlin_main.cpp":
//===========================================================================
//=============================Routines======================================
//===========================================================================
//make beep sound for buzzer (ooxtcoo)
void sound(int S, int P, int D = 0)
{
#if (LARGE_FLASH == true && ( BEEPER > 0 || defined(ULTRALCD) || defined(LCD_USE_I2C_BUZZER)))
int beepS = S;
int beepP = P;
if (beepS > 0)
{
#if BEEPER > 0
tone(BEEPER, beepS);
delay(beepP);
noTone(BEEPER);
#elif defined(ULTRALCD)
lcd_buzz(beepS, beepP);
#elif defined(LCD_USE_I2C_BUZZER)
lcd_buzz(beepP, beepS);
#endif
}
else
{
delay(beepP);
}
delay(D);
#endif
}
______________________________________________________________
and here at:
void setup()
{
sound(1000,50); //<- add this code, to make first short beep after power on!
setup_killpin();
setup_powerhold();
MYSERIAL.begin(BAUDRATE);
SERIAL_PROTOCOLLNPGM("start");
SERIAL_ECHO_START;
______________________________________________________________
and at the end of the setup routine add this:
#ifdef DIGIPOT_I2C
digipot_i2c_init();
#endif
sound(1000,50); //<-- this code
delay(100); //<-- this code
sound(1100,80); //<- and this code
}
______________________________________________________________
then your hear the beep sound at startup like shown in the video!
______________________________________________________________
so if you whant to have a melody when the printer is finished with its printing, add
M9999 S3
to the gcode editor..
in cura you can easy edit it by clicking to "Start/End-GCode"
and add like this:
;End GCode
M104 S0 ;extruder heater off
M140 S0 ;heated bed heater off (if you have it)
G91 ;relative positioning
G1 E-1 F300 ;retract the filament a bit before lifting the nozzle, to release some of the pressure
G1 Z+0.5 E-5 X-20 Y-20 F{travel_speed} ;move Z up a bit and retract filament even more
G28 X0 Y0 ;move X/Y to min endstops, so the head is out of the way
M84 ;steppers off
G90 ;absolute positioning
;Play Success Sound!
M9999 S3
;Put Finished message on LCD screen
M117 Finished!
______________________________________________________________
so i just added 2 lines:
M9999 S3 <- for the melody song 3 which is the success tone
M117 Finished! <- which prints "Finsihed!" to the lcd screen... cause it always stayed "Printing..." also when it was already finished, i dont liked that...
now it plays a nice sound and display "finished"
______________________________________________________________
about the LCD case for the Prusa...
i designed it to be as small als possible, i dont made holes for the reset, led and rotary click encoder, cause this way you can put it anywhere
you whant into the case by just drilling holes into the case where you whant it.
______________________________________________________________
the switch is the kill switch... if you press it, the printer will instant stop and after 10 seconds it will restart..
i had first connected it to the killswitch pin, but this pin just stops the printer and it freezes... so its just a waste of a free pin...
instead we use the reset pin, which will also restart the printer and you dont loose an extra pin for that.
______________________________________________________________
if you are interessted how to install a bluetooth modul, let me know, maybe thats my next tutorial if someone needs it.
maybe i add wlan to it too... i need to check and see if it is useful...
may next plans to add is for shure the auto bed leveling and maybe instead of beep sounds i make the printer speeching.
but that need some extra microcontroller and will be a bit more work then this... but is also possible to make it very cheap for just some euros...
______________________________________________________________
Similar models
thingiverse
free

Panelolu2 by Think3dPrint3d
...d even leaves enough spare pins to drive a couple more outputs. versions available for printrboard, ramps, melzi and sanguinololu
thingiverse
free
TinyOLED V1.0/V1.1 for RAMPS : 1.3" I2C OLED, TF Card Module, Rotary Encoder, Buzzer, Connector Board by fred2088
..._hex_converter.php
http://www.hkmakers.hk
p.s. mks mini / base v1.0 ~ v1.4 , please make sure your board have d20, d21 or i2c pin
thingiverse
free

Graphic LCD controller with PWM fan pins for Sanguinololu1.3 main board by Rockyshi
...nololu1.3 main board by rockyshi
thingiverse
. graphic display
.encode
.beeper
.sd adapter on board
.pwm fan pins
.play&plug
thingiverse
free
MidOLED display by warpster
...e
#define u8glib_ssd1306
#endif
#define is_rrd_sc
#define kill_pin 49
#endif
thingiverse
free

Tali's Mask - LED Sound Reactive by Pandariot779
...rgb values. in this case r=150, g=150, b=150
int bvalue = map(value, 0, 30, 0, 255);
pixel.setbrightness(bvalue);
pixel.show();
}
thingiverse
free

Ender 5 beeper silencer / cap
...eliminates the beeping sound when ever you press the button.
use at your own risk!
before printing, please read the instructions!
thingiverse
free

LCD and encoder for PRUSA I3 by lijingwei
...lcd and encoder for prusa i3 by lijingwei
thingiverse
i2c 2004 lcd and encoder for prusa i3
thingiverse
free
D1 Mini Beeper Case
..., and so on.
a link to this project on my website can be found here:
https://thesmarthomeworks.squarespace.com/blog/alarmbeepers
thingiverse
free
Schematics for UltiPanel with rotary encoder by bkubicek
...might need this if you want to create a similar design for your printer. for ultimakers, it will hopefully...
thingiverse
free
20x4 LCD Case by infodude
...adjustment knob like a pot or a rotary encoder, but scad file to play.
not a great print pic, but i was having nozzle issues ;)
Modefication
thingiverse
free

Raspberry Pi Case for 16x2 LCD and 2 Buttons (not adafruit modul, its for normal components) (AsicMiner Edition) by ooxtcoo
...adafruit modul and made
two holes for normal buttons.
i have added asicminer text and some air gaps in the 3d text.
wbr.
hari
thingiverse
free
iMicroLens - iPhone Microskope using CD-Rom, DVD-Rom Lens! by ooxtcoo
... 0.5
maybe with smaller nozzle, it would be more easy and finer, but i was to lazy to change the nozzle for just the one print,
cg_trader
$3

3STEP PAVE RING | 3D
...designe make by profecional designer . it can be modefication by your recuest. thank...
cg_trader
$15

New-generation AK12 machine-Gun
...version pbr material compitable with unity -unreal engine. any modefication just ask. or u can e-mail me m7mdrf3t3@gmail.com gun...
cg_trader
$5

Brilliant Chandelier
...clean topology everything in turbosmooth no need for more modefication it's ready to used real world scale with cm...
cg_trader
$5

monster car creative design 3D
...be here for your services in any recomendations or modefication in the modele car power drive 4x4 creative design...
3dwarehouse
free

modded sketch up truck
...modded sketch up truck
3dwarehouse
i modefed it : ]
3dwarehouse
free
HR Studio
...hr studio 3dwarehouse studio modefication for a dark...
3dwarehouse
free

Renault scenic tunnig
...renault scenic tunnig
3dwarehouse
this model i modeficed... #yckyhgvhjk
Shematic
thingiverse
free

cone christmas tree minecraft stl, shematic orginal colour wrl of before transformation into minecraft by lokilaufeysen
...atic orginal colour wrl of before transformation into minecraft by lokilaufeysen
thingiverse
made with tinkercad and printcraft
thingiverse
free
Aviation electrical connector 3D view by jfrocchini
...aviation electrical connector 3d view by jfrocchini thingiverse 3d shematic view and openscad code of a 16 mm electrical...
thingiverse
free

Universal phone battery charger by Atiesh
...digital voltmeter ammeter dsn-vc288 shematics: reverse polarity protection connetion shematic p.s.: mosfet in protection board must be "logic-level" with...
thingiverse
free

Simson Case for Ignition Control Unit / Gehäuse für Elektronikzündung by xpertsavenue
...this by your own i can send you a shematic for your own ignition unit for free. i also...
thingiverse
free

CG Scale Heltec wiFi Kit 32 with Oled screen and charger by 3dFabrik
...flashing the esp still needs some knowledge of arduino. shematic will follow as soon as i have done it....
thingiverse
free

DIY RC Transmitter "Orbis Air" by ivnssnn
...2.4' ips screen small size gamepad format assembly manual shematic firmware bom spi screen - http://ali.onl/1edp pcb board stm32f407vet6...
thingiverse
free
Auto-Feed Soldering Station by Atiesh
...and gx16 gx12 aviation connectors 19.11.2018 started making some shematic.. 22.11.2018 add prototype of nippers stand with trays mini...
thingiverse
free

Triple Laboratory Bench Power Supply
...them a bit too small. i've included a rough shematic for the wiring of all parts. bill of materials:...
grabcad
free

Bead Roller shematic
...recision build in freecad 0.20
inspiried from :
make it kustom yotyube link https://www.youtube.com/watch?v=tljm9m4cbgk&t=1s
Panelolu
thingiverse
free
Mounting clip for Panelolu by Little_Bonsai
...panelolu by little_bonsai
thingiverse
clip for mounting the panelolu (http://www.thingiverse.com/thing:30049) on the solidoodle2
thingiverse
free

Panelolu Box for MendelMax by Printbit
...ttp://www.thingiverse.com/thing:25617
this design does not currently include a hole or mounting bracket for the sdsl card reader.
thingiverse
free

Panelolu - sNi - magnetic brackets by clarionut
... for 6mm diameter x 3mm rare-earth magnets. this is enough to hold the panelolu quite securely on the steel case of a solidoodle.
thingiverse
free
Panelolu Prusa I3 Mount by l_k3
...n easily mount your panelolu on your prusa i3.
like my facebook page:https://www.facebook.com/pages/mario-lukas/714788148580621
thingiverse
free
Huxley Fold Panelolu Mod by natko
...t.
hardware required:
thinkprint3d panelolu kit
3 off 16mm m3 screws
2 off 20mm m3 screws
1 off 30mm m3 screw
1 off m6 nyloc nut.
thingiverse
free

Panelolu 2 for MendelMax by Printbit
...added "(thicker)" versions of left, right & screen - recommended
changed "knob.stl" for a better design
thingiverse
free

Panelolu by Think3dPrint3d
...om/browse/listing?os&l=301
and ebayhttp://www.ebay.co.uk/sch/i.html?_from=r40&_trksid=m570.l2736&_nkw=reprap+panelolu
thingiverse
free
Panelolu mod with PCB by Pietruchass by niceCircuits
...ramps). can be used with sanguinololu or ramps.
has build-in sd-card connector. accepts standard size sd-card, not only micro-sd.
thingiverse
free

Panelolu case stand with sanguino included ! by Chri
...sanguino 1.3a board itself.
i designed this because my "beiwagerl" printer is too small to mount the board onto it ^^
thingiverse
free
Prusa i3 Compact Panelolu by indieflow
...inium frame i had to down size the lcd to a 16x2 which i had lying around.
this is now fully up and running on my printer.
enjoy!
Ooxtcoo
thingiverse
free

Twitter Logo Keychane by ooxtcoo
...twitter logo keychane by ooxtcoo
thingiverse
a twitter logo keychane...
thingiverse
free

BatMobil by ooxtcoo
... this: http://www.thingiverse.com/thing:326934
print with little support, also the seats inside of the batobile was printed fine.
thingiverse
free

US Galaxy C5 by ooxtcoo
...us galaxy c5 by ooxtcoo
thingiverse
sliced in 2 halfs for better printing this: http://www.thingiverse.com/thing:364446
thingiverse
free

Edit Make HulkBuster Avenger 2 by ooxtcoo
...edit make hulkbuster avenger 2 by ooxtcoo
thingiverse
here is the mashmixer file to my post.
thingiverse
free
Small Cable Box by ooxtcoo
... is a small box to connect cables inside.
i use it for my emporia service cable with my phone unlock box (jau box: http://jau.cc)
thingiverse
free
Geeetech mechanical Endstop holder for Prusa and other Printers by ooxtcoo
...top holder for prusa and other printers by ooxtcoo
thingiverse
geeetech mechanical endstop holder for prusa and other printers.
thingiverse
free
Oblivion Drone Detail Addon by ooxtcoo
...e.com/thing:83193
i used cura plugin to stop at lyerhigh 1.0 and changed to white filament to make to "166" in white.
thingiverse
free

Mad Cats M.M.O.7 Replacement Part by ooxtcoo
...ats mmo7 got broken finger rest holder.
i designed a new one, printed and repaired it.
if someone nees same part, here it is...
thingiverse
free

LCR-T4 ESR Meter 3D Model by ooxtcoo
..., maybe this 3d model can help you.
i made it for my case, which is not finished yet, cause i just finished this model right now.
thingiverse
free
Razer Blackwidow Tournament Edition 2014 Keyboard Stand by ooxtcoo
...y need some silicone or something soft on the end of the stand like the original have.
print is if 100% infill to make it harder.
20X4
thingiverse
free

20X4 LCD Box
...20x4 lcd box
thingiverse
lcd 20x4 box
thingiverse
free
LCD 20x4 Protection by CLBSangTao
...lcd 20x4 protection by clbsangtao
thingiverse
this is lcd 20x4 box.
thingiverse
free
20x4 LCD Enclosure by chrismalyon
...20x4 lcd enclosure by chrismalyon
thingiverse
20x4 lcd enclosure with buttons and speaker grill
thingiverse
free

Juction box cover Lcd 20x4 by dadigno97
...juction box cover lcd 20x4 by dadigno97
thingiverse
box cover lcd 20x4 for junction box
thingiverse
free

LCD4Linux LCD2USB HD44780 20x4 Case by wanleung
...lcd4linux lcd2usb hd44780 20x4 case by wanleung
thingiverse
this is a case for lcd4linux usb2lcd hd44780 20x4 lcd module.
thingiverse
free

LCD 20x4 Holder by Prosto_Maksks
...lcd 20x4 holder by prosto_maksks
thingiverse
pla,
0,2
30%
thingiverse
free

20x4 LCD case by propsman
...com/gp/product/b003b22ur0/ref=oh_aui_detailpage_o01_s00?ie).
attaching the jumper wires can be tough but not at all impossible.
thingiverse
free

16X2 & 20x4 LCD DISPLAY PANEL
...16x2 & 20x4 lcd display panel
thingiverse
paneles para pantalla lcd de 16x2 y 20x4 con i2c, montaje con taladro de 19mm.
thingiverse
free

LCD 20x4 cover body by Mikx
...erse
this is a cover box for 20x4 lcd with i2c port.
to screw all things together i used plastic spacers.
printed in pla white.
thingiverse
free

Display 20x4 box by ricardpous
...rew to the back cover m3
i added one hole on the back for put one female connector for power supply.
used model display: gdm2004d
I2C
thingiverse
free

I2C for LCD
...i2c for lcd
thingiverse
i2c for lcd.
3dfindit
free

EA_T123X-I2C
...ea_t123x-i2c
3dfind.it
catalog: kicad
thingiverse
free

I2C Terminal by smily77
... provide asimple input / output possibility.
it's just a housing for a 2 line lcd 05 i2c display and 12 tactile switches 6610
thingiverse
free
i2c box by robermorales
...i2c box by robermorales
thingiverse
box
thingiverse
free

Pixhawk I2C display by silentjet
...pixhawk i2c display by silentjet
thingiverse
this is a model of now a days bundled with pixhawk 1 an i2c display.
thingiverse
free

I2C LCD Stand by brandongarner96
...i2c lcd stand by brandongarner96
thingiverse
my version of i2c lcd stand for arduino. works fine.
thingiverse
free
SSD1306 I2C OLED 128x64 by linzaw
...ssd1306 i2c oled 128x64 by linzaw
thingiverse
ssd1360 i2c oled 128x64
thingiverse
free
fischertechnik PCF8574 I2C housing
...iverse
a housing for the (waveshare) pcf8574 i2c i/o board, stackable and with a fischertechnik compatible groove at the bottom.
thingiverse
free
Grove LCD I2C Case by Saint_Charles
...grove lcd i2c case by saint_charles
thingiverse
boitier pour lcd i2c de type grove.
thingiverse
free

1.2in I2C Backpack Holder by zcsaale
...pack holder by zcsaale
thingiverse
small holder for the 1.2" i2c backpack from adafruithttp://www.adafruit.com/products/902
Incl
3d_export
$6
chair with armrest cheerio incl cushion
...chair with armrest cheerio incl cushion
3dexport
chair with armrest cheerio incl. cushion kare design
cg_studio
$20
occhio sento - IES incl.3d model
...el
cgstudio
.3ds .c4d .obj - occhio sento - ies incl. 3d model, royalty free license available, instant download after purchase.
turbosquid
$2

Chair incl room modern seat furniture
... available on turbo squid, the world's leading provider of digital 3d models for visualization, films, television, and games.
turbosquid
$1

Lowpoly & Cheap - GrandPiano (texture & materials incl)
... available on turbo squid, the world's leading provider of digital 3d models for visualization, films, television, and games.
cg_studio
$49

FSC All-in-One Card Reader incl. Cards3d model
...gstudio
.max - fsc all-in-one card reader incl. cards 3d model, royalty free license available, instant download after purchase.
cg_studio
$39
FSC Wireless USB Laserpointer incl. USB Stick3d model
...
.max - fsc wireless usb laserpointer incl. usb stick 3d model, royalty free license available, instant download after purchase.
3d_ocean
$25

miMac Pack incl. Computer Screen, Mouse and Keyboard
...nd accurate model of the apple imac, ready for render in any scene and perfect for close-uü as well as far-away shots. all lay...
3ddd
$1

Диван ZOOM IN by MONTIS
...montis , zoom in breedte: 175 cm (220 cm incl armleuningen) diepte: 59 cm (95 cm incl. rugleuning) hoogte:...
3ddd
free
Eichholtz Presidental S
...eichholtz presidental s 3ddd eichholtz , presidental nickel finish incl shades d-450mm...
3ddd
$1

BoConceptLamp_Tulip
...3ddd boconcept , tulip boconceptlamp_tulip 3ds max 2008, vray incl .obj file and textures in max...
Homemade
turbosquid
$14

Homemade Cup
... free 3d model homemade cup for download as max, fbx, and obj on turbosquid: 3d models for games, architecture, videos. (1530055)
turbosquid
$12

Homemade Bread
...ree 3d model homemade bread for download as max, obj, and fbx on turbosquid: 3d models for games, architecture, videos. (1593685)
turbosquid
$10
Homemade Based Gun
... available on turbo squid, the world's leading provider of digital 3d models for visualization, films, television, and games.
turbosquid
$4

Homemade Gaming Table
... available on turbo squid, the world's leading provider of digital 3d models for visualization, films, television, and games.
turbosquid
$59

Electric Homemade Morgenstern
... morgenstern for download as max, max, max, max, fbx, and obj on turbosquid: 3d models for games, architecture, videos. (1708709)
turbosquid
$15

Homemade Chocolates(8 types)
...e 3d model homemade chocolates(8 types) for download as blend on turbosquid: 3d models for games, architecture, videos. (1214642)
turbosquid
$5

Homemade Axe (High Poly)
...ty free 3d model homemade axe (high poly) for download as obj on turbosquid: 3d models for games, architecture, videos. (1209323)
3d_export
$10

homemade knife
...nife
3dexport
all textures in the png extension (2k, pbr). number of polygons 6980. file formats: fbx, obj, stl, max, mb, blend.
turbosquid
$15
Homemade metal sauna stove
...made metal sauna stove for download as max, obj, fbx, and dwg on turbosquid: 3d models for games, architecture, videos. (1577773)
turbosquid
$9
Homemade guide screw module
...e guide screw module for download as 3ds, ige, obj, and sldas on turbosquid: 3d models for games, architecture, videos. (1224566)
Euro
3d_export
$5
euro pallet
...euro pallet
3dexport
euro pallet 1200-800
turbosquid
$17

euro
... available on turbo squid, the world's leading provider of digital 3d models for visualization, films, television, and games.
turbosquid
$7

euro
... available on turbo squid, the world's leading provider of digital 3d models for visualization, films, television, and games.
turbosquid
$1

euro
... available on turbo squid, the world's leading provider of digital 3d models for visualization, films, television, and games.
turbosquid
free

EURO
... available on turbo squid, the world's leading provider of digital 3d models for visualization, films, television, and games.
3d_export
$5
1 euro
...1 euro
3dexport
this coin is valid to be used instead of 1 euro coins in shopping carts.
3d_export
$5

EURO 3D Model
...euro 3d model
3dexport
euro money logo
euro 3d model eldor 72988 3dexport
3ddd
$1
Euro lamp art
...euro lamp art
3ddd
eurolampart
euro lamp art
3d_ocean
$5

Euro Balloon
... was modelled and prepared for photo-realistic renderings, close-ups, cg visualization. the model is ready to be inserted in y...
3d_ocean
$5

Euro Balloon
... was modelled and prepared for photo-realistic renderings, close-ups, cg visualization. the model is ready to be inserted in y...
Sound
turbosquid
$5

sound
...royalty free 3d model sound for download as max, obj, and fbx on turbosquid: 3d models for games, architecture, videos. (1211937)
3ddd
$1

Sound Bed
...sound bed
3ddd
sound
bed
3ddd
$1

Natuzzi / SOUND
...natuzzi / sound
3ddd
natuzzi
natuzzi модель - sound
turbosquid
$109

Sound Boom
...bosquid
royalty free 3d model sound boom for download as c4d on turbosquid: 3d models for games, architecture, videos. (1568341)
turbosquid
$5

Sound Booster
...quid
royalty free 3d model sound booster for download as stl on turbosquid: 3d models for games, architecture, videos. (1363395)
turbosquid
$3

Sound Card
...bosquid
royalty free 3d model sound card for download as fbx on turbosquid: 3d models for games, architecture, videos. (1709721)
turbosquid
$1

Stereo Sound
...squid
royalty free 3d model stereo sound for download as obj on turbosquid: 3d models for games, architecture, videos. (1342541)
3d_ocean
$5

Sound Heart
... day wing wings
sound heart with wings. setup render and environment map with vray. thank you! please see some of my collection…
turbosquid
$45

Sound Car
...lty free 3d model sound car for download as max, fbx, and obj on turbosquid: 3d models for games, architecture, videos. (1540353)
turbosquid
$25

Speaker Sound
...ee 3d model speaker sound for download as 3ds, obj, and blend on turbosquid: 3d models for games, architecture, videos. (1323810)
Lcd
turbosquid
$20

lcd
... available on turbo squid, the world's leading provider of digital 3d models for visualization, films, television, and games.
turbosquid
$15

LCD
... available on turbo squid, the world's leading provider of digital 3d models for visualization, films, television, and games.
turbosquid
$10

LCD
... available on turbo squid, the world's leading provider of digital 3d models for visualization, films, television, and games.
turbosquid
$10

LCD
... available on turbo squid, the world's leading provider of digital 3d models for visualization, films, television, and games.
turbosquid
$2

lcd
... available on turbo squid, the world's leading provider of digital 3d models for visualization, films, television, and games.
turbosquid
$1

lcd
... available on turbo squid, the world's leading provider of digital 3d models for visualization, films, television, and games.
turbosquid
free
lcd
... available on turbo squid, the world's leading provider of digital 3d models for visualization, films, television, and games.
turbosquid
free

LCD
... available on turbo squid, the world's leading provider of digital 3d models for visualization, films, television, and games.
3ddd
$1

Noti Lcd Sofa
...noti lcd sofa
3ddd
noti , lcd
3d model of noti lcd sofa
3d_ocean
$7

Lcd tube wall
...hrome electronic electronic lcd tv videowall
lcd tube wall you can put in the lcd your own texture or movie in it and animate it.
Less
design_connected
free

Less
...less
designconnected
molteni & c less free models computer generated 3d model. designed by jean nouvel.
3d_export
$10

Two Less tables 3D Model
...two less tables 3d model
3dexport
less molteni molteni&c table desk model
two less tables 3d model boroda 56653 3dexport
3d_export
$7
MolteniC table Less 3D Model
...c table less 3d model
3dexport
table desk molteni molteni&c less model
moltenic table less 3d model boroda 56651 3dexport
3d_export
$7

MolteniC table Less 3D Model
...c table less 3d model
3dexport
table desk molteni molteni&c less model
moltenic table less 3d model boroda 56650 3dexport
turbosquid
$19

Cisal Less New set
...3d model cisal less new set for download as max, obj, and fbx on turbosquid: 3d models for games, architecture, videos. (1470676)
turbosquid
$19

European Modern Couch - Less
...an modern couch - less for download as max, obj, fbx, and dwg on turbosquid: 3d models for games, architecture, videos. (1281460)
turbosquid
$4

Broom plastic less poly
... available on turbo squid, the world's leading provider of digital 3d models for visualization, films, television, and games.
design_connected
$13

ANNA TORFS Parts Low Less Sculpture Vases
...anna torfs parts low less sculpture vases
designconnected
anna torfs parts low less sculpture vases computer generated 3d model.
turbosquid
$15
Ikea set MALSJO LESS chest of drawers
...alsjo less chest of drawers for download as max, obj, and fbx on turbosquid: 3d models for games, architecture, videos. (1607005)
turbosquid
$450

Ear less semi-automatic N95 mask machine Assembly
... semi-automatic n95 mask machine assembly for download as max on turbosquid: 3d models for games, architecture, videos. (1559662)
12
3ddd
free

декор№12
...декор№12
3ddd
декор№12
turbosquid
$25

12
... available on turbo squid, the world's leading provider of digital 3d models for visualization, films, television, and games.
turbosquid
free
bed 01 12/12/2019
...rbosquid
free 3d model bed_01_12/12/2019 for download as max on turbosquid: 3d models for games, architecture, videos. (1482189)
3d_export
$5
12
...12
3dexport
карабин сайга с рожком и патроном
turbosquid
$24

Chandelier MD 89330-12+12 Osgona
... chandelier md 89330-12+12 osgona for download as max and fbx on turbosquid: 3d models for games, architecture, videos. (1222937)
design_connected
$29

Nuvola 12
...nuvola 12
designconnected
gervasoni nuvola 12 computer generated 3d model. designed by navone, paola.
design_connected
$25
Kilt 12
...kilt 12
designconnected
zanotta kilt 12 computer generated 3d model. designed by progetti, emaf.
design_connected
$11
Domino 12
...domino 12
designconnected
zanotta domino 12 computer generated 3d model. designed by progetti, emaf.
design_connected
$9
Croco 12
...croco 12
designconnected
gervasoni croco 12 computer generated 3d model. designed by navone, paola.
design_connected
$16

X.12
...x.12
designconnected
bernini x.12 chairs computer generated 3d model. designed by franco poli.
Simple
turbosquid
$1

Simple goblet (Taca simples)
... available on turbo squid, the world's leading provider of digital 3d models for visualization, films, television, and games.
3d_export
$5
simple bench
...simple bench
3dexport
the simple bench which can be used in simple projects or video-games.
3d_export
$5
simple knob
...simple knob
3dexport
simple knob
3d_export
$5
simple handle
...simple handle
3dexport
simple handle
3d_export
$5
simple button
...simple button
3dexport
simple button
3d_export
$5

simple spindle
...simple spindle
3dexport
simple spindle
3d_export
$5

simple wheel
...simple wheel
3dexport
simple wheel
3d_export
$5

simple chair
...simple chair
3dexport
simple blue chair
3d_export
free

Simple room
...simple room
3dexport
here is a simple but beautiful room
3ddd
free

SIMPLE | Кресло
...io cianfarra , simple
производитель area declic дизайн giulio cianfarra коллекция simple
2
design_connected
$11

No 2
...no 2
designconnected
sibast no 2 computer generated 3d model. designed by sibast, helge.
turbosquid
$6

Cliff Rock 2-2
...uid
royalty free 3d model cliff rock 2-2 for download as obj on turbosquid: 3d models for games, architecture, videos. (1619161)
turbosquid
$29

Book variation 2 2
...3d model book variation 2 2 for download as max, obj, and fbx on turbosquid: 3d models for games, architecture, videos. (1366868)
turbosquid
$22

Classic baluster (2) (2)
...assic baluster (2) (2) for download as max, obj, fbx, and stl on turbosquid: 3d models for games, architecture, videos. (1483789)
turbosquid
$99

Smilodon 2 Pose 2
... available on turbo squid, the world's leading provider of digital 3d models for visualization, films, television, and games.
turbosquid
$20

Barrel Barricade 2-2
... available on turbo squid, the world's leading provider of digital 3d models for visualization, films, television, and games.
turbosquid
$6

Wall Trophy (2) (2)
... available on turbo squid, the world's leading provider of digital 3d models for visualization, films, television, and games.
turbosquid
free

Tire label 2 of 2
... available on turbo squid, the world's leading provider of digital 3d models for visualization, films, television, and games.
3ddd
$1

Кровать, 2 тумбочки, 2 светильника
...кровать, 2 тумбочки, 2 светильника
3ddd
кровать, 2 тумбочки, 2 светильника
нормальное качество
формат 3ds max
без текстур
3ddd
free

Кровать, 2 тумбочки, 2 светильника
...кровать, 2 тумбочки, 2 светильника
3ddd
кровать, 2 тумбочки, 2 светильника
нормальное качество
формат 3ds max
без текстур