Thingiverse

Homelite Lawn Mower Battery DIY Housing Upgrade by amethystjw
by Thingiverse
Last crawled date: 3 years, 5 months ago
I bought a used Homelite 24v battery-powered lawn mower. It came with a heavy lead acid battery that was failing to hold a good charge. I acquired some very high quality lithium iron phosphate A123 brand automotive battery cells and used 16 of them to replace the two 12v lead acid batteries. The result is a battery that weighs a lot less, charges in two hours instead of 24, and lasts longer per charge. And when it is depleted, it just stops rather than getting weaker and weaker for the last 10 minutes.
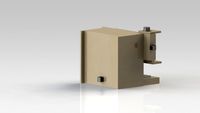
The "thing" I'm posting here is just the black part shown in the photos. This is a housing designed to drop into the Homelite plastic box once you remove the lead acid batteries. With this housing in place, you'll have two slots to insert two battery packs for the A123 cells and a BMS unit (battery management system) in the center with some airflow around it. The point is that everything will fit tightly into the original plastic box without requiring you to stuff styrofoam or anything flexible or flammable inside the pack. Wire it all up properly, screw the red top back on, and you have a durable, high quality DIY lithium rechargeable replacement battery that breathes (a LOT of) new life into your old battery powered mower.
This project is much more an electrical project than a 3D printer project, but I want to share in case someone else can get some use from this. I spent a lot of time and effort designing this and I'd love to know that it helped someone else besides just me.
Also, note that the green battery pack housings in my photos are a separate thing I designed, which you can find by searching Thingiverse for its thing number 4705802.
The strengths of this housing in its final design are that it's very strong (I used PETG) and durable, uses relatively little filament with the large hollow in the bottom, provides several options for running wires and hiding connectors, and is easy to take apart in the event of a problem or cell failure in the future. I put little handles on the top to help me pull it out of the Homelite battery box, and what looks like a tiny handle in the middle so I can zip tie the BMS in place. (I didn't bother doing that, in the end.)
Similar models
thingiverse
free

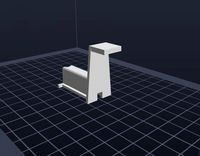
Homelite Mower - Battery Enclosure by mhuff
...homelite-cordless-mower-to-lithium-power/
i've posted the solidworks part file if you'd like to make changes of your own.
thingiverse
free
Enhanced 12s2p / 6s2p battery holder for spot welding (18650 Lithium Ionen cells) by thank-the-maker
... you'll need to print all 4 parts, spot welder the two 6s2p packs together and fold them.
for a 6s2p only 2 parts are needed.
thingiverse
free
12s2p / 6s2p battery holder for spot welding (18650 Lithium Ionen cells) by thank-the-maker
... you'll need to print all 4 parts, spot welder the two 6s2p packs together and fold them.
for a 6s2p only 2 parts are needed.
thingiverse
free

A123 AHR32113 battery pack 8-cell by amethystjw
...ximum strength; you'll end up jamming the cells in there pretty tightly, so you want the housing to hold up to that pressure.
grabcad
free

14kW lithium Prismatic Battery Pack for custom fit purpose
...m prismatic battery pack for custom fit purpose
grabcad
lfp prismatic cells used with orion bms to deliver a 14kwh battery pack.
thingiverse
free

DIY Battery pack 18650 3x6 cell / Obudowa na akumulatory 18650
...6v x1
lithium battery cell bms protection board with balance x1
14awg silicone coated wire
xt60 connectors x2
tact switch 6x6 mm
grabcad
free

3PCS BMS Charger Module 12V 10A 18650 Lithium Battery
... 18650 lithium battery charging board with protection module cell charging input output pcb protection board
solidworks 2021+step
thingiverse
free
10S2P 36V 18650 lithium Li-Ion battery with BMS for scooter, onewheel, e-skateboard
...attery from hoverboard
there is a place for small bms (65x35x10 mm).
when you will use good quality cells you can reach 7000 mah.
3dwarehouse
free

A123 Batteries
...indrical cells to a turnigy 6s1p - 22.2 v 5000 mah lipo battery. do not use as a wiring example! #a123_batteries #size_comparison
thingiverse
free

12V Motorcycle starter battery, 8S Lithium 26650 cell, hard case by bofred
...24/7 you might want to measure the heat produced. similar link: http://liionbms.com/pdf/a123/charging.pdf) voltage regulator on my bike is 14.4v....
Amethystjw
thingiverse
free

AA-Gumstick adapter (dual) by amethystjw
... maybe aluminum foil folded into many layers (maybe 20 layers thick and pressed flat with a vice could work; i did not try this).
thingiverse
free

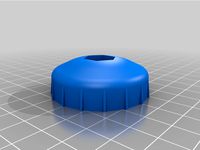
Door or window trim screw plug cover by amethystjw
...er resolution tests i did look good too, because the layer lines approximate the faux wood texture of the plastic they slip into.
thingiverse
free
A123 AHR32113 battery pack 8-cell by amethystjw
...ximum strength; you'll end up jamming the cells in there pretty tightly, so you want the housing to hold up to that pressure.
Homelite
thingiverse
free

homelite weed wacker trigger by Nowzen
...pper / weed wacker. not perfect due to issues in importing between programs. prints ok and works fine. made for homelite hlt-15
thingiverse
free

Homelite leaf blower knob by zzalrs
...omelite leaf blower so made a new one. printed in petg and 100% infill and used an m3 to screw tighten it. (might not be needed)
thingiverse
free

Bouchon tronçonneuse Homelite 410 by bricolou
...bouchon tronçonneuse homelite 410 by bricolou
thingiverse
bouchon réservoir essence ou huile
thingiverse
free
Homelite Mower - Battery Enclosure by mhuff
...homelite-cordless-mower-to-lithium-power/
i've posted the solidworks part file if you'd like to make changes of your own.
thingiverse
free
Homelite F2020 vis de tete de coupe by DzinVolt
...is de remplacement pour la tété de coupe de la débroussailleuse homelite f2020.
la mienne est en petg avec un remplissage a 100%.
thingiverse
free

Homelite Line Trimmer Throttle Hold by ColdCanuck
...er so many years of this, it was time to make a throttle stop (basically cruise control) for my 'homelite" line trimmer.
thingiverse
free

Trimmer Bump Head Knob. Homelite. by SteveCFD
...tion molded original would have had issues cooling out of the tool if it were solid, also it wouldn't have worn out so quick.
thingiverse
free

Homelite 330 Air Filter tray by Mr_Huns
...eecad v0.18
friction is used to hold the foam in the assembly.
this part was designed per request on the house of homelite forum.
thingiverse
free

Carburetor adjustment tool for Ryobi String Trimmer by ElizabethGreene
...tools. it should fit a plethora of ryobi and homelite 2-stroke and 4-stroke engines. v2 includes several changes based...
Mower
3d_export
$5

lawn mower
...lawn mower
3dexport
manual lawn mower for removing grass/
turbosquid
$20

mower
... available on turbo squid, the world's leading provider of digital 3d models for visualization, films, television, and games.
archive3d
free

Mower 3D Model
...l
archive3d
lawn mower grass-cutter
dendropilot mower - 3d model for interior 3d visualization.
3d_export
$8
Button for lawn mower
...button for lawn mower
3dexport
button for lawn mowers
archive3d
free

Mower 3D Model
...er mowing-machine cropper
mower n170213 - 3d model (*.gsm+*.3ds) for exterior 3d visualization.
turbosquid
$15

Toon Mower
...bosquid
royalty free 3d model toon mower for download as obj on turbosquid: 3d models for games, architecture, videos. (1475789)
turbosquid
free

Lawn Mower
...bosquid
royalty free 3d model lawn mower for download as fbx on turbosquid: 3d models for games, architecture, videos. (1293113)
turbosquid
$29

Lawn Mower
...ee 3d model lawn mower for download as max, obj, fbx, and dae on turbosquid: 3d models for games, architecture, videos. (1321465)
turbosquid
$130

Mower Collection
... available on turbo squid, the world's leading provider of digital 3d models for visualization, films, television, and games.
turbosquid
$40

Push Mower
... available on turbo squid, the world's leading provider of digital 3d models for visualization, films, television, and games.
Lawn
3d_export
$5

Lawn
...lawn
3dexport
3d_export
$5
lawn mower
...lawn mower
3dexport
manual lawn mower for removing grass/
3d_export
$8
Button for lawn mower
...button for lawn mower
3dexport
button for lawn mowers
turbosquid
free
Lawn Mower
...bosquid
royalty free 3d model lawn mower for download as fbx on turbosquid: 3d models for games, architecture, videos. (1293113)
3d_ocean
$15

Realistic Lawn
... for high quality architectural visualisation project. files : .max (vray and mentalray) .obj .3ds compatibility : 3d studio m...
turbosquid
$3

Lawn chair
...
royalty free 3d model lawn chair for download as ma and fbx on turbosquid: 3d models for games, architecture, videos. (1173971)
turbosquid
$14

Lawn Grass
...ty free 3d model lawn grass for download as max, max, and fbx on turbosquid: 3d models for games, architecture, videos. (1524349)
turbosquid
$29
Lawn Mower
...ee 3d model lawn mower for download as max, obj, fbx, and dae on turbosquid: 3d models for games, architecture, videos. (1321465)
turbosquid
$45

lawn table.max
... available on turbo squid, the world's leading provider of digital 3d models for visualization, films, television, and games.
turbosquid
$12

Lawn Grass
... model lawn grass for download as max, max, max, fbx, and obj on turbosquid: 3d models for games, architecture, videos. (1538201)
Upgrade
turbosquid
$15

Upgraded Glock
...e 3d model upgraded glock for download as obj, fbx, and blend on turbosquid: 3d models for games, architecture, videos. (1185950)
3ddd
$1

Calligaris / UPGRADE
...calligaris / upgrade
3ddd
calligaris
c материалом
3d_export
free

cz upgrade
...cz upgrade
3dexport
https://www.buymeacoffee.com/mestrezen3d https://linktr.ee/mestrezen3
turbosquid
$80

Custer Tank upgrade
... available on turbo squid, the world's leading provider of digital 3d models for visualization, films, television, and games.
turbosquid
$39

Domestos 1 upgrade
... available on turbo squid, the world's leading provider of digital 3d models for visualization, films, television, and games.
3d_export
$10

Upgraded tea cup
...upgraded tea cup
3dexport
a cup with an unusual design and a unique shape for a more enjoyable tea experience
3d_export
$8

dixy outlander classic style upgraded poplar wood lounge chair
...utlander classic style upgraded poplar wood lounge chair
3dexport
dixy outlander classic style upgraded poplar wood lounge chair
turbosquid
free

AK-12 + Upgrades low-poly 3D model
...ow-poly 3d model for download as fbx, blend, and unitypackage on turbosquid: 3d models for games, architecture, videos. (1501145)
evermotion
$700

Upgrade from V-ray 1.5 to 3.5 for 3ds max
...here is no need to purchase a new dongle - your current dongles will be reprogrammed to carry v-ray 3. evermotion 3d models shop.
evermotion
$300

Upgrade from V-Ray 2.0 to V-ray 3.5 for 3ds Max
... interface (gui) for editing settings on one machine and one render node for rendering on one machine. evermotion 3d models shop.
Diy
3d_export
free
DIY 3D Printer
...diy 3d printer
3dexport
diy 3d printer model
turbosquid
$10

Diy tiered
...l diy tiered for download as max, max, max, max, fbx, and obj on turbosquid: 3d models for games, architecture, videos. (1603709)
turbosquid
$3
Diy Desk to Bench
...odel diy desk to bench for download as 3ds, max, obj, and fbx on turbosquid: 3d models for games, architecture, videos. (1506589)
turbosquid
$2

DIY Moon Light
...model diy moon light for download as obj, fbx, blend, and dae on turbosquid: 3d models for games, architecture, videos. (1501170)
3d_export
$8
DIY CNC Router 3D Model
...diy cnc router 3d model
3dexport
cnc; router; diy; homemade
diy cnc router 3d model maikeru86 58463 3dexport
turbosquid
$5

Diy Kitchen Cabinets
...itchen cabinets for download as 3ds, obj, fbx, blend, and dae on turbosquid: 3d models for games, architecture, videos. (1197373)
3d_export
free

Download free Diying Plant 3D Model
...download free diying plant 3d model
3dexport
diying plant blender
diying plant 3d model visitorsama 98607 3dexport
3ddd
$1
DIY coffee table + decor
... рамка для фото
кофейный столик diy 400х350х600(h) мм. моделился по фото. внимание: материалы - corona.
turbosquid
$3
Diy Wire Lamp Shade
...free 3d model diy wire lamp shade for download as 3ds and fbx on turbosquid: 3d models for games, architecture, videos. (1347605)
cg_studio
$12

DIY MONGOLIAN LAMB STOOLS3d model
... hair soft pile white
.max - diy mongolian lamb stools 3d model, royalty free license available, instant download after purchase.
Battery
3d_ocean
$2

Battery
...battery
3docean
battery electronic
a high quality battery .
3d_export
free

battery
...battery
3dexport
battery
3d_ocean
$5
Battery
...battery
3docean
battery electronics
a classic 6 v battery, high poly with materials
3d_ocean
$3
Batteries
...batteries 3docean aa aaa batteries battery d electronics energy materials power subdivision uv unwrapped aa,...
3d_export
$19
Lead-acid battery storage battery lithium battery
...ttery storage battery lithium battery
3dexport
1.lead-acid battery storage battery lithium battery 2.files include 3dmax obj fbx
3d_ocean
$7

Battery Model
...battery model
3docean
big battery car battery vehicle battery
car battery, big battery, vehicle battery.
3ddd
free

battery energier
...battery energier
3ddd
battery energier , батарейка
battery energier
turbosquid
free
battery
...battery
turbosquid
free 3d model battery for download as obj on turbosquid: 3d models for games, architecture, videos. (1151676)
3d_ocean
$1

Battery Model
...lack minus plus white yellow
this is battery model is about 1000 triangles. turntable preview is smoothed version of the battery.
3d_export
$10

battery 18650
...battery 18650
3dexport
battery 18650
Housing
archibase_planet
free

House
...t
house residential house private house wooden house
house wooden n290815 - 3d model (*.gsm+*.3ds) for exterior 3d visualization.
archibase_planet
free

House
...use residential house private house wooden house
house wood stone n140815 - 3d model (*.gsm+*.3ds) for exterior 3d visualization.
archibase_planet
free

House
...ibase planet
house residential house building private house
house n050615 - 3d model (*.gsm+*.3ds) for exterior 3d visualization.
archibase_planet
free

House
...ibase planet
house residential house building private house
house n030615 - 3d model (*.gsm+*.3ds) for exterior 3d visualization.
archibase_planet
free

House
...ibase planet
house residential house building private house
house n230715 - 3d model (*.gsm+*.3ds) for exterior 3d visualization.
archibase_planet
free

House
...ibase planet
house residential house building private house
house n240615 - 3d model (*.gsm+*.3ds) for exterior 3d visualization.
archibase_planet
free

House
...ibase planet
house residential house building private house
house n290815 - 3d model (*.gsm+*.3ds) for exterior 3d visualization.
archibase_planet
free

House
...ibase planet
house residential house building private house
house n110915 - 3d model (*.gsm+*.3ds) for exterior 3d visualization.
archibase_planet
free

House
...ibase planet
house residential house building private house
house n120915 - 3d model (*.gsm+*.3ds) for exterior 3d visualization.
archibase_planet
free

House
...ibase planet
house residential house building private house
house n210915 - 3d model (*.gsm+*.3ds) for exterior 3d visualization.