Thingiverse
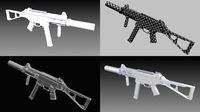
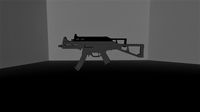
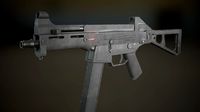
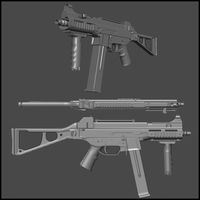
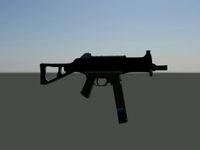
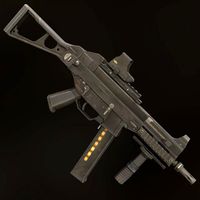
H&K UMP 45 (Prop) by AFlyingCosmonaut
by Thingiverse
Last crawled date: 3 years, 3 months ago
WORK IN PROGRESS
Modeled off of reference pictures, many dimensions are guesses.
This is intended to be a NON-Firing, but bolt operable, replica.
can be printed entirely in PLA (if possible, the charging handle and magazine spring is better printed in petg to retain its springyness)
you will need a large print bed, I printed mine on a 300x300mm print bed.
Test out the magazine spring, upper rear body and stock parts to see if your print area is large enough.
printed with supports, with roof and floor supports enabled.
0.2mm layer height, 20% infil
300x300mm bed was used,
Things to do:
Re-orientate STL files to match intended print orientation.
Re-design the spring rod to be printed horizontally and in less parts
Selector is a little loose, may need to adjust dimensions and/or spring length.
magazine spring is too weak to push up the bolt catch for empty magazines.
magazine needs work to improve feeding.
feeding and shell ejection still needs fine tuning, so dimensions for the barrel, bolt, magazine and extractor may change.
More adjustments as I continue.
You will need as of right now:
8x - M5x6x7 Threaded inserts
8x - M5x10 Pan head screw
3x - M4x10 Pan head screw
3x - M3x6 countersunk screw
1x - M2x10 screw (or anything else thin to use as a pin)
springs:
8x - 9.1x34.9 compression spring (Spring rod)
2x - 9.5x19.1 compression spring (Stock, Magazine release)
2x - 5.6x25 extension spring (Sear, Hammer)
1x - 5.6x20 extension spring (Trigger)
1x - 7.1x19.1 compression spring (Trigger lever)
1x - 7.1x12.7 compression spring (Rear sight)
you should be able to buy a spring kit from amazon which contains all these springs at various quantities, dimensions may vary slightly.
ASSEMBLY:
Lower body:
Remove any loose filament or imperfections on body parts that may prevent smooth operation.
Align lower body left/right and glue together.
Insert magazine release and magazine release spring, pin in place with magazine release pin
Glue bolt release button onto bolt release and pin in place using M2 screw.
Insert trigger spring into trigger, then insert trigger lever.
Insert trigger assembly into lower body and pin in place using body pin.
Insert index wheel into lower body, then insert spring + index plate alongside.
Insert slide into trigger assembly, then fix in place using selector Left/right.
Insert body pin above trigger assembly with trigger spring attached, then hook trigger spring onto trigger.
Screw sear spring onto sear with M3 countrersunk screw, then lock other end of sear spring into lowerbody with M3 countersunk screw and nut.
Insert body pin futherst forward for sear with hammer spring attached, then slide pin through sear and pin in place.
Screw hammer spring onto hammer with m3 countersunk screw then slide and pin inplace with body pin.
Insert unused body pin in the rear most hole.
Upper body:
Remove any loose filament or imperfections on body parts that may prevent smooth operation. especially where the charging handle tube goes. (good idea to test fit what you can before glueing)
Align Upper Body Front left/right and glue togther. (use side rail holes and front sight pin to help with alignment)
Insert front sight and pin in place with front sight pin.
Insert barrel collar into Upper Body Rear Left and glue in place with superglue.
Align Upper Body Rear left/right and glue together. (use the Barrel pin, Front body pin and Rear body pin to help with alignment)
Insert rear sight spring into rear sight notch mock and pin into upper body using rear sight pin, screw down using M4 screw
Stock:
Align Stock left/right and glue together.
Insert stock release button and stock release spring, and pin in place using stock release pin. (may need some sanding or lubricant for smooth operation)
Insert butt plate. Should be press fit, if loose add some glue.
Pin stock into upper body using stock pin.
Spring rod:
Using glue, apply glue and attach spring rod 1 and 2 using spring rod pin. (spring rod 2 is symetric)
prepare spring rod springs by ensuring they slide upand down the rod easily. (may need to bend the ends outward slightly to prevent scratching)
Insert spring ring, follwed by 8 spring rod springs, then screw on spring rod cap with M4 screw to complete spring rod assembly.
Bolt:
Align bolt left/right and glue together. Then slide extractor from rear of bolt towards the front, hook facing inwards. (will need to jiggle it a bit)
complete assembly:
Slide charging handle tude into Upper body assembly with the wider screw hole facing up.
Slide charging handle into chargine handle tube, then align charging handle tube screw hole with the opening on the front upper body, insert M4 screw and screw in place.
Press down hammer in lower body until sear engages, and place stock in a folded position.
Hook lower body onto upper body and swing up into place.
Holding both lower and upper body together, drop in bolt from the rear then insert spring rod assembly.
Insert buttplate, push down and insert rear body pin, locking upper,lower body and butt plate in place.
screw on handrail and top rail using M5 screws. M5 threaded inserts should be used if the screws don't bite.
Similar models
thingiverse
free
Cobra Crossbow Pistol 5-shot Repeating Magazine. by JohnEdwa
...ally, might need to disable or reduce skirt/brim to let some slicers (cura) to allow printing near the edges.
supports required.
3dwarehouse
free

UT-10
...tock. good for cqb because you can fold the stock over the top. shoots 8mmx9.56 rounds. i made up the design out of my imaginaton
thingiverse
free

Cylinder lock by sebastianobos
...in the cylinder. the cylinder will get locked inside thanks to its fins. when the two parts are aligned the key can be extracted.
thingiverse
free

Airsoft Shotgun (Gas) by linkkoz1
... body. slide it in or out, to lock or unlock the barrel.
congratulations! your airsoft shotgun is complete! have fun and be safe!
cg_trader
$35

Argo Remote Control from Star Trek Nemesis | 3D
...control argo argoremote remote control device startrek nemesis cosplay prop replica toy print printable hobby diy hobby diy other
thingiverse
free

Calibrun Rival Reciever Chunky by haphazardlynamed
...her)
2x 5mm nuts
1x volute spring - harvested from bicycle quick-release wheel skewer rod** (used for internal dart tooth spring)
thingiverse
free

Front Sight Insert for NCStar Universal Rear Sight Tool by Tpierce89
...e stl file was created from the exact dimensions of the part. this allows him to use his rear sight tool on front sights as well.
thingiverse
free

Airsoft PPS XM26 - Bullpup Conversion Kit by DaXLR
... or filing so it's not too tight.
there you go! bullpup xm26. it works exactly the same as the stock xm, except much smaller.
thingiverse
free

AK74 & AKM Barrel Populating Alignment Jig by Crashin_Machines
...ssembled. remove the jig and press the assembly back into the front trunnion and pin it. that's it for this tool's use.
cg_trader
$3

AK 74u
...ak 74u
cg trader
the model includes body, bolt, stock, trigger, release and mag.
Aflyingcosmonaut
thingiverse
free

2020 Frame Hook by AFlyingCosmonaut
...2020 frame hook by aflyingcosmonaut
thingiverse
a simple easy print hook to hold a scraper.
thingiverse
free
Tronxy x5s 10mm x 20mm Drag chain mount by AFlyingCosmonaut
... meter.
check mounting before purchase as it may differ from the one this is designed for.
for reference: https://amzn.to/3ivlbsf
thingiverse
free

Tronxy x5s Electronics Enclosure for Duet Wifi by AFlyingCosmonaut
...id
18 m4 nuts :
• 10 – 5x angle_bracket.stl
• 4 – 120mm fan
• 4 – duet wifi
5 m4 2020 t-slot nut (5x angle_bracket.stl)
Ump
3d_export
$15
UMP 3D Model
...ump 3d model
3dexport
ump rifle
ump 3d model cooty125 26212 3dexport
turbosquid
$2

hk ump
... available on turbo squid, the world's leading provider of digital 3d models for visualization, films, television, and games.
turbosquid
$15
UMP Low-Poly
...rbosquid
royalty free 3d model ump low-poly for download as on turbosquid: 3d models for games, architecture, videos. (1473965)
turbosquid
$2
Submachine Gun UMP
...p
turbosquid
royalty free 3d model ump 45 for download as ma on turbosquid: 3d models for games, architecture, videos. (1248625)
turbosquid
free

HK UMP 45
... available on turbo squid, the world's leading provider of digital 3d models for visualization, films, television, and games.
turbosquid
free

UMP 45 SMG
... available on turbo squid, the world's leading provider of digital 3d models for visualization, films, television, and games.
3d_export
$5
HK UMP-45
...g them among the small number of submachine guns deployed by the u.s. military in recent conflicts.<br>2 texture's sets
3d_ocean
$16
High Poly UMP 45
...5
3d model of a high poly ump 45 submachine gun, usefull for various purposes. - poly count: 31000 polys - formats: max /obj /fbx
turbosquid
$1
H&K UMP 45
... available on turbo squid, the world's leading provider of digital 3d models for visualization, films, television, and games.
3d_export
$99

Heckler Koch UMP 3D Model
...ol submachine ump weapon
heckler koch ump 3d model download .c4d .max .obj .fbx .ma .lwo .3ds .3dm .stl humster3d 102517 3dexport
K
turbosquid
$1
Swedish-K / K-Pist
... available on turbo squid, the world's leading provider of digital 3d models for visualization, films, television, and games.
3ddd
free

K lamp
...k lamp
3ddd
k lamp
3ddd
free

Giano K
...giano k
3ddd
стеллаж
книжные полки giano k
3ddd
$1
K-table
...k-table
3ddd
henge furniture , письменный
k-table by henge furnitures
design_connected
$13
Thin-K
...thin-k
designconnected
kristalia thin-k computer generated 3d model. designed by bertoncini, luciano.
design_connected
$9

Miss K
...miss k
designconnected
flos miss k table lights computer generated 3d model. designed by philippe cramer.
3ddd
$1

Papatya / Ego-K
...papatya / ego-k
3ddd
papatya
papatya / ego-k
3ddd
$1

DeMajo 2612/K
...demajo 2612/k
3ddd
demajo
люстра demajo 2612/k
turbosquid
$14
Fence K
...turbosquid
royalty free 3d model fence k for download as fbx on turbosquid: 3d models for games, architecture, videos. (1314643)
turbosquid
$7

K for Key
...rbosquid
royalty free 3d model k for key for download as max on turbosquid: 3d models for games, architecture, videos. (1689776)
45
3ddd
$1
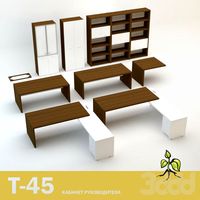
T 45
...t 45
3ddd
t-45
кабинет руководителя t 45
12 предметов
подробнее:http://www.prezident-mebel.ru/index.php?productid=1541
design_connected
$18

Model 45
...model 45
designconnected
onecollection model 45 computer generated 3d model. designed by juhl, finn.
3d_export
free

vase 45
...vase 45
3dexport
3ddd
$1

Frap F101-45
...frap f101-45
3ddd
frap f101-45
turbosquid
$10

building 45
...osquid
royalty free 3d model building 45 for download as max on turbosquid: 3d models for games, architecture, videos. (1362764)
turbosquid
$7
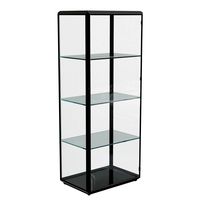
45 Vetrina
...bosquid
royalty free 3d model 45 vetrina for download as max on turbosquid: 3d models for games, architecture, videos. (1630647)
turbosquid
$6
Bedcloth 45
...osquid
royalty free 3d model bedcloth 45 for download as max on turbosquid: 3d models for games, architecture, videos. (1522743)
3ddd
$1

Castle 8341-45
...castle 8341-45
3ddd
castle
люстра castle 8341-45
turbosquid
$25
Submachine 45
...yalty free 3d model submachine 45 for download as fbx and obj on turbosquid: 3d models for games, architecture, videos. (1563993)
turbosquid
$15

Curtain 45
...
royalty free 3d model curtain 45 for download as max and obj on turbosquid: 3d models for games, architecture, videos. (1324828)
Prop
3ddd
$1

Props
...props
3ddd
props
3d_ocean
$10
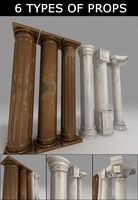
Props
...ject you need this props design this 6 taype for props to get your design perfect and nice file include : 1 max 2 obj 3 3ds 4 zip
turbosquid
$15
Props
...s
turbosquid
royalty free 3d model props for download as max on turbosquid: 3d models for games, architecture, videos. (1249032)
turbosquid
$1

PROPS
...d model props for download as unitypackage, obj, fbx, and tga on turbosquid: 3d models for games, architecture, videos. (1627660)
turbosquid
$5
props
... available on turbo squid, the world's leading provider of digital 3d models for visualization, films, television, and games.
turbosquid
free
PROP
... available on turbo squid, the world's leading provider of digital 3d models for visualization, films, television, and games.
3ddd
$1

kids props
...kids props
3ddd
декоративный набор
kids props
3d_ocean
$8
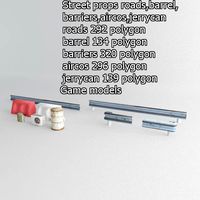
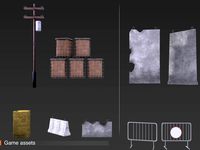
Street props
...l barrier prop roads street street prop
street props game models barrel barrier roads aircos jerrycan models fbx obj and max file
turbosquid
$39
Apocalyptic Props
...uid
royalty free 3d model apocalyptic props for download as on turbosquid: 3d models for games, architecture, videos. (1380028)
turbosquid
$1
Bunker props
...rbosquid
royalty free 3d model bunker props for download as on turbosquid: 3d models for games, architecture, videos. (1196014)