Thingiverse
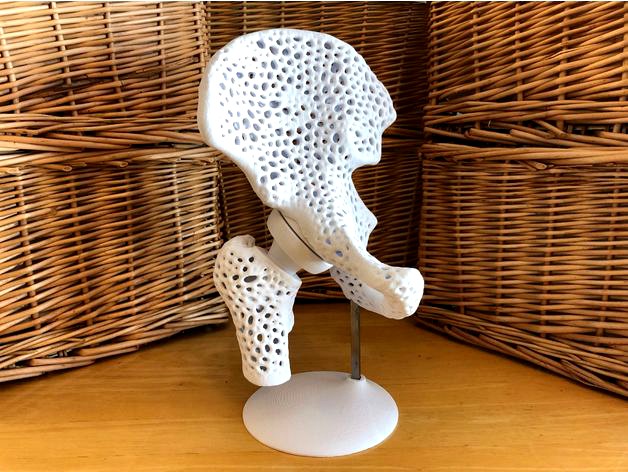
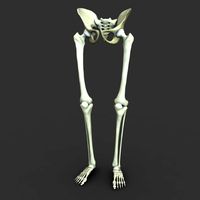
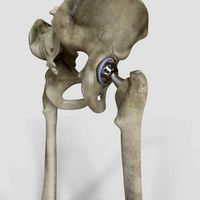
Hip and Pelvis Model by DaveMakesStuff
by Thingiverse
Last crawled date: 2 years, 11 months ago
This display model of the right hemipelvis and femur uses an adjustable ball and socket joint to allow for movement and repositioning of the femoral head in the acetabulum. The model could be used to demonstrate hip replacement prosthesis, or just as an interesting conversation piece!
See here for assembly video: https://youtu.be/LXJVoEX21ZA
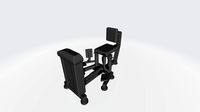
The model is supported on the stand using a 6” long section of ¼” square keystock. The keystock inserts through the ischial tuberosity and is held in place with an anchor inside the pelvis. The anchor is designed as a separate shell and so could be removed digitally before printing if not needed.
Printing:
Print the “Acetabular Cup” and “Collar” as provided so that the threads are oriented upwards. Changing the orientation may result in malformed threads. The “Femoral Head” and “Proximal Femur” should also be oriented as provided to ensure that the connecting surfaces print properly with the correct tolerance.
The “Right Hemipelvis” is oriented to minimize amount of support needed, but you might find an orientation that works better for your setup.
The “Right Hemipelvis” and “Proximal Femur” will need supports.
The “Stand” is a standard print.
Assembly:
If using the stand, ensure that the keystock inserts cleanly through the hole in the ischial tuberosity and is properly seated in the inner anchor. Clean up right surfaces as needed.
Glue the “Acetabular Cup” into the large hole in the “Right Hemipelvis”. Ensure that it is seated securely and evenly. CA glue works well.
Thread the “Collar” over the “Femoral Head” and insert the “Femoral Head” into the “Proximal Femur.” That tolerance is tight enough here that it will hold on its own, but you can add a bit of glue for a permanent connection.
Insert the “Femoral Head” into the “Acetabular Cup” and tighten the “Collar” into place. The collar can be loosened and retightened to move and hold the femur in different positions.
If using the stand, insert the keystock and place on the stand and you’re done!
Credit for the original design idea for this project goes to Thingiverse user “marc_aka_nova” at https://www.thingiverse.com/marc_aka_nova/designs .
Here are more of my anatomic designs you might enjoy:
Hip and Pelvis Model: https://www.thingiverse.com/thing:4875641
Vertebral Stacking Blocks: https://www.thingiverse.com/thing:4868387
Flexible Three-Quarter Spine Model with Display Stand: https://www.thingiverse.com/thing:4863003 Full Size Anatomically Correct Human Foot Model: https://www.thingiverse.com/thing:4849504
Full Size Anatomically Correct Human Hand Model: https://www.thingiverse.com/thing:4841107
Full Size Anatomically-Correct 18-Piece Magnetic Human Skull Model: https://www.thingiverse.com/thing:4830026
Full-sized Anatomically Correct Articulating Spine: https://www.thingiverse.com/thing:4801717
Articulating Lumbar Vertebrae: https://www.thingiverse.com/thing:4637241
Anatomically Correct Voronoi Heart: https://www.thingiverse.com/thing:4636146
Vertebrae with Secret Compartment: https://www.thingiverse.com/thing:4633188
Brain Puzzle: https://www.thingiverse.com/thing:4158232
Anatomical Heart Puzzle: https://www.thingiverse.com/thing:4146688
See here for assembly video: https://youtu.be/LXJVoEX21ZA
The model is supported on the stand using a 6” long section of ¼” square keystock. The keystock inserts through the ischial tuberosity and is held in place with an anchor inside the pelvis. The anchor is designed as a separate shell and so could be removed digitally before printing if not needed.
Printing:
Print the “Acetabular Cup” and “Collar” as provided so that the threads are oriented upwards. Changing the orientation may result in malformed threads. The “Femoral Head” and “Proximal Femur” should also be oriented as provided to ensure that the connecting surfaces print properly with the correct tolerance.
The “Right Hemipelvis” is oriented to minimize amount of support needed, but you might find an orientation that works better for your setup.
The “Right Hemipelvis” and “Proximal Femur” will need supports.
The “Stand” is a standard print.
Assembly:
If using the stand, ensure that the keystock inserts cleanly through the hole in the ischial tuberosity and is properly seated in the inner anchor. Clean up right surfaces as needed.
Glue the “Acetabular Cup” into the large hole in the “Right Hemipelvis”. Ensure that it is seated securely and evenly. CA glue works well.
Thread the “Collar” over the “Femoral Head” and insert the “Femoral Head” into the “Proximal Femur.” That tolerance is tight enough here that it will hold on its own, but you can add a bit of glue for a permanent connection.
Insert the “Femoral Head” into the “Acetabular Cup” and tighten the “Collar” into place. The collar can be loosened and retightened to move and hold the femur in different positions.
If using the stand, insert the keystock and place on the stand and you’re done!
Credit for the original design idea for this project goes to Thingiverse user “marc_aka_nova” at https://www.thingiverse.com/marc_aka_nova/designs .
Here are more of my anatomic designs you might enjoy:
Hip and Pelvis Model: https://www.thingiverse.com/thing:4875641
Vertebral Stacking Blocks: https://www.thingiverse.com/thing:4868387
Flexible Three-Quarter Spine Model with Display Stand: https://www.thingiverse.com/thing:4863003 Full Size Anatomically Correct Human Foot Model: https://www.thingiverse.com/thing:4849504
Full Size Anatomically Correct Human Hand Model: https://www.thingiverse.com/thing:4841107
Full Size Anatomically-Correct 18-Piece Magnetic Human Skull Model: https://www.thingiverse.com/thing:4830026
Full-sized Anatomically Correct Articulating Spine: https://www.thingiverse.com/thing:4801717
Articulating Lumbar Vertebrae: https://www.thingiverse.com/thing:4637241
Anatomically Correct Voronoi Heart: https://www.thingiverse.com/thing:4636146
Vertebrae with Secret Compartment: https://www.thingiverse.com/thing:4633188
Brain Puzzle: https://www.thingiverse.com/thing:4158232
Anatomical Heart Puzzle: https://www.thingiverse.com/thing:4146688
Similar models
grabcad
free

Hip Replacement
...oral stem (as can be seen from one of the screenshots) designed to be 4 mm away from the kinematic center of the hip replacement.
grabcad
free

Total Hip Replacement Parts Assembled
...total hip replacement parts assembled
grabcad
acetabular cup
femoral head
stem
uhmwpe; ultra-high molecular weight polyethylene
grabcad
free

Total Hip Replacement (THR)
...ly replaces the femoral head.
the parts of thr designed here are:
1. acetabular cup
2. cup liner
3. femoral head
4. femoral stem
thingiverse
free

Flexible Three-Quarter Spine Model with Display Stand by DaveMakesStuff
...633188
brain puzzle: https://www.thingiverse.com/thing:4158232
anatomical heart puzzle: https://www.thingiverse.com/thing:4146688
grabcad
free

Hip prosthesis (Rectangular cross section)
... used in thr (total hip replacement) with rectangular or trapezoidal cross section along with acetabular cup, liner femoral head.
grabcad
free

Acetabular Cup
...acetabular cup
grabcad
acetabular cup for hip implant
thingiverse
free

Full Size Anatomically Correct Human Hand Model by DaveMakesStuff
...633188
brain puzzle: https://www.thingiverse.com/thing:4158232
anatomical heart puzzle: https://www.thingiverse.com/thing:4146688
grabcad
free

Hip Joint
...tional force, people often take the chance of using this artificial hip joint to be able to walk properly and without any issues.
grabcad
free

Right hip
...
female proximal femur right. segmented from dicom files downloaded from human visual project at https://mri.radiology.uiowa.edu/
cg_trader
$48

Hip replacement implant installed in the pelvis bone
...solated steel artificial arthroplasty prosthetics femoral prosthesis surgery titanium pelvis cartilage xray femur science medical
Davemakesstuff
thingiverse
free

Pointer by DaveMakesStuff
... pointing at things.
sections screw apart for compact storage and transport. rods are 10cm long, print whatever length you need.
thingiverse
free

Gyroid Sculpture with Oval Profile by DaveMakesStuff
...roid/. it can be purchased at: https://www.shapeways.com/designer/davemakesstuff
see here for video: https://youtu.be/wcjtddytqi0
thingiverse
free

Corona Pumpkin by DaveMakesStuff
...#39;ll probably end up with a headache and fever.
here's a better one for printing: https://www.thingiverse.com/thing:4620382
thingiverse
free
Voronoi Rhombic Dodecahedron Sphere by DaveMakesStuff
... in this sphere are centered on the faces of a rhombic dodecahedron. connecting multiple spheres hole-to-hole will tile 3d space.
thingiverse
free

Hextuple Klein Bottle by DaveMakesStuff
...hat it takes a long time to print, the good news is that it prints without supports.
see video here: https://youtu.be/zcb6e3u87qm
thingiverse
free
Golden Rhombohedra by DaveMakesStuff
...
see here for christmas ornament versions: https://www.thingiverse.com/thing:4577036
see video here: https://youtu.be/odaqybfys84
thingiverse
free

Three Voronoi Gyroid Spheres by DaveMakesStuff
...rnal structures and edge boundary. files are provided with and without supports.
see here for video: https://youtu.be/lunhqfodetm
thingiverse
free

Golden Rhombohedra Ornaments by DaveMakesStuff
...s are separate shells that can be removed by your mesh editing software if you wish.
see video here: https://youtu.be/odaqybfys84
thingiverse
free

Coronavirus Tree Topper by DaveMakesStuff
...ole object is also provided for you to print as you wish.
see here for a plain ornament:https://www.thingiverse.com/thing:4321410
thingiverse
free

Boy's Bowl by DaveMakesStuff
...pasta :)
boy's surface on wikipedia:https://en.wikipedia.org/wiki/boy%27s_surface
see video here:https://youtu.be/x6b0zxcwoye
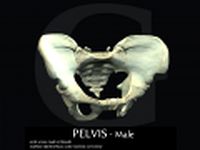
Pelvis
3d_export
$20

human pelvis
...human pelvis
3dexport
human pelvis
turbosquid
$29

Pelvis
... available on turbo squid, the world's leading provider of digital 3d models for visualization, films, television, and games.
turbosquid
$1

Pelvis
... available on turbo squid, the world's leading provider of digital 3d models for visualization, films, television, and games.
turbosquid
$79
Pelvis skeleton
...id
royalty free 3d model pelvis skeleton for download as fbx on turbosquid: 3d models for games, architecture, videos. (1385699)
3d_export
$50

Human Pelvis 3D Model
... model
3dexport
pelvis sacrum human bones skeleton skeletal hip medical anatomy
human pelvis 3d model midnight oil 27706 3dexport
turbosquid
$29
Skeleton Legs and Pelvis
... available on turbo squid, the world's leading provider of digital 3d models for visualization, films, television, and games.
3d_export
$6

Human pelvis low poly
...human pelvis low poly
3dexport
low poly human pelvis, 13058 tris. pbr, met-rough, tiff, 4096*4096
3d_export
$159
PELVIS Male 3D Model
...vis sacrum hip bones innominate coccis pelvic cavity brim pubic symphysis pecten
pelvis male 3d model grrdesign3r 92605 3dexport
3d_export
$59
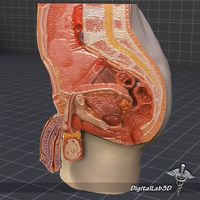
Male Pelvis 3D Model
...is testicles vagina testes
male pelvis 3d model download .c4d .max .obj .fbx .ma .lwo .3ds .3dm .stl digitallab3d 106392 3dexport
3d_export
$49

Female Pelvis 3D Model
...ters people 3d model 3ds
female pelvis 3d model download .c4d .max .obj .fbx .ma .lwo .3ds .3dm .stl digitallab3d 106390 3dexport
Hip
turbosquid
$1
Hip-Flask
...ree 3d model hip-flask for download as blend, fbx, obj, and x on turbosquid: 3d models for games, architecture, videos. (1659557)
turbosquid
$59

Hip replacement
...el hip replacement for download as ma, c4d, lwo, lxo, and obj on turbosquid: 3d models for games, architecture, videos. (1520195)
turbosquid
$32

Hip Armor
... available on turbo squid, the world's leading provider of digital 3d models for visualization, films, television, and games.
turbosquid
$10

Hip Flask
... available on turbo squid, the world's leading provider of digital 3d models for visualization, films, television, and games.
turbosquid
free

Hip Scarf
... available on turbo squid, the world's leading provider of digital 3d models for visualization, films, television, and games.
3d_export
$44
Hip Replacement
...omponents. the damaged femoral head is removed and replaced with a metal stem that is placed into the hollow center of the femur.
3d_export
$19

Multi hip machine
...multi hip machine
3dexport
turbosquid
$39

Hip Abduction/Adduction
...l hip abduction/adduction for download as obj, fbx, and blend on turbosquid: 3d models for games, architecture, videos. (1277331)
turbosquid
$19
Compression hips trainer
... compression hips trainer for download as , fbx, stl, and obj on turbosquid: 3d models for games, architecture, videos. (1684685)
turbosquid
$19

Hip joint trainer
...d model hip joint trainer for download as , obj, stl, and fbx on turbosquid: 3d models for games, architecture, videos. (1684675)