Thingiverse
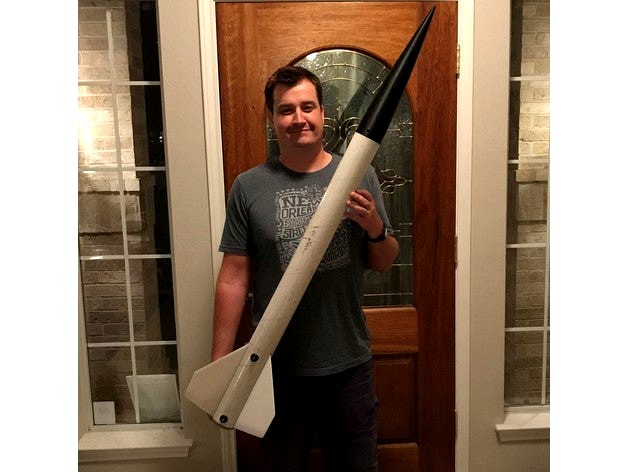
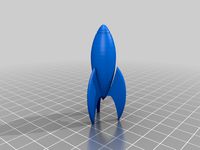
High Power Rocket - 3 inch shipping tube by JRad
by Thingiverse
Last crawled date: 3 years ago
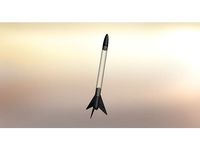
CAUTION You WILL need to add ballast weight to the nose cone tip to make this design stable. I fly a pretty heavy Arduino based flight computer in the front of mine, and I STILL need some ballast weight. I’ve attached the open rocket design I used for simulation so you can adjust and measure and simulate as needed.
All of these parts should print fine without supports (except my custom scaffolding on the fins) although you might have to rotate some of them. I print all my parts at 10% fill with ABS (even the motor mount) and I haven’t had any flight failures up to an H123 motor.
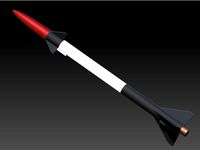
Here are the parts for the rocket I built to get my level 1 high power certification. It’s designed around an Aerotech 38mm RMS motor.
I would recommend dual deployment, but I did my certification flights without it, I just had to do a little more hiking.
Other parts you will need:
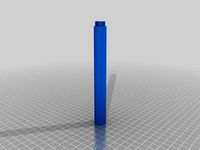
3” paper shipping tube for the body tube, preferably 36”.
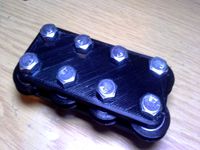
6-32 countersunk screws x2 – for the rail buttons. I could only find 1/2” length at my HW store so I had to trim mine down.
6-32 t-nut. The kind that’s meant for furniture and brad nails (no teeth). These need to be made of really thin metal in order to fit into the rail buttons. Make sure to test fit the buttons before you go gluing them into place (made that mistake before). I’ve found the t-nuts at Home Depot are too large, but the ones at my local Lowe’s fit great.
Nuber 8 eye bolt for shock cord anchor. There is a hole in the front of the motor mount for it to screw into.
Shock cord – I just use Kevlar kite string from Amazon.
Parachute – Many options. I’ve flown with as small as a 12” ‘choute, but I did get some fin damage.
Quck-link – for quickly changing out parachutes. Make sure your shock cord and chute are both attached to the strong quick-link since the nose cone loop is not very strong.
Epoxy – lots of epoxy. I use 5 min epoxy for everything except laminating the body tube.
CA (superglue)
Ballast weight for nose cone – I like to use BBs and epoxy.
Order of operations:
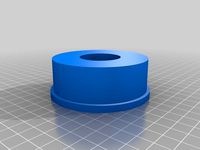
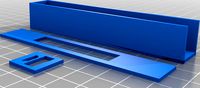
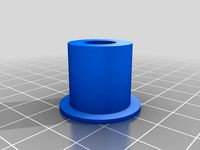
Before you go printing a bunch of parts that may not fit, print the “3in – Test Fit” part and test it against your tube. There are two diameters for inside components. Loose for Nose cone, and tight for motor mount and ejection baffle. You should be able to scale the parts up or down a bit if need be.
You can slot the body tube with a hobby knife before, or after you glue in the motor mount. I usually do it before so I can keep the epoxy out of the grooves better, just be sure to wrap it in paper and wrap it tight with tape when you glue the motor mount into place so the airframe walls are firm against the mount. Slide the motor mount into the tube while slotting to support the tube so you don’t bend it.
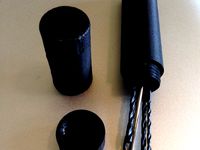
Assemble the ejection baffle outside of the rocket with CA. Glue the baffle into the body tube with Epoxy so it is far enough forward that you can get your motor in w/o bumping it. It’s best if you feed your shock cord through the ejection baffle before installing it, but if you forget you can fish some thread through it w/ a small nut tied to the end and use that to pull your shock cord through.
Bend the 6-32 t-nut flanges so they match the curve of the body tube. Drill holes for the t-nuts. One should be near the end of the motor mount clearance slot, and the other should be somewhere near the front of the fins. First drill a small pilot hole, then put some CA in the hole and let it soak into the paper and dry. This will make the paper brittle so you can drill through it without tearing up the tube. Glue the t-nuts into place with epoxy. Screw the rail buttons on while the epoxy dries so that the t-nuts are pulled tight against the inside wall. Be sure not to glue the buttons on! They only last for a handful of flights before you have to replace them. Only use a little epoxy, you don’t want to block the motor mount from sliding into the airframe.
After the ejection baffle and rail buttons are installed you can epoxy the motor mount into place. Glue it together out of the rocket with some CA (superglue). Use the fins to align the two sections, but make sure there isn’t any glue in the fin grooves so you can get them back out. The #8 eye bolt anchor screws into the front of the mount.
Other assembly notes and hints:
Body tube – It’s just a simple 3 inch paper shipping tube. I pick them up at Office Depot, but any should do. I did my certification flights with nothing more than primer on my body tube. Recently I’ve been
laminating the tube with a good laminating epoxy (meant for fiberglass). The epoxy significantly reduced “zippering” of the body tube, but I still plan to try actual fiberglass laminating soon.
Fins – If they don’t fit into the grooves right off your printer, don’t fear, they usually don’t. The root tabs are designed to be just a little larger than the grooves so they can be sanded down a little for a nice snug fit. I usually just have to sand the bottom of the tab a little, and then clean up the long edges. I had a HELL of a time getting these fins to print without getting separation between a layer or two. I had to add some print bed anchors as well as support scaffolding to get good consistent prints. Using the right ABS makes a world of difference. Filament from Fillament Outlet on Amazon works great for me. I haven’t had a failed fin print since I started using that brand. I like the natural (white) the best.
It is also importand that the fins be printed so that the layer "grain" is parallel with the leading edge of the fin or they will snap right off.
I think the rest is pretty straight forward, but feel free to ask any questions in the comments and I’ll do my best to answer.
I’ve flown this design about 7-8 times now (including my two level 1 high power certification flights). I think it’s pretty well dialed in so that’s why I’m putting it out for other people to use.
ENJOY!
Jared
Video of a launch of this design:https://youtu.be/FuZghXuwPnQ
All of these parts should print fine without supports (except my custom scaffolding on the fins) although you might have to rotate some of them. I print all my parts at 10% fill with ABS (even the motor mount) and I haven’t had any flight failures up to an H123 motor.
Here are the parts for the rocket I built to get my level 1 high power certification. It’s designed around an Aerotech 38mm RMS motor.
I would recommend dual deployment, but I did my certification flights without it, I just had to do a little more hiking.
Other parts you will need:
3” paper shipping tube for the body tube, preferably 36”.
6-32 countersunk screws x2 – for the rail buttons. I could only find 1/2” length at my HW store so I had to trim mine down.
6-32 t-nut. The kind that’s meant for furniture and brad nails (no teeth). These need to be made of really thin metal in order to fit into the rail buttons. Make sure to test fit the buttons before you go gluing them into place (made that mistake before). I’ve found the t-nuts at Home Depot are too large, but the ones at my local Lowe’s fit great.
Nuber 8 eye bolt for shock cord anchor. There is a hole in the front of the motor mount for it to screw into.
Shock cord – I just use Kevlar kite string from Amazon.
Parachute – Many options. I’ve flown with as small as a 12” ‘choute, but I did get some fin damage.
Quck-link – for quickly changing out parachutes. Make sure your shock cord and chute are both attached to the strong quick-link since the nose cone loop is not very strong.
Epoxy – lots of epoxy. I use 5 min epoxy for everything except laminating the body tube.
CA (superglue)
Ballast weight for nose cone – I like to use BBs and epoxy.
Order of operations:
Before you go printing a bunch of parts that may not fit, print the “3in – Test Fit” part and test it against your tube. There are two diameters for inside components. Loose for Nose cone, and tight for motor mount and ejection baffle. You should be able to scale the parts up or down a bit if need be.
You can slot the body tube with a hobby knife before, or after you glue in the motor mount. I usually do it before so I can keep the epoxy out of the grooves better, just be sure to wrap it in paper and wrap it tight with tape when you glue the motor mount into place so the airframe walls are firm against the mount. Slide the motor mount into the tube while slotting to support the tube so you don’t bend it.
Assemble the ejection baffle outside of the rocket with CA. Glue the baffle into the body tube with Epoxy so it is far enough forward that you can get your motor in w/o bumping it. It’s best if you feed your shock cord through the ejection baffle before installing it, but if you forget you can fish some thread through it w/ a small nut tied to the end and use that to pull your shock cord through.
Bend the 6-32 t-nut flanges so they match the curve of the body tube. Drill holes for the t-nuts. One should be near the end of the motor mount clearance slot, and the other should be somewhere near the front of the fins. First drill a small pilot hole, then put some CA in the hole and let it soak into the paper and dry. This will make the paper brittle so you can drill through it without tearing up the tube. Glue the t-nuts into place with epoxy. Screw the rail buttons on while the epoxy dries so that the t-nuts are pulled tight against the inside wall. Be sure not to glue the buttons on! They only last for a handful of flights before you have to replace them. Only use a little epoxy, you don’t want to block the motor mount from sliding into the airframe.
After the ejection baffle and rail buttons are installed you can epoxy the motor mount into place. Glue it together out of the rocket with some CA (superglue). Use the fins to align the two sections, but make sure there isn’t any glue in the fin grooves so you can get them back out. The #8 eye bolt anchor screws into the front of the mount.
Other assembly notes and hints:
Body tube – It’s just a simple 3 inch paper shipping tube. I pick them up at Office Depot, but any should do. I did my certification flights with nothing more than primer on my body tube. Recently I’ve been
laminating the tube with a good laminating epoxy (meant for fiberglass). The epoxy significantly reduced “zippering” of the body tube, but I still plan to try actual fiberglass laminating soon.
Fins – If they don’t fit into the grooves right off your printer, don’t fear, they usually don’t. The root tabs are designed to be just a little larger than the grooves so they can be sanded down a little for a nice snug fit. I usually just have to sand the bottom of the tab a little, and then clean up the long edges. I had a HELL of a time getting these fins to print without getting separation between a layer or two. I had to add some print bed anchors as well as support scaffolding to get good consistent prints. Using the right ABS makes a world of difference. Filament from Fillament Outlet on Amazon works great for me. I haven’t had a failed fin print since I started using that brand. I like the natural (white) the best.
It is also importand that the fins be printed so that the layer "grain" is parallel with the leading edge of the fin or they will snap right off.
I think the rest is pretty straight forward, but feel free to ask any questions in the comments and I’ll do my best to answer.
I’ve flown this design about 7-8 times now (including my two level 1 high power certification flights). I think it’s pretty well dialed in so that’s why I’m putting it out for other people to use.
ENJOY!
Jared
Video of a launch of this design:https://youtu.be/FuZghXuwPnQ
Similar models
thingiverse
free

Rear Eject Bomb Rocket (18mm motors) by Aslansmonkey
...an 18mm design. so here it is. assembly is similar to the 24mm versions so see my things on...
thingiverse
free

Parametric Shock Cord Mount by gravatite
...ayer adhesion is also important, give the loop a good tug to make sure it's going to hold up before you rely on it in flight!
thingiverse
free
Printer Roll Rocket
...which is why i didn't suggest epoxying them together.
i haven't built it yet so build it, edit it, have fun, and be safe!
thingiverse
free

Mini M&M Rocket for 18mm Motors
... launched this on an a8-3 as seen in this video...https://www.youtube.com/watch?v=gjyxiius168
...but it should take up to a c6-7.
thingiverse
free

Model Rocket by ThePyroCreator
...l rolls, these are odd sized tubes but they're all i had lying around, please adapt my project to suit your own requirements.
thingiverse
free
18mm rocket Double Fin by BJWilliam
...ck cord mount to the top coupler
wont fly as high as the original due to being heavier
print motor clip, trim to size and glue in
thingiverse
free

Modular 3D Printed Model Rocket by Bluegillbronco2
...hat allows the nosecone to be installed), fsmm-2+( fin section/motor mount with clipped delta fins and 24mm motor compatibility).
thingiverse
free

Model rocket ejection baffle by pbrandt1
...side down, which is the orientation of the stl. the image is top side up like it will look sitting inside your rocket on the pad.
thingiverse
free

Rocket Fin Glue Jig for 18.5mm rocket tube (Standard minimum diameter tube for Estes A-B-C Motors by Tinkerlabs
...hingiverse
this is a jig you can use to glue 3 and 4 fins nice and straight. filets added so you dont glue your fins to the jig.
thingiverse
free

Thorn Rocket by Noha111
...the chamfer on the coupler should go into the fin tube. i used spray paint for a smoother finish but it would be fine without it.
Jrad
thingiverse
free
Vial by JRad
...work with those files can easily make a vial of any size, juts change the inner diameter and height of the vial body and rebuild.
thingiverse
free

GoPro Hero 5 Lense Cover by JRad
...gopro hero 5 lense cover by jrad
thingiverse
pretty straight forward :-)
thingiverse
free

Simple quadcopter wall hooks by JRad
...simple quadcopter wall hooks by jrad
thingiverse
simple wall hook for larger quadcopeters. made for my 450 quad.
thingiverse
free

Recycle sign by JRad
...ted one that's pictured is scaled down by 50% to make it small and then resized by 200% on the z axis to make it thick again.
thingiverse
free
Vial 10x150mm Remix by JRad
... at request of another user.
inner cavity = 10mm x 150mm
solidworks files are availible via my original "vial" thing.
thingiverse
free

Large Hook for IKEA hanging rod by JRad
...large hook for ikea hanging rod by jrad
thingiverse
not much too it, just a large hook for ikea hanging rods.
thingiverse
free

Orbit sprinkler timer mounting bracket by JRad
...orbit sprinkler timer mounting bracket by jrad
thingiverse
simple bracket to wall mount an orbit brand sprinkler controller.
thingiverse
free

Sonicare head stand by JRad
...or a pair of sonicare toothbrush heads. i made it a tight fit behind my sink, but it stands up fine as a free standing stand too.
thingiverse
free

Helicopter Wall Hanger by JRad
...from their landing skids.
designed around my align trex 550l dominator, but i'm sure it will work on most helis of this type.
thingiverse
free

SD Card & Reader Case by JRad
...ch joint and hinge.
solidworks files are included in case someone wants to adjust it for another usb card reader or something.
Rocket
thingiverse
free
Rocket
...rocket
thingiverse
rocket
thingiverse
free

Rocket
...rocket
thingiverse
this is a very cool rocket.
thingiverse
free

rocket
...rocket
thingiverse
rocket #massimino_martello #razzo
thingiverse
free
Rocket
...rocket
thingiverse
simple rocket with three fins and a porthole.
thingiverse
free

rocket
...rocket
thingiverse
rocket #smoke #massimino_martello #fumo #razzo
thingiverse
free

Rocket
...rocket
thingiverse
beautiful rocket. ready to launch. 3. 2. 1.
thingiverse
free

Lego Rocket Launcher with Rocket by LegoDude
...lego rocket launcher with rocket by legodude
thingiverse
lego rocket and launcher
thingiverse
free

Rocket
...rocket
thingiverse
a small basic rocket that can have a motor installed. for use with pla and abs.
thingiverse
free
Rocket
...rocket
thingiverse
second rocket i created to help improve my 3d design skills
thingiverse
free

Rocket for Rocket Pod by hszer0
...t fins. without fins will fit in the pod, though.
edit: slowly moving everything to youmagine, because i like that site better.
Shipping
thingiverse
free

Ship by lkg218
...ship by lkg218
thingiverse
ship
thingiverse
free

ship by huscaptain
...ship by huscaptain
thingiverse
ship
thingiverse
free

Ship by Inliner
...ship by inliner
thingiverse
ship
thingiverse
free

Ship by agudopalacios
...ship by agudopalacios
thingiverse
ship
thingiverse
free

SHIP by eddiillusion
...ship by eddiillusion
thingiverse
ship
thingiverse
free

ship by Windpower
...ship by windpower
thingiverse
ship
thingiverse
free

Ship by alexdfox
...ship by alexdfox
thingiverse
ship boat
thingiverse
free

Stumpy Rammer Ship Proxy ship by barnEbiss2
... ship proxy ship by barnebiss2
thingiverse
new man o war proxy ship stumpy rammer ship for use as proxy ship in man o war games.
thingiverse
free

Ship It by Rknudson08
...ship it by rknudson08
thingiverse
ship it logo for your desk
thingiverse
free

ship by GinaYui
...ship by ginayui
thingiverse
model of a space engineers ship
Inch
thingiverse
free
8 inch 4 inch and 2 inch bubble gear by Sixdollaftlong
...nch is bubblegear.stl....... the 8 inch is massivly thick and strong. im lovin the gear thing more extravagant gears to come....
thingiverse
free

Tube 2 inch diameter 6 inches tall with 1/4 inch thickness by mahow
...h diameter 6 inches tall with 1/4 inch thickness by mahow
thingiverse
tube 2 inch diameter 6 inches tall with 1/4 inch thickness
thingiverse
free

Circular pottery ribs 5 inch 4 inch 3 inch by navdeepasi
...circular pottery ribs 5 inch 4 inch 3 inch by navdeepasi
thingiverse
pottery ribs, good for bowls, plates.
thingiverse
free
3 inch to 1.25 inch adapter for 3 inch diagonal by jaguar001
...apter for 3 inch diagonal by jaguar001
thingiverse
for a 3" diagonal so that you can use your favorite 1.25" eyepiece.
thingiverse
free

5.25-inch to 3.5-inch / 2.5-inch drive by printandplay2k
...pter fits in most computer cases used to place hdd/s in cd/dvd drive bays
included solid works files made with solid works 2014
thingiverse
free

2.5 inch wheel with 3.8 inch hole for eliptical by gorrilla10101
... hole for eliptical by gorrilla10101
thingiverse
this is a 1 1/2 inch thick and 2 1/2 inch diameter wheel with a 3/8 inch hole.
thingiverse
free

Conduit Clamp (1 inch and 0.5 inch)
...conduit clamp (1 inch and 0.5 inch)
thingiverse
shedule 40 conduit clamp for 1inch and 0.5inch pipe
thingiverse
free

4 Inch to 5 Inch Velocity Stack Adapter by Jman64cola
...la
thingiverse
this is a 4inch to 5 inch adapter velocity stack so i can adapt a 5 inch k&n filter to my 4 inch intake pipe.
thingiverse
free

2 inch to 3 inch net cup adapter by target022
... plants in 2 inch cups were getting pretty long roots. i use this to put the 2 inch cup in the larger tube with the 3 inch holes.
thingiverse
free

Dust Collector hose adapter 4 inch to 3.5 inch by Yobo
...ollector hose adapter 4 inch to 3.5 inch by yobo
thingiverse
hose adaptor 4 inch connector to 3.5 inch hose for dust collection.
High
thingiverse
free

high elf high mage - tm
...high elf high mage - tm
thingiverse
low level high mage
thingiverse
free

Mount high
...mount high
thingiverse
mount high
thingiverse
free

halo HIGH by lamerhouse
...halo high by lamerhouse
thingiverse
halo high
thingiverse
free

Med High caduceus
...med high caduceus
thingiverse
med high caduceus
thingiverse
free

Fly High by Jon_E_Palmer
...fly high by jon_e_palmer
thingiverse
fly high sculpture
thingiverse
free

High heels by benyus16
...high heels by benyus16
thingiverse
high heels
created by craftbot +
good present for girls. they will like it .
thingiverse
free

High Heels by JBFromOZ
...high heels by jbfromoz
thingiverse
stl conversion of step file at http://grabcad.com/library/high-hills
thingiverse
free

High Elf Mage - high elves - aos - tm - lp by jimjimjimmyjim
...high elf mage - high elves - aos - tm - lp by jimjimjimmyjim
thingiverse
high elf mage - high elves - aos - tm - lp
thingiverse
free

high voltage insulator
...ulator
thingiverse
insulator for high voltage transformer at 17kva, tests were successful, no leaks and breakdowns of insulation
thingiverse
free

High Elf by MedFanGames
...high elf by medfangames
thingiverse
Tube
thingiverse
free

tubes by
...tubes by
thingiverse
tube time
thingiverse
free

Edrio Two Tubes (Tubes) by Sidejoebob
...edrio two tubes (tubes) by sidejoebob
thingiverse
tube for the edrio two tubes helmet
thingiverse
free
Tube Racks
...tube racks
thingiverse
tube racks for 15ml & 50ml falcon tubes and 20mm round-bottom tubes
thingiverse
free
A tube squeezer for aluminum tubes by joergkrause
...rinted with pla. no support required. suitable for tubes up to 50mm
update 03.07.2018 better version uploadet. tube squeezer2.stl
thingiverse
free

Tube by williandb
...tube by williandb
thingiverse
tube
thingiverse
free

tube by shvanmajd
...tube by shvanmajd
thingiverse
tube
thingiverse
free

Tube by vovkachuk
...tube by vovkachuk
thingiverse
tube
thingiverse
free

tube by baramon
...tube by baramon
thingiverse
tube
thingiverse
free

Sliding tube cap or tube foot for 0.85" OD tube by DBQGrips
...f a tube leg to assist in sliding across the floor.
this was designed for 0.85" od tube but can be scaled for similar sizes.
thingiverse
free
Tubing straightener (4,8mm tubes)
... brake lines for example).
all you need is 8x 608 ball bearing, 8x m8 screw and 8x m8 nut.
print list:
2x body
8x roller
1x shims
Power
thingiverse
free

Power Macintosh Power PC Power Button (Repaired) by 360alaska
...power macintosh power pc power button (repaired) by 360alaska
thingiverse
repaired the power button
thingiverse
free

Power adaptation for switching power by vladimirgaal
...tation with switch to be used directly on switching power supply.
be sure that this part is compatible with your switching power.
thingiverse
free
power jack
...power jack
thingiverse
iec ac jack power
thingiverse
free
POWER SUPLY HIDE POWER SWITCH by Thearc
...power suply hide power switch by thearc
thingiverse
hello ! i made this power switch for my new power suply
work really well
thingiverse
free
Power supply & power button support by thomasgobert
...power supply & power button support by thomasgobert
thingiverse
needed !
thingiverse
free
Power Bank Box for Power Bank with light by 344026653
...power bank box for power bank with light by 344026653
thingiverse
this is where the power bank parts are kept in.
thingiverse
free
Power Macintosh Power PC Power Botton ;) by Rattiso
...stic, pegt not yet tested, should be even more durable than pla
better before installing, glue
the power button to the holder !!!
thingiverse
free

Power Switch and Power Plug Angle Brackets by EvolHub
...brackets
power switch bracket hole is designed for "carling ra901/911t85" switch, but should fit similar size switches.
thingiverse
free

flower power by Syzguru11
...flower power by syzguru11
thingiverse
flower power
thingiverse
free

flower power by Syzguru11
...flower power by syzguru11
thingiverse
flower power
3
thingiverse
free
Raspberry 3 and 3+ case
...raspberry 3 and 3+ case
thingiverse
case for raspberry 3 and 3+ wit fan
thingiverse
free
Cube Dissection Puzzle/ Model for 3^3 + 4^3 +5^3 = 6^3 by lgbu
...: oxford university press. (p. 203). the authors gave credit to a solution in eureka, the magazine of the cambridge archimedeans.
thingiverse
free
Makeblock Aluminum Pieces 3*3/3*9
...makeblock aluminum pieces 3*3/3*9
thingiverse
makeblock pieces 3x3 and 3x9 recreated for 3d printing
thingiverse
free
Floss 3 Lite - lollipop 3
...floss 3 lite - lollipop 3
thingiverse
antenna mount for floss 3 lite.
thingiverse
free
3 by obstacledaddy
...3 by obstacledaddy
thingiverse
3
thingiverse
free

????????? ??? ??????? 3 ?? by Rigel
...????????? ??? ??????? 3 ?? by rigel
thingiverse
????????? ??? ??????? 3 ??
thingiverse
free
oloid 3
...oloid 3
thingiverse
oloid 3
thingiverse
free

A stand 3
...a stand 3
thingiverse
a stand 3.
thingiverse
free

Tischlampe #3
...tischlampe #3
thingiverse
tischlampe #3
thingiverse
free
3/8 to 3/4 grommet by quikniq
...3/8 to 3/4 grommet by quikniq
thingiverse
3/8" to 3/4" grommet.