Thingiverse

HG P407 shock and servo mod
by Thingiverse
Last crawled date: 4 years, 4 months ago
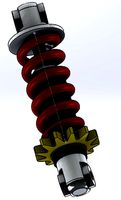
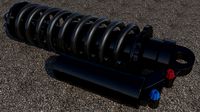
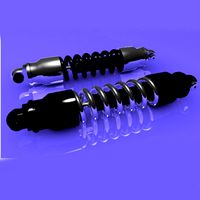
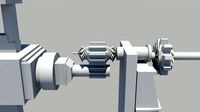
This is for P407 RC Truck or Tamiya Bruiser shock modification.
The original shock is quite bad(I think) so I want to replace some common after market shocks.
Use 100mm hole to hole shocks X 4.
However it's not easy because the space between wheel and chassis is narrow, some modification must be made.
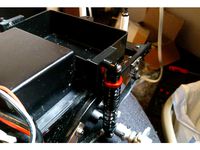
Front Shock: use file Top Mount Front two parts and bottom mount, it has enough space for shock to install between outside of chassis and front wheel, however the original super long steering servo rod has to be removed.
therefore, it's necessary to change the steering servo to front mount, the front mount servo idea is originally from https://www.thingiverse.com/thing:3471382
, thanks to him , it's very good idea. and I designed my own front servo mount part, so I can make necessary modification.
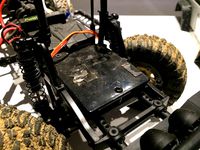
Rear Shock: not enough space for common shocks installed in between wheels and chassis, so we have to install shocks inside the chassis, it's necessary to make two holes in the electronic box to let shock go through it, then it works very well.
Optional:
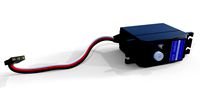
since we moved the steering servo to the front then the original servo room has only one gear switching servo, it's possible to move it to side so to make a bigger room so we can if needed, put esc or receiver in the servo room. we can use the file gear_switch_servo_mount.stl to change the gear speed servo mount position.
=============================================
File List
rear_shock_mount_passenger_side.stl
rear_shock_mount_drv_side.stl
To slice and print: the largest face should facing down on bed.
for rear shock mount , left and right , install on chassis, outside.
using 4X M3 screws (8mm long) and 2X M3 nuts. the other 2 screws and screw into the metal holes.
shock_bottom_mount.stl
for front and rear shock bottom mount, to replace the original white plastic part.
To slice and print: nut face facing down, on bed
For rear shock installation: make sure it's facing the correct side, nut face toward outside of the chassis.
Suggest install the shock on it first so we have easier access to the screws, then put it on the chassis later.
It's a little longer than the original one, so our new shocks don't touch the chassis.
top_mount_front_driver_side.stl
top_mount_front_passenger_side.stl
front shock mount left and right
To slice and print: the largest face should facing down on bed.
Install inside of chassis, 4 self-tapping screw should work.
car_body_mount_front.stl
install it between two front shock mount, to reinforce the front mount, and put the car/truck body holder on it. need to remove the screws and nuts from the original body mount metal piece and install them here.
Use 2X M3 self tapping screw to connect it with two shock mounts.
shock_insert.stl
insert shock upper hole if necessary.
can also use the original insert
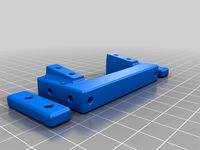
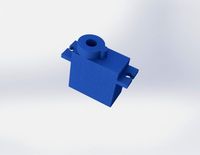
servo_mount_vertical.stl
use it to mount the servo on the truck front.
idea is from this design https://www.thingiverse.com/thing:3471382
Can use the original short servo rod to connect the wheel and servo, no need to buy an extra servo rod.
gear_switch_servo_mount.stl
optional use it change the gear switch servo mount position if necessary.
Print using PETG
50% or more infill
The original shock is quite bad(I think) so I want to replace some common after market shocks.
Use 100mm hole to hole shocks X 4.
However it's not easy because the space between wheel and chassis is narrow, some modification must be made.
Front Shock: use file Top Mount Front two parts and bottom mount, it has enough space for shock to install between outside of chassis and front wheel, however the original super long steering servo rod has to be removed.
therefore, it's necessary to change the steering servo to front mount, the front mount servo idea is originally from https://www.thingiverse.com/thing:3471382
, thanks to him , it's very good idea. and I designed my own front servo mount part, so I can make necessary modification.
Rear Shock: not enough space for common shocks installed in between wheels and chassis, so we have to install shocks inside the chassis, it's necessary to make two holes in the electronic box to let shock go through it, then it works very well.
Optional:
since we moved the steering servo to the front then the original servo room has only one gear switching servo, it's possible to move it to side so to make a bigger room so we can if needed, put esc or receiver in the servo room. we can use the file gear_switch_servo_mount.stl to change the gear speed servo mount position.
=============================================
File List
rear_shock_mount_passenger_side.stl
rear_shock_mount_drv_side.stl
To slice and print: the largest face should facing down on bed.
for rear shock mount , left and right , install on chassis, outside.
using 4X M3 screws (8mm long) and 2X M3 nuts. the other 2 screws and screw into the metal holes.
shock_bottom_mount.stl
for front and rear shock bottom mount, to replace the original white plastic part.
To slice and print: nut face facing down, on bed
For rear shock installation: make sure it's facing the correct side, nut face toward outside of the chassis.
Suggest install the shock on it first so we have easier access to the screws, then put it on the chassis later.
It's a little longer than the original one, so our new shocks don't touch the chassis.
top_mount_front_driver_side.stl
top_mount_front_passenger_side.stl
front shock mount left and right
To slice and print: the largest face should facing down on bed.
Install inside of chassis, 4 self-tapping screw should work.
car_body_mount_front.stl
install it between two front shock mount, to reinforce the front mount, and put the car/truck body holder on it. need to remove the screws and nuts from the original body mount metal piece and install them here.
Use 2X M3 self tapping screw to connect it with two shock mounts.
shock_insert.stl
insert shock upper hole if necessary.
can also use the original insert
servo_mount_vertical.stl
use it to mount the servo on the truck front.
idea is from this design https://www.thingiverse.com/thing:3471382
Can use the original short servo rod to connect the wheel and servo, no need to buy an extra servo rod.
gear_switch_servo_mount.stl
optional use it change the gear switch servo mount position if necessary.
Print using PETG
50% or more infill
Similar models
thingiverse
free
Chassis mount for Steering Servo SCX10 Chassis by MrCadillacsts
... be necessary), have fun!!!!
use pla or abs for printing (standard settings)
ps: the wheels are also available on youmagine.com
thingiverse
free

HG P407 Shock Tower by jdebuhr
...rew.
i have not run my p407 as i am in the middle of building it and this was required as i needed to replace the leaking shocks
thingiverse
free
HG P407 rear shock mount adapters
...up.
hardware needed:
2x m3x12 machine screws
1x m3x20 machine screw
3x m3 hex nuts
installation steps are provided in the photos.
thingiverse
free

HG P407 forward mounted electronics tray
...2 3mm holes in the battery tray 37.5mm apart.
use 3mm drill bit to clean printed part screw holes.
screw part on to battery tray.
thingiverse
free

Gmade Sawback frame servo mount by Finntrollet
...unt his steering servo in the chassi of his gmade sawback.
so after som thinkng and testing, we got this simple mount to install.
thingiverse
free

RC modification of the Tony Stark's Hotrod by gamebox13
...by m5 nuts and lock-nuts.
small gear puts on motor's axle with m3 nut and screw.
https://www.youtube.com/watch?v=uztbpafhmxo
thingiverse
free

MN90 - D90 - Front Chassis Brace by silverbullet126
...adjustment; washes help)
2 x m2 screws (5mm to replace the stock shock screws)
2 x m2 screws (10mm+ to replace the bumper screws)
thingiverse
free

Simple micro 8x8 Chassis by Leiywen
... or glue (i used mixture of pads and glue.
as i said, it's a simple design, but does need some work to get it up and running.
thingiverse
free

RC Truck 1:14 kit for better steering by RC_AEM_LIPTOV
...th 4x2 and 6x4).
use with low profile steering servo.
assembled with original screws, no additional holes, srews or rods needed.
thingiverse
free

traxxas slash a-arm by asciencepotato
... you need to have your printer settings just perfect to get the best layers surrounding those pin holes for the highest strength.
P407
thingiverse
free
HG P407 Shock Tower by jdebuhr
...rew.
i have not run my p407 as i am in the middle of building it and this was required as i needed to replace the leaking shocks
thingiverse
free

HG P407 Gearbox Skid Plate by Dadio1969
...tacles so this part just gives it a 45 degree angle to help it ride over and only reduces ground clearance by 1mm at the lowest .
thingiverse
free
HG P407 rear shock mount adapters
...up.
hardware needed:
2x m3x12 machine screws
1x m3x20 machine screw
3x m3 hex nuts
installation steps are provided in the photos.
thingiverse
free

HG P407 2.2 rim, AX-2014 version
...g the rim width and offset. in particular p407_hub.scad can be re-used to develop your own rim designs compatible with p407 hubs!
thingiverse
free
HG P407 forward mounted electronics tray
...2 3mm holes in the battery tray 37.5mm apart.
use 3mm drill bit to clean printed part screw holes.
screw part on to battery tray.
thingiverse
free

HG-p407 Bruiser Clone 8mm front hub spacer Remix larger inner diameter by davidsen
...45mm
uploaded all three files, maybe it's helpful for somebody
this is a remix from https://www.thingiverse.com/thing:4501576
thingiverse
free
HG P407 / Tamiya Bruiser Front Servo Mount Revisited
...note: the spacers have the holes offset to one side slightly. look at the sides of the servo mount for reference when installing.
thingiverse
free

Tamiya Bruiser 2.2 wheel by Dadio1969
...2.2 wheel rims for the tamiya bruiser and hg p407 , these are 20mm narrower that stock , 10mm...
cg_trader
$23

Lion P407
...lion p407
cg trader
the mascote, toy lion p407 toy fun lion p407 plastic mascote cartoon animals other animals lion
Hg
3ddd
$1

HG Eastbourne
...hg eastbourne
3ddd
капитоне
hg eastbourne
3ddd
$1
TERMA AERO HG
...terma aero hg
3ddd
полотенцесушитель , aero
terma radiator aero hg
cg_studio
$99

Hyundai Grandeur (HG) 20123d model
...d .fbx .lwo .max .mb .obj - hyundai grandeur (hg) 2012 3d model, royalty free license available, instant download after purchase.
3d_export
$20
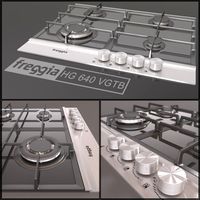
FREGGIA HG 640 VGTB 3D Model
...freggia hg 640 vgtb 3d model
3dexport
cooktop gas stove cook top restart
freggia hg 640 vgtb 3d model felru 99063 3dexport
humster3d
$75

3D model of Hyundai Grandeur (HG) 2012
...d 3d model of hyundai grandeur (hg) 2012 in various file formats. all our 3d models were created maximally close to the original.
turbosquid
$49

AEZ Raise HG Disk Car Wheel
... available on turbo squid, the world's leading provider of digital 3d models for visualization, films, television, and games.
3ddd
free

FREGGIA HG 640 VGTB
...s/builtin/hobs/id_78.html
file's inside:
*.max (uncollapsed modifier list)
*.fbx
*.obj
все материалы для corona.
3ddd
$1

Кресло HG Deco Tub Chair
...глубина: 660 мм
ссылка на сайт:http://www.homeconcept.ru/catalog/section.php?section_id=1685
артикул: h-dec-sa-0041-r
humster3d
$150

3D model of Hyundai Grandeur (HG) with HQ interior 2014
...ndai grandeur (hg) with hq interior 2014 in various file formats. all our 3d models were created maximally close to the original.
3d_export
$10

HG 2 person sofa studio
...~ 100,000 model parts: 1 texture format: .png .jpg resolution: 1024*1024 pbr in substance painter formats: .obj .gltf .fbx .blend
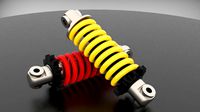
Shock
3d_export
$10

Shock Absorber
... energy (typically heat); usually consists of a combination of a spring and a dashpot; most shock absorbers are a form of dashpot
3d_export
$5
shock absorber
...shock absorber
3dexport
3d printable shock absorber can also provide .stp or .iges format if required
3d_export
$5
shock absorber inflator
...shock absorber inflator
3dexport
shock absorber inflator
turbosquid
$5
shock absorber
...osquid
royalty free 3d model shock absorber for download as on turbosquid: 3d models for games, architecture, videos. (1474521)
turbosquid
$10
Shock absorber
...uid
royalty free 3d model shock absorber for download as c4d on turbosquid: 3d models for games, architecture, videos. (1266562)
3d_export
free

motorcycle shock absorber
...motorcycle shock absorber
3dexport
motorcycle shock absorber 267 mm
turbosquid
$1

Shock Absorber
... free 3d model shock absorber for download as sldpr and sldas on turbosquid: 3d models for games, architecture, videos. (1240883)
3d_export
$25

Shock absorber
...rber it can also be used in the following files: . autocad (.dwg) . blender(.blend) . step(.stp) . dxf(.dxf) . autodesk fbx(.fbx)
turbosquid
$30
Shock Absorber
... available on turbo squid, the world's leading provider of digital 3d models for visualization, films, television, and games.
turbosquid
$15

shock absorber
... available on turbo squid, the world's leading provider of digital 3d models for visualization, films, television, and games.
Servo
turbosquid
$30
Servo
...d model servo for download as obj, blend, dae, stl, and sldpr on turbosquid: 3d models for games, architecture, videos. (1394011)
3d_export
$5

servo motor
...tor
3dexport
it's a simple part of servo motor 0.75kw for used in machines assembly to show specified motor in own project.
turbosquid
$1

Servo Moter
...quid
royalty free 3d model servo moter for download as blend on turbosquid: 3d models for games, architecture, videos. (1650816)
turbosquid
free
Motor/Servo
...osquid
royalty free 3d model motor/servo for download as obj on turbosquid: 3d models for games, architecture, videos. (1522522)
turbosquid
$60

Servo Skull
...
royalty free 3d model servo skull for download as ma and fbx on turbosquid: 3d models for games, architecture, videos. (1318573)
3d_export
$5
Servo 3D Model
...rvo 3d model
3dexport
servo
servo 3d model download .c4d .max .obj .fbx .ma .lwo .3ds .3dm .stl pasqualesiciliano 104590 3dexport
turbosquid
$50
Servo Motor
... available on turbo squid, the world's leading provider of digital 3d models for visualization, films, television, and games.
turbosquid
$49
Servo Motor
...model servo motor for download as 3ds, max, obj, fbx, and stl on turbosquid: 3d models for games, architecture, videos. (1324153)
turbosquid
$29
Servo Set
... available on turbo squid, the world's leading provider of digital 3d models for visualization, films, television, and games.
turbosquid
$10
machine servo
... available on turbo squid, the world's leading provider of digital 3d models for visualization, films, television, and games.
Mod
design_connected
$13

MOD. 4233 - MOD. 4234 Table Lamp
...mod. 4233 - mod. 4234 table lamp
designconnected
arcahorn mod. 4233 - mod. 4234 table lamp computer generated 3d model.
design_connected
$11

MOD.1095
...mod.1095
designconnected
mod.1095 computer generated 3d model. designed by sarfatti, gino.
3ddd
$1

fireplaces mod Spec
...fireplaces mod spec
3ddd
камин
fireplaces mod spec 180x90x125h
3ddd
free

Flos Mod. 2129
... mod
фабрика: flos
модель: mod. 2129
описание: подвесной светильник, металл, белый, черный.
сайт: www.flos.com
turbosquid
$34
Mod Lamp.c4d
... available on turbo squid, the world's leading provider of digital 3d models for visualization, films, television, and games.
turbosquid
$32

MOD A 001
... available on turbo squid, the world's leading provider of digital 3d models for visualization, films, television, and games.
turbosquid
$29

Maars Mod
... available on turbo squid, the world's leading provider of digital 3d models for visualization, films, television, and games.
turbosquid
$15

Mod 70..
... available on turbo squid, the world's leading provider of digital 3d models for visualization, films, television, and games.
turbosquid
$10

MOD Sofa
... available on turbo squid, the world's leading provider of digital 3d models for visualization, films, television, and games.
turbosquid
$1

Mod-Lite
... available on turbo squid, the world's leading provider of digital 3d models for visualization, films, television, and games.