Thingiverse
Hercules - QIDI X-Plus X-Max Carriage for BMG & Dragon / E3D V6 by humebeam
by Thingiverse
Last crawled date: 3 years ago
Update April 3, 2021
Bearings X-axis clearance increased to 19.5 mm to fit slightly taller aftermarket bearings.
Added a version without dial indicator holder for those not wanting one or have fitment issues.
Bearings now sit further apart (69.8 mm) based on a thermal shrinkage of 0.8% which should be fine to print as is without slicer scaling for most filament.
If you get more thermal shrinkage than 0.8% with your filament, scale it in your slicer a little to compensate.
Most users probably won't notice and will not need to reprint.
Hercules 1.4 is considered a stable release, no major updates planned.
Thanks to Brian Martin and Olaf Krause for feedback.
Hercules is coming for the new and inexpensive QIDI I-Mate ($399) series soon. It's the same size as the X-Plus. I have ordered one for this and my other designs.
About
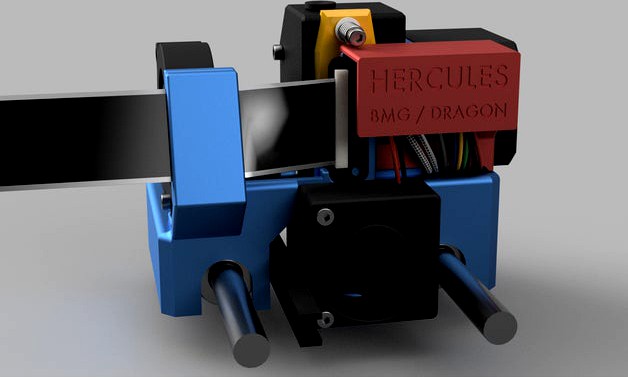
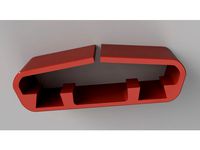
Hercules is a sturdy and dimensionally accurate one-piece carriage for the QIDI X-Plus and X-Max that was designed focusing on strength and ease of maintenance while keeping it lightweight. It uses self-securing cable management that doesn't require any cable ties. The PCB snaps in place and is moved to the side so it's not in the way of extruder access.
The whole carriage is only roughly 100 g depending on infill and filament type used and the extruder and hotend are easily accessible without removing any other parts, although removing the blower fan attached with a single screw is recommended. Once the carriage is installed, there is no play between the bearings and the carriage.
Hercules is using the popular dual gear BMG extruder and Dragon or V6 hotend.
It is a remix of cwills75's design which in turn is a remix from jhenrikb's carriage, who did the original. This is however, apart from the air duct channel, completely redesigned. I've kept the outer dimensions for the carriage and the mounting holes for the fan duct identical for cross-design compatibility. Thanks to jhenrikb and cwills75 and the other guys pioneering the work and for calculating e-steps and firmware settings.
Why?
Curiosity. I didn't find the original QIDI extruders as bad as some people did but had to find out if they could be improved. I also wanted to be able to print a wide range of filament without having to switch extruders or worry about unrecoverable QIDI high temp extruder clogs and gear slippage. Ease of maintenance is also a big plus.
Is it better?
With Hercules I'm using a Trianglelab BMG (Clone) extruder and Trianglelab Dragon hotend and it prints even better with cleaner lines and the dual gear extruder is night and day.
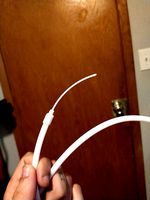
Here's a comparison picture by Hercules user techguychad:
Hercules using BMG & Dragon vs Stock QIDI extruder
What to print:
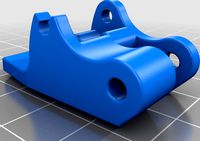
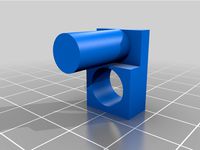
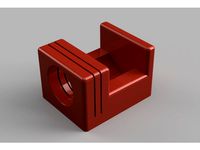
Print these files:
hercules-1.4.stl
hercules-belt-peg-1.2.stl
hercules-fan-duct-1.0.stl
bmg-handle-short-1.0.stl
Optionally, print the PCB cover as well (it's not needed):
hercules-optional-pcb-cover-1.0.stl
Tools needed
Apart from the obvious M3 allen key you got with your printer already, you also need a JST crimping tool and JST-XH connectors (linked below under BOM) and a soldering tool which you probably already have. The soldering tool is needed for the M3 brass inserts for the bottom of the carriage for attaching the fan duct.
BOM - Bill of Materials
I buy most my 3D printer parts from Trianglelab and the rest from other stores on Aliexpress or 3DJake. Shipping takes a while from China but quality is excellent on the Trianglelab products and the prices are good.
You need the following parts:
Trianglelab Dragon Hotend V2.0 (standard or high flow, both are great) Trianglelab BMG Extruder V2.0Trianglelab 6x20MM 24V 50W Heater CartridgeTrianglelab T-K500 Thermocouple sensor 500℃ (sensor only)Trianglelab 5015 blower fan 24V (optional)Trianglelab 24V 2P 4010 40x40x10mm Brushless Fan (I use the Sunon below instead)
The extruder fan I use is Sunon Maglev MF40202V2-1000U-A99 which is a 24V 40x40x20 mm (4020) fan that I bought locally, either one should be fine.
As for extruder and hotend you can use a genuine Bondtech BMG Extruder and E3D V6 hotend instead of course or a Trianglelab V6 clone if you like.
You also need some screws and nuts:
For extruder: 3 x 45 mm M3 bolts and nuts
For blower fan: 1 x 20 mm M3 bolt and nut
For extruder fan: 2 x 20 mm M3 bolt and nuts (2 x 30 mm for 4020 fan)
For short BMG handle: 1 x 20 mm M3 bolt
For parts cooling fan duct: 4 x 8 mm M3 bolts (4 x 12 mm M3 bolts and nuts for hex nut mount)
You can get these from Aliexpress as well:
10 pcs M3 Hex Socket Head Cap Allen Bolt Screw L=4-60mm
You also need a JST crimping tool and some JST-XH terminals and connectors. I'm using this IWISS crimping tool which is inexpensive and is doing a good job.
IWS-2412M/IWS-2820M Crimping Tool for JST-XH
If you don't know how to crimp JST connectors, this is an excellent video showing how to crimp with a mini (two step) crimping tool like the IWISS:
https://www.youtube.com/watch?v=jHfYzrSF4pY
It's not difficult.
If you want to use a dial indicator to perfect the bed level you also need is a good quality dial indicator:
Neoteck DTI Digital Dial Indicator 0.001/0.00005'' 0-25.4mm/1''
Finally, you need a set of M3 brass inserts, I use these that will fit the Hercules carriage:
Trianglelab M3 Brass Embedded Nut
Extras:
It might be a good idea to stock up on some extras while you're at it:
Trianglelab T-V6 nozzleTrianglelab T-V6 Plated Copper NozzleTrianglelab Hardened Steel T-V6 NozzleTrianglelab 5PCS Silicone Socks for V6Trianglelab Dragon Heat BlockTrianglelab Dragon Core (Dragon Heatbreak)
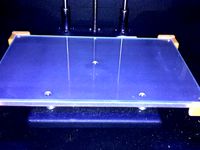
How do I use the Dial Indicator Holder?
You can achieve perfect bed level in about a minute without removing any parts / carriage.
As the dial holder is in front of the carriage it doesn't measure on top of the bed leveling screws but it doesn't matter for accuracy, we still achieve perfect bed level. The script checks the bed level on three different spots on the bed in a triangular pattern. Adjust the bed leveling screw closest to where it measures and by the time the script has looped three times the bed will be perfectly level. Copy to your USB and just print it like you would a normal model:
qidi-xmax-hercules-dial-bed-leveling-script-v2.gcode
Bearings X-axis clearance increased to 19.5 mm to fit slightly taller aftermarket bearings.
Added a version without dial indicator holder for those not wanting one or have fitment issues.
Bearings now sit further apart (69.8 mm) based on a thermal shrinkage of 0.8% which should be fine to print as is without slicer scaling for most filament.
If you get more thermal shrinkage than 0.8% with your filament, scale it in your slicer a little to compensate.
Most users probably won't notice and will not need to reprint.
Hercules 1.4 is considered a stable release, no major updates planned.
Thanks to Brian Martin and Olaf Krause for feedback.
Hercules is coming for the new and inexpensive QIDI I-Mate ($399) series soon. It's the same size as the X-Plus. I have ordered one for this and my other designs.
About
Hercules is a sturdy and dimensionally accurate one-piece carriage for the QIDI X-Plus and X-Max that was designed focusing on strength and ease of maintenance while keeping it lightweight. It uses self-securing cable management that doesn't require any cable ties. The PCB snaps in place and is moved to the side so it's not in the way of extruder access.
The whole carriage is only roughly 100 g depending on infill and filament type used and the extruder and hotend are easily accessible without removing any other parts, although removing the blower fan attached with a single screw is recommended. Once the carriage is installed, there is no play between the bearings and the carriage.
Hercules is using the popular dual gear BMG extruder and Dragon or V6 hotend.
It is a remix of cwills75's design which in turn is a remix from jhenrikb's carriage, who did the original. This is however, apart from the air duct channel, completely redesigned. I've kept the outer dimensions for the carriage and the mounting holes for the fan duct identical for cross-design compatibility. Thanks to jhenrikb and cwills75 and the other guys pioneering the work and for calculating e-steps and firmware settings.
Why?
Curiosity. I didn't find the original QIDI extruders as bad as some people did but had to find out if they could be improved. I also wanted to be able to print a wide range of filament without having to switch extruders or worry about unrecoverable QIDI high temp extruder clogs and gear slippage. Ease of maintenance is also a big plus.
Is it better?
With Hercules I'm using a Trianglelab BMG (Clone) extruder and Trianglelab Dragon hotend and it prints even better with cleaner lines and the dual gear extruder is night and day.
Here's a comparison picture by Hercules user techguychad:
Hercules using BMG & Dragon vs Stock QIDI extruder
What to print:
Print these files:
hercules-1.4.stl
hercules-belt-peg-1.2.stl
hercules-fan-duct-1.0.stl
bmg-handle-short-1.0.stl
Optionally, print the PCB cover as well (it's not needed):
hercules-optional-pcb-cover-1.0.stl
Tools needed
Apart from the obvious M3 allen key you got with your printer already, you also need a JST crimping tool and JST-XH connectors (linked below under BOM) and a soldering tool which you probably already have. The soldering tool is needed for the M3 brass inserts for the bottom of the carriage for attaching the fan duct.
BOM - Bill of Materials
I buy most my 3D printer parts from Trianglelab and the rest from other stores on Aliexpress or 3DJake. Shipping takes a while from China but quality is excellent on the Trianglelab products and the prices are good.
You need the following parts:
Trianglelab Dragon Hotend V2.0 (standard or high flow, both are great) Trianglelab BMG Extruder V2.0Trianglelab 6x20MM 24V 50W Heater CartridgeTrianglelab T-K500 Thermocouple sensor 500℃ (sensor only)Trianglelab 5015 blower fan 24V (optional)Trianglelab 24V 2P 4010 40x40x10mm Brushless Fan (I use the Sunon below instead)
The extruder fan I use is Sunon Maglev MF40202V2-1000U-A99 which is a 24V 40x40x20 mm (4020) fan that I bought locally, either one should be fine.
As for extruder and hotend you can use a genuine Bondtech BMG Extruder and E3D V6 hotend instead of course or a Trianglelab V6 clone if you like.
You also need some screws and nuts:
For extruder: 3 x 45 mm M3 bolts and nuts
For blower fan: 1 x 20 mm M3 bolt and nut
For extruder fan: 2 x 20 mm M3 bolt and nuts (2 x 30 mm for 4020 fan)
For short BMG handle: 1 x 20 mm M3 bolt
For parts cooling fan duct: 4 x 8 mm M3 bolts (4 x 12 mm M3 bolts and nuts for hex nut mount)
You can get these from Aliexpress as well:
10 pcs M3 Hex Socket Head Cap Allen Bolt Screw L=4-60mm
You also need a JST crimping tool and some JST-XH terminals and connectors. I'm using this IWISS crimping tool which is inexpensive and is doing a good job.
IWS-2412M/IWS-2820M Crimping Tool for JST-XH
If you don't know how to crimp JST connectors, this is an excellent video showing how to crimp with a mini (two step) crimping tool like the IWISS:
https://www.youtube.com/watch?v=jHfYzrSF4pY
It's not difficult.
If you want to use a dial indicator to perfect the bed level you also need is a good quality dial indicator:
Neoteck DTI Digital Dial Indicator 0.001/0.00005'' 0-25.4mm/1''
Finally, you need a set of M3 brass inserts, I use these that will fit the Hercules carriage:
Trianglelab M3 Brass Embedded Nut
Extras:
It might be a good idea to stock up on some extras while you're at it:
Trianglelab T-V6 nozzleTrianglelab T-V6 Plated Copper NozzleTrianglelab Hardened Steel T-V6 NozzleTrianglelab 5PCS Silicone Socks for V6Trianglelab Dragon Heat BlockTrianglelab Dragon Core (Dragon Heatbreak)
How do I use the Dial Indicator Holder?
You can achieve perfect bed level in about a minute without removing any parts / carriage.
As the dial holder is in front of the carriage it doesn't measure on top of the bed leveling screws but it doesn't matter for accuracy, we still achieve perfect bed level. The script checks the bed level on three different spots on the bed in a triangular pattern. Adjust the bed leveling screw closest to where it measures and by the time the script has looped three times the bed will be perfectly level. Copy to your USB and just print it like you would a normal model:
qidi-xmax-hercules-dial-bed-leveling-script-v2.gcode
Similar models
thingiverse
free

Hercules - QIDI X-Plus I-Mate Carriage for BMG & Dragon / E3D V6 by humebeam
...available for easy editing.
if you enjoy this or any of my other designs, a small donation is not needed but welcome. thanks! :)
thingiverse
free

Prusa i3 BMG Extruder Carriage
...xis. (https://es.aliexpress.com/item/32599122130.html?spm=a2g0s.9042311.0.0.274263c07swcgb)
you need m3 screw and nuts for mount.
thingiverse
free

Fan Duct for BMG & Dragon / V6 by humebeam
...ses the same air duct channels as the original, however the model is made thinner and lighter and uses a low-poly style exterior.
grabcad
free

Anycubic Mega X V6 Hotend BMG Direkt Extruder Conversion Plate
...for anycubic mega x with a bmg direct extruder and a e3d v6 hotend.
pch holder included.
m3 nut for the variable compomnent fan.
thingiverse
free

SILENCE! QIDI X-Max Modifications for Noise Reduction by humebeam
...follow the guide. making these changes will not make the printer silent by any means but the noise level is lowered considerably.
thingiverse
free

Linear Rail BMG Extruder V6 hotend Adapter for KP3S w/ 5015 fan by Artifical
...l allow you to mount a bmg extruder onto the exist rail block with a direct v6 hotend
integrated cooling duct and 5015 fan mount
thingiverse
free

Qidi BMG Dragon Mod 40mm Fan Duct by El_Bartron
...are bolts provided in the qidi tool box (if you are using a 20mm thick fan).
let me know if you find any issues or have requests.
thingiverse
free

Ender 3 Direct Drive Mini BMG Extruder mounting plate for E3D V6(V5) with adjustable BL-Touch mount by ru_ace
...www.thingiverse.com/thing:4620308
adjustable bl-touch mount compatible with mounts from https://www.thingiverse.com/thing:3148733
thingiverse
free

QIDI X-Max Dial Indicator Carriage and Bed Leveling Script by humebeam
...ick which is my print-in-place dial indicator. it can be used to level the bed as well:
https://www.thingiverse.com/thing:4607036
thingiverse
free

x carriage for E3D V6 / 50 mm axis distance with Auto Bed Leveling by MacNite
...lace - if you have the adapter from e3d you wont need this.
for assembly you will need some m3 hex nuts and m3 screws (18-30 mm).
Humebeam
thingiverse
free
Short BMG Handle by humebeam
...coming "hercules" extruder carriage for qidi x-max and x-plus. a full length handle would hit the frame of the printer.
thingiverse
free

Dragon Phone Holder by humebeam
...sily on its side without supports. it's also scaled more reasonably so it fits a normal sized phone while still being stable.
thingiverse
free
Dial indicator add to humebeam's Extruder cover (bed leveling) by Printing_Platypus
...y not too bad, national calibration stickered mine.https://www.harborfreight.com/1-in-travel-machinists-dial-indicator-63521.html
thingiverse
free
Fan Duct for BMG & Dragon / V6 by humebeam
...ses the same air duct channels as the original, however the model is made thinner and lighter and uses a low-poly style exterior.
thingiverse
free

Tomato Planter by humebeam
...available for easy editing.
if you enjoy this or any of my other designs, a small donation is not needed but welcome. thanks! :)
thingiverse
free

QIDI Leveling Nut by humebeam
...s.
i also recommend replacing the springs with silicone spacers / bed leveling columns:
https://www.thingiverse.com/thing:4713728
thingiverse
free

Technivorm Moccamaster Drip-Stop Plug by humebeam
...k plastic it will hardly be noticeable.
it should fit all moccamaster classic coffee makers that use this style of filter holder.
thingiverse
free
Silicone Bed Leveling Column (Cutting Jig) by humebeam
...th an 18 mm one.
i've uploaded two versions: one for hoses with a diameter up to 11 mm and one for a diameter of up to 15 mm.
thingiverse
free

Filament Clip (Spring Loaded) by humebeam
...filament if you like.
the clip will fit 1.75 mm filament. if someone is interested in a 2.85 mm version i could make one as well.
thingiverse
free
QIDI X-Max Modular Tool Holder by humebeam
...e.
the attachments fit quite snugly in the attachment base so it will take a little force to get them in and also to remove them.
Qidi
thingiverse
free

Qidi XMAX Spool Clamp
...qidi xmax spool clamp
thingiverse
a simple spool clamp for qidi tech xmax or xplus spool holder(30mm diameter).
thingiverse
free
QIDI Upper spool holder by Shibatam
...qidi upper spool holder by shibatam
thingiverse
upper spool holder for qidi.
use this when the back space is narrow.
thingiverse
free

Qidi Z axis brace by mjgrundmann
...qidi z axis brace by mjgrundmann
thingiverse
used to stiffen up the z axis guide rods on a qidi tech i.
thingiverse
free
DEROULEUR BOBINE QIDI by bil26
...i by bil26
thingiverse
bonjour,
c'est un montage pour imprimante qidi xmax .
montage avec 2 x roulements 6002.
cordialement,
thingiverse
free
QIDI Glass Bed Clips by ChrisX35
...idi glass bed clips by chrisx35
thingiverse
qidi glass bed upgrade.
new clips are here https://www.thingiverse.com/thing:2480107
thingiverse
free

Bed level QIDI - Microsoft LifeCam by lemacs
...bed level qidi - microsoft lifecam by lemacs
thingiverse
bed level camera mount for qidi - microsoft lifecam
thingiverse
free

Qidi X-One cooler duct by rpagyc
...qidi x-one cooler duct by rpagyc
thingiverse
extruder cooling duct for the qidi tech x-one
thingiverse
free
Qidi Tech PTFE adapter by sewallman
...h ptfe adapter by sewallman
thingiverse
adapter for a 6mm ptfe tube to fit ontop the qidi tech xmax/xplus/imates extruder cover.
thingiverse
free

QIDI Shadow filter plug by shifter
... by shifter
thingiverse
this is a cap/plug for the qidi tech shadow 5.5s. to cover the spot where the pointless air filter goes.
thingiverse
free

QIDI Door Latch by TobyC84
...i created for the qidi printer. it holds the door open while you print pla or while you remove a print from the print bed! enjoy!
Bmg
turbosquid
$3

.50 BMG
... available on turbo squid, the world's leading provider of digital 3d models for visualization, films, television, and games.
turbosquid
$2

.50 BMG
... available on turbo squid, the world's leading provider of digital 3d models for visualization, films, television, and games.
turbosquid
$25
50 BMG Cartridge
...e 3d model 50 bmg cartridge for download as 3ds, max, and obj on turbosquid: 3d models for games, architecture, videos. (1303035)
turbosquid
$30

Sniper 50 bmg
... available on turbo squid, the world's leading provider of digital 3d models for visualization, films, television, and games.
turbosquid
free

Cal 50 BMG
... available on turbo squid, the world's leading provider of digital 3d models for visualization, films, television, and games.
cg_studio
$25
.50 BMG Cartridge3d model
...odel
cgstudio
.3ds .max .obj .wrl - .50 bmg cartridge 3d model, royalty free license available, instant download after purchase.
3d_export
$5
50 caliber BMG round 3D Model
...d 3d model
3dexport
50cal caliber 50 round bullet bmg cartridge browning rifle
50 caliber bmg round 3d model csw92 27660 3dexport
3d_export
$22
.50 BMG Cartridge 3D Model
...ectile rifle round pistol cartridge m2 hb 127x99mm nato browning barrett m82a1
.50 bmg cartridge 3d model plutonius 8091 3dexport
turbosquid
free

LAR Grizzly .50 BMG Sniper
... available on turbo squid, the world's leading provider of digital 3d models for visualization, films, television, and games.
3d_export
$8
cartrige m50 bmg
...aterials are logically named<br>the main format is in 3ds max 2009.<br>satisfcation garranteed..<br>thank you !
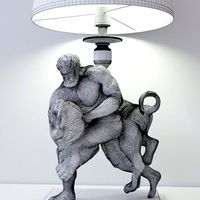
Hercules
3d_export
$5
hercules
...hercules
3dexport
hercules 3d model good quality for animation
3d_export
$10

Hercules
...r use with software of your choice. formats included .obj .fbx includes uv 2048 x2048 and 4096 x 4096 maps for hercules graphics.
turbosquid
$40
Hercules
...les for download as ma, max, ige, obj, fbx, 3dm, dae, and stl on turbosquid: 3d models for games, architecture, videos. (1448753)
3d_export
$65

Hercules 3D Model
...hercules 3d model
3dexport
hercules
hercules 3d model modelix 59722 3dexport
3d_export
$10

hercules
...014).this file contains: 1 club/mallet made of wood,with a leather grip.<br>total objects : 5<br>thanks for watching.
3d_export
$30

bicycle hercules sumatra
...bicycle hercules sumatra
3dexport
bicycle hercules sumatra
3d_export
$17

C-130 Hercules
...c-130 hercules
3dexport
c-130 hercules
turbosquid
$6
lamp hercules
...quid
royalty free 3d model lamp hercules for download as max on turbosquid: 3d models for games, architecture, videos. (1198854)
turbosquid
$99

Hercules Statue
...cules statue for download as 3ds, max, lwo, obj, c4d, and fbx on turbosquid: 3d models for games, architecture, videos. (1333254)
turbosquid
$39

Hercules Bicycle
...bicycle for download as ma, max, 3ds, gltf, fbx, stl, and obj on turbosquid: 3d models for games, architecture, videos. (1634000)
E3D
turbosquid
$23

E3D - Google Home
... 3d model e3d - google home for download as max, obj, and c4d on turbosquid: 3d models for games, architecture, videos. (1192509)
cg_studio
free

e3d model
...e3d model
cgstudio
- e 3d model, royalty free license available, instant download after purchase.
turbosquid
$2

Syringe C4D (E3D Ready)
...lty free 3d model syringe c4d (e3d ready) for download as c4d on turbosquid: 3d models for games, architecture, videos. (1336720)
turbosquid
$12

Microphone USB E3D and C4D
...ree 3d model microphone usb e3d & c4d for download as c4d on turbosquid: 3d models for games, architecture, videos. (1568216)
turbosquid
$29

E3D - OnePlus 6 Black
...model e3d - oneplus 6 black for download as max, obj, and c4d on turbosquid: 3d models for games, architecture, videos. (1358534)
turbosquid
$29

E3D - Motorola One 2018
...del e3d - motorola one 2018 for download as max, obj, and c4d on turbosquid: 3d models for games, architecture, videos. (1358533)
turbosquid
$29

E3D - Disney MagicBands 2
...l e3d - disney magicbands 2 for download as max, obj, and c4d on turbosquid: 3d models for games, architecture, videos. (1355515)
turbosquid
$29

E3D - Samsung Z4 Smartphone
...e3d - samsung z4 smartphone for download as max, obj, and c4d on turbosquid: 3d models for games, architecture, videos. (1182179)
turbosquid
$23

E3D - Razer Phone model
...del e3d - razer phone model for download as max, obj, and c4d on turbosquid: 3d models for games, architecture, videos. (1231207)
turbosquid
$23

E3D - Alcatel Idol 5
... model e3d - alcatel idol 5 for download as max, obj, and c4d on turbosquid: 3d models for games, architecture, videos. (1212799)
V6
3d_export
$100

v6 engine
...engine
3dexport
complete v6 engine modeled on solidworks 2017 along with .stl, .sldprt and .sldasm of all th parts and assembly.
3d_export
$10

V6 engine
... the first v6 engines were designed and produced independently by marmon motor car company, deutz gasmotoren fabrik and delahaye.
3d_export
$35

v6 engine
...s a complete model of a v6 engine containing over 400 components. you can contact me for a video of all the components assembling
3d_export
$10

v6 engine
...v6 engine
3dexport
turbosquid
$25

Bed1001-v6
... available on turbo squid, the world's leading provider of digital 3d models for visualization, films, television, and games.
turbosquid
$22

Chair2-v6
... available on turbo squid, the world's leading provider of digital 3d models for visualization, films, television, and games.
turbosquid
$20

V6.mb
... available on turbo squid, the world's leading provider of digital 3d models for visualization, films, television, and games.
3d_export
$20

V6 engine
...rovided in this package is all the parts in sldprt format and assembly in sldasm format. i can also convert the format on demand.
3ddd
$1

Стол V6
...6" в стиле дизельпанк изготовлен из блока двигателя, 4х поршней и 4х шатунов.
столешница изготовлена из стекла толщиной 8мм.
cg_studio
$199

V6 VVTi3d model
...v6 vvti3d model
cgstudio
.3ds - v6 vvti 3d model, royalty free license available, instant download after purchase.
Carriage
archibase_planet
free

Carriage
...arriage
archibase planet
perambulator baby carriage pram
carriage n250908 - 3d model (*.gsm+*.3ds) for interior 3d visualization.
3d_export
free

carriage
...carriage
3dexport
old fashion carriage model, more files here:
turbosquid
$140

Carriage
...urbosquid
royalty free 3d model carriage for download as max on turbosquid: 3d models for games, architecture, videos. (1482052)
turbosquid
$25

Carriage
...urbosquid
royalty free 3d model carriage for download as max on turbosquid: 3d models for games, architecture, videos. (1285944)
3d_export
free

carriage
...carriage
3dexport
game cart
3d_ocean
$15

Barrel Carriage
...ieval oak old transport wheels wine wood
this model contains a barrel and a carriage. it is a medieval type of wood oak carriage.
turbosquid
$40

Carriage
...ty free 3d model carriage for download as obj, fbx, and blend on turbosquid: 3d models for games, architecture, videos. (1290094)
turbosquid
free

Carriage
...yalty free 3d model carriage for download as ma, obj, and fbx on turbosquid: 3d models for games, architecture, videos. (1239157)
3d_export
$5

Medieval carriage
...medieval carriage
3dexport
medieval carriage in fairy style
turbosquid
$58

Carriage
...d model carriage with scene for download as max, obj, and fbx on turbosquid: 3d models for games, architecture, videos. (1276262)
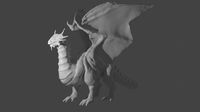
Dragon
3d_export
$15
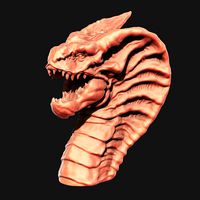
dragon
...dragon
3dexport
dragon
3d_export
$15
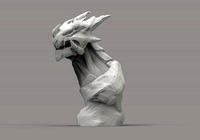
dragon
...dragon
3dexport
dragon
3d_export
$5

dragon
...dragon
3dexport
dragon figurine
3d_export
$6

dragon
...dragon
3dexport
cool dragon for decoration
3d_export
$20

dragon
...dragon
3dexport
glass dragon made in blender.
3d_export
$8
dragon
...dragon
3dexport
3d model of the dragon (sculpting)
3d_export
$5
dragon
...dragon
3dexport
dragon 3d model printing
3d_export
$5
dragon
...dragon
3dexport
black dragon with model+render
archibase_planet
free

Dragon
...dragon
archibase planet
toy dragon
dragon n170508 - 3d model (*.gsm+*.3ds) for interior 3d visualization.
archibase_planet
free
Dragon
...dragon
archibase planet
sculpture dragon statue
dragon 1- 3d model (*.3ds) for interior 3d visualization.
Plus
turbosquid
$2
plus-plus puzzle and lego
...d model plus-plus puzzle and lego for download as stl and obj on turbosquid: 3d models for games, architecture, videos. (1662633)
3ddd
$1
Стенка Plus
...стенка plus
3ddd
plus , модная мебель
фабрика "модная мебель", модель plus
3ddd
$1
Спальня METIS plus
... hulsta , metis , спальня
спальня metis plus
design_connected
$11
be plus B+
...be plus b+
designconnected
blå station be plus b+ chairs computer generated 3d model. designed by börge lindau.
design_connected
$11
Bank Plus
...bank plus
designconnected
röthlisberger kollektion bank plus coffee tables computer generated 3d model. designed by atelier oi.
3ddd
$1
elos Plus
... candela
elos plus — мультифункциональный аппарат для проведения лазерного и ipl лечений
3ddd
$1
Calligaris Even Plus
...calligaris even plus
3ddd
calligaris
calligaris_chair_even plus
design_connected
$29

Basket Plus
...nconnected
photo-realistic 3d models of the basket plus bed from bonaldo for 3d architectural and interior design presentations.
3ddd
free
Artpole Faktum Plus
... артполе , панель
artpole faktum plus
размеры:
высота 625мм
ширина 800мм
глубина 17мм
3ddd
$1

Мария / Jazz Plus
...мария / jazz plus
3ddd
мария
кухня фабрики мария модель__jazz plus