Thingiverse
Helios 44 to Sony (Zenit M39x1 Mount to Sony E Mount) by WOODYtheWOLF
by Thingiverse
Last crawled date: 3 years, 1 month ago
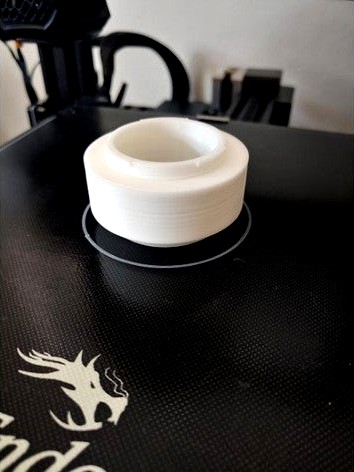
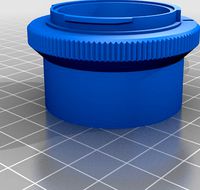
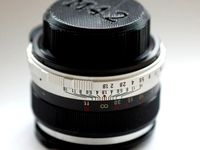
HELIOS 44 to SONY E Lens Adapter
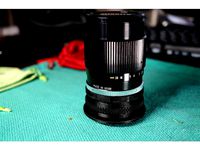
This is a camera lens adapter for the ORIGINAL Helios 44 58mm F2. The mount is an M39 with a flange distance of 45.2mm NOT an M42 with a flange distance of 45.5mm on the Helios 44-2.
MOUNT DETAILS:
Zenit M39x1 Mount
Flange Distance: 45.2mm
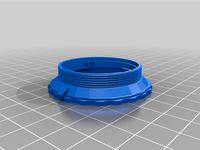
If you have the Original Helios 44 f/2 then this is the adapter that you want to print. The flange distance on the Original Helios 44 lens is 45.2mm instead of 45.5mm on the Helios 44-2 and beyond, so I modeled this to fix that issue.
You can get an M39 to M42 adapter and use that to mount on an M42 (42x1mm) camera adapter, but the flange distance will be off by .3mm and you will not be able to fully focus to infinity. Plus this adapter can be printed for less than a dollar's worth of PLA so it might be worth it just to print it. It's not perfect, but I can finally use this lens to some degree.
BE ADVISED:
This is V1 and there are a couple of issues that need to be resolved. But for me, it has been working pretty well.
DETAILS:
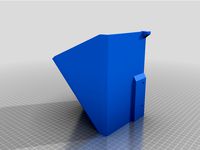
Printing this took about 4 hours and 26 grams of filament with my custom Cura print settings.
I had issues getting the M39 inner threads to adhere on the inside, that is why I used custom settings. Once I started using these settings, I never had an issue with it. I added the preset file in the downloads and have written it down below if you want to use my same Cura settings.
Be sure to print in Black or paint black afterward (including on the inside). This stops light and reflections from getting to the sensor.
BONUS:
I have made a MACRO CONVERSION version for those who want to use this lens as a macro lens for closer details. It is roughly 18mm longer and prints at a time of 6 hours and 30 minutes. The file is in the download section.
INFO & SETTINGS
Printer: Stock Creality Ender 3 V2 (With upgraded bed springs)
Print time: 3 Hours 49 Minutes
Material: PLA
Color: BLACK (Or needs to be painted black later on, especially on the inside to stop reflections)
Temperature: Hot End 200 C/ Bed 60 C
Bed Adhesion Method: Hairspray
Bed Leveling: Manual
CUSTOM CURA SETTINGS (helped me print the threads perfectly):
Start with the Default Super Quality 0.12
SHELL > Top Layers = 18 (for stronger bayonet connection on the camera)
SHELL > Bottom Layers = 2 (Needed to change to enable other settings that helped with the M39 threads)
SHELL > Outer Wall Inset = 0.2
INFILL > 10%
INFILL > Extra Infill Wall Count = 1
INFILL > Infill Before Walls = YES (Checked Yes / Helps the threads have something to hold on to and not disconnect ... in theory)
SPEED > Wall Speed = 50 (Not sure if this helped or not, but it made it faster and still printed the M39 threads without issue)
SPEED > Top/Bottom Speed = 25
EXPERIMENTAL > Infill Travel Optimization = YES (Checked Yes)
I'm sure you or someone else may have a quicker or better way to get this to print fairly quickly and have the M39 threads stay intact on the inside, but this is what I did to accomplish that.
This is a camera lens adapter for the ORIGINAL Helios 44 58mm F2. The mount is an M39 with a flange distance of 45.2mm NOT an M42 with a flange distance of 45.5mm on the Helios 44-2.
MOUNT DETAILS:
Zenit M39x1 Mount
Flange Distance: 45.2mm
If you have the Original Helios 44 f/2 then this is the adapter that you want to print. The flange distance on the Original Helios 44 lens is 45.2mm instead of 45.5mm on the Helios 44-2 and beyond, so I modeled this to fix that issue.
You can get an M39 to M42 adapter and use that to mount on an M42 (42x1mm) camera adapter, but the flange distance will be off by .3mm and you will not be able to fully focus to infinity. Plus this adapter can be printed for less than a dollar's worth of PLA so it might be worth it just to print it. It's not perfect, but I can finally use this lens to some degree.
BE ADVISED:
This is V1 and there are a couple of issues that need to be resolved. But for me, it has been working pretty well.
DETAILS:
Printing this took about 4 hours and 26 grams of filament with my custom Cura print settings.
I had issues getting the M39 inner threads to adhere on the inside, that is why I used custom settings. Once I started using these settings, I never had an issue with it. I added the preset file in the downloads and have written it down below if you want to use my same Cura settings.
Be sure to print in Black or paint black afterward (including on the inside). This stops light and reflections from getting to the sensor.
BONUS:
I have made a MACRO CONVERSION version for those who want to use this lens as a macro lens for closer details. It is roughly 18mm longer and prints at a time of 6 hours and 30 minutes. The file is in the download section.
INFO & SETTINGS
Printer: Stock Creality Ender 3 V2 (With upgraded bed springs)
Print time: 3 Hours 49 Minutes
Material: PLA
Color: BLACK (Or needs to be painted black later on, especially on the inside to stop reflections)
Temperature: Hot End 200 C/ Bed 60 C
Bed Adhesion Method: Hairspray
Bed Leveling: Manual
CUSTOM CURA SETTINGS (helped me print the threads perfectly):
Start with the Default Super Quality 0.12
SHELL > Top Layers = 18 (for stronger bayonet connection on the camera)
SHELL > Bottom Layers = 2 (Needed to change to enable other settings that helped with the M39 threads)
SHELL > Outer Wall Inset = 0.2
INFILL > 10%
INFILL > Extra Infill Wall Count = 1
INFILL > Infill Before Walls = YES (Checked Yes / Helps the threads have something to hold on to and not disconnect ... in theory)
SPEED > Wall Speed = 50 (Not sure if this helped or not, but it made it faster and still printed the M39 threads without issue)
SPEED > Top/Bottom Speed = 25
EXPERIMENTAL > Infill Travel Optimization = YES (Checked Yes)
I'm sure you or someone else may have a quicker or better way to get this to print fairly quickly and have the M39 threads stay intact on the inside, but this is what I did to accomplish that.
Similar models
thingiverse
free

M39 Lens to M42 Camera/Enlarger adaptor by dunga
... use on a camera, consider printing in black.
ask if you have questions or requests.
have fun, and post your makes or remixes! :)
3dbaza
$5

Film camera ZENIT 122 and HELIOS 44M (329320)
...camera 3d model<br>helios-44m-7 58 mm f/ 2.0 is a fast multi-coated normal lens for 35 mm cameras with m42 mounting thread.
thingiverse
free
M42 lens adapter for Fujifilm X mount by Insane569
...er-1
ive printed a couple of different designs that almost worked fine, ive gone from 50 to 40% infill with no noticeable issues.
thingiverse
free

Minox Lens to M39 Minotar by jiyongraphic
... used this on an sony a7 using an adapter, works fine!, no idea if the flange distance is safe for an actual leica camera system.
thingiverse
free
Contax-Kiev / ContaxRF lens to helicoid adapters by nigelpstanley
...pter to mount the helicoids) but as they go a bit beyond infinity they may work on systems with slightly bigger flange distances.
thingiverse
free

HELIOS 44-2 soft-focus adapter by aeropic
...-a6000 mirrorless camera.
take care when using this lens on a dslr, the rear of the lens might come in contact with the mirror...
thingiverse
free

M42 Lens To Leica M Body (Techart Pro LM-EA7) Adapter by profhankd
...r 55mm f/1.8 lens shown. note that you can shift the autofocus range closer by not leaving the manual focus ring set to infinity.
thingiverse
free

T42 to Canon EF-S lens Adapter (Work in progress) by Bootdsc
...nce. the necessary supports are built into the the bottom half. do not enable supports. v2 has been printed and is a perfect fit.
thingiverse
free
Kiev to Sony E Lens Adapter with Aperture Control by mlise
... kiev mount for the aperture control arm, but that would weaken it and add light leak risk. best to just print one for each lens.
thingiverse
free
M42 Rear Lenscap by profhankd
...standard metric m42x1. the outside is a grip pattern similar to that used on the focus ring of many...
M39X1
thingiverse
free

10mm macro M42 to M39 Mount (aperture locked)
...m42 to m39 mount (aperture locked) thingiverse m42x1 to m39x1 macro 10mm. aperture is...
thingiverse
free

M39 to Micro Four Thirds Adapter by LorDXEO
...fits accurate and also have focus to infinity too. m39x1 (flange 28.8mm) to m4/3 (flange 20mm) i also added...
Zenit
3ddd
$1

Zenit
...zenit
3ddd
"profi" зеркальная фотокамера zenit 412ls, 3ds max 2010, vray 1,5 sp4, текстуры, карты, obj
turbosquid
$27

Zenit-E
...yalty free 3d model zenit-e for download as obj, c4d, and fbx on turbosquid: 3d models for games, architecture, videos. (1259109)
3ddd
free

cabina armadio Zenit
... гардероб
стеллажная система cabina armadio zenit
модель по размерам, текстуры не требуются, стек не свёрнут. 37500 faces
turbosquid
$5

zenit.3DS
... available on turbo squid, the world's leading provider of digital 3d models for visualization, films, television, and games.
3ddd
free

выключатели ABB Zenit
... выключатель , розетка
3d модель выключателей abb niessen серии zenit.
3d_export
$10

Camera ZenitE 3D Model
...camera zenite 3d model
3dexport
camera zenite 3d model nightic 71840 3dexport
turbosquid
$15

Zenit Football Club Ring
...nit football club ring for download as max, obj, fbx, and stl on turbosquid: 3d models for games, architecture, videos. (1226581)
3d_export
$35
Zenit-a spaceship
...ith sketchup. model polygons are triangles.models are low polygon. my own design style is also products. i hope it will be liked.
turbosquid
$29

Paola Zani ZENIT Sofa and armchair
...aola zani zenit sofa and armchair for download as max and obj on turbosquid: 3d models for games, architecture, videos. (1412660)
3d_export
$35

Zenit - c spaceship
... stl extensions x-ray tests are clean. model polygons are triangles.models are low polygon. my own design style is also products.
Helios
3ddd
$1
Helios
...helios
3ddd
helios
светильник helios испания, арт.042в
3ddd
$1

Люстра Helios
... madera
люстра helios madera 60 из деревянных пластин, также возможен вариант из металлических пластин.
3ddd
$1

Baccarat Helios
...baccarat helios
3ddd
baccarat
люстра фирмы baccarat, модель helios на 48 рожков.
3ddd
free

HELIOS
... нерабочих поверхностях допускается использование искусственной кожи. модель доступна в двух модификациях: helios и helios extra.
3ddd
free

HOLLY HUNT Helios Chandelier
...holly hunt helios chandelier
3ddd
holly hunt , helios
helios chandelier
by: holly hunt
3d_export
$20

Sofa Helios 3D Model
...sofa helios 3d model
3dexport
sofa helios
sofa helios 3d model net_men 944 3dexport
3d_export
$10

Chair Helios 3D Model
...chair helios 3d model
3dexport
chair helios
chair helios 3d model net_men 943 3dexport
turbosquid
$99

Helios Tower
... available on turbo squid, the world's leading provider of digital 3d models for visualization, films, television, and games.
3ddd
$1

Baccarat - Helios 24L long
...accarat , helios
люстра фирмы baccarat, модель helios на 24 рожка, текстуры прилагаются.
3ddd
$1

Baccarat - Helios 24L long
... helios
люстра фирмы baccarat, модель helios на 24 рожка, текстуры прилагаются. (перезалито)
Sony
3ddd
$1
Sony
...sony
3ddd
sony , телевизор
телевизор sony подставкой колонкой и сабуфером 55"
3ddd
$1

Джойстик Sony
...джойстик sony
3ddd
джойстик , sony
джойстик sony
3ddd
$1
Sony camera
...sony camera
3ddd
sony , камера
sony camera
3ddd
$1

sony ericsson
...sony ericsson
3ddd
sony ericsson , телефон
sony ericsson
3ddd
$1
Sony F35
...sony f35
3ddd
sony , камера
камера sony f35
3ddd
$1
Sony-W300
...sony-w300
3ddd
sony , фотоаппарат
фотокамера sony-w300+текстуры
3ddd
free
Монитор Sony
...монитор sony
3ddd
sony , монитор
монитор sony, текстуры есть
3ddd
$1

Фотоаппарат Sony
...ony , фотоаппарат
фотоаппарат sony p150. неплохое качество. текстуры в vray прилагаются.
3d_export
$5

sony headphones
...sony headphones
3dexport
sony headphones modeling in blender
turbosquid
$59

Sony
... available on turbo squid, the world's leading provider of digital 3d models for visualization, films, television, and games.
44
turbosquid
$39

STG 44 / MP 44
... available on turbo squid, the world's leading provider of digital 3d models for visualization, films, television, and games.
turbosquid
$60

StG 44 Sturmgewehr-44 MP44
... free 3d model stg 44 sturmgewehr-44 mp44 for download as fbx on turbosquid: 3d models for games, architecture, videos. (1150167)
3d_export
$12
Sudaev AS-44
...sudaev as-44
3dexport
7.62 mm sudaev as-44 prototype assault rifle of 1944
3d_export
$39

Revolver 44 magnum
...revolver 44 magnum
3dexport
revolver 44 magnum
turbosquid
$35

Bracelet 44
...osquid
royalty free 3d model bracelet 44 for download as 3dm on turbosquid: 3d models for games, architecture, videos. (1548237)
turbosquid
$15

Ring 44
...turbosquid
royalty free 3d model ring 44 for download as 3dm on turbosquid: 3d models for games, architecture, videos. (1548232)
turbosquid
$15

building 44
...osquid
royalty free 3d model building 44 for download as max on turbosquid: 3d models for games, architecture, videos. (1362762)
turbosquid
$6

Bedcloth 44
...osquid
royalty free 3d model bedcloth 44 for download as max on turbosquid: 3d models for games, architecture, videos. (1522744)
turbosquid
$10

T-44
...bosquid
free 3d model t-44 for download as max, fbx, and obj on turbosquid: 3d models for games, architecture, videos. (1575700)
3ddd
$1
Зеркало 44
...зеркало 44
3ddd
круглое
зеркало .
Mount
3d_export
free

mounting bracket
...mounting plate is the portion of a hinge that attaches to the wood. mounting plates can be used indoors, cabinetry and furniture.
turbosquid
$2

MOUNTING
... available on turbo squid, the world's leading provider of digital 3d models for visualization, films, television, and games.
turbosquid
free

Mounts
... available on turbo squid, the world's leading provider of digital 3d models for visualization, films, television, and games.
turbosquid
free

Mount Fuji
...fuji
turbosquid
free 3d model mount fuji for download as obj on turbosquid: 3d models for games, architecture, videos. (1579977)
3d_export
$5

Headphone mount LR
...headphone mount lr
3dexport
headphone mount l+r
turbosquid
$39

Mount rainier
...quid
royalty free 3d model mount rainier for download as fbx on turbosquid: 3d models for games, architecture, videos. (1492586)
turbosquid
$5

pipe mounting
...quid
royalty free 3d model pipe mounting for download as obj on turbosquid: 3d models for games, architecture, videos. (1293744)
turbosquid
$3

Mounting Tires
...uid
royalty free 3d model mounting tires for download as fbx on turbosquid: 3d models for games, architecture, videos. (1708511)
3d_export
$5

Magnetic GoPro Mount
...pro mount
3dexport
cool magnetic mount for gopro. allows you to mount the camera on flat metal surfaces and get exclusive shots.
turbosquid
$5

Stone Mount
...ty free 3d model stone mount for download as ma, obj, and fbx on turbosquid: 3d models for games, architecture, videos. (1370306)
E
3ddd
$1
WALL-E
...wall-e
3ddd
wall-e , робот
wall-e
3d_export
$100

e-rickshaw
...e-rickshaw
3dexport
e-rickshaw- it have 3d model of passenger e-rickshaw
3d_ocean
$12

Wall E
...wall e
3docean
character robot wall e
its a 3d model of wall e….
turbosquid
$68
Model-E Droids 2-E Q-E Star Wars
... available on turbo squid, the world's leading provider of digital 3d models for visualization, films, television, and games.
cg_studio
$45

Model-E Droids 2-E Q-E Star Wars3d model
....3ds .c4d .obj .vue - model-e droids 2-e q-e star wars 3d model, royalty free license available, instant download after purchase.
3d_export
$100
e-rickshaw
...e-rickshaw
3dexport
e-rickshaw design for passenger it have all mechanical component
design_connected
$7
Cone E
...cone e
designconnected
bonaldo cone e computer generated 3d model. designed by pasini, ennio.
3ddd
$1

Wall-E NEW
...wall-e new
3ddd
wall-e , робот
wall-e
design_connected
$29

Extrasoft E
...extrasoft e
designconnected
living divani extrasoft e computer generated 3d model. designed by lissoni, piero.
3ddd
$1

E-Turn
... скамейка
современная скамейка фирмы kundalini.
модель e-turn.
дизайнер brodie neil.
размеры: h 42 cm l 185 cm w 54 cm