Thingiverse

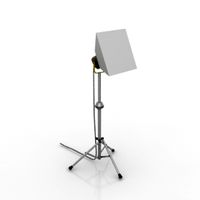
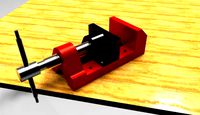
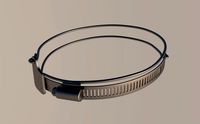
Heavy Duty C Clamp Tripod for Camera and Light
by Thingiverse
Last crawled date: 4 years, 3 months ago
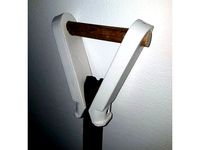
This is an heavy duty c clamp to mount photo gear to an table top or an shelf.
I failed to break the prototype, so I consider it strong enough. Th e secret of its strength will reveal the slicer. So be curios!
It has an 1/4" thread to directly attach a ball head. But the pole gives you more flexibility.
The pole is made for 16mm tubes. You can use cable pipes witch is the cheapest option. The optimal choice would be aluminum, but carbon will also has its appeal ;-)
There are different models for different screw sizes. So you should find the appropriated screws in your stock or at your local hardware store. (Witch wars quite frustrating that's why I added the addition options.)
I have provided two caps for the pole. One for an camera screw and with an spigot for lights. The spigot fits through the clamp, so the pole can be removed from the clamp later.
BOM
1pcs M5x40/50/60 hex bolt (choose according to the clamp body size)
2pcs M5 nuts
1pcs M4x10/12/16 hex bolt (choose the model for the knob according to the size)
1pcs m4 nut
1pcs m3x30 countersink screw (to enforce the spigot)
2pcs 1/4-20 unc 5/8 countersink screw
1pcs anti slip pad with adhesive (non-slip shoe pads, witch are used to make high heels mire secure)
Printing
The body sould be printed wit 0.2mm layer hight, 0.4mm nozzle with and 3 perimeters.
Mounting
Step: Equip the m5 hex-bolt with the "ClampSpindelKnobLid" and one m5 nut.
step: Insert the prepared m5 Bolt into the body of the clamp. This needs all space from all cavities. Push the nut into its cavity at the bottom and insert a second m5 nut into the cavity at the outside of the clamp screw the bolt down until it engages with the second nut too.
3.Step: Now put the "ClampSpindelKnob" in top of the bolt and press the "ClampSpindelKnobLid" into the "ClampSpindelKnob" from the bottom. This will need a fair amount of force and you will hardly get this apart again.
(not shown:) Screw the 1/4-20 5/8 screw into the upper bracket of the clamp.
Step: Stick an piece of non-slip pad under the upper bracket as shown and trimm of the access with an utility knife.
Step (not shown): Insert the m4 nut into its cavity inside the tunnel at the rear. Fit the knob with the appropriated m4 hex bolt and screw it in from the rear.
Step: Cut the pole from an 16mm tube to the desired length. Equip the "ClampPoleCap" with the second 1/4-20 5/8 screw and glue it in one end of the pole.
The other end is to be equipped with the "ClampSpigot" witch can be enforced with an m3x30 countersink screw.
Please considere leaving me a tip if you like the design.
Similar models
thingiverse
free

Warsley/Ankey rotary tool "clamp" holder by MACPET
...t;screw_feet")
designed for warsley/ankey 480w professional rotary tool
i am going to make more accessories for this holder.
thingiverse
free
Shovel Handle by BoopidooDesigns
...
2pcs 3d-printed handle parts
2pcs countersunk wood screws
1pcs m5x55 screw
1pcs m5 nut
2pcs m5 washers
1pcs 2.5" hose clamp
thingiverse
free

KOSO RX1N 28.6mm fatbar mount by Jebex
...cycle speedometer.
use original mounting dampers.
required screws:
2pcs m5x16 hex head bolt
1pcs m5x20 hex head bolt
3pcs m5 nuts
thingiverse
free

Ender-5 LCD12864 Holder
...eccesary to assemble:
1pc m3x30 screw + m3 nut
1pc m5x20 screw + 2pcs m5 washers + 1pc m5 nut
and stock lcd holder screws.
enjoy!
thingiverse
free

Filament guide for Geeetech A10 + BMG extruder + Runout sensor by Cstom75
... guide with runout sensor for bmg extruder.
bolts:
1pcs m3x10 + nut
1pcs m4x25
2pcs m4 lock nut
2pcs m4 washer
1pcs 688zz bearing
thingiverse
free

Adapter with rotation for Mantis Gripper to EEZYbotARM MK2
..._mount_b
1pcs martins_gripper_claw_3_r
1pcs martins_gripper_claw_3_l
1pcs martins_gripper_gear
2pcs martins_gripper_bearingfix_2x
thingiverse
free
V-slot fan holder (60,80mm) by CaptainDz
... secret screw - 2pc.
m4 nut - 3pc.
for 60mm fan need's:
30mm m4 secret screw - 1pc.
20mm m4 secret screw - 2pc.
m4 nut - 3pc.
thingiverse
free
CR-10 modified spool holder with bearing by szili83
...ols for example: philamentpm
updated, short axes:
"cr_10_tengely_v2_roviditett"
"cr10_tengely_belsoalatet_v3"
thingiverse
free

spool holder for profile delta lightweight by codavr
...crew m4 bolts, thread length 6mm: 4pcs
printed:
rod 1: 2pcs
rod 2: 2pcs
joint 1: 2pcs
joint 2: 1pcs
joint 3: 1pcs
pla amount: 50g
thingiverse
free
turnable base for modular mini tripod by JrGong92
...ead screws
2pcs. m4x16mm lens head screws
3pcs. m4x12mm lens head screws
4pcs. m4 square nuts (low profile)
3pcs. m4 hexagon nuts
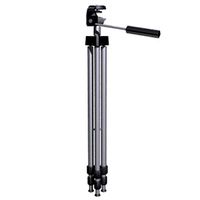
Tripod
archibase_planet
free
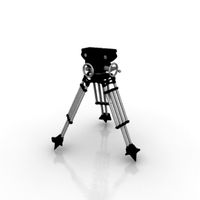
Tripod
...tripod
archibase planet
tripod staff state stand
tripod - 3d model for interior 3d visualization.
archibase_planet
free
Tripod
...tripod
archibase planet
camera tripod
cam tripod 2 - 3d model (*.gsm+*.3ds) for interior 3d visualization.
archibase_planet
free
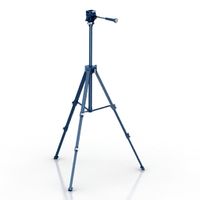
Tripod
...tripod
archibase planet
tripod support stand holder
tripod n191213 - 3d model (*.gsm+*.3ds+*.max) for interior 3d visualization.
design_connected
$13
Tripod
...tripod
designconnected
erickson æsthetics tripod computer generated 3d model. designed by erickson, ben.
design_connected
$13

Tripod
...tripod
designconnected
david weeks studio tripod computer generated 3d model. designed by weeks, david.
3d_ocean
$4

Tripod
...tripod
3docean
3d models coffee table furnishings furniture tripod
3d models,furnishings,furniture
archibase_planet
free
Tripod
...tripod
archibase planet
tv camera equipment
cam tripod - 3d model (*.gsm+*.3ds) for interior 3d visualization.
turbosquid
$4
Tripod
...urbosquid
royalty free 3d model tripod for download as blend on turbosquid: 3d models for games, architecture, videos. (1580064)
turbosquid
$5

Tripod
...uid
royalty free 3d model tripod for download as c4d and fbx on turbosquid: 3d models for games, architecture, videos. (1593078)
turbosquid
$35

Tripod
... available on turbo squid, the world's leading provider of digital 3d models for visualization, films, television, and games.
Duty
3d_export
$5

call of duty credits emblem
...call of duty credits emblem
3dexport
credits emblem in 3d mode, call of duty coin
turbosquid
$3
Heavy Duty Aircraft
...yalty free 3d model heavy duty aircraft for download as blend on turbosquid: 3d models for games, architecture, videos. (1599053)
3d_ocean
$14
Duty Free Goods
...are a low polygonal models, easy to animate. - poly count: 408 - formats: max /obj /fbx/3ds/dxf - high detail was preserved wi...
turbosquid
$150

Heavy Duty Drone
... heavy duty drone for download as lwo, obj, fbx, lxo, and dae on turbosquid: 3d models for games, architecture, videos. (1268820)
turbosquid
$120

Heavy Duty Fighter
... available on turbo squid, the world's leading provider of digital 3d models for visualization, films, television, and games.
turbosquid
$1

Heavy duty chain
... available on turbo squid, the world's leading provider of digital 3d models for visualization, films, television, and games.
turbosquid
free
Heavy Duty Clutch
... available on turbo squid, the world's leading provider of digital 3d models for visualization, films, television, and games.
turbosquid
$22
Heavy Duty Shelf
...y duty shelf for download as 3ds, obj, wrl, c4d, fbx, and dae on turbosquid: 3d models for games, architecture, videos. (1227727)
3d_export
$14
800t heavy duty rubber press
...800t heavy duty rubber press
3dexport
800t heavy duty rubber press
3d_export
$10

Call of Duty personnages 3D Model
...ll of duty character 3ds c4d cinema 4d juggernaut shepherd ghost price
call of duty personnages 3d model arabizzle 66478 3dexport
Heavy
design_connected
$16

Heavy
...heavy
designconnected
decode heavy computer generated 3d model. designed by hubert, benjamin.
turbosquid
$12
Spar TRAIN-Heavy HEAVY-DUTY
... available on turbo squid, the world's leading provider of digital 3d models for visualization, films, television, and games.
3ddd
$1
The Heavy Rabbit
...the heavy rabbit
3ddd
табурет
project: heavy rabbit
designed by bongo design
3d_ocean
$40

Heavy vehicles
...el this model is created with 3ds max 2009 and content .max (3ds max), size: 7,65 mb this model can be used in any scene. enjoy !
3d_export
$8

heavy plastic crusher
...heavy plastic crusher
3dexport
heavy plastic crusher
3d_export
$5
heavy rotation handle
...heavy rotation handle
3dexport
heavy rotation handle
turbosquid
free
heavy sword
...ord
turbosquid
free 3d model heavy sword for download as fbx on turbosquid: 3d models for games, architecture, videos. (1223423)
turbosquid
free

Heavy Shield
...squid
royalty free 3d model heavy shield for download as fbx on turbosquid: 3d models for games, architecture, videos. (1382280)
turbosquid
$42

Heavy Tank
...
royalty free 3d model heavy tank for download as max and fbx on turbosquid: 3d models for games, architecture, videos. (1311230)
turbosquid
$3

Heavy Ball
...
royalty free 3d model heavy ball for download as ma and obj on turbosquid: 3d models for games, architecture, videos. (1515557)
Clamp
3d_export
$11
clamp
...clamp
3dexport
clamp
3ddd
free

Clamp
... enricо zanolla , капитоне
дизайнерenrico zanollмодель clamp
3ddd
$1

Clamp
...ricо zanolla , капитоне
дизайнеры
enrico zanolla
andrea di filippo
модель clamp
dzstudio
3d_export
free
clamp
...clamp
3dexport
simple clamp model, more free 3d models here:
3d_export
$5
clamping handle
...clamping handle
3dexport
clamping handle
3ddd
$1

Clamp / DZstudio
... dzstudio , капитоне
люстра clamp от dzstudio/enrico zanolla(италия).
3ddd
$1
Светильник Clamp
...светильник clamp
3ddd
clamp
стеганый светильник clamp в двух цветах в черном и белом.
turbosquid
$29
clamp
...ty free 3d model clamp for download as 3ds, obj, c4d, and fbx on turbosquid: 3d models for games, architecture, videos. (1442049)
turbosquid
$29
clamp
...ty free 3d model clamp for download as 3ds, obj, c4d, and fbx on turbosquid: 3d models for games, architecture, videos. (1442041)
3d_export
$5
Clamp-14
...clamp-14
3dexport
3d model of clamp name 14
C
3ddd
$1
Gustavsberg Skandic 160 c-c
...gustavsberg skandic 160 c-c
3ddd
gustavsberg , смеситель
3dmax 2009
3ddd
$1
Кресло Victoria C
...кресло victoria c
3ddd
victoria c , стул
victoria c
design_connected
$25
Mobius C
...mobius c
designconnected
zenith mobius c computer generated 3d model. designed by schamburg, marc.
3ddd
$1

Molteni & C
...molteni & c
3ddd
molteni&c
molteni & c
turbosquid
$10
Raids house C&C Tiberian sun
... raids house c&c tiberian sun for download as max and fbx on turbosquid: 3d models for games, architecture, videos. (1188376)
turbosquid
$10
Civilian Asylum C&C Tiberian sun
...ilian asylum c&c tiberian sun for download as max and fbx on turbosquid: 3d models for games, architecture, videos. (1188365)
3ddd
$1

Molteni & C
...molteni & c
3ddd
molteni&c
стул molteni & c
3ddd
free
kamina&c
...kamina&c
3ddd
kamina-c , табурет барашек
sheep chair by kamina-c
design_connected
$29
Extrasoft C
...extrasoft c
designconnected
living divani extrasoft c computer generated 3d model. designed by lissoni, piero.
design_connected
$4
Mono C
...mono c
designconnected
scp mono c tables computer generated 3d model. designed by konstantin grcic.
Camera
archibase_planet
free
Camera
...base planet
camera surveillance camera video camera
camera surveillance n090211 - 3d model (*.3ds) for interior 3d visualization.
archibase_planet
free

Camera
...hibase planet
camera security camera video camera
camera security n210515 - 3d model (*.gsm+*.3ds) for exterior 3d visualization.
archibase_planet
free
Camera
...se planet
camera web camera webcam
camera butterfly usb pc camera n090713 - 3d model (*.gsm+*.3ds) for interior 3d visualization.
archibase_planet
free
Camera
...mera
archibase planet
surveillance camera video camera camcorder
camera n011211 - 3d model (*.3ds) for exterior 3d visualization.
archibase_planet
free
Camera
...camera
archibase planet
camera digital camera
camera canon digital n041211 - 3d model (*.3ds) for interior 3d visualization.
archibase_planet
free
Camera
...camera
archibase planet
camera film camera phototechnique
camera n100214 - 3d model (*.gsm+*.3ds) for interior 3d visualization.
archibase_planet
free

Camera
...amera
archibase planet
camera video camera camcorder
camera video n070315 - 3d model (*.gsm+*.3ds) for interior 3d visualization.
archibase_planet
free

Camera
...rchibase planet
camera video camera camcorder
camera studio n101213 - 3d model (*.gsm+*.3ds+*.max) for interior 3d visualization.
archibase_planet
free
Camera
...ibase planet
digital camera camera phototechnique
camera canon ixus 400 n310311 - 3d model (*.3ds) for interior 3d visualization.
archibase_planet
free
Camera
...ase planet
photocamera video camera camera
camera sony t300 black n291010 - 3d model (*.gsm+*.3ds) for interior 3d visualization.
Light
archibase_planet
free

Light
...light
archibase planet
lamp lighting light
light - s2 - 3d model for interior 3d visualization.
archibase_planet
free

Light
...light
archibase planet
light luminaire lighting
light l0465 - 3d model (*.gsm+*.3ds) for interior 3d visualization.
3d_export
$5

lighting
...lighting
3dexport
lighting
3d_export
$5

lighting
...lighting
3dexport
lighting in livingroom
turbosquid
$3

Lighting Tree with Lights
...d model lighting tree with lights for download as max and 3ds on turbosquid: 3d models for games, architecture, videos. (1585507)
archibase_planet
free

Light
...light
archibase planet
luster lighting solution
light - s - 3d model for interior 3d visualization.
archibase_planet
free

Light
...light
archibase planet
luster lamp lighting
light 1 - 3d model for interior 3d visualization.
archibase_planet
free

Lights
...lights
archibase planet
surgical lights surgical lamp
surgical lights (floor) - 3d model for interior 3d visualization.
archibase_planet
free

Light
...light
archibase planet
lighting luminaire candlelight
light l0463 - 3d model (*.gsm+*.3ds) for interior 3d visualization.
3d_export
$18

street light-lighting-light-xia bing
...
3dexport
street light-lighting-light-xia bing<br>max 2015 v-ray 3 max 2015<br>textures<br>all files in zip...