Thingiverse
Heat-Set Insert Press with Spring Return
by Thingiverse
Last crawled date: 5 years, 3 months ago
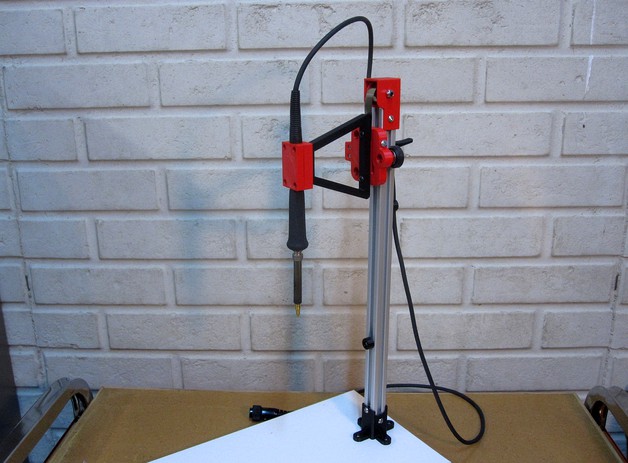
This remix replaces the pulley and counter weight system used in the adafruit and atmakers design with a constant force spring, providing a simpler solution.
A constant force spring maybe similar to what is in a tape measure. It always pulls with the same force, regardless of the pulled distance.
The Arm, Handle, and 2020 Mount are used as-is from the adafruit design. The Roller Plate is symetrical in design so the Handle can be mounted on either side of the tower, and even on the front or back of the Roller Plate. I added the tension adjustment to the Roller Plate design to remove wheel play on the 2020 extrusion.
The 2020 Mount from the atmakers design looks to be sturdier than the adafruit, but I did not print it. The adafruit uses #4 woodscrews, which feel too small for this application, but are working fine.
I designed the Iron Mount for a Weller WES51 soldering iron. The Iron Mount used on adafruit design is interchangeable with this design. Included are drawings for the brass tips for the WES51. The tips sold by adafruit will not fit on the Weller WES51 iron.
The 3mm heat-set inserts are used on the short section of the Arm that attaches to the Soldering Iron Mount. The holes in the long section of the Arm are used as through holes for the 4mm button head screw. The CF Spring is sandwiched between the Arm and Roller Plate and accepts the 4mm button head screw.
Counter sunk holes were used in the Roller Plate and Iron Mount because they print well from either direction. Flat head screws mate well with the printed countersinks, and are used for the soldering Iron Mount and the Handle.
The internal holes printed a little undersized, so I opened some up with an appropriate sized drill. The Bobbin needs to spin freely on the thru-hole bolt.
Bill Of Material
Bobbin
Bobbin Holder
Qty=3, M4 2020 T-Nut
Qty=3, Button Head Screw, M4x0.7x8
Qty=1, Button Head Screw, M5x0.8x30
Qty=1, Lock Nut, M5x0.8
Qty=1, Constant Force Spring, 0.7 lbs, McMaster 9293K17
Roller Plate
Qty=3, Ball Bearings with Wheels, www.amazon.com/dp/B01FJHZ42M/
Qty=3, Flat Head Screw, M5x0.8x25
Qty=3, Lock Nut, M5x0.8
Qty=1, Button Head Screw, M4x0.7x25
Qty=1, Nut, M4x0.7
Handle
Qty=2, M3x0.5 Brass Heat-Set Insert
Qty=2, Flat Head Screw, M3x0.5x10
Arm
Qty=2, Button Head Screw, M4x0.7x16
Qty=2, Nut, M4x0.7
Qty=2, M3x0.5 Brass Heat-Set Insert
Iron Mount
Iron Clamp
Qty=4, M3x0.5 Brass Heat-Set Insert
Qty=6, Flat Head Screw, M3x0.5x10
Stop
Qty=1, M4 2020 T-Nut
Qty=1, Button Head Screw, M4x0.7x8
Cable Clamp
Qty=1, M4 2020 T-Nut
Qty=1, Button Head Screw, M4x0.7x8
2020 Mount
Qty=4, M4 2020 T-Nut
Qty=4, Button Head Screw, M4x0.7x8
Qty=4, Wood Screw, #4 x 3/4"
This is a rewarding project to build because it is a useful tool that has a good feel. Printing and redesign some of the parts was fun too. I had not used heat-set inserts until building this project, but I can easily see that this tool will be helpful in providing true alignment of the inserts as well as holding the iron in the ready position.