Thingiverse
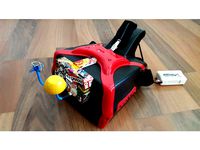
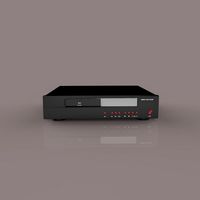
Headplay "Sly-Versity" receiver upgrade by earlynerd
by Thingiverse
Last crawled date: 3 years ago
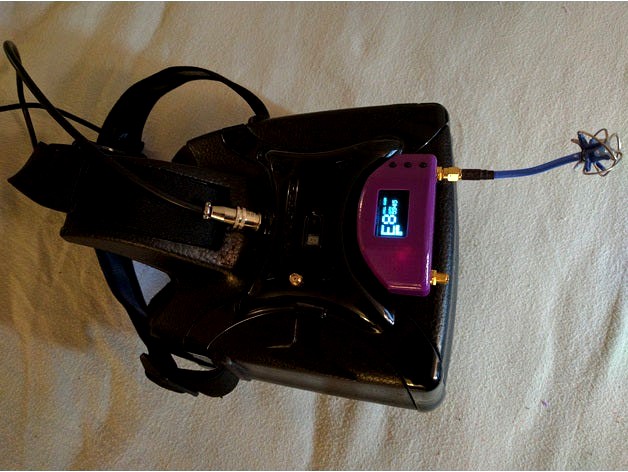
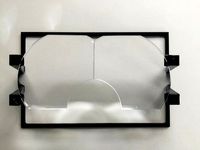
This is a clean way to add an integrated diversity receiver to your headplay HD! It uses the Realacc rx5808 pro module with OLED, which is fully enclosed and protected with a smoked acrylic display window. It also uses pushbuttons to replace the stock navigation switch, a built in USB serial converter with externally accessible micro USB port for easily updating the module firmware,and two conveniently located forward facing SMA or RP-SMA connectors (your choice). Assembling this unit will require a fair bit of modding to the module, and unfortunately I didn't take many pictures of that process. I'm building another unit for a friend, so I'll document the build better at that point.
You'll need:
M2 heat set threaded inserts, 4.8mm length
This USB to serial adapter this is optional if you don't need easy firmware update, and I can upload a version without the USB hole.
A pair of SMA or RP-SMA extensions with bulkhead nuts, I used these SMA ones
5x m2 screws, 10mm I believe. You can also order them longer and cut to length as necessary
3x 6x6x6mm tactile switch. I got mine from this set
Some smoked acrylic or not smoked if tht's your style. 12x12 is way too much and 1/8'' is thicker than I'd like but I made it work.
An RX5808 Pro diversity module you dont need the cover obviously, and it doesnt matter if you get the SMA or RP-SMA version if one's out of stock since those will be getting removed anyway.
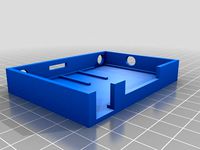
And, finally, a set of the above printed parts, basic hand tools, some random small gauge wire, the receiver cable interconnect from your headplay or a JST SH 6 pin cable, and some soldering finesse.
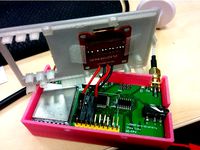
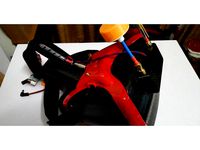
The basic process is to unscrew the two boards from each other, desolder the built in SMA connectors from the rx5808 pro module, install the acrylic window in the housing, wire the FTDI to the RX5808, replace the threaded module board spacers with the above clearance spacers, and screw the module to the inside of the housing using the m2 inserts. The buttons press in snugly from the back, but will require a bit of a hack to wire up. I will update with details, but it involves scraping off some solder mask and tapping into three traces plus ground. Finally, bolt in the SMA extension bulkheads and solder to the pads on the rear of the module board. then, add the power/audio/video headplay cable, bolt on the cover, plug into the headplay motherboard, and apply the module to the top of the headplay with some strong transfer tape.
I know thats a lot of steps and no pictures, I will update with a more detailed build guide and can answer any questions via messages in the meantime!
You'll need:
M2 heat set threaded inserts, 4.8mm length
This USB to serial adapter this is optional if you don't need easy firmware update, and I can upload a version without the USB hole.
A pair of SMA or RP-SMA extensions with bulkhead nuts, I used these SMA ones
5x m2 screws, 10mm I believe. You can also order them longer and cut to length as necessary
3x 6x6x6mm tactile switch. I got mine from this set
Some smoked acrylic or not smoked if tht's your style. 12x12 is way too much and 1/8'' is thicker than I'd like but I made it work.
An RX5808 Pro diversity module you dont need the cover obviously, and it doesnt matter if you get the SMA or RP-SMA version if one's out of stock since those will be getting removed anyway.
And, finally, a set of the above printed parts, basic hand tools, some random small gauge wire, the receiver cable interconnect from your headplay or a JST SH 6 pin cable, and some soldering finesse.
The basic process is to unscrew the two boards from each other, desolder the built in SMA connectors from the rx5808 pro module, install the acrylic window in the housing, wire the FTDI to the RX5808, replace the threaded module board spacers with the above clearance spacers, and screw the module to the inside of the housing using the m2 inserts. The buttons press in snugly from the back, but will require a bit of a hack to wire up. I will update with details, but it involves scraping off some solder mask and tapping into three traces plus ground. Finally, bolt in the SMA extension bulkheads and solder to the pads on the rear of the module board. then, add the power/audio/video headplay cable, bolt on the cover, plug into the headplay motherboard, and apply the module to the top of the headplay with some strong transfer tape.
I know thats a lot of steps and no pictures, I will update with a more detailed build guide and can answer any questions via messages in the meantime!
Similar models
thingiverse
free

RX5808 Pro Diversity mid screen case by cahbtexhuk
...for modifications of rx5808 board with oled screen mounted in the middle of main pcb and where rx5808 modules have tall rf shield
thingiverse
free

RX5808 Pro Diversity Bracket by zanthor
...have a printer, i have these for sale on my site (http://www.twistedquads.com/rx5808-pro-diversity-mounting-bracket_p_2602.html).
thingiverse
free

Realacc RX5808 Pro diversity FatShark doors by 4runner
...realacc rx5808 pro diversity fatshark doors by 4runner
thingiverse
fatshark doors for realacc rx5808 pro diversity two modules
thingiverse
free

Fatshark cable cover and holder for diversity receiver by sashat720
... together).
i used the tesa® powerbond ultra strong double-sided mounting tape to attach the printed part to the fatshark goggles
thingiverse
free

ESP8266 FYSETC CASE
... i designed this beautiful case for the module. i hope, you will like it.
please don't forget to give thumbs-up :-)
thanks...
thingiverse
free
rx5808-pro-diversity case by Heathicus
...s/showthread.php?t=2477752
the case halves hold together by friction. use a little hot glue to hold the oled screen in position.
thingiverse
free

RX5808 Diversity - Negativ form for own cases / Placeholder by TeeZee
...er by teezee
thingiverse
this is a rough design of the rx5808-pro-diversity module. you can use it to easily generate new cases.
thingiverse
free

RX5808 pro diversity small case by 0815Paulchen
...es printing services as well. if you want to let this item print or you are a printing service, contact me in advance! thank you.
thingiverse
free
rx5808 diversity case by bondikene
...www.thingiverse.com/thing:2548467
wiring: https://github.com/sheaivey/rx5808-pro-diversity/blob/develop/docs/oled-arduino-nano.md
thingiverse
free

CONNECTOR BULKHEAD CABLES by skelo
...khead cables would work.
the sma is the standard opening.
i also attached the design for the occlusion to make your own sma hole.
Versity


Headplay
thingiverse
free
RX9850 case for Headplay goggle by wohenzhuce
... soldered on top of the pcb.
ps: the definition of this aviation connector is: 1. video in; 2. audio in; 3. gnd; 4.positive wire
thingiverse
free

Headplay Battery Holder by Cloudsmasher
...headplay battery holder by cloudsmasher
thingiverse
a small battery holder for the gopro mount.
thingiverse
free
Headplay True-D Diversity Pro 5805 by Kryptoo
...headplay true-d diversity pro 5805 by kryptoo
thingiverse
true-d diversity 5805 pro mod für die headplay hd.
thingiverse
free
Headplay HD Goggle SMA Antenna Mount by carrera0to60
... goggles to mount a patch style antenna. requires an extension to go from the stock antenna location to the front of the goggles.
thingiverse
free
Headplay RHO-Lens Holder by Seamongrel
...e rho-lens on the nose bridge and push down onto the double sided tape.
the rho-lens is from here: http://rho-lens.com/index.html
thingiverse
free

Headplay FPV battery mount by Mysabre73
...t; style mount on the back of the headset.
i used supports at 10% infill with .25mm layers. it took less than an hour to print.
thingiverse
free

Headplay FatShark-Like Bay Dock by Ashade
...u can just plug the module, position it, and glue it.
i have also added a vertical, plain version for other non-headplay goggles.
thingiverse
free

Headplay FPV battery case by miharix
...les. one is ca. 40% deeper then other.
the source files(feecad) are for the smaller, so you can change the writing on the bottom.
thingiverse
free

True-D Mount for Headplay SE FPV Goggles by jaymaster2000
...can be figured out by looking at the existing video receiver wiring layout, the pcb has markings indicating which wire does what.
thingiverse
free

LaForge Diversity V2 Module (Buttons) for Headplay HD Headsets by Fredgineer
...g feature.
the idea was to make the laforge integration look as clean as possible.
it takes about a few hours to do all the work.
Earlynerd
thingiverse
free

Yet another Bus Pirate Remix (Inserts Edition) by earlynerd
... edition) by earlynerd
thingiverse
lid and base split up, base modified for 3.8mm length thermoplastic m3 inserts from mcmaster!
thingiverse
free

IN-12 Nixie socket by earlynerd
.... heat from a soldering iron seats the pins the rest of the way, and locks them in. the tube helps make sure they go in straight.
thingiverse
free

Reptile S800 motor mount w/ inserts by earlynerd
...nserts. specifically mcmaster-carr part number 94180a331. the wing will need some small cuts to make relief holes for the bosses.
thingiverse
free
Realacc X210 lightweight antenna tube mount by earlynerd
...10. slides over standoffs, use a bit of double sided tape to secure to the bottom plate. fits standard 1/8" od antenna tube.
thingiverse
free

Runcam Owl HS1177 adapter by earlynerd
...nd should hold into the mount with a little bit of double sided adhesive. step file provided in case you'd like to modify it.
thingiverse
free

Rakon Tiny Whoop pico camera mount by earlynerd
... frame but may also fit the standard size one. i got the camera at readymade rc, but highly similar ones are available elsewhere.
thingiverse
free

Hive150 Antenna mount and VTX mount by earlynerd
...ideo transmitter which slides onto the horizontal standoffs behind the camera. i used a little double sided tape to hold mine on.
thingiverse
free

Hive210 VTX and receiver antenna mount by earlynerd
...attaching them to zip ties! there's also a version without the rx antenna spikes, if you prefer to mount them somewhere else.
thingiverse
free

Micro 85 Propeller Guard by earlynerd
...htly depending on material and machine. for me, 101% fits well in petg and 103% is about right in abs, but your mileage may vary.
thingiverse
free

Hive 210 underbody LED tray by earlynerd
...ight! great for making sure your quad can be seen in opponent's fpv feed.
weighs around 7 or 8g with leds when printed solid.
Sly
turbosquid
$55

Sly Stone
...alty free 3d model sly stone for download as ma, obj, and fbx on turbosquid: 3d models for games, architecture, videos. (1231438)
turbosquid
$31

Armchair Sly
... free 3d model armchair sly for download as max, obj, and fbx on turbosquid: 3d models for games, architecture, videos. (1205071)
3ddd
$1

SLY DELUX SOFA BED
...sly delux sofa bed
3ddd
sly , delux
modern sofa bed
3ddd
$1

Innovation Living Sly Coz Sofa
...иале пледа - дисплейс.
polys: 562 688
vert: 287 706
в файле две одинаковых модели с разными цветами. все текстуры присутствуют.
3d_export
$299

statue of hecules slying the lernaean hydra
...000 pixel clay mode image picture wire size : 3000 x 3000 pixel full view image of sculputre polygons : 1080214 vertices : 542800
3ddd
$1

Round Lamp
...round lamp 3ddd ding3000 , sly lamp , минимализм минималистичная люстра, диаметр 600 мм. название...
3d_export
$49
Google Glass with Mono Earbud Sky 3D Model
...ear bud wi-fi android glasses mobile bluetooth cyan blue sly google glass with mono earbud sky 3d model download...
3d_export
$299

sculpture hercules
...hercules it is 41.5cm in height statue of hecules slyng the lernaean hydra texture includes : dirt : 2362...
thingiverse
free

Sly Monkey
...sly monkey
thingiverse
a monkey who is quite sure of thiehrmselvzs.
thingiverse
free

Sly Dragon by MartialDesign
...sly dragon by martialdesign
thingiverse
dragon speed sculpt - pretty alright
Receiver
archibase_planet
free
Receiver
...receiver
archibase planet
receiver receiving set radio set
receiver n170311 - 3d model (*.3ds) for interior 3d visualization.
archibase_planet
free
Receiver
...receiver
archibase planet
receiver equipment
receiver - 3d model (*.gsm+*.3ds) for interior 3d visualization.
archibase_planet
free

Receiver
...receiver
archibase planet
radio tuner receiver
receiver n120108 - 3d model (*.gsm+*.3ds) for interior 3d visualization.
archibase_planet
free

Receiver
...receiver
archibase planet
receiver denon
denon avr3805- 3d model for interior 3d visualization.
turbosquid
$62
RECEIVER
... available on turbo squid, the world's leading provider of digital 3d models for visualization, films, television, and games.
turbosquid
$40

Receiver
... available on turbo squid, the world's leading provider of digital 3d models for visualization, films, television, and games.
3d_export
$6

Receiver for 20m3
...receiver for 20m3
3dexport
receiver for 20m3 of compressed air
archive3d
free

Receiver 3D Model
...iver receiving set radio set
receiver n170311 - 3d model (*.3ds) for interior 3d visualization.
3d_ocean
$6
DVD Receiver
...yer. can also be used as a receiver. original design dvd player or stereo design with exceptional detail. dvd receiver 3d models.
3d_ocean
$25
Television receiver
...cial plugin needed to open scene. - correctly scaled accurate representation of the original objects. - model is all materials...
Upgrade
turbosquid
$15

Upgraded Glock
...e 3d model upgraded glock for download as obj, fbx, and blend on turbosquid: 3d models for games, architecture, videos. (1185950)
3ddd
$1

Calligaris / UPGRADE
...calligaris / upgrade
3ddd
calligaris
c материалом
3d_export
free

cz upgrade
...cz upgrade
3dexport
https://www.buymeacoffee.com/mestrezen3d https://linktr.ee/mestrezen3
turbosquid
$80

Custer Tank upgrade
... available on turbo squid, the world's leading provider of digital 3d models for visualization, films, television, and games.
turbosquid
$39

Domestos 1 upgrade
... available on turbo squid, the world's leading provider of digital 3d models for visualization, films, television, and games.
3d_export
$10

Upgraded tea cup
...upgraded tea cup
3dexport
a cup with an unusual design and a unique shape for a more enjoyable tea experience
3d_export
$8

dixy outlander classic style upgraded poplar wood lounge chair
...utlander classic style upgraded poplar wood lounge chair
3dexport
dixy outlander classic style upgraded poplar wood lounge chair
turbosquid
free

AK-12 + Upgrades low-poly 3D model
...ow-poly 3d model for download as fbx, blend, and unitypackage on turbosquid: 3d models for games, architecture, videos. (1501145)
evermotion
$700

Upgrade from V-ray 1.5 to 3.5 for 3ds max
...here is no need to purchase a new dongle - your current dongles will be reprogrammed to carry v-ray 3. evermotion 3d models shop.
evermotion
$300

Upgrade from V-Ray 2.0 to V-ray 3.5 for 3ds Max
... interface (gui) for editing settings on one machine and one render node for rendering on one machine. evermotion 3d models shop.