Thingiverse
Hanging Shower Caddy by whayden001
by Thingiverse
Last crawled date: 3 years, 3 months ago
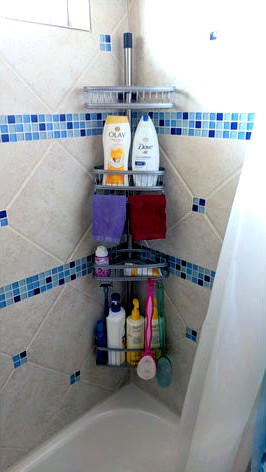
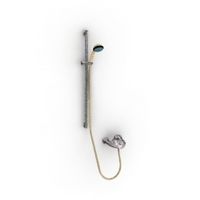
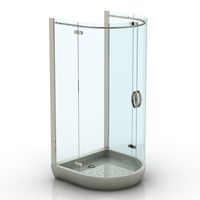
Hanging Shower Caddy (Life Hack)
Ever pull a shower head off the wall because of the shower caddy that was hanging from it? Ever scratched your tub or put a dent or hole in your ceiling with one of those tension pole shower caddies? Tired of having to adjust that tensioned shower caddy because it keeps falling over and making a mess? Just want something to hold all of your bath and shower products safely, durably and out of the way? Well that's what this is all about.
There aren't many 3D models here and I would argue they aren't needed for this life hack, but they do help.
The first model is a top cap for the top pole of the caddy. It tidies up the top of the pole, helps to keep water and soap from getting in and manages the wire rope.
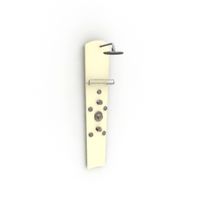
The second model is for a corner clip that has 2 suction cups to help keep the caddy from banging against the wall or moving around.
What is needed for each Shower Caddy:
1ea Pole Type Shower Caddy
a. Option 1 (Master Shower) https://www.amazon.com/gp/product/B07XLLLFBB/ref=ppx_yo_dt_b_search_asin_title?ie=UTF8&psc=1
b. Option 2 (Kids Bath) https://www.amazon.com/gp/product/B00FA0W170/ref=ppx_yo_dt_b_search_asin_title?ie=UTF8&psc=1
c. Or select something you like
1ea 3D Printed Top Cap - tweak scale for fit.
1-x 3D Printed Corner Clip
Stainless Steel Rope 1/8" (3mm)
a. Amazon Link - Note you will need to buy cutters as this stuff is near impossible to cut without them! https://www.amazon.com/gp/product/B01N0N4IME/ref=ppx_yo_dt_b_search_asin_title?ie=UTF8&psc=1
b. I suggest buying by the ft./m at your local big box store as it's much cheaper and it's cut to length at the store (no cutters to buy)
i. For the Master Shower (short caddy) I used 48" (1.2m)
ii. For the Kids Shower (tall caddy) I used 8' (2.5m)
2ea Stainless Steel Thimble 1/8" (M3) https://www.amazon.com/gp/product/B077SLZDFX/ref=ppx_yo_dt_b_search_asin_title?ie=UTF8&psc=1
Chose a Sleeve or Clamp
a. 2ea Aluminum Crimping Loop Sleeve 1/8" (M3) https://www.amazon.com/gp/product/B077SLZDFX/ref=ppx_yo_dt_b_search_asin_title?ie=UTF8&psc=1
b. 2ea Stainless Steel Wire Rope Cable Clip Clamp 1/8" (M3) https://www.amazon.com/gp/product/B07G8XWTZF/ref=ppx_yo_dt_b_search_asin_title?ie=UTF8&psc=1
Notes: The Crimping Loops are much cleaner and nicer looking, but if used make sure they are properly crimped or they will come lose. I opted to use the Cable Clip Clamps for the Master Shower Caddy after one of the Aluminum clips gave way on the kids caddy.
1ea Stainless Steel Carabiner Clip (2" x 1")https://www.amazon.com/DGOL-Stainless-Carabiner-Outdoor-Fastner/dp/B07QYKXVTZ
1ea Aluminum Corner Bracket https://www.amazon.com/gp/product/B01GNQ64RM/ref=ppx_yo_dt_b_search_asin_title?ie=UTF8&psc=1
1ea Stainless Steel Clevis Pin (8mm x 30mm) https://www.amazon.com/gp/product/B0816LZJ54/ref=ppx_yo_dt_b_search_asin_title?ie=UTF8&psc=1
1ea Cotter Pin Hairpin https://www.amazon.com/gp/product/B08DFBGTR5/ref=ox_sc_act_title_1?smid=A367AL7LC2JD18&psc=1
2-x Suction Cups 40mm for use with the corner clip (2ea per clip) https://www.amazon.com/gp/product/B0793F2JXQ/ref=ox_sc_act_title_1?smid=A29XXIZFENJQ9I&psc=1
2ea Drywall Screws, Course Thread, Coated (2.5")
Yes, it's a lot of stuff for a Pole Caddy that you have to buy and are essentially going to omit several poles and the crappy tensioner. I can tell you from my experience it's well worth the effort. At least in my opinion. Some of the benefits:
There is no pole from ceiling to tub or shower floor.
You can move the caddy out of the way to clean behind it.
You can hang this anywhere you like (ideally in a corner) making more room in the shower or tub.
If properly installed it's not going to come crashing down.
It's not going to put strain on your shower head because its not hanging on it.
I may provide a step-by-step, but for now I'm going to post as is with the pictures. If your handy this is pretty straight forward. The most exotic tool used was a cordless drill which was used for drilling a hole through the bottom pole for the clevis pin, a hole through the Aluminum Corner Bracket for the Carabiner to clip through and to drive the 2.5" course thread coated drywall screws into studs firmly fixing the Aluminum Corner Bracket to the wall.
The only other required tools is a Crimping Loop Crimper if you chose to go that route or a nut driver for the Cable Clip Clamps if you choose that route.
Ever pull a shower head off the wall because of the shower caddy that was hanging from it? Ever scratched your tub or put a dent or hole in your ceiling with one of those tension pole shower caddies? Tired of having to adjust that tensioned shower caddy because it keeps falling over and making a mess? Just want something to hold all of your bath and shower products safely, durably and out of the way? Well that's what this is all about.
There aren't many 3D models here and I would argue they aren't needed for this life hack, but they do help.
The first model is a top cap for the top pole of the caddy. It tidies up the top of the pole, helps to keep water and soap from getting in and manages the wire rope.
The second model is for a corner clip that has 2 suction cups to help keep the caddy from banging against the wall or moving around.
What is needed for each Shower Caddy:
1ea Pole Type Shower Caddy
a. Option 1 (Master Shower) https://www.amazon.com/gp/product/B07XLLLFBB/ref=ppx_yo_dt_b_search_asin_title?ie=UTF8&psc=1
b. Option 2 (Kids Bath) https://www.amazon.com/gp/product/B00FA0W170/ref=ppx_yo_dt_b_search_asin_title?ie=UTF8&psc=1
c. Or select something you like
1ea 3D Printed Top Cap - tweak scale for fit.
1-x 3D Printed Corner Clip
Stainless Steel Rope 1/8" (3mm)
a. Amazon Link - Note you will need to buy cutters as this stuff is near impossible to cut without them! https://www.amazon.com/gp/product/B01N0N4IME/ref=ppx_yo_dt_b_search_asin_title?ie=UTF8&psc=1
b. I suggest buying by the ft./m at your local big box store as it's much cheaper and it's cut to length at the store (no cutters to buy)
i. For the Master Shower (short caddy) I used 48" (1.2m)
ii. For the Kids Shower (tall caddy) I used 8' (2.5m)
2ea Stainless Steel Thimble 1/8" (M3) https://www.amazon.com/gp/product/B077SLZDFX/ref=ppx_yo_dt_b_search_asin_title?ie=UTF8&psc=1
Chose a Sleeve or Clamp
a. 2ea Aluminum Crimping Loop Sleeve 1/8" (M3) https://www.amazon.com/gp/product/B077SLZDFX/ref=ppx_yo_dt_b_search_asin_title?ie=UTF8&psc=1
b. 2ea Stainless Steel Wire Rope Cable Clip Clamp 1/8" (M3) https://www.amazon.com/gp/product/B07G8XWTZF/ref=ppx_yo_dt_b_search_asin_title?ie=UTF8&psc=1
Notes: The Crimping Loops are much cleaner and nicer looking, but if used make sure they are properly crimped or they will come lose. I opted to use the Cable Clip Clamps for the Master Shower Caddy after one of the Aluminum clips gave way on the kids caddy.
1ea Stainless Steel Carabiner Clip (2" x 1")https://www.amazon.com/DGOL-Stainless-Carabiner-Outdoor-Fastner/dp/B07QYKXVTZ
1ea Aluminum Corner Bracket https://www.amazon.com/gp/product/B01GNQ64RM/ref=ppx_yo_dt_b_search_asin_title?ie=UTF8&psc=1
1ea Stainless Steel Clevis Pin (8mm x 30mm) https://www.amazon.com/gp/product/B0816LZJ54/ref=ppx_yo_dt_b_search_asin_title?ie=UTF8&psc=1
1ea Cotter Pin Hairpin https://www.amazon.com/gp/product/B08DFBGTR5/ref=ox_sc_act_title_1?smid=A367AL7LC2JD18&psc=1
2-x Suction Cups 40mm for use with the corner clip (2ea per clip) https://www.amazon.com/gp/product/B0793F2JXQ/ref=ox_sc_act_title_1?smid=A29XXIZFENJQ9I&psc=1
2ea Drywall Screws, Course Thread, Coated (2.5")
Yes, it's a lot of stuff for a Pole Caddy that you have to buy and are essentially going to omit several poles and the crappy tensioner. I can tell you from my experience it's well worth the effort. At least in my opinion. Some of the benefits:
There is no pole from ceiling to tub or shower floor.
You can move the caddy out of the way to clean behind it.
You can hang this anywhere you like (ideally in a corner) making more room in the shower or tub.
If properly installed it's not going to come crashing down.
It's not going to put strain on your shower head because its not hanging on it.
I may provide a step-by-step, but for now I'm going to post as is with the pictures. If your handy this is pretty straight forward. The most exotic tool used was a cordless drill which was used for drilling a hole through the bottom pole for the clevis pin, a hole through the Aluminum Corner Bracket for the Carabiner to clip through and to drive the 2.5" course thread coated drywall screws into studs firmly fixing the Aluminum Corner Bracket to the wall.
The only other required tools is a Crimping Loop Crimper if you chose to go that route or a nut driver for the Cable Clip Clamps if you choose that route.
Similar models
thingiverse
free

Jack black body wash holder/hanger
...g in the shower using hooks like:https://www.amazon.com/gp/product/b07p53rnb7/ref=ppx_yo_dt_b_search_asin_title?ie=utf8&psc=1
thingiverse
free

12 Function Deep Dish Button Box by coyoteyz13
..._title_o03_s00?ie=utf8&psc=1
https://www.amazon.com/gp/product/b07vhcb1q4/ref=ppx_yo_dt_b_search_asin_title?ie=utf8&psc=1
thingiverse
free
Hand Mixer by OM3
...e?ie=utf8&psc=1
power supplyhttps://www.amazon.com/gp/product/b01461mogq/ref=ppx_yo_dt_b_search_asin_title?ie=utf8&psc=1
thingiverse
free

Light-Duty Vice by tmt0727
...gc96/ref=ppx_yo_dt_b_search_asin_title?ie=utf8&psc=1
you need a grease, 1x nut 1x washer, 2x washers and small 2x wood screws
thingiverse
free
DEEJ Audio Controller - 5 linear sliders by Scnd_edition
...8&psc=1
optional: rubber feethttps://www.amazon.com/gp/product/b075f1hw3s/ref=ppx_yo_dt_b_search_asin_title?ie=utf8&psc=1
thingiverse
free

X-Carriage Anet Hotend by davidtanis
...?ie=utf8&psc=1
and the wheelshttps://www.amazon.com/gp/product/b07gf9vghd/ref=ppx_yo_dt_b_search_asin_title?ie=utf8&psc=1
thingiverse
free
XB-31 Kamerakopf MK1
...=utf8&psc=1
kugellager:https://www.amazon.de/gp/product/b07cxn1143/ref=ppx_yo_dt_b_search_asin_title?ie=utf8&psc=1
welle:
thingiverse
free

Noctua Laptop Cooling Pad for 3:2 Aspect Ratio Laptops by 3Dnate
...e?ie=utf8&psc=1
rubber feet:https://www.amazon.com/gp/product/b087h5b87m/ref=ppx_yo_dt_b_asin_title_o09_s00?ie=utf8&psc=1
thingiverse
free

Sonoff Enclosure by JeffLZ
...title_o00_s00?ie=utf8&psc=1
https://www.amazon.com/gp/product/b00qvb6qpu/ref=ox_sc_saved_title_1?smid=atvpdkikx0der&psc=1
thingiverse
free

Lavalier Mount and XLR Clamp by StefanKovatchev
...on.com/gp/product/b07f36r49k/ref=ppx_yo_dt_b_search_asin_title?ie=utf8&psc=1
instructional video:https://youtu.be/7r1u72yyfys
Whayden001
thingiverse
free

Smartphone Shower Stand by whayden001
...ever you like while showering. it works surprisingly well and security holds large and small smartphones with or without a case.
thingiverse
free

Drawer Organizers by whayden001
...spent a few minutes and designed a stacking drawer organizer to make it easier to get what i needed and make it look a lot nicer.
thingiverse
free

PC Speaker Stand by whayden001
...e else would find it useful or draw inspiration from it.
i have included my simplify3d gcode file as well. print settings below.
thingiverse
free

Computer Cable Chase by whayden001
...ade this it was only my 4th and most complex project i created.
the project came out perfectly and works better than i hoped for.
thingiverse
free

Drill Guides by whayden001
... great pictures of it in use. i was busy trying to get things done.
i provide guides for 6.6mm and 7/8" (.94mm) drill bits.
thingiverse
free

Pinewood Derby Car Stand by whayden001
...hment to the stand
add a removable placard that attaches to the riser that can include the child's name and other information
thingiverse
free

Knob, Valve, Hose Quick Disconnect by whayden001
...d receives constant harsh sunlight all season long.
to reduce uv damage i painted the part with 3 coats of black rustoleum paint.
thingiverse
free

Display Base and Stand for Bandai Star Wars 1/72 Kits by whayden001
...for the display
9v battery holder - the display is lighted and the holder keeps the battery held firmly in place under the tiles.
thingiverse
free

Winning Design - Filament Spool Holder for 3DPN Filament Shelving System by whayden001
... filament spool and print. to move simply tilt the holder to disengage the rear of the holder and slide to the desired position.
Caddy
turbosquid
$10

scissor caddy
... available on turbo squid, the world's leading provider of digital 3d models for visualization, films, television, and games.
3d_ocean
$89

Volkswagen Caddy 2011
... real car base. model is created accurately, in real units of measurement, qualitatively and maximally close to the original. ...
3d_export
$3

bath caddy tray for tub
...bath caddy tray for tub
3dexport
bath caddy tray for tub
turbosquid
$25

Chashaku and Tea caddy
...alty free 3d model chashaku and tea caddy for download as max on turbosquid: 3d models for games, architecture, videos. (1197555)
3d_export
$99

Volkswagen Caddy 2011 3D Model
...addy van 2011 2012 2013 2014 pickup commercial cab suv minivan mpv bus vw
volkswagen caddy 2011 3d model humster3d 39333 3dexport
turbosquid
$25

Caddy-Wing-Chair
... available on turbo squid, the world's leading provider of digital 3d models for visualization, films, television, and games.
turbosquid
$10
Wood Garden Caddy
... available on turbo squid, the world's leading provider of digital 3d models for visualization, films, television, and games.
turbosquid
$5

Oblivion Tool Caddy
... available on turbo squid, the world's leading provider of digital 3d models for visualization, films, television, and games.
cg_studio
$37

VW caddy TDI3d model
...vw caddy tdi3d model
cgstudio
.max - vw caddy tdi 3d model, royalty free license available, instant download after purchase.
cg_studio
$37

VW caddy SDI3d model
...man car vehicles vehicle transport
.max - vw caddy sdi 3d model, royalty free license available, instant download after purchase.
Shower
archibase_planet
free

Shower
...wer cubicle shower cabin sanitary engineering
shower linea genesi n290713 - 3d model (*.gsm+*.3ds) for interior 3d visualization.
archibase_planet
free

Shower
...shower
archibase planet
shower-bath douche shower
shower - 3d model (*.gsm+*.3ds) for interior 3d visualization.
archibase_planet
free
Shower
...cubicle shower cabin sanitary engineering
shower behappy s2 ravak n180813 - 3d model (*.gsm+*.3ds) for interior 3d visualization.
archibase_planet
free
Shower
...shower
archibase planet
shower shower-bath douche
shower n100408- 3d model (*.gsm+*.3ds) for interior 3d visualization.
archibase_planet
free
Shower
...shower
archibase planet
shower-bath shower douche
shower n151208 - 3d model (*.gsm+*.3ds) for interior 3d visualization.
archibase_planet
free
Shower
...hower cabin sanitary engineering
shower cabin twin space flaminia n250413 - 3d model (*.gsm+*.3ds) for interior 3d visualization.
archibase_planet
free
Shower
...shower
archibase planet
shower-bath shower douche
shower panel n270308 - 3d model (*.gsm+*.3ds) for interior 3d visualization.
archibase_planet
free

Shower
...base planet
shower-bath douche shower
shower axor waterwall 10920 n040510 - 3d model (*.gsm+*.3ds) for interior 3d visualization.
archibase_planet
free
Shower
...shower
archibase planet
shower sanitary engineering douche
shower - 3d model (*.3ds) for interior 3d visualization.
archibase_planet
free
Shower
...shower
archibase planet
shower douche sanitary ware
shower - 3d model (*.gsm+*.3ds) for interior 3d visualization.
Hanging
3d_export
$5

hanging lamp
...hanging lamp
3dexport
this is the hanging lamp
3d_export
free

hanging gardens
...hanging gardens
3dexport
hanging gardens
3d_export
$20

hanging chair
...hanging chair
3dexport
hanging chair polycount: 600.000
3ddd
$1

Hanging Chair
...hanging chair
3ddd
подвесное
hanging chair wood , textures included
3d_ocean
$15
Hanging Ceiling
...ling
3docean
attic ceiling cloth garret hanging loft
it’s a hanging ceiling for interiors. i made it from box and use simulation.
3ddd
$1

Hanging Lamp
...hanging lamp
3ddd
подвесной
hallo this is my new 3d model, hanging lamp
3ddd
$1
Supernova Hanging
...va hanging
3ddd
supernova hanging , foscarini
спасибо авторам моделей взятых для привью.
3d_export
$12

modern hanging painting
...modern hanging painting
3dexport
modern hanging painting
archive3d
free
Hang 3D Model
...archive3d
hang awning shed
hang n101207 - 3d model (*.gsm+*.3ds) for interior 3d visualization.
3d_export
$10

modern hanging painting
...modern hanging painting
3dexport
modern hanging painting vr4.1