Thingiverse

Hal 9000 by Diablo944
by Thingiverse
Last crawled date: 3 years, 1 month ago
This is my rendition of the HAL 9000 from 2001 A space odyssey. It has the facility to turn the LED on and off WITHOUT having to lift the unit off the wall and without changing the look of the unit in any way whatsoever. The marks/blemishes shown on the 3d render are not in the final build.
I originally printed off a version of Hal that somebody else had created on thingiverse. I found way too many issues with it, both in the design and in the difficulty of putting it together in a simple manner. To that end I started from scratch and built what I know is a far better thing both in build quality and functionality. If you just want a static exhibit and don't want the hidden switch facility you can just skip the whole mech/switch option entirely and go for a simpler illumination option (both options are explained in better detail in the notes).
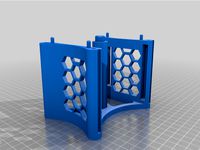
When assembled it's approximately 15 inches by 5 inches with the frame depth at around a centimeter so not an insignificant amount of printing. It is designed to be a sturdy unit so 30 percent infill was a minimum for me, but there is no reason not to drop it to 20 if you want to save a little time and pla.
Items used to create this (full build/assembly details are provided
2x colours of PLA. Black and silver (colour choice saves painting it later).
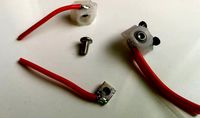
1x 100mm arcade button (I have seen this go for as low as 6 pounds sterling).
1x microswitch (I used the one that came with the 100mm button).
some wire (I used some from a dead keyboard cable).
1x LED (you could use the one from the button, But I went with
cakelights as they also come with batteries, they sell for
around 4 pounds per pack of 5).
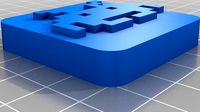
1x sticky label (printed in HAL blue and cut to size for nameplate).
Solder and soldering iron (you could just twist the wires and add a drop of glue if
soldering isn't something you do. Not ideal, but its certainly
an option. Alternatively, If you plan on not wiring iin the
switch option, just use a cakelight and a blob of blutack to
hold it in the lens, going that route there is no wiring so no
need for solder and iron.
Superglue.
optional 4x small bolts a tap to tap a thread into frame to secure frame
together (alternatively, nuts and bolts or just glue it).
tweezers (the letters of hals name were way too small for my
sausage fingers.
A stack of books to press/hold things together while glue set
Print time (estimated)
larger face panels, eye/lens, frame segments and grille all took me a minimum of 4 to 6 hours per item.
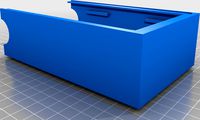
Rear Mech unit for switch activation, silver frame surrounds and nameplate were all considerably less. nameplate and inner ring were around 40 mins if memory serves.
Actual build time once everything was printed? if you include wiring and sorting bolt holes it was around an hour. most of that was the filing holes, wiring and letting glue dry between fitting it all together. ultra fast superglue, no bolts and steady hands, you could comfortably assemble it in less than twenty mins
Also hosted on pinshape at https://pinshape.com/items/105707-3d-printed-hal-9000
This is a link to the switch operation on youtube https://www.youtube.com/watch?v=F0q0LBPFqdQ
Updated Eye/refractor added to file set March 28 2021. Not tested as My HAL is already firmly assembled and I don't have another button to check fitments beyond virtual tests. Fitment tolerance change, Better external diameter and lens ring while keeping the same light catching central segment. It is possible the new version may prevent use of the optional external black ring. If for any reason this doesn't suit your purposes then use the original version as that was fully tested and used in my build.
I originally printed off a version of Hal that somebody else had created on thingiverse. I found way too many issues with it, both in the design and in the difficulty of putting it together in a simple manner. To that end I started from scratch and built what I know is a far better thing both in build quality and functionality. If you just want a static exhibit and don't want the hidden switch facility you can just skip the whole mech/switch option entirely and go for a simpler illumination option (both options are explained in better detail in the notes).
When assembled it's approximately 15 inches by 5 inches with the frame depth at around a centimeter so not an insignificant amount of printing. It is designed to be a sturdy unit so 30 percent infill was a minimum for me, but there is no reason not to drop it to 20 if you want to save a little time and pla.
Items used to create this (full build/assembly details are provided
2x colours of PLA. Black and silver (colour choice saves painting it later).
1x 100mm arcade button (I have seen this go for as low as 6 pounds sterling).
1x microswitch (I used the one that came with the 100mm button).
some wire (I used some from a dead keyboard cable).
1x LED (you could use the one from the button, But I went with
cakelights as they also come with batteries, they sell for
around 4 pounds per pack of 5).
1x sticky label (printed in HAL blue and cut to size for nameplate).
Solder and soldering iron (you could just twist the wires and add a drop of glue if
soldering isn't something you do. Not ideal, but its certainly
an option. Alternatively, If you plan on not wiring iin the
switch option, just use a cakelight and a blob of blutack to
hold it in the lens, going that route there is no wiring so no
need for solder and iron.
Superglue.
optional 4x small bolts a tap to tap a thread into frame to secure frame
together (alternatively, nuts and bolts or just glue it).
tweezers (the letters of hals name were way too small for my
sausage fingers.
A stack of books to press/hold things together while glue set
Print time (estimated)
larger face panels, eye/lens, frame segments and grille all took me a minimum of 4 to 6 hours per item.
Rear Mech unit for switch activation, silver frame surrounds and nameplate were all considerably less. nameplate and inner ring were around 40 mins if memory serves.
Actual build time once everything was printed? if you include wiring and sorting bolt holes it was around an hour. most of that was the filing holes, wiring and letting glue dry between fitting it all together. ultra fast superglue, no bolts and steady hands, you could comfortably assemble it in less than twenty mins
Also hosted on pinshape at https://pinshape.com/items/105707-3d-printed-hal-9000
This is a link to the switch operation on youtube https://www.youtube.com/watch?v=F0q0LBPFqdQ
Updated Eye/refractor added to file set March 28 2021. Not tested as My HAL is already firmly assembled and I don't have another button to check fitments beyond virtual tests. Fitment tolerance change, Better external diameter and lens ring while keeping the same light catching central segment. It is possible the new version may prevent use of the optional external black ring. If for any reason this doesn't suit your purposes then use the original version as that was fully tested and used in my build.
Similar models
thingiverse
free

Tactile Button Case by darko1002001
...3 parts: base case button additional items needed (or similar alternatives): soldering iron and some solder wire electronics glue...
thingiverse
free

Arcade Coindoor Lock Replacement with Credit Button by MoreBeer
... the cam to keep it from moving once you install everything.
attach the wires to the coin credit switch, and you're all set!
thingiverse
free

Printed LED Desk lamp by Promocable
...he wires from the led strips
final assemble screwing the printed parts together
done -> profit
i apologize for my englisch. :/
thingiverse
free

Simple KCD11 button case by Glaicer
...iverse
a very simple enclosure for the kcd11 button. just solder the wires and assemble two parts of the case. no glue required.
thingiverse
free

Emergency Stop Button by Dragonsigma
...ired to the power supply to stop the printer.
the button top, shaft, and lettering were assembled with thick ca glue (superglue).
thingiverse
free
solder reel stand by Jaisl
...xt element, but the fitment is tight enough to just press fit the elements together. main body is printed in pla, and feet in tpu
thingiverse
free

Delta wing motor mount by coldmake
...ation screws is 16 mm.
you need to print:
1x base
1x motor
2x side
assembly:
just click it together and secure it with superglue.
thingiverse
free

Pinball Service Button Bar by robw
... cube with wires coming out the back so i just pushed it into its new home and plugged it with some hot glue to keep in in there.
thingiverse
free
Screw power switch for combat robots by JEQuad
...a soldering iron 16-20 awg silicon wire so something similar depending your use steps: file one side of the...
grabcad
free

HAL 9000
...hal 9000
grabcad
based on the nikkor 1:8 fisheye lens used in the movie.
Diablo944
thingiverse
free

Technics Amplifier by Diablo944
...technics amplifier by diablo944
thingiverse
another of my mini stereo components. technics amp
thingiverse
free
Piboy dmg protective cover by Diablo944
...piboy dmg protective cover by diablo944
thingiverse
protective cover for experimental pi piboy dmg.
thingiverse
free

Technics Amplifier by Diablo944
...technics amp. scaled to the reel to reel i did earlier. it (and the open reel) would benefit from scaling up to keep the details.
thingiverse
free

PiBoy DMG styled storage box/container by Diablo944
...piboy dmg styled storage box/container by diablo944
thingiverse
piboy styled storage container
thingiverse
free

Experimental pi piboy Controller accessory by Diablo944
...ntroller accessory by diablo944
thingiverse
experimental pi piboy controller addon. read the notes for frame difference details.
thingiverse
free

Experimental pi Piboy cover by Diablo944
.../sleeve for the experimental pi piboy. not designed for throwing in a bag and carrying around, more a keep it safe at home thing.
thingiverse
free

Retroflag GPi stand by Diablo944
...single file with no assembly required. additional gusset added to the base so the gpi will always be stable when using the stand.
thingiverse
free

Ender 3 V2 LCD Mount for left side by Diablo944
...t for left side by diablo944
thingiverse
ender 3 v2 lcd relocation mount. locates screen to left side and nearer the build plate
thingiverse
free
invader end by Diablo944
... also, there was a tiny error on my first (pictured) attempt that has since been fixed. that graphical glitch is no longer there.
thingiverse
free

Ender Bender by Diablo944
...pter obviously) and used a tiny drop of glue to hold the nut to the exposed top of the z lead screw.
https://youtu.be/r1iaoojuysw
Hal
design_connected
$16

Hal wood
...hal wood
designconnected
vitra hal wood computer generated 3d model. designed by morrison, jasper.
turbosquid
$5

Hal Shelve
... available on turbo squid, the world's leading provider of digital 3d models for visualization, films, television, and games.
3ddd
$1

Vitra Hal Cantilever\Sledge
... with armrests
- vitra hal sledge chair
textures included.
*max2010, *fbx, *objhttp://www.vitra.com/en-us/product/hal
3ddd
$1

Vitra Hal Wood Chair
...vitra hal wood chair
3ddd
vitra
vitra hal wood chair + hal ply seat coat
textures included.
*max2010, *fbx, *obj
3ddd
$1

Vitra Hal Tube Chair Collection
...t chair
- vitra hal tube writing tablet
textures included.
*max2010, *fbx, *objhttp://www.vitra.com/en-us/product/hal
3ddd
$1
Vitra Hal Stool High\Medium
...hal stool high + vitra hal stool medium
textures included.
*max2010, *fbx, *objhttp://www.vitra.com/en-us/product/hal
turbosquid
$29
Vitra Hal Armchair
... available on turbo squid, the world's leading provider of digital 3d models for visualization, films, television, and games.
3ddd
free
Vitra / HAL Table Tom Vac
...vitra / hal table tom vac
3ddd
vitra
стол hal table
стул tom vac
turbosquid
$19

Hal Armchair Wood Vitra
...lty free 3d model hal armchair wood vitra for download as max on turbosquid: 3d models for games, architecture, videos. (1639489)
turbosquid
$7

Vitra HAL Ply wood walnut
...vitra hal ply wood walnut for download as obj, fbx, and blend on turbosquid: 3d models for games, architecture, videos. (1217339)
9000
turbosquid
$45

9000
... available on turbo squid, the world's leading provider of digital 3d models for visualization, films, television, and games.
design_connected
$10

9000 Triton
...9000 triton
designconnected
intertime 9000 triton computer generated 3d model.
turbosquid
$39

Beosound 9000
... available on turbo squid, the world's leading provider of digital 3d models for visualization, films, television, and games.
turbosquid
$1

Beretta 9000
... available on turbo squid, the world's leading provider of digital 3d models for visualization, films, television, and games.
3d_export
$59
Beretta 9000 3D Model
...tomatic beretta bullet gaston gun italia italian pistol semi semi-automatic weapon
beretta 9000 3d model humster3d 79309 3dexport
3ddd
free
Kinnarps 9000 cv
...kinnarps 9000 cv
3ddd
kinnarps
enjoy
3d_export
$20

BlackBerry Bold 9000 3D Model
...blackberry bold 9000 3d model
3dexport
phone blackberry bold 9000
blackberry bold 9000 3d model creativeartmind 14386 3dexport
turbosquid
$25

Beretta 9000 Package
... available on turbo squid, the world's leading provider of digital 3d models for visualization, films, television, and games.
turbosquid
$2

Space Speeder 9000
... available on turbo squid, the world's leading provider of digital 3d models for visualization, films, television, and games.
3d_export
$35
BlackBerry 9000 3D Model
...bile smart android touch screen 2011 pc new copy detail tablet qwerty button usa
blackberry 9000 3d model blacks3d 57937 3dexport