Thingiverse
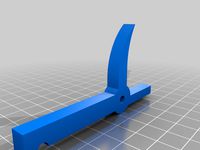
Glock Trigger Housing Adjustable Trigger Drill Jig by ian99rt
by Thingiverse
Last crawled date: 3 years ago
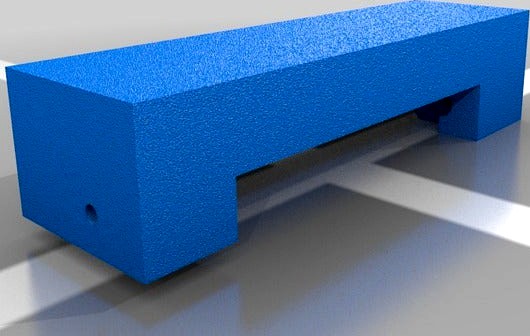
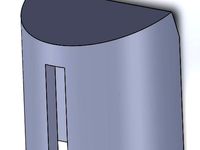
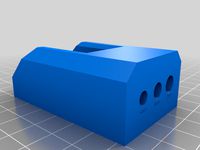
NOTE: These drill jigs are one time use as the holes will open up after drilling and cause you to get too close to the outer surfaces. Also I used variable layer height to tighten around the holes at 0.07mm layer height printing in PLA (PETG doesn't like to print lower than .15mm layer height on my Prusa Mk2s).
UPDATE: R03 has larger hole moved .015" inwards. R02 (.020" offset from R01) worked well but threads almost broke thru on the inside surface. I've used this design on 3 housings and its worked wonderfully.
R01 drill jig was causing the larger drill to be too close to the outer wall of the housing. Not sure exactly why because measurements all lined up but were .020" off when drilled.
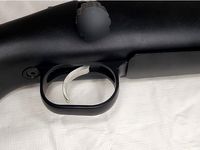
Hated the stock trigger on my Gen 3 G34. Zev Spring kit, 25 cent polish job, Zev Pro connector all made it better but the pre-travel and over-travel just stunk.
This drill fixture is meant for a #56 (.0465", front end of housing for pre-travel) and #40 (.0980", rear end of housing for over-travel) drill bits for the forward and rear drilling points.
The front end hole is tapped for a M1.6 thread and the rear hole an M3 thread. I used Stainless Flat Face set screws purchased from Mcmaster-Carr.
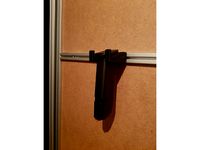
The trigger housing needs to have the metal ejector component removed. Drilling and tapping the M1.6 thread without the ejector has a benefit of allowing you to adjust the pre-travel then reinsert the ejector which cause an interfence in the thread locking the super tiny set screw in place (you cannot adjust it with the ejector installed in the housing).
Also to really be able to remove the pre-travel you will need to either shave down or cut off the large "foot" on the back side of the trigger safety. I use a pair of flush cut electronics cutters to simply snip the foot off. This allows you to remove alot of pre-travel and the new ledge created keep the trigger safety functional.
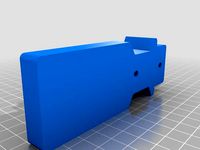
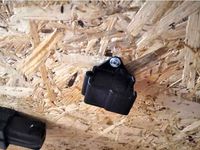
Be sure your printers dimensional accuracy before drilling. Clip is used to simply hold jig in place for drilling.
Also be sure that you do not disable any of the Glocks 3 safety mechanisms. There are multiple youtube videos on the subject and you can print out my Glock Armorer's plate for verifying the drop safety mechanism.
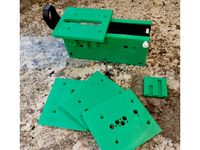
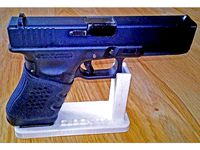
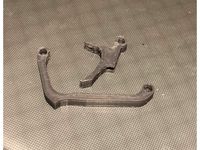
See pictures for final product and trigger safety modification.
UPDATE: R03 has larger hole moved .015" inwards. R02 (.020" offset from R01) worked well but threads almost broke thru on the inside surface. I've used this design on 3 housings and its worked wonderfully.
R01 drill jig was causing the larger drill to be too close to the outer wall of the housing. Not sure exactly why because measurements all lined up but were .020" off when drilled.
Hated the stock trigger on my Gen 3 G34. Zev Spring kit, 25 cent polish job, Zev Pro connector all made it better but the pre-travel and over-travel just stunk.
This drill fixture is meant for a #56 (.0465", front end of housing for pre-travel) and #40 (.0980", rear end of housing for over-travel) drill bits for the forward and rear drilling points.
The front end hole is tapped for a M1.6 thread and the rear hole an M3 thread. I used Stainless Flat Face set screws purchased from Mcmaster-Carr.
The trigger housing needs to have the metal ejector component removed. Drilling and tapping the M1.6 thread without the ejector has a benefit of allowing you to adjust the pre-travel then reinsert the ejector which cause an interfence in the thread locking the super tiny set screw in place (you cannot adjust it with the ejector installed in the housing).
Also to really be able to remove the pre-travel you will need to either shave down or cut off the large "foot" on the back side of the trigger safety. I use a pair of flush cut electronics cutters to simply snip the foot off. This allows you to remove alot of pre-travel and the new ledge created keep the trigger safety functional.
Be sure your printers dimensional accuracy before drilling. Clip is used to simply hold jig in place for drilling.
Also be sure that you do not disable any of the Glocks 3 safety mechanisms. There are multiple youtube videos on the subject and you can print out my Glock Armorer's plate for verifying the drop safety mechanism.
See pictures for final product and trigger safety modification.
Similar models
thingiverse
free

Airsoft Glock 17/19/34 Custom Trigger (Flat w/o Trigger Safety) by MrLongFace
...irsoft pistols (vfc oem). this flat faced trigger is designed to reduce the take up distance and the over travel after the break.
thingiverse
free
AK74 and AKM Rear Trunnion Jig by Crashin_Machines
...trunnion and clamp it with a c-clamp or something similar drill through your receiver so you can then rivet...
thingiverse
free
AR10 80% Jig by neilk
...work in progress since i've only compared the print with a single lower.
edit 1: adjusted the trigger shoe hole size/position
thingiverse
free

Round or Square Stock Drilling Jig by TikiLuke
...center depending on the size of hole you typically drill. if the hole is too small i am sure there is a way to easily enlarge it.
thingiverse
free

80% AR15 lower jig by Hyudryu
...ttom is used as a template to drill out the trigger hole. mark it with a sharpie, and use a drill bit + file to get the job done.
thingiverse
free

Funjet hybrid aluminium motor mount and drill jig
...enter hole and 7mm drill for the vent holes.
use something sharp to score a line around the jig and grind the shape of the mount.
thingiverse
free

Pagoda Jig Ejector by OldHead
...the completed antennas from the jig. the ejector applies pressure evenly across 3 disk of the antenna for safe and easy removal.
thingiverse
free

1 inch tubing pixel jig
...ches. the 12mm holes accomodate a 15/32" drill bit to push your ws2811 pixels into. the holes are spaced at 2" centers.
thingiverse
free
Drillguide for straight/perpendicular holes Type A1, customizable by Coat
...mation about the fantastic and challenging program openscad can be found here: https://en.wikibooks.org/wiki/openscad_user_manual
thingiverse
free

Kreg mini adapter
....
drill a single hole through the most forward hole of the adapter.
the second file is a colette measuring jig for the drill bit.
Ian99Rt
thingiverse
free

Bundled up Bernie by ian99rt
...m to the chair legs be prusaslicer 2.3 with support wasn't attaching the brim to the chair feet and detached during printing.
thingiverse
free

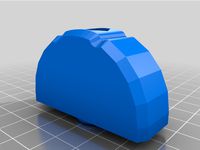
3030 Extrusion End Cap, easy to install / remove by ian99rt
...se
wanted an endcap that had the same radii and profile as the extrusion. wanted it relatively easy to install / remove as well.
thingiverse
free

4 Cube Retraction Calibration by ian99rt
...f retraction and 30mm/sec.
i then iterated until i reached 4.0 mm of retraction and 55 mm/sec and has been working awesome since.
thingiverse
free

Mad Max War Boys Stencil by ian99rt
...nted stencil to hold all the inner pieces in places for painting.
note: stl is in inches, multiply by 25.4 for mm or 2540% scale.
thingiverse
free

Prusa i3 LCD Open Hardware Gear Knob by ian99rt
... size as r01 felt a little too small.
i printed at 100% size and 98% to find a better fit onto the shaft and 98% was the winner.
thingiverse
free

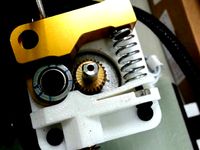
Deltaprintr Hotend Retainer with wire pass thru by ian99rt
...i had an issue with the retained getting pushed up by the wires so i printed a retaining clip as well (hotend_retainer_clip.stl).
thingiverse
free

Cable Managment for Prusa I3 Haribo 3030 Frame by ian99rt
...qty. 2: ribbon_cable_clips (i had a lot of slack in the ribbon cable so i double folded them over to take up the slack).
thingiverse
free

Deltaprintr Filament Guide for Extended Extruder Arm by ian99rt
...rint with brim as the cylindrical guide's lower surface is very narrow, and support for arch if you have inadequate cooling.
thingiverse
free

OpenWheeler Gen 2 5 Degree Seat Wedge by ian99rt
...er thing required are 2x 8mmx75mm bolts to account for the longer length needed at the front rails-seat frame attachment points.
thingiverse
free

Glock Armorer Inspection Slide Cover Gen 1 thru Gen 4 by ian99rt
...te to view the trigger bar and striker engagement.
printed solid esun petg and worked as intended on a gen 4 g19 and gen 3 g34.
Glock
thingiverse
free

glock v1
...glock v1
thingiverse
first version of glock 17 gen4
thingiverse
free
Glock handle plug for Glock 9mm by jbswaff
...bswaff
thingiverse
this is a plug for the handle of a glock 9mm to keep dirt and debris from becoming trapped inside the handle.
thingiverse
free

MAG INSERT GLOCK
...mag insert glock
thingiverse
magazine insert glock
thingiverse
free

Glock Bottle Opener
...glock bottle opener
thingiverse
glock bottle opener
thingiverse
free
Wall mounted glock
...nted glock
thingiverse
wall mount for kjw glock 17. when printing for cyma glock 18c - 103%. printing with supports. v 2.0. petg
thingiverse
free
Magazine holder Glock
...magazine holder glock
thingiverse
tested with original glock magazine
hole for attachment with an m4 screw
thingiverse
free

Glock Pins by smokeypast
...ngiverse
glock pins
don't know if they work.
slide worked with them installed.
haven't shot my glock with them installed
thingiverse
free

Glock Slide Tool
...glock slide tool
thingiverse
a tool for better slide removal
tested with a glock 17 gen 5
thingiverse
free
Stand for Glock gun by OlegR
...stand for glock gun by olegr
thingiverse
glock gun stand.
thingiverse
free

Glock-19 (PREMIUM EDITION)
...glock-19 (premium edition)
thingiverse
a camouflaged glock 19.
Jig
thingiverse
free

jig by groyer60
...jig by groyer60
thingiverse
jig
thingiverse
free

JIG by spyfeedback
...jig by spyfeedback
thingiverse
jig
thingiverse
free
Jig by _PeskyBee_
...jig by _peskybee_
thingiverse
jig for hole drilling.
thingiverse
free

Trunk Jig
...trunk jig
thingiverse
jig for mustang duck tail cutout
thingiverse
free
Jig stand by cwthoma
... the jigs from touching and a lip for drips. works with 1/32, 1/16, 1/8, and 1/4 oz jig heads. it may work with larger jig heads.
thingiverse
free
Pocket Hole Jig
...pocket hole jig
thingiverse
pocket hole jig
thingiverse
free

Pocket Jig by SgrA8
...pocket jig by sgra8
thingiverse
simple pocket jig.
thingiverse
free

Jig Casing by lm42p
...jig casing by lm42p
thingiverse
this is the jig for drilling the holes in the casing
thingiverse
free

Paracord Jig by Philhawtin
...paracord jig by philhawtin
thingiverse
paracord jig
monkey fist
thingiverse
free

K40 Jig
...g
thingiverse
k40 jig to mark out a line corresponding to the lens focal height for the purpose of mounting a spring loaded bed.
Trigger
thingiverse
free

talon trigger+trigger guide by Muthinor
...de can be printed if wanted to help you placing the trigger in the correct spot.
yellow: trigger
red: guide
blue: rest of the gun
thingiverse
free

trigger
...trigger
thingiverse
watch joker online
thingiverse
free
Novritsch SSG24 Trigger Dust Cover - S-Trigger Trigger by TheBurk
...ory trigger? see my other designs
designs take massive amount of hours, please please donate any amount so i can keep them coming
thingiverse
free
Trigger Button
...trigger button
thingiverse
simple trigger w/ screw hole. fasten with a rubber elastic for snap and better feedback.
thingiverse
free
Intimidator Trigger Guard
... finger trigger in intimidator paintball markers. i plan to upload more items in the future. including a trigger to go with this.
thingiverse
free

clamp trigger by xfred
...clamp trigger by xfred
thingiverse
clamp trigger
thingiverse
free

M4A1 Trigger by uwcrutch
...m4a1 trigger by uwcrutch
thingiverse
m4a1 trigger
thingiverse
free

TRIGGER by mussy
...trigger by mussy
thingiverse
crossbow improved trigger
don't forget to check out my other designs, enjoy ;)
thingiverse
free

Lego Trigger Shoes
...lego trigger shoes
thingiverse
a set of trigger shoes inspired by the famous toys.
can be used in any trigger with 4mm shaft.
thingiverse
free

KoPropo Trigger by Zedpi
...kopropo trigger by zedpi
thingiverse
trigger for kopropo ex1 , ex10
Housing
thingiverse
free
House
...house
thingiverse
generic house
thingiverse
free

house by
...house by
thingiverse
a normal house
thingiverse
free

House
...house
thingiverse
a copy of my house.
thingiverse
free
House
...house
thingiverse
this is a house that has a garage.
thingiverse
free

house by
...house by
thingiverse
just a normal house... or is it?
thingiverse
free

House by
...house by
thingiverse
it's a house
thingiverse
free

House by
...house by
thingiverse
it's a house
thingiverse
free

house by
...house by
thingiverse
a nice house with a driveway and a car
thingiverse
free

house
...house
thingiverse
it is a house with 1 room
i made this for a class project
thingiverse
free

House by aaronalvarez365
... by aaronalvarez365
thingiverse
this house was designed in tinkercad and this house is mainly a house with a porch in the front.
Drill
thingiverse
free

Drill holder
...drill holder
thingiverse
drill holder for metric drills.
thingiverse
free

drill by Syzguru11
...drill by syzguru11
thingiverse
drill
thingiverse
free

drill by Syzguru11
...drill by syzguru11
thingiverse
drill
thingiverse
free

Drill by redkidpavel
...drill by redkidpavel
thingiverse
the drill
thingiverse
free

Handheld Drill
...handheld drill
thingiverse
this handheld drill should fit any normal drill bit.
thingiverse
free

Drill by raikayl
...drill by raikayl
thingiverse
drill model
thingiverse
free

Drills storage
...drills storage
thingiverse
drills storage on the wall.
thingiverse
free

Breaching drill
...breaching drill
thingiverse
hades breaching drill model.
thingiverse
free

Drill Bit Clip for Power Drills by danielferal
...drill bit clip for power drills by danielferal
thingiverse
bit holder that attaches to your drill.
thingiverse
free

Drill Tray
...to allow shaking without dropping drills over edges. also includes a spout for easy placing drills back into original containers.
Adjustable
thingiverse
free
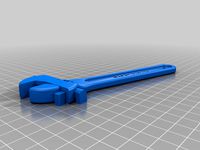
Adjustable Wrench
...adjustable wrench
thingiverse
working adjustable hand wrench.
thingiverse
free
PPG adjustable propellers adjusting device by x3x3x
...ppg) adjustable propellers adjusting device. 95 mm blade width. android phone, apple, symbian os. applications for free download.
thingiverse
free

Adjustable foot
...adjustable foot
thingiverse
just another adjustable foot for m5 screw (better if is self-locking nut).
diameter 20mm
thingiverse
free
Adjustment Handle by adamdthornton
...adjustment handle by adamdthornton
thingiverse
adjustment handle
thingiverse
free

Adjustable foot by denis4
...adjustable foot by denis4
thingiverse
adjustable leg
thingiverse
free
Adjustable Extruded by CruiseLee
...adjustable extruded by cruiselee
thingiverse
adjustable extruded
thingiverse
free
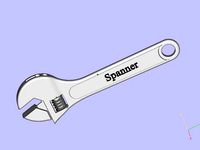
adjustable spanner by stevehaines
...adjustable spanner by stevehaines
thingiverse
adjustable spanner
thingiverse
free
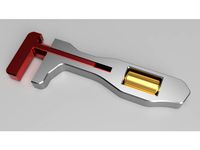
Adjustable Wrench by AdamsLab
...h by adamslab
thingiverse
this is an adjustable wrench.
the top jaws slide into the main body, and you use the nut to adjust it.
thingiverse
free

Lawnmower adjustment handle
...lawnmower adjustment handle
thingiverse
lawnmower adjustment handle
thingiverse
free

Adjustable Frame by Quinventor
...adjustable frame by quinventor
thingiverse
an adjustable picture frame